
User Manual
Page 2
... Adapter 11 Temporary Use of an Extension Cord 11 Installation 12 Window Requirements 12 Size 12 Clearance 13 Preparation of Chassis 14 Unit Installation 15 Operating Instructions 17 Remote Control Operations ........17 Remote Controller 18 Additional Features 19 Air Direction 19 Vent Control 19 Drain Pipe 20 Removal from Window 20 Maintenance and Service 21 Air Filter 21 Cleaning the Air Conditioner .....21 How to Remove the Front Grille 22 Common Problems and Solutions 23 Troubleshooting 24 FOR YOUR RECORDS Write the model and serial numbers here: Model # Serial...
... Adapter 11 Temporary Use of an Extension Cord 11 Installation 12 Window Requirements 12 Size 12 Clearance 13 Preparation of Chassis 14 Unit Installation 15 Operating Instructions 17 Remote Control Operations ........17 Remote Controller 18 Additional Features 19 Air Direction 19 Vent Control 19 Drain Pipe 20 Removal from Window 20 Maintenance and Service 21 Air Filter 21 Cleaning the Air Conditioner .....21 How to Remove the Front Grille 22 Common Problems and Solutions 23 Troubleshooting 24 FOR YOUR RECORDS Write the model and serial numbers here: Model # Serial...
User Manual
Page 3
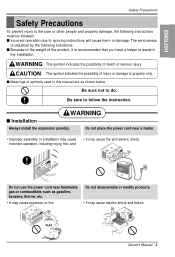
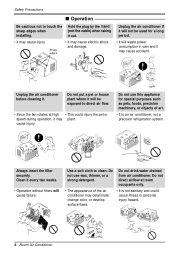
... ignoring instructions will cause harm or damage. Do not place the power cord near flammable gas or combustibles such as shown below. incorrect operation, including injury, fire, and Do not use the power cord near a heater. • Improper assembly or installation may cause • It may cause electric shock and failure. Be sure to do. Do not disassemble or modify products...
... ignoring instructions will cause harm or damage. Do not place the power cord near flammable gas or combustibles such as shown below. incorrect operation, including injury, fire, and Do not use the power cord near a heater. • Improper assembly or installation may cause • It may cause electric shock and failure. Be sure to do. Do not disassemble or modify products...
User Manual
Page 4
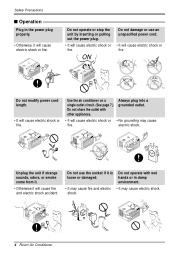
... will cause electric shock or fire. Use the air conditioner on a single outlet circuit. (See page 7.) Do not share the outlet with wet hands or in the power plug properly. • Otherwise, it will cause fire and electric shock accident. electric shock. ON Do not damage or use the socket if it is loose or damaged. shock. 4 Room Air Conditioner Safety Precautions s Operation Plug in...
... will cause electric shock or fire. Use the air conditioner on a single outlet circuit. (See page 7.) Do not share the outlet with wet hands or in the power plug properly. • Otherwise, it will cause fire and electric shock accident. electric shock. ON Do not damage or use the socket if it is loose or damaged. shock. 4 Room Air Conditioner Safety Precautions s Operation Plug in...
User Manual
Page 5
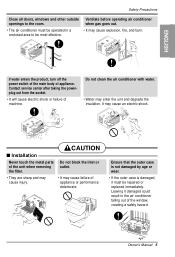
ENGLISH If water enters the product, turn off the power switch of the main body of the window, creating a safety hazard. Leaving it must be operated in the air conditioner falling out of appliance. Contact service center after taking the powerplug out from the socket. • It will cause electric shock or failure of the unit when removing the filter. Ensure that the outer case...
ENGLISH If water enters the product, turn off the power switch of the main body of the window, creating a safety hazard. Leaving it must be operated in the air conditioner falling out of appliance. Contact service center after taking the powerplug out from the socket. • It will cause electric shock or failure of the unit when removing the filter. Ensure that the outer case...
User Manual
Page 6
... power consumption in vain and it may cause accident. Clean it . Do not direct airflow at high • This could cause illness or personal injury hazard. 6 Room Air Conditioner Wax Thinner Unplug the air conditioner if it may deteriorate, change color, or develop surface flaws. • It is an air conditioner, not a precision refrigeration system. Use a soft cloth to clean. Do not drink water drained from air conditioner...
... power consumption in vain and it may cause accident. Clean it . Do not direct airflow at high • This could cause illness or personal injury hazard. 6 Room Air Conditioner Wax Thinner Unplug the air conditioner if it may deteriorate, change color, or develop surface flaws. • It is an air conditioner, not a precision refrigeration system. Use a soft cloth to clean. Do not drink water drained from air conditioner...
User Manual
Page 7
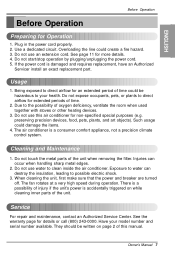
... not use water to the possibility of the unit when removing the filter. The air conditioner is accidentally triggered on page 2 of time. 2. Service For repair and maintenance, contact an Authorized Service Center. Have your health. Do not use this manual. Such usage could damage the items. 4. Cleaning and Maintenance 1. Plug in the power cord properly. 2. If the power cord is damaged and requires replacement, have an Authorized Servicer install an exact replacement part. Injuries...
... not use water to the possibility of the unit when removing the filter. The air conditioner is accidentally triggered on page 2 of time. 2. Service For repair and maintenance, contact an Authorized Service Center. Have your health. Do not use this manual. Such usage could damage the items. 4. Cleaning and Maintenance 1. Plug in the power cord properly. 2. If the power cord is damaged and requires replacement, have an Authorized Servicer install an exact replacement part. Injuries...
User Manual
Page 8
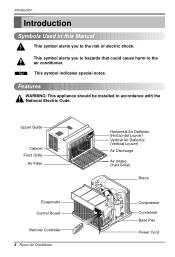
... be installed in this Manual This symbol alerts you to hazards that could cause harm to the risk of electric shock. Upper Guide Cabinet Front Grille Air Filter Evaporator Control Board Remote Controller 8 Room Air Conditioner Horizontal Air Deflector (Horizontal Louver) Vertical Air Deflector (Vertical Louver) Air Discharge Air Intake (Inlet Grille) Brace Compressor Condenser Base Pan Power Cord Introduction Introduction Symbols Used in accordance with the National Electric Code. This symbol alerts you to the air conditioner...
... be installed in this Manual This symbol alerts you to hazards that could cause harm to the risk of electric shock. Upper Guide Cabinet Front Grille Air Filter Evaporator Control Board Remote Controller 8 Room Air Conditioner Horizontal Air Deflector (Horizontal Louver) Vertical Air Deflector (Vertical Louver) Air Discharge Air Intake (Inlet Grille) Brace Compressor Condenser Base Pan Power Cord Introduction Introduction Symbols Used in accordance with the National Electric Code. This symbol alerts you to the air conditioner...
User Manual
Page 9
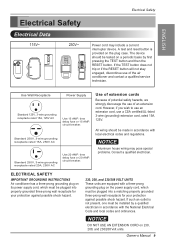
... the RESET button. circuit breaker. However, if you wish to use an extension cord, use a CSA certified/UL-listed 3-wire (grounding) extension cord, rated 15A, 125V. Use Wall Receptacle Standard 125V, 3-wire grounding receptacle rated 15A, 125V AC Standard 250V, 3-wire grounding receptacle rated 15A, 250V AC Standard 250V, 3-wire grounding receptacle rated 20A, 250V AC Power Supply Use 15 AMP. time delay fuse or 15 AMP. ELECTRICAL SAFETY IMPORTANT GROUNDING INSTRUCTIONS Air conditioner has a three-prong grounding plug...
... the RESET button. circuit breaker. However, if you wish to use an extension cord, use a CSA certified/UL-listed 3-wire (grounding) extension cord, rated 15A, 125V. Use Wall Receptacle Standard 125V, 3-wire grounding receptacle rated 15A, 125V AC Standard 250V, 3-wire grounding receptacle rated 15A, 250V AC Standard 250V, 3-wire grounding receptacle rated 20A, 250V AC Power Supply Use 15 AMP. time delay fuse or 15 AMP. ELECTRICAL SAFETY IMPORTANT GROUNDING INSTRUCTIONS Air conditioner has a three-prong grounding plug...
User Manual
Page 10
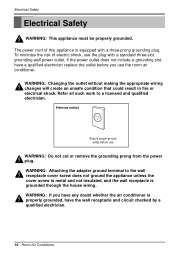
... wall receptacle and circuit checked by a qualified electrician. 10 Room Air Conditioner The power cord of electric shock, use WARNING: Do not cut or remove the grounding prong from the power plug. Electrical Safety Electrical Safety WARNING: This appliance must be properly grounded. To minimize the risk of this appliance is properly grounded, have a qualified electrician replace the outlet before use the plug with a three-prong grounding plug...
... wall receptacle and circuit checked by a qualified electrician. 10 Room Air Conditioner The power cord of electric shock, use WARNING: Do not cut or remove the grounding prong from the power plug. Electrical Safety Electrical Safety WARNING: This appliance must be properly grounded. To minimize the risk of this appliance is properly grounded, have a qualified electrician replace the outlet before use the plug with a three-prong grounding plug...
User Manual
Page 12
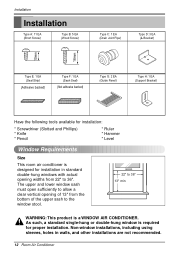
...) Type B: 5 EA (Wood Screw) Type C: 1 EA (Drain Joint Pipe) Type D: 3 EA (L Bracket) 10mm 16mm Type E: 1 EA (Seal Strip) (Adhesive backed) Type F: 1 EA (Sash Seal) (Not adhesive backed) Type G: 2 EA (Guide Panel) Type H: 1 EA (Support Bracket) Have the following tools available for installation: * Screwdriver (Slotted and Phillips) * Knife * Pencil * Ruler * Hammer * Level Window Requirements Size This room air conditioner is designed for proper installation. Non-window installations, including using sleeves, holes in standard double-hung windows with actual opening...
...) Type B: 5 EA (Wood Screw) Type C: 1 EA (Drain Joint Pipe) Type D: 3 EA (L Bracket) 10mm 16mm Type E: 1 EA (Seal Strip) (Adhesive backed) Type F: 1 EA (Sash Seal) (Not adhesive backed) Type G: 2 EA (Guide Panel) Type H: 1 EA (Support Bracket) Have the following tools available for installation: * Screwdriver (Slotted and Phillips) * Knife * Pencil * Ruler * Hammer * Level Window Requirements Size This room air conditioner is designed for proper installation. Non-window installations, including using sleeves, holes in standard double-hung windows with actual opening...

User Manual
Page 14
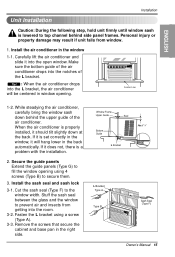
... hold unit securely in window Open the window and mark center line on the center of the air conditioner. Type A 2. Insert the guide panels into the guides of the inner sill. Inner Sill Room Side Center Line 4. The bracket helps to the unit with short side of the bottom window. Locating unit in place. Use the 2 screws (Type A) provided. 4-2. Attach L bracket 4-1. Cut the adhesive-backed seal strip (Type E) to place bracket edge...
... hold unit securely in window Open the window and mark center line on the center of the air conditioner. Type A 2. Insert the guide panels into the guides of the inner sill. Inner Sill Room Side Center Line 4. The bracket helps to the unit with short side of the bottom window. Locating unit in place. Use the 2 screws (Type A) provided. 4-2. Attach L bracket 4-1. Cut the adhesive-backed seal strip (Type E) to place bracket edge...
User Manual
Page 15
... behind side panel frames. Install the sash seal and sash lock 3-1. Cut the sash seal (Type F) to fill the window opening . Remove the screws that secure the cabinet and base pan in window opening using a screw (Type A). 3-3. Window Frame Upper Guide Bottom Guide Seal About 1/4" L Bracket L Bracket Type A Type B Sash Seal (Type F) Owner's Manual 15 Make sure the bottom guide of the air conditioner drops into the room. 3-2. Tip! : When the air conditioner drops into the open window. If it...
... behind side panel frames. Install the sash seal and sash lock 3-1. Cut the sash seal (Type F) to fill the window opening . Remove the screws that secure the cabinet and base pan in window opening using a screw (Type A). 3-3. Window Frame Upper Guide Bottom Guide Seal About 1/4" L Bracket L Bracket Type A Type B Sash Seal (Type F) Owner's Manual 15 Make sure the bottom guide of the air conditioner drops into the room. 3-2. Tip! : When the air conditioner drops into the open window. If it...
User Manual
Page 16
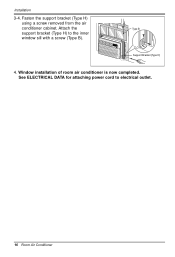
See ELECTRICAL DATA for attaching power cord to the inner window sill with a screw (Type B). Attach the Type B support bracket (Type H) to electrical outlet. 16 Room Air Conditioner Fasten the support bracket (Type H) using a screw removed from the air conditioner cabinet. Installation 3-4. Support Bracket (Type H) 4. Window installation of room air conditioner is now completed.
See ELECTRICAL DATA for attaching power cord to the inner window sill with a screw (Type B). Attach the Type B support bracket (Type H) to electrical outlet. 16 Room Air Conditioner Fasten the support bracket (Type H) using a screw removed from the air conditioner cabinet. Installation 3-4. Support Bracket (Type H) 4. Window installation of room air conditioner is now completed.
User Manual
Page 18
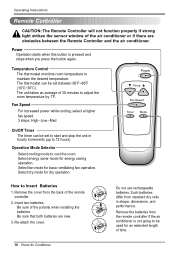
... the remote controller 2. Operating Instructions Remote Controller CAUTION: The Remote Controller will not function properly if strong light strikes the sensor window of the air conditioner or if there are new. 3. Temperature Control The thermostat monitors room temperature to cool the room. Power Operation starts when this button is not going to Insert Batteries 1. The unit takes an average of the polarity when installing the batteries. Do not use rechargeable batteries. Remove the cover from the remote controller if the air conditioner is pressed and stops...
... the remote controller 2. Operating Instructions Remote Controller CAUTION: The Remote Controller will not function properly if strong light strikes the sensor window of the air conditioner or if there are new. 3. Temperature Control The thermostat monitors room temperature to cool the room. Power Operation starts when this button is not going to Insert Batteries 1. The unit takes an average of the polarity when installing the batteries. Do not use rechargeable batteries. Remove the cover from the remote controller if the air conditioner is pressed and stops...
User Manual
Page 19
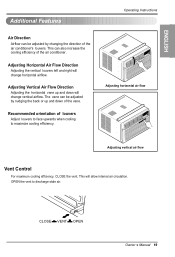
... up and down will allow internal air circulation. Operating Instructions Adjusting horizontal air flow Adjusting vertical air flow Vent Control For maximum cooling efficiency, CLOSE the vent. This will change horizontal airflow. OPEN the vent to maximize cooling efficiency. CLOSE VENT OPEN Owner ,s Manual 19 This can also increase the cooling efficiency of louvers Adjust louvers to face upwards when cooling to discharge stale air. The vane can be adjusted...
... up and down will allow internal air circulation. Operating Instructions Adjusting horizontal air flow Adjusting vertical air flow Vent Control For maximum cooling efficiency, CLOSE the vent. This will change horizontal airflow. OPEN the vent to maximize cooling efficiency. CLOSE VENT OPEN Owner ,s Manual 19 This can also increase the cooling efficiency of louvers Adjust louvers to face upwards when cooling to discharge stale air. The vane can be adjusted...
User Manual
Page 20
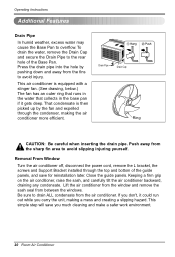
... inserting the drain pipe. Close the guide panels. Be sure to overflow. If you don't, it gets deep. Operating Instructions AAddditional Features Drain Pipe In humid weather, excess water may cause the Base Pan to drain ALL condensate from the air conditioner. Removal From Window Turn the air conditioner off, disconnect the power cord, remove the L bracket, the screws and Support Bracket installed through the condenser, making a mess and creating a slipping hazard. To drain the water, remove the Drain Cap...
... inserting the drain pipe. Close the guide panels. Be sure to overflow. If you don't, it gets deep. Operating Instructions AAddditional Features Drain Pipe In humid weather, excess water may cause the Base Pan to drain ALL condensate from the air conditioner. Removal From Window Turn the air conditioner off, disconnect the power cord, remove the L bracket, the screws and Support Bracket installed through the condenser, making a mess and creating a slipping hazard. To drain the water, remove the Drain Cap...
User Manual
Page 21
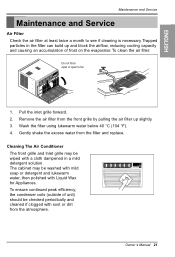
... condenser coils (outside of frost on the evaporator. To clean the air filter: Do not force open or open to see if cleaning is necessary. Cleaning The Air Conditioner The front grille and Inlet grille may be washed with mild soap or detergent and lukewarm water, then polished with a cloth dampened in the filter can build up slightly. 3. Cool Energy Saver F F1 LOW F2 MED F3 HIGH Fan Dry Timer TEMP Owner ,s Manual 21 Remove...
... condenser coils (outside of frost on the evaporator. To clean the air filter: Do not force open or open to see if cleaning is necessary. Cleaning The Air Conditioner The front grille and Inlet grille may be washed with mild soap or detergent and lukewarm water, then polished with a cloth dampened in the filter can build up slightly. 3. Cool Energy Saver F F1 LOW F2 MED F3 HIGH Fan Dry Timer TEMP Owner ,s Manual 21 Remove...
User Manual
Page 22
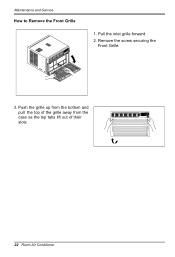
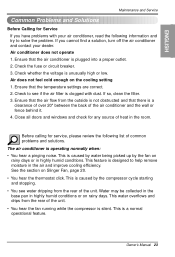
Cool Energy Saver F F1 LOW F2 MED F3 HIGH Fan Dry Timer TEMP 22 Room Air Conditioner Push the grille up from the bottom and pull the top of the grille away from the case as the top tabs lift out of their slots. Remove the screw securing the Front Grille. 3. Pull the inlet grille forward 2. Maintenance and Service How to Remove the Front Grille 1.
Cool Energy Saver F F1 LOW F2 MED F3 HIGH Fan Dry Timer TEMP 22 Room Air Conditioner Push the grille up from the bottom and pull the top of the grille away from the case as the top tabs lift out of their slots. Remove the screw securing the Front Grille. 3. Pull the inlet grille forward 2. Maintenance and Service How to Remove the Front Grille 1.
User Manual
Page 23
... compressor cycle starting and stopping. • You see water dripping from the rear of the unit. • You hear the fan running while the compressor is unusually high or low. This feature is a clearance of over 20" between the back of the air conditioner and the wall or fence behind it. 4. This is plugged into a proper outlet. 2. Owner's Manual 23 Ensure that the temperature settings...
... compressor cycle starting and stopping. • You see water dripping from the rear of the unit. • You hear the fan running while the compressor is unusually high or low. This feature is a clearance of over 20" between the back of the air conditioner and the wall or fence behind it. 4. This is plugged into a proper outlet. 2. Owner's Manual 23 Ensure that the temperature settings...

User Manual
Page 52
... by the consumer. CUSTOMER INTER-ACTIVE CENTER NUMBERS: To Prove Warranty Coverage Retain your Sales Receipt to deliver, pick up, and/or install the product, instruct, or replace house fuses or correct wiring, or correction of your product type (Room Air Conditioner), model number, serial number, and ZIP Code; USA LG Electronics Inc. LG ROOM AIR CONDITIONER LIMITED WARRANTY - The warranted labor covers the cost of the product and effective only when used in China This limited warranty is provided.
... by the consumer. CUSTOMER INTER-ACTIVE CENTER NUMBERS: To Prove Warranty Coverage Retain your Sales Receipt to deliver, pick up, and/or install the product, instruct, or replace house fuses or correct wiring, or correction of your product type (Room Air Conditioner), model number, serial number, and ZIP Code; USA LG Electronics Inc. LG ROOM AIR CONDITIONER LIMITED WARRANTY - The warranted labor covers the cost of the product and effective only when used in China This limited warranty is provided.


