
Owners Manual
Page 2
... not intended for use and maintain your air conditioner properly. that • If the power cord requires replacement, have an Authorized Servicer install an exact replacement part. • Installation work must be performed in the chart of your air conditioner. Just a little preventive care on how to prove date of purchase or...
... not intended for use and maintain your air conditioner properly. that • If the power cord requires replacement, have an Authorized Servicer install an exact replacement part. • Installation work must be performed in the chart of your air conditioner. Just a little preventive care on how to prove date of purchase or...

Owners Manual
Page 3
...is classified by the following instructions must be followed. • Incorrect operation due to follow the instruction. , WARNING> • Installation • Improperassembly or installation may cause incorrect operation, including injury,fire, and electric shock hazards. • It may cause fire and electric shock. &#... the user or other people and property damage, the following indications. • Because of the weight of symbols used in the installation. only. / This symbol possibility of of injury or damage to property J • Meanings of the product, it is recommended...
...is classified by the following instructions must be followed. • Incorrect operation due to follow the instruction. , WARNING> • Installation • Improperassembly or installation may cause incorrect operation, including injury,fire, and electric shock hazards. • It may cause fire and electric shock. &#... the user or other people and property damage, the following indications. • Because of the weight of symbols used in the installation. only. / This symbol possibility of of injury or damage to property J • Meanings of the product, it is recommended...

Owners Manual
Page 5
... failure of machine. • Water may cause failure of the window, creating a safety hazard. ® Owner's Manual 5 It may cause an electric shock. 0 ILCAUTION • Installation °They are sharp and may cause injury. ° It may enter the unit and degrade the insulation.
... failure of machine. • Water may cause failure of the window, creating a safety hazard. ® Owner's Manual 5 It may cause an electric shock. 0 ILCAUTION • Installation °They are sharp and may cause injury. ° It may enter the unit and degrade the insulation.
Owners Manual
Page 7
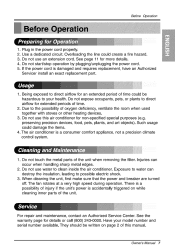
... model number and serial number available. Overloading the line could damage the items. 4. The air conditioner is damaged and requires replacement, have an Authorized Servicer install an exact replacement part. 1. Owner's Manual 7 Use a dedicated circuit. Do not use water to possible electric shock. 3. If the power cord is a consumer comfort appliance...
... model number and serial number available. Overloading the line could damage the items. 4. The air conditioner is damaged and requires replacement, have an Authorized Servicer install an exact replacement part. 1. Owner's Manual 7 Use a dedicated circuit. Do not use water to possible electric shock. 3. If the power cord is a consumer comfort appliance...

Owners Manual
Page 8
Upper Guide Horizontal Air Deflector (Horizontal Louver) Vertical Air Deflector (Vertical Louver) Cabinet -Front Grille Air Filter Air Intake (Inlet Grille) Air Discharge Brace Eva_ Control Board -Remote Controller _ _ Compressor Base Pan Power Cord 8 Room Air Conditioner This symbol indicates special notes. ,_ WARNING: This appliance should be installed in accordance with the National Electric Code. This symbol alerts you to the air conditioner. Introduction This symbol alerts you to hazards that could cause harm to the risk of electric shock.
Upper Guide Horizontal Air Deflector (Horizontal Louver) Vertical Air Deflector (Vertical Louver) Cabinet -Front Grille Air Filter Air Intake (Inlet Grille) Air Discharge Brace Eva_ Control Board -Remote Controller _ _ Compressor Base Pan Power Cord 8 Room Air Conditioner This symbol indicates special notes. ,_ WARNING: This appliance should be installed in accordance with the National Electric Code. This symbol alerts you to the air conditioner. Introduction This symbol alerts you to hazards that could cause harm to the risk of electric shock.

Owners Manual
Page 9
... against possible shock hazard. delay fuse or 20 AMP. time delay fuse or 15 AMP. A test and reset button is not present, one must be installed by first pressing the TEST button and then the RESET button. If the TEST button does not trip or if the RESET button will not...
... against possible shock hazard. delay fuse or 20 AMP. time delay fuse or 15 AMP. A test and reset button is not present, one must be installed by first pressing the TEST button and then the RESET button. If the TEST button does not trip or if the RESET button will not...

Owners Manual
Page 11
... electrician. 230,208, and 230/208 VOLT UNITS These units are equipped with a three-prong grounding plug on the power supply cord, which must be installed by a qualified electrician in accordance with the National Electrical Code and local codes and ordinances.
... electrician. 230,208, and 230/208 VOLT UNITS These units are equipped with a three-prong grounding plug on the power supply cord, which must be installed by a qualified electrician in accordance with the National Electrical Code and local codes and ordinances.

Owners Manual
Page 12
..._ Heat \ \ _[ ,, _o L o/ 1. I i °__ • .-" q si, '" _Offset Exterior Interior wall "- AUTION: All side louvers of the cabinet must extend outward for installation in standard double hung windows with actual opening widths from 23" to 36". • The top and bottom window sash must open sufficiently to allow...the floor level. : All supporting parts should be secured to firm wood, masonry, or metal. • This unit is installed securely Install the unit whereand the firmly sunlight does not shine directly on the unit. The outside of the cabinet must remain exposed to ...
..._ Heat \ \ _[ ,, _o L o/ 1. I i °__ • .-" q si, '" _Offset Exterior Interior wall "- AUTION: All side louvers of the cabinet must extend outward for installation in standard double hung windows with actual opening widths from 23" to 36". • The top and bottom window sash must open sufficiently to allow...the floor level. : All supporting parts should be secured to firm wood, masonry, or metal. • This unit is installed securely Install the unit whereand the firmly sunlight does not shine directly on the unit. The outside of the cabinet must remain exposed to ...

Owners Manual
Page 13
Installation NO. 1 2 3 4 5 6 7 8 9 10 11 12 NAME OF PARTS FRAME CURTAIN SILL SUPPORT BOLT NUT SCREW (TYPE A) SCREW (TYPE B) SCREW (TYPE C) FOAM-STRIP DRAIN PIPE FRAME GUIDE ...
Installation NO. 1 2 3 4 5 6 7 8 9 10 11 12 NAME OF PARTS FRAME CURTAIN SILL SUPPORT BOLT NUT SCREW (TYPE A) SCREW (TYPE B) SCREW (TYPE C) FOAM-STRIP DRAIN PIPE FRAME GUIDE ...

Owners Manual
Page 14
... Pull the bottom window sash down tightly that will place the Sill Support ® near the outer most point on sill : Be careful when you install the cabinet (Frame Guides @ are broken easily). Screw(Type A) @ IL Frame Guide @ \ Attach the Sill Support @ to the cabinet track hole in relation to the...OUTDOOR 14 Room Air Conditioner Carefully place the cabinet on the window stool and align the center mark on center of Frame Curtain Q is restricted. Installation Open the window. Window Sash\ 112'¢J'_"43 : Do not pull the window sash down behind the Upper Guide until it meets.
... Pull the bottom window sash down tightly that will place the Sill Support ® near the outer most point on sill : Be careful when you install the cabinet (Frame Guides @ are broken easily). Screw(Type A) @ IL Frame Guide @ \ Attach the Sill Support @ to the cabinet track hole in relation to the...OUTDOOR 14 Room Air Conditioner Carefully place the cabinet on the window stool and align the center mark on center of Frame Curtain Q is restricted. Installation Open the window. Window Sash\ 112'¢J'_"43 : Do not pull the window sash down behind the Upper Guide until it meets.

Owners Manual
Page 15
... B) Q Attach the cabinet to the proper length and insert between the upper window sash and the lower window sash. The unit is dry. Installation The cabinet should be installed with approximately 1/2" of Sill Support _'_for balancing the cabinet. iiiiiiiiiii! :' ifi_ iiiiiHiiiiiiiiiiiiii!iJiiiiiiiiii_ _ sh track _ Front Angle Screw(Type B) (_) Sill Support (_) Attach each...
... B) Q Attach the cabinet to the proper length and insert between the upper window sash and the lower window sash. The unit is dry. Installation The cabinet should be installed with approximately 1/2" of Sill Support _'_for balancing the cabinet. iiiiiiiiiii! :' ifi_ iiiiiHiiiiiiiiiiiiii!iJiiiiiiiiii_ _ sh track _ Front Angle Screw(Type B) (_) Sill Support (_) Attach each...

Owners Manual
Page 16
Window installation of the cabinet. Pull down the inlet grille and secure it snaps into the tabs on the grille into place. See ELECTRICAL DATA for attaching power cord to the cabinet by inserting the tabs on the front of room air conditioner is now completed. Push the grille in until it with a Type C screw _>. Installation Attach the Window Locking Bracket @ with a Type A screw _>through the front grille. Window locking bracket @ Attach the front grille to electrical outlet. 16 Room Air Conditioner
Window installation of the cabinet. Pull down the inlet grille and secure it snaps into the tabs on the grille into place. See ELECTRICAL DATA for attaching power cord to the cabinet by inserting the tabs on the front of room air conditioner is now completed. Push the grille in until it with a Type C screw _>. Installation Attach the Window Locking Bracket @ with a Type A screw _>through the front grille. Window locking bracket @ Attach the front grille to electrical outlet. 16 Room Air Conditioner

Owners Manual
Page 18
... Controller window of will the not air function conditionerproperly or if there are new. 3. Select dry mode for an extended length of the polarity when installing the batteries.
... Controller window of will the not air function conditionerproperly or if there are new. 3. Select dry mode for an extended length of the polarity when installing the batteries.

Owners Manual
Page 20
... away from between the windows. Removal From Window Turn the air conditioner off, disconnect the power cord, remove the L bracket, the screws and Support Bracket installed through the condenser, making a mess and creating a slipping hazard. OHang i (_Push Or _k AUTION: Be careful when inserting the drain pipe. Press the drain pipe...
... away from between the windows. Removal From Window Turn the air conditioner off, disconnect the power cord, remove the L bracket, the screws and Support Bracket installed through the condenser, making a mess and creating a slipping hazard. OHang i (_Push Or _k AUTION: Be careful when inserting the drain pipe. Press the drain pipe...

Owners Manual
Page 52
... the Date of Purchase. The warranted _arts including labor covers the cost of repair or replacement INTER-ACTWE CENTER NUMBERS: 3. LG WiLL NOT BE LIABLE FOR ANY CONSEQUENTIAL, iNDiRECT, OR iNCiDENTAL DAMAGES OF ANY KIND, iNCLUDiNG LOST REVENUES OR PROFITS, iN ...such a defective product shall be of purchase. Please have your product ifitproves tobedefective in China submitted at http://www.lgappliances.com. install and the product, instruct, or replace house fuses or wiring, or correction of God, unauthorized modification or alteration, incorrect electrical ...
... the Date of Purchase. The warranted _arts including labor covers the cost of repair or replacement INTER-ACTWE CENTER NUMBERS: 3. LG WiLL NOT BE LIABLE FOR ANY CONSEQUENTIAL, iNDiRECT, OR iNCiDENTAL DAMAGES OF ANY KIND, iNCLUDiNG LOST REVENUES OR PROFITS, iN ...such a defective product shall be of purchase. Please have your product ifitproves tobedefective in China submitted at http://www.lgappliances.com. install and the product, instruct, or replace house fuses or wiring, or correction of God, unauthorized modification or alteration, incorrect electrical ...


