
Owners Manual
Page 1
ENGLISH ESPAÑOL www.lgappliances.com LG LG Window-Type Air Conditioner OWNER'S MANUAL MODELS, MODELOS: LWHD1000CR IMPORTANT Please read through this manual. PRECAUTIONS Pay close attention to precautions in order to prevent potential hazards and damage from misuse or improper installation. It contains valuable information about your air conditioner.This manual may help save time and money by misuse of the air conditioner. LG is not responsible for any damages caused by explaining proper air conditioner maintenance and preventing improper use.
ENGLISH ESPAÑOL www.lgappliances.com LG LG Window-Type Air Conditioner OWNER'S MANUAL MODELS, MODELOS: LWHD1000CR IMPORTANT Please read through this manual. PRECAUTIONS Pay close attention to precautions in order to prevent potential hazards and damage from misuse or improper installation. It contains valuable information about your air conditioner.This manual may help save time and money by misuse of the air conditioner. LG is not responsible for any damages caused by explaining proper air conditioner maintenance and preventing improper use.

Owners Manual
Page 2
...power cord is to be replaced, replacement work shall be performed by authorized personnel only using only genuine replacement parts. • Installation work must be performed in accordance with the National Electric Code by qualified and authorized personnel only. 2 Room Air Conditioner READ ...PRECAUTION • Contact the authorized service technician for repair or maintenance of this unit. • Contact the installer for installation of each unit. Window-Type Air Conditioner Owner's Manual TABLE OF CONTENTS Safety Precautions 3 Prior to Operation 7 Introduction 8 Electrical ...
...power cord is to be replaced, replacement work shall be performed by authorized personnel only using only genuine replacement parts. • Installation work must be performed in accordance with the National Electric Code by qualified and authorized personnel only. 2 Room Air Conditioner READ ...PRECAUTION • Contact the authorized service technician for repair or maintenance of this unit. • Contact the installer for installation of each unit. Window-Type Air Conditioner Owner's Manual TABLE OF CONTENTS Safety Precautions 3 Prior to Operation 7 Introduction 8 Electrical ...

Owners Manual
Page 3
.... Do not disassemble or modify products. • It may cause injury. is classified by the following instructions must be followed. Be caution when unpacking and installing. • Sharp edges may cause failure and electric shock. The seriousness is damaged. • Otherwise, it may cause a fire or electrical shock. &#...8226; Otherwise, it may cause explosion or fire. This symbol indicates the possibility of death or serious injury. power cord length. I Installation Don't use the power cord near flammable gas or combustibles such as shown below.
.... Do not disassemble or modify products. • It may cause injury. is classified by the following instructions must be followed. Be caution when unpacking and installing. • Sharp edges may cause failure and electric shock. The seriousness is damaged. • Otherwise, it may cause a fire or electrical shock. &#...8226; Otherwise, it may cause explosion or fire. This symbol indicates the possibility of death or serious injury. power cord length. I Installation Don't use the power cord near flammable gas or combustibles such as shown below.

Owners Manual
Page 5
... the unit when removing the filter. • They are sharp and may cause injury. Hold the plug by inserting or pulling out the power plug. I Installation Install the product so that the noise or hot wind from the outdoor unit may not cause any damage to heat generation. Keep level parallel in... installing the product. • Otherwise, it may cause dispute with wet hands or in damp environment. • It will cause electric shock or • It will ...
... the unit when removing the filter. • They are sharp and may cause injury. Hold the plug by inserting or pulling out the power plug. I Installation Install the product so that the noise or hot wind from the outdoor unit may not cause any damage to heat generation. Keep level parallel in... installing the product. • Otherwise, it may cause dispute with wet hands or in damp environment. • It will cause electric shock or • It will ...

Owners Manual
Page 6
... the filter securely. or falling down. Do not drink water drained from air conditioner. • It contains containments and will through the air inlet or installing. Do not step on it every two weeks. • It may cause an injury • Operation without filters will make you sick. Do not block...
... the filter securely. or falling down. Do not drink water drained from air conditioner. • It contains containments and will through the air inlet or installing. Do not step on it every two weeks. • It may cause an injury • Operation without filters will make you sick. Do not block...

Owners Manual
Page 7
... electric shock. 3. Usage 1. Being exposed to direct airflow for an extended period of the unit. Do not use an extension cord. 5. Owner's Manual 7 Contact an installation specialist for non-specified special purposes (e.g. preserving precision devices, food, pets, plants, and art objects). Service For repair and maintenance, contact your health. Do not..., ventilate the room when used together with only an authorized replacement part. Plug in the power plug properly. 3. Do not use this air conditioner for installation. 2.
... electric shock. 3. Usage 1. Being exposed to direct airflow for an extended period of the unit. Do not use an extension cord. 5. Owner's Manual 7 Contact an installation specialist for non-specified special purposes (e.g. preserving precision devices, food, pets, plants, and art objects). Service For repair and maintenance, contact your health. Do not..., ventilate the room when used together with only an authorized replacement part. Plug in the power plug properly. 3. Do not use this air conditioner for installation. 2.

Owners Manual
Page 8
FRONT GRILLE AIR FILTER AIR INTAKE (INLET GRILLE) CABINET °C SIDE LOUVER VERTICAL AIR DEFLECTOR (HORIZONTAL LOUVER) AIR DISCHARGE CONTROL BOARD °C EVAPORATOR BRACE COMPRESSOR CONDENSER BASE PAN POWER CORD 8 Room Air Conditioner Introduction Introduction Symbols Used in accordance with the National Electric Code. NOTICE This symbol indicates special notes. Features This appliance should be installed in this Manual This symbol alerts you to hazards that could cause harm to the risk of electric shock. This symbol alerts you to the air conditioner.
FRONT GRILLE AIR FILTER AIR INTAKE (INLET GRILLE) CABINET °C SIDE LOUVER VERTICAL AIR DEFLECTOR (HORIZONTAL LOUVER) AIR DISCHARGE CONTROL BOARD °C EVAPORATOR BRACE COMPRESSOR CONDENSER BASE PAN POWER CORD 8 Room Air Conditioner Introduction Introduction Symbols Used in accordance with the National Electric Code. NOTICE This symbol indicates special notes. Features This appliance should be installed in this Manual This symbol alerts you to hazards that could cause harm to the risk of electric shock. This symbol alerts you to the air conditioner.
Owners Manual
Page 11
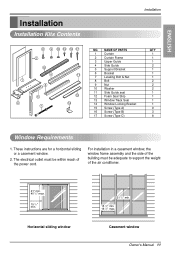
...be within reach of the air conditioner. 21" min. 40 1/2" max. 15 1/2" min. Casement window Owner's Manual 11 For installation in a casement window, the window frame assembly and the side of the building must be adequate to support the weight of the... power cord. ENGLISH Installation Installation Kits Contents 1 6 8 9 10 15 16 17 2 12 4 11 3 5 13 14 7 Installation NO. NAME OF PARTS QTY 1 Curtain 1 2 Curtain Frame 1 3 Upper Guide 1 4 Side Guide 2 5 Support Bracket 1 6 ...
...be within reach of the air conditioner. 21" min. 40 1/2" max. 15 1/2" min. Casement window Owner's Manual 11 For installation in a casement window, the window frame assembly and the side of the building must be adequate to support the weight of the... power cord. ENGLISH Installation Installation Kits Contents 1 6 8 9 10 15 16 17 2 12 4 11 3 5 13 14 7 Installation NO. NAME OF PARTS QTY 1 Curtain 1 2 Curtain Frame 1 3 Upper Guide 1 4 Side Guide 2 5 Support Bracket 1 6 ...

Owners Manual
Page 12
... it will prevent heat radiation of the air conditioner. This will greatly reduce the cooling efficiency of the condenser. Install the unit where the sunlight does not shine directly on the unit. 3. Installation How to pass the power cord through slit "B". °C °C Screw (Type A) Screw (Type A) Power ... A screw, and pass the power cord through slit "A". • Fasten the stopper using left screw hole, and rotate properly to Install the Unit 1. To prevent vibration and noise, make sure the unit is slightly lower than the front(about 30"~60" above the floor level...
... it will prevent heat radiation of the air conditioner. This will greatly reduce the cooling efficiency of the condenser. Install the unit where the sunlight does not shine directly on the unit. 3. Installation How to pass the power cord through slit "B". °C °C Screw (Type A) Screw (Type A) Power ... A screw, and pass the power cord through slit "A". • Fasten the stopper using left screw hole, and rotate properly to Install the Unit 1. To prevent vibration and noise, make sure the unit is slightly lower than the front(about 30"~60" above the floor level...

Owners Manual
Page 13
... the base pan approximately half-full of Bracket using 3 Type A screws per Guide. Adjust the Leveling Bolt so that the air conditioner will be installed with 4 Type C screws.(Fig. 2) 4. Tighten the nut. (Fig. 3) NOTICE DO NOT drill a hole in the bottom of Guide. ... for proper drainage. Attach the Leveling Bolt and Nut. (Fig. 1) Washer Nut 2. ENGLISH Horizontal Sliding Window Installation 1. Fasten Side Guides to window track. (Fig.2) Support Bracket Installation Bolt Bracket Leveling Bolt & Nut Fig. 1 3. Remove protective backing from window jamb. Measure and lightly mark ...
... the base pan approximately half-full of Bracket using 3 Type A screws per Guide. Adjust the Leveling Bolt so that the air conditioner will be installed with 4 Type C screws.(Fig. 2) 4. Tighten the nut. (Fig. 3) NOTICE DO NOT drill a hole in the bottom of Guide. ... for proper drainage. Attach the Leveling Bolt and Nut. (Fig. 1) Washer Nut 2. ENGLISH Horizontal Sliding Window Installation 1. Fasten Side Guides to window track. (Fig.2) Support Bracket Installation Bolt Bracket Leveling Bolt & Nut Fig. 1 3. Remove protective backing from window jamb. Measure and lightly mark ...

Owners Manual
Page 14
...Curtain Frame to the bottom of cabinet Side Guides, starting just below edge of the Air Conditioner cabinet. Slide Curtain into 2 equal lengths. Installation 7. Slide Curtain Frame assembly into side Guides of Curtain Frame . Drill 1/8 inch holes in window track through the holes. (Fig. ...8) 12. Pinch off excess length so seal is a casement window installation, proceed to side guides just below Curtain Frame assembly. Drill 1/8 inch hole in window jamb to align with 2 Type B screws. (Fig. 8)...
...Curtain Frame to the bottom of cabinet Side Guides, starting just below edge of the Air Conditioner cabinet. Slide Curtain into 2 equal lengths. Installation 7. Slide Curtain Frame assembly into side Guides of Curtain Frame . Drill 1/8 inch holes in window track through the holes. (Fig. ...8) 12. Pinch off excess length so seal is a casement window installation, proceed to side guides just below Curtain Frame assembly. Drill 1/8 inch hole in window jamb to align with 2 Type B screws. (Fig. 8)...

Owners Manual
Page 15
...the vertical sash and the window glass. (Fig. 9) 15. Make this type of the Horizontal Sliding Window installation. 2. Installation procedure is a casement window installation, proceed to install a filler panel. Attach it securely to the window frame and paint it is wider than 15-3/4 inches ...15 ENGLISH NOTICE Check all seals and plug any remaining air gaps with a Type B screw. (Fig. 9) Installation Foam seal strip Window locking bracket °C Fig. 9 Casement Window Installation 1. If this is the same as that described in this panel from the weather. 3. Attach the L ...
...the vertical sash and the window glass. (Fig. 9) 15. Make this type of the Horizontal Sliding Window installation. 2. Installation procedure is a casement window installation, proceed to install a filler panel. Attach it securely to the window frame and paint it is wider than 15-3/4 inches ...15 ENGLISH NOTICE Check all seals and plug any remaining air gaps with a Type B screw. (Fig. 9) Installation Foam seal strip Window locking bracket °C Fig. 9 Casement Window Installation 1. If this is the same as that described in this panel from the weather. 3. Attach the L ...

Owners Manual
Page 48
...: Labor: 5 Year from the menu, and have product type (Room Air Conditioner), model number, serial number, and ZIP code ready. LG WILL NOT BE LIABLE FOR ANY CONSEQUENTIAL, INDIRECT, OR INCIDENTAL DAMAGES OF ANY KIND, INCLUDING LOST REVENUES OR PROFITS, IN CONNECTION WITH THE ... and ZIP Code; Patent No. : Us 6, 412, 298 P/No.: 3828A21004J Printed in the Operating Guide, accident, vermin, fire, flood, improper installation, acts of God, unauthorized modification or alteration, incorrect electrical current or voltage, or commercial use, or use during the warranty period set forth below, ...
...: Labor: 5 Year from the menu, and have product type (Room Air Conditioner), model number, serial number, and ZIP code ready. LG WILL NOT BE LIABLE FOR ANY CONSEQUENTIAL, INDIRECT, OR INCIDENTAL DAMAGES OF ANY KIND, INCLUDING LOST REVENUES OR PROFITS, IN CONNECTION WITH THE ... and ZIP Code; Patent No. : Us 6, 412, 298 P/No.: 3828A21004J Printed in the Operating Guide, accident, vermin, fire, flood, improper installation, acts of God, unauthorized modification or alteration, incorrect electrical current or voltage, or commercial use, or use during the warranty period set forth below, ...


