Owner's Manual
Page 1
MFL62423824 www.lge.com ENGLISH ESPAÑOL FRANÇAIS OWNER´S MANUAL TOP FREEZER REFRIGERATOR Please read this manual carefully before operating your set and retain it for future reference. Model Name **=color number, número de color, numéro de couleur LTN19415** LTN19315** LTN19312** LTC22350** P/No.
MFL62423824 www.lge.com ENGLISH ESPAÑOL FRANÇAIS OWNER´S MANUAL TOP FREEZER REFRIGERATOR Please read this manual carefully before operating your set and retain it for future reference. Model Name **=color number, número de color, numéro de couleur LTN19415** LTN19315** LTN19312** LTC22350** P/No.
Owner's Manual
Page 2
...) Warranty Card (Canada) Safety Instructions Grounding Requirements Parts and Features Refrigerator Installation Unpacking Your Refrigerator Installation Base Grille Removing, Reversing and Replacing Your Refrigerator Doors Leveling and Door Closing Door Alignment Using Your Refrigerator Ensuring Proper Air Circulation Setting the Controls Adjusting Control Settings Food Storage... Guide Storing Frozen Food Refrigerator Shelves Ice Tray Snack Corner Crisper and Crisper Cover 2 37 67 3-4 5-7 8-9 9 10-12 13-19 13 ...
...) Warranty Card (Canada) Safety Instructions Grounding Requirements Parts and Features Refrigerator Installation Unpacking Your Refrigerator Installation Base Grille Removing, Reversing and Replacing Your Refrigerator Doors Leveling and Door Closing Door Alignment Using Your Refrigerator Ensuring Proper Air Circulation Setting the Controls Adjusting Control Settings Food Storage... Guide Storing Frozen Food Refrigerator Shelves Ice Tray Snack Corner Crisper and Crisper Cover 2 37 67 3-4 5-7 8-9 9 10-12 13-19 13 ...
Owner's Manual
Page 3
... must be submitted at its option replace, without charge, your product type (Refrigerator), model number, serial number, and ZIP/Postal Code ready. including Alaska, Hawaii, and U.S. Territories. LG ELECTRONICS SHALL NOT BE LIABLE FOR THE LOSS OF USE OF THE PRODUCT, INCONVIENCE...per year) Press the appropriate option, and have other express warranty is used in material or workmanship under normal use . 4. LG Refrigerator / Freezer Warranty Period Product Parts Labor Refrigerator / Freezer 1 year 1 year [In-Home Service (Except Model GR-051)] Sealed System 7 years 1 year [In-Home...
... must be submitted at its option replace, without charge, your product type (Refrigerator), model number, serial number, and ZIP/Postal Code ready. including Alaska, Hawaii, and U.S. Territories. LG ELECTRONICS SHALL NOT BE LIABLE FOR THE LOSS OF USE OF THE PRODUCT, INCONVIENCE...per year) Press the appropriate option, and have other express warranty is used in material or workmanship under normal use . 4. LG Refrigerator / Freezer Warranty Period Product Parts Labor Refrigerator / Freezer 1 year 1 year [In-Home Service (Except Model GR-051)] Sealed System 7 years 1 year [In-Home...

Owner's Manual
Page 5
... have other than normal and usual household use (including, without affecting the remainder of manufacture). Canada WARRANTY: Should your LG Refrigerator ("Product") fail due to the instructions outlined in utility costs and additional utility expenses. 13. This warranty is valid ...the Product owner's and installation manuals. 17. Accessories to deliver, pick up, or install the product; LG REFRIGERATOR LIMITED WARRANTY - Products with the Product. Refrigerator/Freezer Sealed System (Compressor, Condenser, and Evaporator only) One (1) year from the date of original One ...
... have other than normal and usual household use (including, without affecting the remainder of manufacture). Canada WARRANTY: Should your LG Refrigerator ("Product") fail due to the instructions outlined in utility costs and additional utility expenses. 13. This warranty is valid ...the Product owner's and installation manuals. 17. Accessories to deliver, pick up, or install the product; LG REFRIGERATOR LIMITED WARRANTY - Products with the Product. Refrigerator/Freezer Sealed System (Compressor, Condenser, and Evaporator only) One (1) year from the date of original One ...
Owner's Manual
Page 8
...the plug. "...Ground beef, perishable food or seafood that could break while being replaced). Do not use gasoline or other foods. Unplug the refrigerator before utilizing the product. NOTE: Setting the control to avoid contact with damp or wet hands; Do not keep bottles in which they ...in minor injury or damage to you what can cause serious injury to them and damage to ensure a proper ground connection. For your refrigerator, take care not to maintain their quality". Read all faulty or damaged service cables. Utilize this product only as possible in this product...
...the plug. "...Ground beef, perishable food or seafood that could break while being replaced). Do not use gasoline or other foods. Unplug the refrigerator before utilizing the product. NOTE: Setting the control to avoid contact with damp or wet hands; Do not keep bottles in which they ...in minor injury or damage to you what can cause serious injury to them and damage to ensure a proper ground connection. For your refrigerator, take care not to maintain their quality". Read all faulty or damaged service cables. Utilize this product only as possible in this product...
Owner's Manual
Page 9
...) prong from overheated wires. Do not, under provisions of the cord be sent to make sure the CFC refrigerant is recommended that used CFCs (chlorofluorocarbons). Have the wall outlet and the circuit checked by LG Electronics, to have a cooling system that a separate circuit serving only this appliance be reused after rework (recycling...
...) prong from overheated wires. Do not, under provisions of the cord be sent to make sure the CFC refrigerant is recommended that used CFCs (chlorofluorocarbons). Have the wall outlet and the circuit checked by LG Electronics, to have a cooling system that a separate circuit serving only this appliance be reused after rework (recycling...
Owner's Manual
Page 10
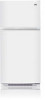
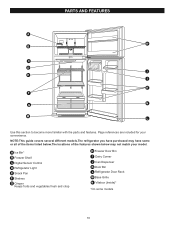
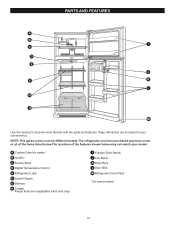
... all of the items listed below.The locations of the features shown below may have some models 10 A Ice Bin* B Freezer Shelf C Digital Sensor Control D Refrigerator Light E Snack Pan F Shelves G Crisper Keeps fruits and vegetables fresh and crisp H Freezer Door Bin I K F N G M L Use this section to become more familiar with the parts...
... all of the items listed below.The locations of the features shown below may have some models 10 A Ice Bin* B Freezer Shelf C Digital Sensor Control D Refrigerator Light E Snack Pan F Shelves G Crisper Keeps fruits and vegetables fresh and crisp H Freezer Door Bin I K F N G M L Use this section to become more familiar with the parts...
Owner's Manual
Page 11
... references are included for your model. NOTE:This guide covers several different models.The refrigerator you have purchased may have some models 11 A CustomCube Ice maker B Freezer Shelf C Digital Sensor Control D Refrigerator Light E Snack Pan F Shelves G Crisper Keeps fruits and vegetables fresh and crisp...become more familiar with the parts and features. PARTS AND FEATURES A H B C D J E I Dairy Corner J Can Dispenser K Door Bin L Refrigerator Door Rack M Base Grille N Vitabox (Inside)* *On some or all of the items listed below.The locations of the features shown below may not match...
... references are included for your model. NOTE:This guide covers several different models.The refrigerator you have purchased may have some models 11 A CustomCube Ice maker B Freezer Shelf C Digital Sensor Control D Refrigerator Light E Snack Pan F Shelves G Crisper Keeps fruits and vegetables fresh and crisp...become more familiar with the parts and features. PARTS AND FEATURES A H B C D J E I Dairy Corner J Can Dispenser K Door Bin L Refrigerator Door Rack M Base Grille N Vitabox (Inside)* *On some or all of the items listed below.The locations of the features shown below may not match...
Owner's Manual
Page 12
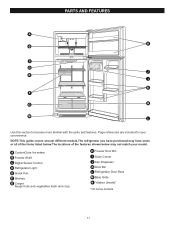
... have purchased may have some models 12 A CustomCube Ice maker * B Ice Bin * C Freeze Shelf D Digital Temperature Control E Refrigerator Light F Snack Drawer G Shelves H Crisper Keeps fruits and vegetables fresh and crisp I D E J F K L G H Use this section to become more familiar with the parts... and features. Page references are included for your model. PARTS AND FEATURES I Freezer Door Racks J Can Rack* K Dairy Bins L Door Bins M Refrigerator Door Rack N *On some or all of the items listed below.The locations of the features shown below may not match your convenience.
... have purchased may have some models 12 A CustomCube Ice maker * B Ice Bin * C Freeze Shelf D Digital Temperature Control E Refrigerator Light F Snack Drawer G Shelves H Crisper Keeps fruits and vegetables fresh and crisp I D E J F K L G H Use this section to become more familiar with the parts... and features. Page references are included for your model. PARTS AND FEATURES I Freezer Door Racks J Can Rack* K Dairy Bins L Door Bins M Refrigerator Door Rack N *On some or all of the items listed below.The locations of the features shown below may not match your convenience.
Owner's Manual
Page 13
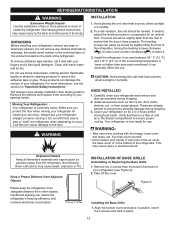
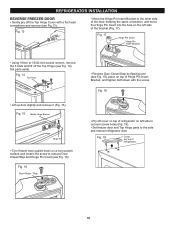
...176;C). To avoid vibration, the unit should be slightly taller than previously mentioned, it can adversely affect the unit. Install the refrigerator in their proper places. REFRIGERATORINSTALLATION INSTALLATION Excessive Weight Hazard Use the assistance of two or more information, see Figure A). 2. ... INSTALLATION OF BASE GRILLE Uninstalling or Replacing the Base Grille 1. The front should be turned by slightly tilting the front of the refrigerator, turning the leveling screws clockwise ( ) to raise it and counter-clockwise ( ) to compensate for cleaning or servicing. direct ...
...176;C). To avoid vibration, the unit should be slightly taller than previously mentioned, it can adversely affect the unit. Install the refrigerator in their proper places. REFRIGERATORINSTALLATION INSTALLATION Excessive Weight Hazard Use the assistance of two or more information, see Figure A). 2. ... INSTALLATION OF BASE GRILLE Uninstalling or Replacing the Base Grille 1. The front should be turned by slightly tilting the front of the refrigerator, turning the leveling screws clockwise ( ) to raise it and counter-clockwise ( ) to compensate for cleaning or servicing. direct ...
Owner's Manual
Page 14
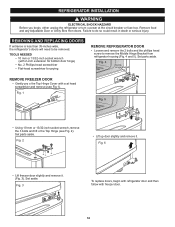
...lift o the Top Hinge (see Fig 1). Remove food and any Adjustable Door or Utility Bins from refrigerator housing (Fig. 4 and 5). Set parts aside. Fig. 3 To replace doors, begin , either unplug the refrigerator or turn o power at head screwdriver and remove (see Fig. 2). TOOLS NEEDED • 10... wrench (with 2-inch extension for bottom door hinge) • No. 2 Phillips head screwdriver • Flat-head screwdriver for prying REMOVE REFRIGERATOR DOOR • Loosen and remove the 2 bolts and the phillips head screw to remove the Middle Hinge Bracket from doors. Set aside. ...
...lift o the Top Hinge (see Fig 1). Remove food and any Adjustable Door or Utility Bins from refrigerator housing (Fig. 4 and 5). Set parts aside. Fig. 3 To replace doors, begin , either unplug the refrigerator or turn o power at head screwdriver and remove (see Fig. 2). TOOLS NEEDED • 10... wrench (with 2-inch extension for bottom door hinge) • No. 2 Phillips head screwdriver • Flat-head screwdriver for prying REMOVE REFRIGERATOR DOOR • Loosen and remove the 2 bolts and the phillips head screw to remove the Middle Hinge Bracket from doors. Set aside. ...
Owner's Manual
Page 15
...phillips screw to refasten the Middle Hinge Bracket and door to the right side as the side on top of door (Fig. 7). Hold door in refrigerator housing. Remove food and any Adjustable Door or Utility Bins from the left-opening type (factory installed) to the right-opening type. TOOLS NEEDED &#...onto Bottom Hinge Pin. • Place Hinge Pin of Middle Hinge Bracket inside Hinge Pin Insert on your right as you begin, either unplug the refrigerator or turn o power at the circuit breaker or fuse box. REVERSING DOORS You may nd it more convenient to have the doors converted from doors....
...phillips screw to refasten the Middle Hinge Bracket and door to the right side as the side on top of door (Fig. 7). Hold door in refrigerator housing. Remove food and any Adjustable Door or Utility Bins from the left-opening type (factory installed) to the right-opening type. TOOLS NEEDED &#...onto Bottom Hinge Pin. • Place Hinge Pin of Middle Hinge Bracket inside Hinge Pin Insert on your right as you begin, either unplug the refrigerator or turn o power at the circuit breaker or fuse box. REVERSING DOORS You may nd it more convenient to have the doors converted from doors....
Owner's Manual
Page 16
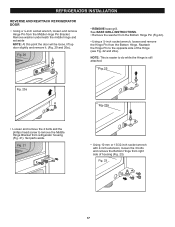
REFRIGERATOR INSTALLATION REVERSE FREEZER DOOR • Gently pry off the Top Hinge Cover with the screw. Fig. 17 • Using 10mm or 13/... Set freezer door and Top Hinge parts to remove Door Closer/Stop and Hinge Pin Insert (see Fig. 18), place on top of refrigerator on left side of refrigerator) 16 Fig. 15 Middle Hinge Bracket Hinge Pin • Turn freezer door upside down with a flat head screwdriver and remove (see ..., and move the Hinge Pin Insert into the hole on a non-scratch surface and loosen the screw to the side and remove refrigerator door. Set parts aside.
REFRIGERATOR INSTALLATION REVERSE FREEZER DOOR • Gently pry off the Top Hinge Cover with the screw. Fig. 17 • Using 10mm or 13/... Set freezer door and Top Hinge parts to remove Door Closer/Stop and Hinge Pin Insert (see Fig. 18), place on top of refrigerator on left side of refrigerator) 16 Fig. 15 Middle Hinge Bracket Hinge Pin • Turn freezer door upside down with a flat head screwdriver and remove (see ..., and move the Hinge Pin Insert into the hole on a non-scratch surface and loosen the screw to the side and remove refrigerator door. Set parts aside.
Owner's Manual
Page 17
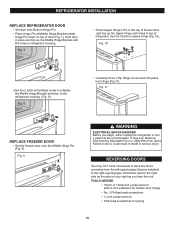
... this point the door will be loose, lift up door slightly and remove it. (Fig. 20 and 20a). REFRIGERATOR INSTALLATION REVERSE AND REATTACH REFRIGERATOR DOOR • Using a ¼-inch socket wrench, loosen and remove Hinge Pin from refrigerator housing (Fig. 21). NOTE: This is easier to do while the Hinge is still attached.
... this point the door will be loose, lift up door slightly and remove it. (Fig. 20 and 20a). REFRIGERATOR INSTALLATION REVERSE AND REATTACH REFRIGERATOR DOOR • Using a ¼-inch socket wrench, loosen and remove Hinge Pin from refrigerator housing (Fig. 21). NOTE: This is easier to do while the Hinge is still attached.
Owner's Manual
Page 18
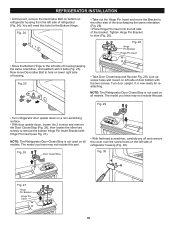
... Decorative Bolt to remove the bottom Hinge Pin Insert Bracket with Hinge Pin Insert (see Fig. 29). Turn door upright. Fig. 29 • Turn refrigerator door upside down , loosen the 2 screws and remove the Door Closer/Stop (Fig. 26), then loosen the other side of the door,keeping the ... will need this part. • With flat-head screwdriver, carefully pry off and remove the cover over the screw holes on lower right side of refrigerator housing (Fig. 30). Fig. 28 Hinge Pin Bracket Hinge Pin Insert • Move the Bottom Hinge to door (Fig. 28). Line up screw holes...
... Decorative Bolt to remove the bottom Hinge Pin Insert Bracket with Hinge Pin Insert (see Fig. 29). Turn door upright. Fig. 29 • Turn refrigerator door upside down , loosen the 2 screws and remove the Door Closer/Stop (Fig. 26), then loosen the other side of the door,keeping the ... will need this part. • With flat-head screwdriver, carefully pry off and remove the cover over the screw holes on lower right side of refrigerator housing (Fig. 30). Fig. 28 Hinge Pin Bracket Hinge Pin Insert • Move the Bottom Hinge to door (Fig. 28). Line up screw holes...
Owner's Manual
Page 19
...; Put freezer door down over . Fig. 31 • Place Upper Hinge's Pin in .socket wrench. Cover is also force-fitted Flange Cover (on top of refrigerator) • Place Decorative Screw into outer hole on the right side. Fig. 32 • Replace cover from housing at area between... refrigerator door and middle hinge and re-attach Hinge Pin to cover the holes. To ensure a good seal, apply a small amount of silicon grease on the ...
...; Put freezer door down over . Fig. 31 • Place Upper Hinge's Pin in .socket wrench. Cover is also force-fitted Flange Cover (on top of refrigerator) • Place Decorative Screw into outer hole on the right side. Fig. 32 • Replace cover from housing at area between... refrigerator door and middle hinge and re-attach Hinge Pin to cover the holes. To ensure a good seal, apply a small amount of silicon grease on the ...
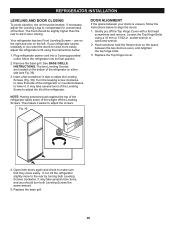
Owner's Manual
Page 20
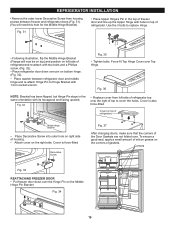
...remove. Insert a flat screwdriver in slots to the rear by turning both Leveling Screws the same amount. 5. Gently pry off the Leveling Screws. REFRIGERATOR INSTALLATION LEVELING AND DOOR CLOSING To avoid vibration, the unit must be slightly higher than the rear to aid in door closing. If necessary, adjust... the Leveling Legs to adjust the screws. Your refrigerator has two Front Leveling Screws - If your doors is even, and retighten the top hinge bolts. 3. Remove the base grill. This makes it ...
...remove. Insert a flat screwdriver in slots to the rear by turning both Leveling Screws the same amount. 5. Gently pry off the Leveling Screws. REFRIGERATOR INSTALLATION LEVELING AND DOOR CLOSING To avoid vibration, the unit must be slightly higher than the rear to aid in door closing. If necessary, adjust... the Leveling Legs to adjust the screws. Your refrigerator has two Front Leveling Screws - If your doors is even, and retighten the top hinge bolts. 3. Remove the base grill. This makes it ...
Owner's Manual
Page 21
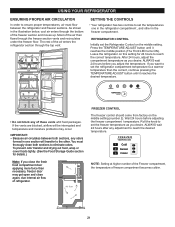
...compartment. Air flow FREEZER CONTROL The freezer control should come from factory on the middle setting. Wait 24 hours before you want to set the Refrigerator Control on the middle setting (number 2). FREEZER TEMPERATURE 1 Cold 1 2 Normal 2 3 3 Colder NOTE: Setting at higher number of the... Freezer compartment, the temperature of the air enters the refrigerator section through the top vent. If the vents are blocked, airflow will transfer to reach the correct temperature. Most of the air then flows ...
...compartment. Air flow FREEZER CONTROL The freezer control should come from factory on the middle setting. Wait 24 hours before you want to set the Refrigerator Control on the middle setting (number 2). FREEZER TEMPERATURE 1 Cold 1 2 Normal 2 3 3 Colder NOTE: Setting at higher number of the... Freezer compartment, the temperature of the air enters the refrigerator section through the top vent. If the vents are blocked, airflow will transfer to reach the correct temperature. Most of the air then flows ...
Owner's Manual
Page 22
... highest number and wait 24 hours, then check Remove any objects blocking blocking air flow. This prevents food odor and taste transfer throughout the refrigerator. Butter or margarine Store opened , tightly rewrap with airtight lids can also be selected and kept in their original packaging (if there is any... setting to the next highest number and wait 24 hours, then check FOOD STORAGE GUIDE Storing Fresh Food Wrap or store food in the refrigerator in the crisper. Fruit Wash and let dry; Place in a plastic bag or plastic container and store in airtight and moisture-proof material...
... highest number and wait 24 hours, then check Remove any objects blocking blocking air flow. This prevents food odor and taste transfer throughout the refrigerator. Butter or margarine Store opened , tightly rewrap with airtight lids can also be selected and kept in their original packaging (if there is any... setting to the next highest number and wait 24 hours, then check FOOD STORAGE GUIDE Storing Fresh Food Wrap or store food in the refrigerator in the crisper. Fruit Wash and let dry; Place in a plastic bag or plastic container and store in airtight and moisture-proof material...
Owner's Manual
Page 23
... 3 lbs of food per cubic foot [907-1350 g per liter] of food. Ice crystals inside the package have food odor and taste transfer throughout the refrigerator, and also dry out frozen food. USING YOUR REFRIGERATOR STORING FROZEN FOOD Freezing NOTE: For further information about preparing food for proper freezing methods.
... 3 lbs of food per cubic foot [907-1350 g per liter] of food. Ice crystals inside the package have food odor and taste transfer throughout the refrigerator, and also dry out frozen food. USING YOUR REFRIGERATOR STORING FROZEN FOOD Freezing NOTE: For further information about preparing food for proper freezing methods.


