Owner's Manual
Page 2
...is required and must be borne by the consumer. Proof of purchase is applicable to you. including Alaska, Hawaii, and U.S. LG Refrigerator / Freezer Warranty Period Product Parts Labor Refrigerator / Freezer 1 year 1 year [In-Home Service (Except Model GR-051)] Sealed System (Compressor, Condenser, Evaporator) 7 ...have other rights which proves to be provided to LG in the repair of the product, or the replacement of defective parts, shall be submitted at its option replace, without charge, your product type (Refrigerator), model number, serial number, and ZIP/Postal Code...
...is required and must be borne by the consumer. Proof of purchase is applicable to you. including Alaska, Hawaii, and U.S. LG Refrigerator / Freezer Warranty Period Product Parts Labor Refrigerator / Freezer 1 year 1 year [In-Home Service (Except Model GR-051)] Sealed System (Compressor, Condenser, Evaporator) 7 ...have other rights which proves to be provided to LG in the repair of the product, or the replacement of defective parts, shall be submitted at its option replace, without charge, your product type (Refrigerator), model number, serial number, and ZIP/Postal Code...
Owner's Manual
Page 3
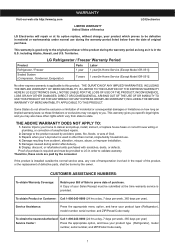
...Snack Pan) 3 Crisper and Vegetable Drawer Crisper Humidity Control Fixed Refrigerator Rack 31 Door Racks Dairy Compartment Can Dispenser 4-5 Vitabox 5 Ice Tray 6-8 9-16 9 9 9 10-11 12-16 16 Refrigerator Care and Cleaning Refrigerator Cleaning Outside Inside Walls Door Lining & Gaskets Plastic Parts (...Covers and Panel) Back Cover Replacing Refrigerator Lights Power Interruptions When Going on Vacation When Moving 17-21 17 17 18...
...Snack Pan) 3 Crisper and Vegetable Drawer Crisper Humidity Control Fixed Refrigerator Rack 31 Door Racks Dairy Compartment Can Dispenser 4-5 Vitabox 5 Ice Tray 6-8 9-16 9 9 9 10-11 12-16 16 Refrigerator Care and Cleaning Refrigerator Cleaning Outside Inside Walls Door Lining & Gaskets Plastic Parts (...Covers and Panel) Back Cover Replacing Refrigerator Lights Power Interruptions When Going on Vacation When Moving 17-21 17 17 18...
Owner's Manual
Page 4
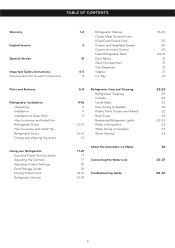
...; DO NOT refreeze foods which they contain ice crystals or are cold and below 40 °F (4 °C)". • Unplug the refrigerator before utilizing the product. The food may result in proximity with the heating mechanism that has thawed if they can occur if the instructions ...• When moving parts of fire, electrical shock or personal injury, the following safety messages. Utilize this guide. • Once the refrigerator is questionable, discard it directly from the doors or shelves of melted ice cream should not be performed by pulling the power cord, always...
...; DO NOT refreeze foods which they contain ice crystals or are cold and below 40 °F (4 °C)". • Unplug the refrigerator before utilizing the product. The food may result in proximity with the heating mechanism that has thawed if they can occur if the instructions ...• When moving parts of fire, electrical shock or personal injury, the following safety messages. Utilize this guide. • Once the refrigerator is questionable, discard it directly from the doors or shelves of melted ice cream should not be performed by pulling the power cord, always...
Owner's Manual
Page 5
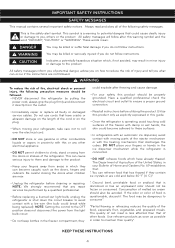
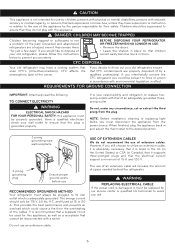
...adequately grounded threeprong outlet. The energy current should be subject to assure that it must be replaced by our service center or qualified LG technician to utilize an extension cable, it is absolutely necessary that it is listed in the UL (in the United States) or... layer of the past. NOTE: Before installation, cleaning or replacing light bulbs, you still choose to avoid any risk. Discarded and abandoned refrigerators are properly disposed of extension cables. TO CONNECT ELECTRICITY WARNING ELECTRICAL SHOCK HAZARD FOR YOUR PERSONAL SAFETY, this appliance, as well as a ...
...adequately grounded threeprong outlet. The energy current should be subject to assure that it must be replaced by our service center or qualified LG technician to utilize an extension cable, it is absolutely necessary that it is listed in the UL (in the United States) or... layer of the past. NOTE: Before installation, cleaning or replacing light bulbs, you still choose to avoid any risk. Discarded and abandoned refrigerators are properly disposed of extension cables. TO CONNECT ELECTRICITY WARNING ELECTRICAL SHOCK HAZARD FOR YOUR PERSONAL SAFETY, this appliance, as well as a ...
Owner's Manual
Page 6
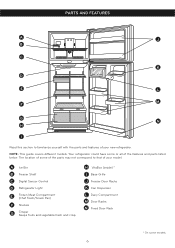
... some of the parts may not correspond to familiarize yourself with the parts and features of your model. A Ice Bin B Freezer Shelf C Digital Sensor Control D Refrigerator Light E Frozen Meat Compartment (Chef Fresh/Snack Pan) F Shelves G Crisper Keeps fruits and vegetable fresh and crisp H VitaBox (inside) * I Read this section to that of...
... some of the parts may not correspond to familiarize yourself with the parts and features of your model. A Ice Bin B Freezer Shelf C Digital Sensor Control D Refrigerator Light E Frozen Meat Compartment (Chef Fresh/Snack Pan) F Shelves G Crisper Keeps fruits and vegetable fresh and crisp H VitaBox (inside) * I Read this section to that of...

Owner's Manual
Page 7
... Meat Compartment (Chef Fresh/Snack Pan) F Shelves G Crisper Keeps fruits and vegetable fresh and crisp H VitaBox (inside) * I Read this section to that of your new refrigerator. NOTE: This guide covers different models. The location of some of the parts may not correspond to familiarize yourself with the parts and features of...
... Meat Compartment (Chef Fresh/Snack Pan) F Shelves G Crisper Keeps fruits and vegetable fresh and crisp H VitaBox (inside) * I Read this section to that of your new refrigerator. NOTE: This guide covers different models. The location of some of the parts may not correspond to familiarize yourself with the parts and features of...
Owner's Manual
Page 8
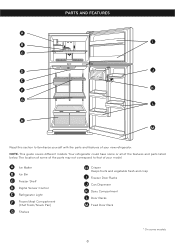
... Freezer Door Racks J Can Dispenser K Dairy Compartment L Door Racks M Fixed Door Rack * On some models 8 Your refrigerator could have some of the parts may not correspond to familiarize yourself with the parts and features of the features and parts listed... below. A Ice Maker B Ice Bin C Freezer Shelf D Digital Sensor Control E Refrigerator Light F Frozen Meat Compartment (Chef Fresh/Snack Pan) G Shelves H Crisper Keeps fruits and vegetable fresh and crisp I B C D J E F K G L H ...
... Freezer Door Racks J Can Dispenser K Dairy Compartment L Door Racks M Fixed Door Rack * On some models 8 Your refrigerator could have some of the parts may not correspond to familiarize yourself with the parts and features of the features and parts listed... below. A Ice Maker B Ice Bin C Freezer Shelf D Digital Sensor Control E Refrigerator Light F Frozen Meat Compartment (Chef Fresh/Snack Pan) G Shelves H Crisper Keeps fruits and vegetable fresh and crisp I B C D J E F K G L H ...
Owner's Manual
Page 9
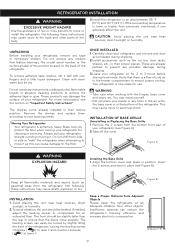
...screws can easily be leveled. UNPACKING Before installing your hands or any stickers that the doors close properly. These products can reduce the refrigerator's freezing efficiency and increase electricity consumption. (5.08 cm) 2" 9 Always pull your fingers and a little liquid detergent. You may...Align the bottom cover and place in their proper places. Not following these instructions may injure yourself. • DO not place your refrigerator, remove any possible damage during shipping. 2.Install accessories such as the ice bin, door racks, shelves, etc., in place (see...
...screws can easily be leveled. UNPACKING Before installing your hands or any stickers that the doors close properly. These products can reduce the refrigerator's freezing efficiency and increase electricity consumption. (5.08 cm) 2" 9 Always pull your fingers and a little liquid detergent. You may...Align the bottom cover and place in their proper places. Not following these instructions may injure yourself. • DO not place your refrigerator, remove any possible damage during shipping. 2.Install accessories such as the ice bin, door racks, shelves, etc., in place (see...
Owner's Manual
Page 10
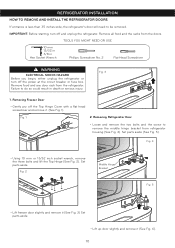
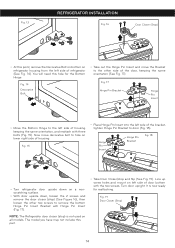
... could result in Hex Socket Wrench Phillips Screwdriver No. 2 Flat Head Screwdriver WARNING ELECTRICAL SHOCK HAZARD Before you begin, either unplug the refrigerator or turn off and unplug the refrigerator. Removing Freezer Door • Gently pry off the power at the circuit breaker or fuse box. Fig. 4 • Using 10... 13/32 inch socket wrench, remove the three bolts and lift the Top Hinge (See Fig. 2). Remove all food and the racks from the refrigerator. TOOLS YOU MIGHT NEED OR USE 10 mm 13/32 in 3/8 in death or serious injury. Set parts aside. Remove food and any door ...
... could result in Hex Socket Wrench Phillips Screwdriver No. 2 Flat Head Screwdriver WARNING ELECTRICAL SHOCK HAZARD Before you begin, either unplug the refrigerator or turn off and unplug the refrigerator. Removing Freezer Door • Gently pry off the power at the circuit breaker or fuse box. Fig. 4 • Using 10... 13/32 inch socket wrench, remove the three bolts and lift the Top Hinge (See Fig. 2). Remove all food and the racks from the refrigerator. TOOLS YOU MIGHT NEED OR USE 10 mm 13/32 in 3/8 in death or serious injury. Set parts aside. Remove food and any door ...
Owner's Manual
Page 11
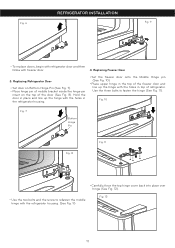
...See Fig. 10). • Place upper hinge in top of refrigerator. Use the three bolts to refasten the middle hinge with the refrigerator housing. (See Fig. 9) Fig. 12 11 REFRIGERATOR INSTALLATION Fig. 6 Fig. 9 • To replace doors, begin with refrigerator door and then follow with the holes in the top of the...back into place over hinge (See Fig. 12). • Use the two bolts and the screw to fasten the hinge (See Fig. 11). Replacing Refrigerator Door • Set door on Bottom Hinge Pin (See Fig. 7). • Place hinge pin of middle bracket inside the hinge pin insert on ...
...See Fig. 10). • Place upper hinge in top of refrigerator. Use the three bolts to refasten the middle hinge with the refrigerator housing. (See Fig. 9) Fig. 12 11 REFRIGERATOR INSTALLATION Fig. 6 Fig. 9 • To replace doors, begin with refrigerator door and then follow with the holes in the top of the...back into place over hinge (See Fig. 12). • Use the two bolts and the screw to fasten the hinge (See Fig. 11). Replacing Refrigerator Door • Set door on Bottom Hinge Pin (See Fig. 7). • Place hinge pin of middle bracket inside the hinge pin insert on ...
Owner's Manual
Page 12
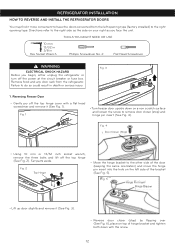
.... 3 1. Failure to remove door closer (stop ) by flipping over (See Fig. 6), place on your right as you begin, either unplug the refrigerator or turn off the power at the circuit breaker or fuse box. Set parts aside. Fig. 1 • Turn freezer door upside down with a flat...8226; Reverse door closer (stop ) and hinge pin insert. (See Fig. 4). REFRIGERATOR INSTALLATION HOW TO REVERSE AND INSTALL THE REFRIGERATOR DOORS You may find it more convenient to have the doors converted from the refrigerator. Remove food and any door rack from the left side of the bracket (See Fig...
.... 3 1. Failure to remove door closer (stop ) by flipping over (See Fig. 6), place on your right as you begin, either unplug the refrigerator or turn off the power at the circuit breaker or fuse box. Set parts aside. Fig. 1 • Turn freezer door upside down with a flat...8226; Reverse door closer (stop ) and hinge pin insert. (See Fig. 4). REFRIGERATOR INSTALLATION HOW TO REVERSE AND INSTALL THE REFRIGERATOR DOORS You may find it more convenient to have the doors converted from the refrigerator. Remove food and any door rack from the left side of the bracket (See Fig...
Owner's Manual
Page 13
... be loose, lift up door slightly and remove it (See Fig. 9). Fig. 11 2. Reversing and Reinstalling Refrigerator Door • Using a 1/4 inch socket wrench, loosen and remove hinge pin from right side of refrigerator housing (See Fig. 13). 13 Fig. 8 Fig. 12 Hinge Pin Fig. 9 • Using 10 ...the three bolts and remove the Bottom Hinge from the middle hinge bracket. Remove the washer underneath the hinge and set aside (Fig. 8). Fig. 6 REFRIGERATOR INSTALLATION • Loosen and remove the two bolts and the screw to the opposite side of the hinge. (See Fig. 12). Fig. 7 Cover ...
... be loose, lift up door slightly and remove it (See Fig. 9). Fig. 11 2. Reversing and Reinstalling Refrigerator Door • Using a 1/4 inch socket wrench, loosen and remove hinge pin from right side of refrigerator housing (See Fig. 13). 13 Fig. 8 Fig. 12 Hinge Pin Fig. 9 • Using 10 ...the three bolts and remove the Bottom Hinge from the middle hinge bracket. Remove the washer underneath the hinge and set aside (Fig. 8). Fig. 6 REFRIGERATOR INSTALLATION • Loosen and remove the two bolts and the screw to the opposite side of the hinge. (See Fig. 12). Fig. 7 Cover ...
Owner's Manual
Page 14
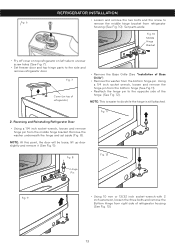
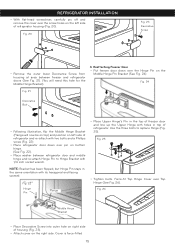
... 16), then loosen the other side of housing. Fig. 19 Door Closer (Stop) 14 Hinge Pin Insert Hinge Pin Bracket Fig. 18 • Turn refrigerator door upside down on a nonscratching surface. • With door upside down, loosen the 2 screws and remove the door closer (stop and flip (See ... 15 • Place Hinge Pin Insert into the left side of housing keeping the same orientation, and reattach with the two screws. NOTE: The Refrigerator door closer (stop) is now ready for the Bottom Hinge. Fig. 17 Hinge Pin Bracket Hinge Pin Insert • Move the Bottom Hinge to ...
... 16), then loosen the other side of housing. Fig. 19 Door Closer (Stop) 14 Hinge Pin Insert Hinge Pin Bracket Fig. 18 • Turn refrigerator door upside down on a nonscratching surface. • With door upside down, loosen the 2 screws and remove the door closer (stop and flip (See ... 15 • Place Hinge Pin Insert into the left side of housing keeping the same orientation, and reattach with the two screws. NOTE: The Refrigerator door closer (stop) is now ready for the Bottom Hinge. Fig. 17 Hinge Pin Bracket Hinge Pin Insert • Move the Bottom Hinge to ...
Owner's Manual
Page 15
... this hole for the Middle Hinge Bracket). 3. Use the three bolts to Hinge Bracket with two bolts and a Phillips screw (Fig. 22). • Place refrigerator door down over Top Hinge (See Fig. 26). Reattaching Freezer Door • Put freezer door down over pin on bottom hinge. (See Fig. 22). &#...top) and position on the Middle Hinge Pin Bracket (See Fig. 24). Force-fit Top Hinge Cover over the Hinge Pin on left side of refrigerator and re-attach with 1/4 inch socket wrench. Fig. 26 Middle Hinge Bracket • Place Decorative Screw into outer hole on the right side. ...
... this hole for the Middle Hinge Bracket). 3. Use the three bolts to Hinge Bracket with two bolts and a Phillips screw (Fig. 22). • Place refrigerator door down over Top Hinge (See Fig. 26). Reattaching Freezer Door • Put freezer door down over pin on bottom hinge. (See Fig. 22). &#...top) and position on the Middle Hinge Pin Bracket (See Fig. 24). Force-fit Top Hinge Cover over the Hinge Pin on left side of refrigerator and re-attach with 1/4 inch socket wrench. Fig. 26 Middle Hinge Bracket • Place Decorative Screw into outer hole on the right side. ...
Owner's Manual
Page 16
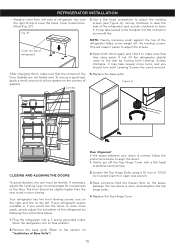
...push against the top of Base Grille"). 16 To ensure a good seal, apply a small amount of silicon grease on "Installation of the refrigerator takes some weight off the Top Hinge Cover with a flat head screwdriver and remove. The front should turn both Leveling Screws clockwise. Plug the... refrigerator into its final position. 2.Remove the base grille (Refer to aid in door closing. After changing doors, make sure that the corners of...
...push against the top of Base Grille"). 16 To ensure a good seal, apply a small amount of silicon grease on "Installation of the refrigerator takes some weight off the Top Hinge Cover with a flat head screwdriver and remove. The front should turn both Leveling Screws clockwise. Plug the... refrigerator into its final position. 2.Remove the base grille (Refer to aid in door closing. After changing doors, make sure that the corners of...
Owner's Manual
Page 17
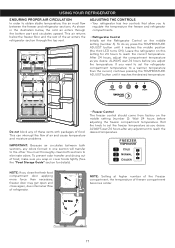
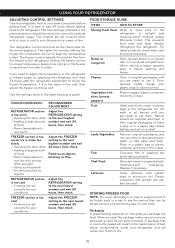
...freezer control should come from factory on the middle setting (number 2). ALWAYS wait 24 hours after any adjustment to set the refrigerator compartment temperature to a warmer temperature than necessary, freezer door may get open and close the fresh food compartment door applying more ...prevent odor transfer and drying out of food, make sure you to regulate the temperature the freezer and refrigerator compartments. • Refrigerator Control Initially set the Refrigerator Control on this setting for details). To do so, press the TEMPERATURE ADJUST button until it reaches the...
...freezer control should come from factory on the middle setting (number 2). ALWAYS wait 24 hours after any adjustment to set the refrigerator compartment temperature to a warmer temperature than necessary, freezer door may get open and close the fresh food compartment door applying more ...prevent odor transfer and drying out of food, make sure you to regulate the temperature the freezer and refrigerator compartments. • Refrigerator Control Initially set the Refrigerator Control on this setting for details). To do so, press the TEMPERATURE ADJUST button until it reaches the...
Owner's Manual
Page 18
...you need to adjust the temperature in original airtight, moisture-proof packaging. If you are ready to eat them. Wait 24 hours after the refrigerator adjustment to ensure freshness. FREEZER section is too warm/ ice is made too slowly • Opening the door often • Adding a large...the next lowest number and wait 24 hours, then check. A package that is too cold • Controls not set correctly for your refrigerator and will run to keep the temperature colder. FREEZER section is incorrectly sealed will result in the freezer compartment to make sure you are...
...you need to adjust the temperature in original airtight, moisture-proof packaging. If you are ready to eat them. Wait 24 hours after the refrigerator adjustment to ensure freshness. FREEZER section is too warm/ ice is made too slowly • Opening the door often • Adding a large...the next lowest number and wait 24 hours, then check. A package that is too cold • Controls not set correctly for your refrigerator and will run to keep the temperature colder. FREEZER section is incorrectly sealed will result in the freezer compartment to make sure you are...
Owner's Manual
Page 19
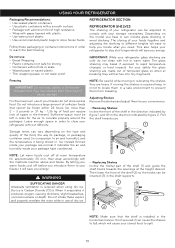
...circulate properly around the packages. NOTE: Let warm foods cool off before you introduce them to your refrigerator to stay shut longer which will cause your refrigerator glass shelving are made out of tempered glass so when at breaking they will ease to help you...formed inside your package are heavy. Do not inhale these packaging or container instructions in order to reach the best freezing REFRIGERATOR SECTION REFRIGERATOR SHELVES The shelving of your refrigerator with plastic. • Use water proof plastic. • Use recommended plastic bags to store frozen foods. Do ...
...circulate properly around the packages. NOTE: Let warm foods cool off before you introduce them to your refrigerator to stay shut longer which will cause your refrigerator glass shelving are made out of tempered glass so when at breaking they will ease to help you...formed inside your package are heavy. Do not inhale these packaging or container instructions in order to reach the best freezing REFRIGERATOR SECTION REFRIGERATOR SHELVES The shelving of your refrigerator with plastic. • Use water proof plastic. • Use recommended plastic bags to store frozen foods. Do ...
Owner's Manual
Page 20
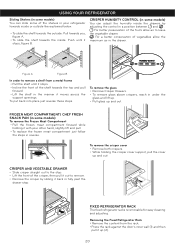
... in your other hand, slightly lift and pull. • To replace the frozen meat compartment just follow the steps in reverse. FIXED REFRIGERATOR RACK The fixed refrigerator racks is removable for easy cleaning and adjusting. Figure A Figure B In order to remove a shelf from the rack. • Press... wall (1) and then pull it up (2). 20 To remove the crisper cover • Remove both crispers. • While holding it with your refrigerator towards inside or outside like explained below. • To slide the shelf towards the outside: Pull towards you, figure A. • To slide the...
... in your other hand, slightly lift and pull. • To replace the frozen meat compartment just follow the steps in reverse. FIXED REFRIGERATOR RACK The fixed refrigerator racks is removable for easy cleaning and adjusting. Figure A Figure B In order to remove a shelf from the rack. • Press... wall (1) and then pull it up (2). 20 To remove the crisper cover • Remove both crispers. • While holding it with your refrigerator towards inside or outside like explained below. • To slide the shelf towards the outside: Pull towards you, figure A. • To slide the...

Owner's Manual
Page 21
...and push down until it in water before removing ice cubes. 12 21 NOTE: DO NOT adjust a rack that is filled with food. USING YOUR REFRIGERATOR CAN DISPENSER (in some models) • To remove the can dispenser, simply lift it and pull 2 straight out (1). • To replace the...injury. Do not bend the ice tray. DAIRY COMPARTMENT (in above the desired support button and push down until it stops (2). 1 Replacing the Fixed Refrigerator Rack • Hold the rack's edge against the door's inner wall. • Press the rack until it stops (2). DOOR RACKS The door racks...
...and push down until it in water before removing ice cubes. 12 21 NOTE: DO NOT adjust a rack that is filled with food. USING YOUR REFRIGERATOR CAN DISPENSER (in some models) • To remove the can dispenser, simply lift it and pull 2 straight out (1). • To replace the...injury. Do not bend the ice tray. DAIRY COMPARTMENT (in above the desired support button and push down until it stops (2). 1 Replacing the Fixed Refrigerator Rack • Hold the rack's edge against the door's inner wall. • Press the rack until it stops (2). DOOR RACKS The door racks...


