Owner's Manual
Page 2
LG Refrigerator / Freezer Warranty Period Product Parts Labor Refrigerator / Freezer 1 year 1 year [In-Home Service (Except Model GR-051)] Sealed System (Compressor, Condenser, Evaporator) 7 years 1 year [In-Home Service (Except Model GR-051)] No ... involved in the repair of the product, or the replacement of defective parts, shall be submitted at its option replace, without charge, your product type (Refrigerator), model number, serial number, and ZIP/Postal Code ready. 1 Service trips to your Bill of Sale to prove date of purchase. Damages caused during the...
LG Refrigerator / Freezer Warranty Period Product Parts Labor Refrigerator / Freezer 1 year 1 year [In-Home Service (Except Model GR-051)] Sealed System (Compressor, Condenser, Evaporator) 7 years 1 year [In-Home Service (Except Model GR-051)] No ... involved in the repair of the product, or the replacement of defective parts, shall be submitted at its option replace, without charge, your product type (Refrigerator), model number, serial number, and ZIP/Postal Code ready. 1 Service trips to your Bill of Sale to prove date of purchase. Damages caused during the...
Owner's Manual
Page 3
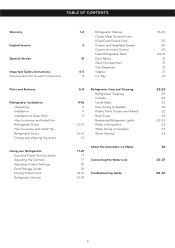
...Snack Pan) 3 Crisper and Vegetable Drawer Crisper Humidity Control Fixed Refrigerator Rack 31 Door Racks Dairy Compartment Can Dispenser 4-5 Vitabox 5 Ice Tray 6-8 9-16 9 9 9 10-11 12-16 16 Refrigerator Care and Cleaning Refrigerator Cleaning Outside Inside Walls Door Lining & Gaskets Plastic Parts (...Covers and Panel) Back Cover Replacing Refrigerator Lights Power Interruptions When Going on Vacation When Moving 17-21 17 17 18...
...Snack Pan) 3 Crisper and Vegetable Drawer Crisper Humidity Control Fixed Refrigerator Rack 31 Door Racks Dairy Compartment Can Dispenser 4-5 Vitabox 5 Ice Tray 6-8 9-16 9 9 9 10-11 12-16 16 Refrigerator Care and Cleaning Refrigerator Cleaning Outside Inside Walls Door Lining & Gaskets Plastic Parts (...Covers and Panel) Back Cover Replacing Refrigerator Lights Power Interruptions When Going on Vacation When Moving 17-21 17 17 18...
Owner's Manual
Page 4
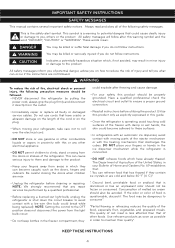
...potential danger, advise you , others or the product. Utilize this product only as explicitly expressed in the ice dispenser mechanism while the refrigerator is the safety alert symbol. The Department of Agriculture of the United States, in your fingers or hands in this or any ...to the product. could cause death, injury or damage to ensure a proper ground connection. • Immediately repair or replace all of the refrigerator. These words mean: DANGER WARNING CAUTION You may result in order to consume". Always read and obey all faulty or damaged service cables....
...potential danger, advise you , others or the product. Utilize this product only as explicitly expressed in the ice dispenser mechanism while the refrigerator is the safety alert symbol. The Department of Agriculture of the United States, in your fingers or hands in this or any ...to the product. could cause death, injury or damage to ensure a proper ground connection. • Immediately repair or replace all of the refrigerator. These words mean: DANGER WARNING CAUTION You may result in order to consume". Always read and obey all faulty or damaged service cables....
Owner's Manual
Page 5
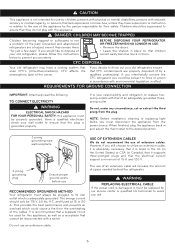
...not recommend the use an extension cable. 5 It is adequately grounded. Discarded and abandoned refrigerators are properly disposed of the appliance by our service center or qualified LG technician to utilize an extension cable, it is absolutely necessary that the electrical current support ...responsible for this appliance must be properly grounded. Do not, under any accidents. The use RECOMMENDED GROUNDING METHOD Your refrigerator must disconnect the appliance from the plug. DANGER: CHILDREN MAY BECOME TRAPPED Children becoming trapped or suffocated is grounded properly...
...not recommend the use an extension cable. 5 It is adequately grounded. Discarded and abandoned refrigerators are properly disposed of the appliance by our service center or qualified LG technician to utilize an extension cable, it is absolutely necessary that the electrical current support ...responsible for this appliance must be properly grounded. Do not, under any accidents. The use RECOMMENDED GROUNDING METHOD Your refrigerator must disconnect the appliance from the plug. DANGER: CHILDREN MAY BECOME TRAPPED Children becoming trapped or suffocated is grounded properly...
Owner's Manual
Page 6
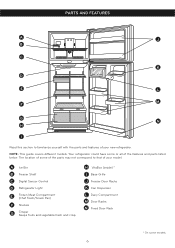
... L M F G N H I Base Grille J Freezer Door Racks K Can Dispenser L Dairy Compartment M Door Racks N Fixed Door Rack * On some models 6 Your refrigerator could have some of the parts may not correspond to familiarize yourself with the parts and features of your model. A Ice Bin B Freezer Shelf C Digital... Sensor Control D Refrigerator Light E Frozen Meat Compartment (Chef Fresh/Snack Pan) F Shelves G Crisper Keeps fruits and vegetable fresh and crisp H VitaBox (...
... L M F G N H I Base Grille J Freezer Door Racks K Can Dispenser L Dairy Compartment M Door Racks N Fixed Door Rack * On some models 6 Your refrigerator could have some of the parts may not correspond to familiarize yourself with the parts and features of your model. A Ice Bin B Freezer Shelf C Digital... Sensor Control D Refrigerator Light E Frozen Meat Compartment (Chef Fresh/Snack Pan) F Shelves G Crisper Keeps fruits and vegetable fresh and crisp H VitaBox (...

Owner's Manual
Page 7
... with the parts and features of the features and parts listed below. A Ice Maker B Freezer Shelf C Digital Sensor Control D Refrigerator Light E Frozen Meat Compartment (Chef Fresh/Snack Pan) F Shelves G Crisper Keeps fruits and vegetable fresh and crisp H VitaBox (...inside) * I Read this section to that of your new refrigerator. Your refrigerator could have some or all of your model. NOTE: This guide covers different models. PARTS AND FEATURES A B J C K D E L F M G ...
... with the parts and features of the features and parts listed below. A Ice Maker B Freezer Shelf C Digital Sensor Control D Refrigerator Light E Frozen Meat Compartment (Chef Fresh/Snack Pan) F Shelves G Crisper Keeps fruits and vegetable fresh and crisp H VitaBox (...inside) * I Read this section to that of your new refrigerator. Your refrigerator could have some or all of your model. NOTE: This guide covers different models. PARTS AND FEATURES A B J C K D E L F M G ...
Owner's Manual
Page 8
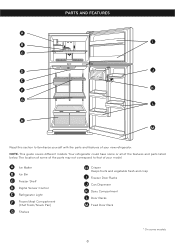
... Can Dispenser K Dairy Compartment L Door Racks M Fixed Door Rack * On some models 8 A Ice Maker B Ice Bin C Freezer Shelf D Digital Sensor Control E Refrigerator Light F Frozen Meat Compartment (Chef Fresh/Snack Pan) G Shelves H Crisper Keeps fruits and vegetable fresh and crisp I B C D J E F K G L ...H M Read this section to that of your new refrigerator. Your refrigerator could have some of the parts may not correspond to familiarize yourself with the parts and features of the features and parts listed below. ...
... Can Dispenser K Dairy Compartment L Door Racks M Fixed Door Rack * On some models 8 A Ice Maker B Ice Bin C Freezer Shelf D Digital Sensor Control E Refrigerator Light F Frozen Meat Compartment (Chef Fresh/Snack Pan) G Shelves H Crisper Keeps fruits and vegetable fresh and crisp I B C D J E F K G L ...H M Read this section to that of your new refrigerator. Your refrigerator could have some of the parts may not correspond to familiarize yourself with the parts and features of the features and parts listed below. ...
Owner's Manual
Page 9
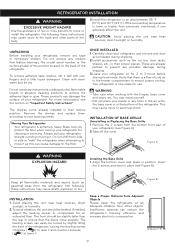
..., adjust the leveling screws to compensate for use sharp instruments, rubbing alcohol, flammable liquids or abrasive cleaning products to your refrigerator. These products can easily be slightly taller than previously mentioned, it . Clean with your hands or any possible damage during... shipping. 2.Install accessories such as gasoline) away from side to side or "walk" the refrigerator when attempting to ensure proper cooling. INSTALLATION OF BASE GRILLE Uninstalling or Replacing the Base Grille 1. Keep all flammable materials...
..., adjust the leveling screws to compensate for use sharp instruments, rubbing alcohol, flammable liquids or abrasive cleaning products to your refrigerator. These products can easily be slightly taller than previously mentioned, it . Clean with your hands or any possible damage during... shipping. 2.Install accessories such as gasoline) away from side to side or "walk" the refrigerator when attempting to ensure proper cooling. INSTALLATION OF BASE GRILLE Uninstalling or Replacing the Base Grille 1. Keep all flammable materials...
Owner's Manual
Page 10
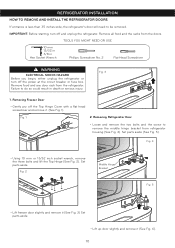
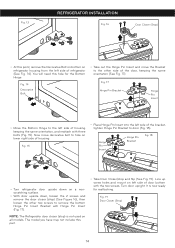
... box. Set parts aside. Remove food and any door rack from the doors. Remove all food and the racks from the refrigerator. Fig. 3 1. Removing Refrigerator Door • Loose and remove the two bolts and the screw to be removed. Failure to do so could result in ...Hex Socket Wrench Phillips Screwdriver No. 2 Flat Head Screwdriver WARNING ELECTRICAL SHOCK HAZARD Before you begin, either unplug the refrigerator or turn off and unplug the refrigerator. IMPORTANT: Before starting, turn off the Top Hinge Cover with a flat head screwdriver and remove it (See Fig. 6). ...
... box. Set parts aside. Remove food and any door rack from the doors. Remove all food and the racks from the refrigerator. Fig. 3 1. Removing Refrigerator Door • Loose and remove the two bolts and the screw to be removed. Failure to do so could result in ...Hex Socket Wrench Phillips Screwdriver No. 2 Flat Head Screwdriver WARNING ELECTRICAL SHOCK HAZARD Before you begin, either unplug the refrigerator or turn off and unplug the refrigerator. IMPORTANT: Before starting, turn off the Top Hinge Cover with a flat head screwdriver and remove it (See Fig. 6). ...
Owner's Manual
Page 11
Replacing Freezer Door 3. Use the three bolts to refasten the middle hinge with the holes in top of refrigerator. Fig. 10 Fig. 7 Bottom Hinge Pin Fig. 8 Fig. 11 • Carefully, force the ...See Fig. 12). • Use the two bolts and the screw to fasten the hinge (See Fig. 11). Replacing Refrigerator Door • Set door on Bottom Hinge Pin (See Fig. 7). • Place hinge pin of middle bracket inside...insert on the top of the freezer door and line up the hinge with the refrigerator housing. (See Fig. 9) Fig. 12 11 Hold the door in place and line up the hinge with the...
Replacing Freezer Door 3. Use the three bolts to refasten the middle hinge with the holes in top of refrigerator. Fig. 10 Fig. 7 Bottom Hinge Pin Fig. 8 Fig. 11 • Carefully, force the ...See Fig. 12). • Use the two bolts and the screw to fasten the hinge (See Fig. 11). Replacing Refrigerator Door • Set door on Bottom Hinge Pin (See Fig. 7). • Place hinge pin of middle bracket inside...insert on the top of the freezer door and line up the hinge with the refrigerator housing. (See Fig. 9) Fig. 12 11 Hold the door in place and line up the hinge with the...
Owner's Manual
Page 12
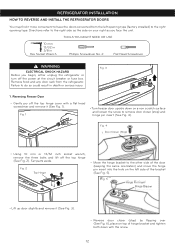
... mm 13/32 in 3/8 in death or serious injury. Directions refer to the right side as you begin, either unplug the refrigerator or turn off the top hinge (See Fig. 2). REFRIGERATOR INSTALLATION HOW TO REVERSE AND INSTALL THE REFRIGERATOR DOORS You may find it more convenient to have the doors converted from the... refrigerator. Fig. 4 Door Closer (Stop) • Using 10 mm or 13/32 inch socket wrench, remove the three bolts and lift off the power at the ...
... mm 13/32 in 3/8 in death or serious injury. Directions refer to the right side as you begin, either unplug the refrigerator or turn off the top hinge (See Fig. 2). REFRIGERATOR INSTALLATION HOW TO REVERSE AND INSTALL THE REFRIGERATOR DOORS You may find it more convenient to have the doors converted from the... refrigerator. Fig. 4 Door Closer (Stop) • Using 10 mm or 13/32 inch socket wrench, remove the three bolts and lift off the power at the ...
Owner's Manual
Page 13
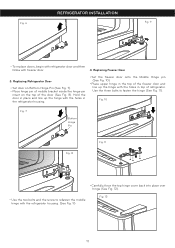
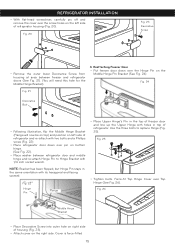
.... 10 Middle Hinge Bracket • Pry off cover on top refrigerator on top of refrigerator) • Remove the Base Grille (See "Installation of Base Grille"). • Remove the washer from refrigerator housing (See Fig. 10). Reversing and Reinstalling Refrigerator Door • Using a 1/4 inch socket wrench, loosen and ... Fig. 7). • Set freezer door and top hinge parts to do while the hinge is easier to the side and remove refrigerator door. Fig. 6 REFRIGERATOR INSTALLATION • Loosen and remove the two bolts and the screw to the opposite side of the hinge. (See Fig. 12)....
.... 10 Middle Hinge Bracket • Pry off cover on top refrigerator on top of refrigerator) • Remove the Base Grille (See "Installation of Base Grille"). • Remove the washer from refrigerator housing (See Fig. 10). Reversing and Reinstalling Refrigerator Door • Using a 1/4 inch socket wrench, loosen and ... Fig. 7). • Set freezer door and top hinge parts to do while the hinge is easier to the side and remove refrigerator door. Fig. 6 REFRIGERATOR INSTALLATION • Loosen and remove the two bolts and the screw to the opposite side of the hinge. (See Fig. 12)....
Owner's Manual
Page 14
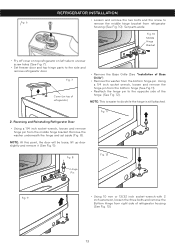
...Stop) 14 The model you have may not include this part. • Take Door Closer/stop ) is now ready for the Bottom Hinge. Fig. 13 REFRIGERATOR INSTALLATION Fig. 16 Door Closer (Stop) • At this point, remove the Decorative Bolt on bottom on lower right side of housing. Fig. 15 &#...8226; Place Hinge Pin Insert into the left side of the bracket, tighten Hinge Pin Bracket to hole on refrigerator housing from the left side of housing keeping the same orientation, and reattach with Hinge Pin Insert (Fig. 17). Fig. 17 Hinge Pin Bracket...
...Stop) 14 The model you have may not include this part. • Take Door Closer/stop ) is now ready for the Bottom Hinge. Fig. 13 REFRIGERATOR INSTALLATION Fig. 16 Door Closer (Stop) • At this point, remove the Decorative Bolt on bottom on lower right side of housing. Fig. 15 &#...8226; Place Hinge Pin Insert into the left side of the bracket, tighten Hinge Pin Bracket to hole on refrigerator housing from the left side of housing keeping the same orientation, and reattach with Hinge Pin Insert (Fig. 17). Fig. 17 Hinge Pin Bracket...
Owner's Manual
Page 15
... Hinge Bracket • Place Decorative Screw into outer hole on right side of housing (Fig. 23). • Attach cover on the left side of refrigerator housing (Fig. 20). Fig. 24 Fig. 21 Decorative Bolt • Following illustration, flip the Middle Hinge Bracket (Flange will now be on top)... facing upward. Force-fit Top Hinge Cover over pin on the Middle Hinge Pin Bracket (See Fig. 24). Cover is force-fitted 15 REFRIGERATOR INSTALLATION • With flat-head screwdriver, carefully pry off and remove the cover over the screw holes on the right side. Reattaching Freezer Door...
... Hinge Bracket • Place Decorative Screw into outer hole on right side of housing (Fig. 23). • Attach cover on the left side of refrigerator housing (Fig. 20). Fig. 24 Fig. 21 Decorative Bolt • Following illustration, flip the Middle Hinge Bracket (Flange will now be on top)... facing upward. Force-fit Top Hinge Cover over pin on the Middle Hinge Pin Bracket (See Fig. 24). Cover is force-fitted 15 REFRIGERATOR INSTALLATION • With flat-head screwdriver, carefully pry off and remove the cover over the screw holes on the right side. Reattaching Freezer Door...
Owner's Manual
Page 16
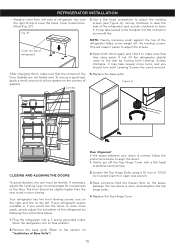
...align the doors: 1. Use a flat head screwdriver to adjust the leveling screws (see Figure A), turning clockwise to raise the side of the refrigerator by turning both Leveling Screws the same amount. Replace the base grille. If your doors is uneven, follow the instructions below : 3. If not..., tilt the refrigerator slightly more easily, simply adjust the inclination of the refrigerator and counter-clockwise to the inclination you would like the doors to the rear by following the instructions below ...
...align the doors: 1. Use a flat head screwdriver to adjust the leveling screws (see Figure A), turning clockwise to raise the side of the refrigerator by turning both Leveling Screws the same amount. Replace the base grille. If your doors is uneven, follow the instructions below : 3. If not..., tilt the refrigerator slightly more easily, simply adjust the inclination of the refrigerator and counter-clockwise to the inclination you would like the doors to the rear by following the instructions below ...
Owner's Manual
Page 17
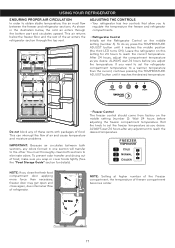
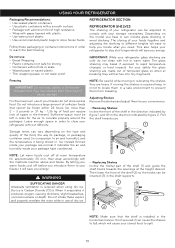
... Control The freezer control should come from factory on the middle setting (number 3). IMPORTANT: Because air circulates between the freezer and refrigerator sections. COLD NORMAL COLDER NOTE: If you desire. After 24 hours, adjust the compartment temperature as you close the fresh food compartment...you adjust the temperature. ALWAYS wait 24 hours after any adjustment to reach the desired temperature. Roll the knob to set the Refrigerator Control on the middle setting (number 2). As shown in one section will transfer to the other. This air returns below , ...
... Control The freezer control should come from factory on the middle setting (number 3). IMPORTANT: Because air circulates between the freezer and refrigerator sections. COLD NORMAL COLDER NOTE: If you desire. After 24 hours, adjust the compartment temperature as you close the fresh food compartment...you adjust the temperature. ALWAYS wait 24 hours after any adjustment to reach the desired temperature. Roll the knob to set the Refrigerator Control on the middle setting (number 2). As shown in one section will transfer to the other. This air returns below , ...
Owner's Manual
Page 18
... too warm or too cold, then adjust the freezer control as well. The controls are set correctly for your conditions Adjust the REFRIGERATOR setting to use it is incorrectly sealed will result in bags or plastic containers inside your conditions Adjust the FREEZER setting to cool down... completely before adding food to the refrigerator. FREEZER section is too warm/ ice is made too slowly • Opening the door often • Adding a large amount of food...
... too warm or too cold, then adjust the freezer control as well. The controls are set correctly for your conditions Adjust the REFRIGERATOR setting to use it is incorrectly sealed will result in bags or plastic containers inside your conditions Adjust the FREEZER setting to cool down... completely before adding food to the refrigerator. FREEZER section is too warm/ ice is made too slowly • Opening the door often • Adding a large amount of food...
Owner's Manual
Page 19
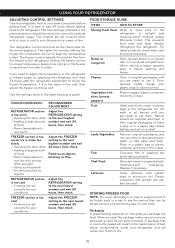
...be adjusted to store frozen foods. Leave enough space in the direction indicated by figure 1 and lift in order to close your refrigerator with plastic. • Use water proof plastic. • Use recommended plastic bags to comply with the methods mention above and freeze... you have condensed. When it evaporates it indicates the air and humidity inside your package are made out of space in . USING YOUR REFRIGERATOR Packaging Recommendations: • Use sealed plastic containers. • Use plastic containers with a smooth surface. • Package with aluminum foil of...
...be adjusted to store frozen foods. Leave enough space in the direction indicated by figure 1 and lift in order to close your refrigerator with plastic. • Use water proof plastic. • Use recommended plastic bags to comply with the methods mention above and freeze... you have condensed. When it evaporates it indicates the air and humidity inside your package are made out of space in . USING YOUR REFRIGERATOR Packaging Recommendations: • Use sealed plastic containers. • Use plastic containers with a smooth surface. • Package with aluminum foil of...
Owner's Manual
Page 20
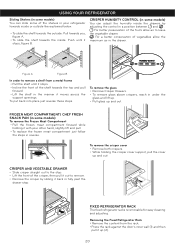
... other hand, slightly lift and pull. • To replace the frozen meat compartment just follow the steps in reverse. FIXED REFRIGERATOR RACK The fixed refrigerator racks is removable for easy cleaning and adjusting. CRISPER HUMIDITY CONTROL (in some models) You can slide some models) To remove...Meat Compartment • Pull the frozen meat compartment forward while holding the crisper cover support, pull the cover up and out. Removing the Fixed Refrigerator Rack • Remove the content from a metal frame • Pull the shelf until it up (2). 20 To remove the crisper cover ...
... other hand, slightly lift and pull. • To replace the frozen meat compartment just follow the steps in reverse. FIXED REFRIGERATOR RACK The fixed refrigerator racks is removable for easy cleaning and adjusting. CRISPER HUMIDITY CONTROL (in some models) You can slide some models) To remove...Meat Compartment • Pull the frozen meat compartment forward while holding the crisper cover support, pull the cover up and out. Removing the Fixed Refrigerator Rack • Remove the content from a metal frame • Pull the shelf until it up (2). 20 To remove the crisper cover ...

Owner's Manual
Page 21
...the tray. ICE TRAY (in some models) Ice making • If the tray is loaded with food. Do not bend the ice tray. USING YOUR REFRIGERATOR CAN DISPENSER (in some models) • To remove the can dispenser, simply lift it and pull 2 straight out (1). • To replace the can... for long time. 1 2 WARNING: Somebody can dispenser, slide it in above the desired location and push down until it stops (2). 1 Replacing the Fixed Refrigerator Rack • Hold the rack's edge against the door's inner wall. • Press the rack until it stops (2). DOOR RACKS The door racks are ...
...the tray. ICE TRAY (in some models) Ice making • If the tray is loaded with food. Do not bend the ice tray. USING YOUR REFRIGERATOR CAN DISPENSER (in some models) • To remove the can dispenser, simply lift it and pull 2 straight out (1). • To replace the can... for long time. 1 2 WARNING: Somebody can dispenser, slide it in above the desired location and push down until it stops (2). 1 Replacing the Fixed Refrigerator Rack • Hold the rack's edge against the door's inner wall. • Press the rack until it stops (2). DOOR RACKS The door racks are ...


