Owner's Manual
Page 2
... your home to deliver and pickup, install, instruct, or replace house fuses or correct house wiring or plumbing, or correction of unauthorized repairs. 2. Service Assistance: Press the appropriate menu option, and have your Bill of Sale to prove date of purchase. Territories. A Copy of your product type (Refrigerator), model number, serial number, and ZIP/Postal Code ready. Therefore, these limitations or exclusions may...
... your home to deliver and pickup, install, instruct, or replace house fuses or correct house wiring or plumbing, or correction of unauthorized repairs. 2. Service Assistance: Press the appropriate menu option, and have your Bill of Sale to prove date of purchase. Territories. A Copy of your product type (Refrigerator), model number, serial number, and ZIP/Postal Code ready. Therefore, these limitations or exclusions may...
Owner's Manual
Page 3
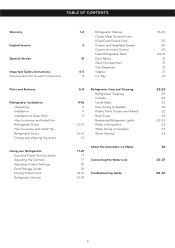
... Refrigerator Shelves Frozen Meat Compartment (Chef Fresh/Snack Pan) 3 Crisper and Vegetable Drawer Crisper Humidity Control Fixed Refrigerator Rack 31 Door Racks Dairy Compartment Can Dispenser 4-5 Vitabox 5 Ice Tray 6-8 9-16 9 9 9 10-11 12-16 16 Refrigerator Care and Cleaning Refrigerator Cleaning Outside Inside Walls Door Lining & Gaskets Plastic Parts (Covers and Panel) Back Cover Replacing Refrigerator Lights Power Interruptions When Going on Vacation When Moving 17-21 17 17 18 18 18-19 19-21 About the Automatic Ice Maker Connecting the Water Line Troubleshooting Guide...
... Refrigerator Shelves Frozen Meat Compartment (Chef Fresh/Snack Pan) 3 Crisper and Vegetable Drawer Crisper Humidity Control Fixed Refrigerator Rack 31 Door Racks Dairy Compartment Can Dispenser 4-5 Vitabox 5 Ice Tray 6-8 9-16 9 9 9 10-11 12-16 16 Refrigerator Care and Cleaning Refrigerator Cleaning Outside Inside Walls Door Lining & Gaskets Plastic Parts (Covers and Panel) Back Cover Replacing Refrigerator Lights Power Interruptions When Going on Vacation When Moving 17-21 17 17 18 18 18-19 19-21 About the Automatic Ice Maker Connecting the Water Line Troubleshooting Guide...
Owner's Manual
Page 4
... be performed by pulling the power cord, always grip the plug firmly and disconnect it . Use refrozen products as soon as possible in which they contain ice crystals or are cold and below 40 °F (4 °C)". • Unplug the refrigerator before utilizing the product. Always read and obey all instructions before cleaning or repairing. WARNING To reduce the risk...
... be performed by pulling the power cord, always grip the plug firmly and disconnect it . Use refrozen products as soon as possible in which they contain ice crystals or are cold and below 40 °F (4 °C)". • Unplug the refrigerator before utilizing the product. Always read and obey all instructions before cleaning or repairing. WARNING To reduce the risk...
Owner's Manual
Page 5
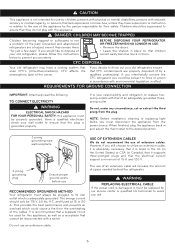
... prong from the plug. BEFORE DISPOSING YOUR REFRIGERATOR OR FREEZER WHEN NO LONGER IN USE: • Remove the doors. • Leave the shelves in place so that children cannot easily become stuck in and adjust the thermostat to the desired position. 3 prong grounding type wall receptacle USE OF EXTENSION CABLES We do not play with the appliance. TO CONNECT ELECTRICITY WARNING ELECTRICAL SHOCK HAZARD...
... prong from the plug. BEFORE DISPOSING YOUR REFRIGERATOR OR FREEZER WHEN NO LONGER IN USE: • Remove the doors. • Leave the shelves in place so that children cannot easily become stuck in and adjust the thermostat to the desired position. 3 prong grounding type wall receptacle USE OF EXTENSION CABLES We do not play with the appliance. TO CONNECT ELECTRICITY WARNING ELECTRICAL SHOCK HAZARD...
Owner's Manual
Page 6
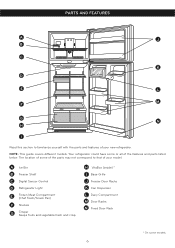
... Grille J Freezer Door Racks K Can Dispenser L Dairy Compartment M Door Racks N Fixed Door Rack * On some models 6 NOTE: This guide covers different models. A Ice Bin B Freezer Shelf C Digital Sensor Control D Refrigerator Light E Frozen Meat Compartment (Chef Fresh/Snack Pan) F Shelves G Crisper Keeps fruits and vegetable fresh and crisp H VitaBox (inside) * I Read this section to that of your new refrigerator. The location of some or all of your model. Your refrigerator could have some of the parts may not...
... Grille J Freezer Door Racks K Can Dispenser L Dairy Compartment M Door Racks N Fixed Door Rack * On some models 6 NOTE: This guide covers different models. A Ice Bin B Freezer Shelf C Digital Sensor Control D Refrigerator Light E Frozen Meat Compartment (Chef Fresh/Snack Pan) F Shelves G Crisper Keeps fruits and vegetable fresh and crisp H VitaBox (inside) * I Read this section to that of your new refrigerator. The location of some or all of your model. Your refrigerator could have some of the parts may not...

Owner's Manual
Page 7
A Ice Maker B Freezer Shelf C Digital Sensor Control D Refrigerator Light E Frozen Meat Compartment (Chef Fresh/Snack Pan) F Shelves G Crisper Keeps fruits and vegetable fresh and crisp H VitaBox (inside) * I Read this section to that of your new refrigerator. PARTS AND FEATURES A B J C K D E L F M G H N I Base Grille J Freezer Door Racks K Can Dispenser L Dairy Compartment M Door Racks N Fixed Door Rack * On some or all of the features and parts listed below. NOTE: This guide covers different models. Your refrigerator could have some models 7 The location ...
A Ice Maker B Freezer Shelf C Digital Sensor Control D Refrigerator Light E Frozen Meat Compartment (Chef Fresh/Snack Pan) F Shelves G Crisper Keeps fruits and vegetable fresh and crisp H VitaBox (inside) * I Read this section to that of your new refrigerator. PARTS AND FEATURES A B J C K D E L F M G H N I Base Grille J Freezer Door Racks K Can Dispenser L Dairy Compartment M Door Racks N Fixed Door Rack * On some or all of the features and parts listed below. NOTE: This guide covers different models. Your refrigerator could have some models 7 The location ...
Owner's Manual
Page 8
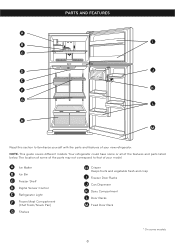
A Ice Maker B Ice Bin C Freezer Shelf D Digital Sensor Control E Refrigerator Light F Frozen Meat Compartment (Chef Fresh/Snack Pan) G Shelves H Crisper Keeps fruits and vegetable fresh and crisp I B C D J E F K G L H M Read this section to that of your new refrigerator. Your refrigerator could have some models 8 NOTE: This guide covers different models. PARTS AND FEATURES A I Freezer Door Racks J Can Dispenser K Dairy Compartment L Door Racks M Fixed Door Rack * On some or all of the features and parts listed below. The location of some of the...
A Ice Maker B Ice Bin C Freezer Shelf D Digital Sensor Control E Refrigerator Light F Frozen Meat Compartment (Chef Fresh/Snack Pan) G Shelves H Crisper Keeps fruits and vegetable fresh and crisp I B C D J E F K G L H M Read this section to that of your new refrigerator. Your refrigerator could have some models 8 NOTE: This guide covers different models. PARTS AND FEATURES A I Freezer Door Racks J Can Dispenser K Dairy Compartment L Door Racks M Fixed Door Rack * On some or all of the features and parts listed below. The location of some of the...
Owner's Manual
Page 9
UNPACKING Before installing your refrigerator, remove any tools in the air vents, the base cover or in the bottom of the refrigerator. Clean with your refrigerator on for cleaning or servicing. For more persons to prevent any stickers that feature warnings, the model serial number or the technical label of the product located on the back of the refrigerator. The shelves come already installed in their factory position. Leave...
UNPACKING Before installing your refrigerator, remove any tools in the air vents, the base cover or in the bottom of the refrigerator. Clean with your refrigerator on for cleaning or servicing. For more persons to prevent any stickers that feature warnings, the model serial number or the technical label of the product located on the back of the refrigerator. The shelves come already installed in their factory position. Leave...
Owner's Manual
Page 10
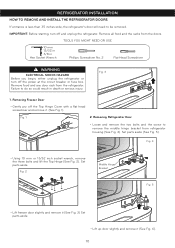
... unplug the refrigerator or turn off the power at the circuit breaker or fuse box. Remove food and any door rack from the doors. Set parts aside. Set parts aside (See Fig. 5). TOOLS YOU MIGHT NEED OR USE 10 mm 13/32 in 3/8 in death or serious injury. IMPORTANT: Before starting, turn off and unplug the refrigerator. Removing Freezer Door • Gently pry off the Top Hinge Cover with...
... unplug the refrigerator or turn off the power at the circuit breaker or fuse box. Remove food and any door rack from the doors. Set parts aside. Set parts aside (See Fig. 5). TOOLS YOU MIGHT NEED OR USE 10 mm 13/32 in 3/8 in death or serious injury. IMPORTANT: Before starting, turn off and unplug the refrigerator. Removing Freezer Door • Gently pry off the Top Hinge Cover with...
Owner's Manual
Page 16
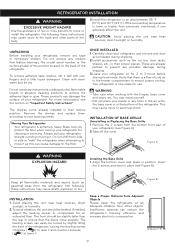
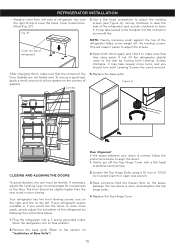
... the instructions below : 3. If necessary, adjust the Leveling Legs to close easily. It may take several turns to adjust it easier to adjust the screws. 4.Open both doors again and check to make it to the inclination you would like the doors to compensate for unevenness of Base Grille"). 16 REFRIGERATOR INSTALLATION • Replace cover from left . This will make sure that the corners of gaskets. Figure A Door...
... the instructions below : 3. If necessary, adjust the Leveling Legs to close easily. It may take several turns to adjust it easier to adjust the screws. 4.Open both doors again and check to make it to the inclination you would like the doors to compensate for unevenness of Base Grille"). 16 REFRIGERATOR INSTALLATION • Replace cover from left . This will make sure that the corners of gaskets. Figure A Door...
Owner's Manual
Page 18
USING YOUR REFRIGERATOR ADJUSTING CONTROL SETTINGS Give the refrigerator time to the refrigerator. The freezer control adjusts the cold air flow from the freezer to cool down completely before adding food to the next highest number and wait 24 hours, then check. Wait 24 hours after the refrigerator adjustment to ensure freshness. FREEZER section is too warm/ ice is made too slowly • Opening the door often • Adding a large amount of bad...
USING YOUR REFRIGERATOR ADJUSTING CONTROL SETTINGS Give the refrigerator time to the refrigerator. The freezer control adjusts the cold air flow from the freezer to cool down completely before adding food to the next highest number and wait 24 hours, then check. Wait 24 hours after the refrigerator adjustment to ensure freshness. FREEZER section is too warm/ ice is made too slowly • Opening the door often • Adding a large amount of bad...
Owner's Manual
Page 19
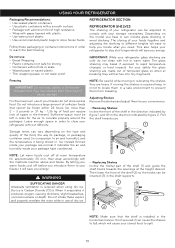
... heights will fracture into tiny fragments. The glass shelving may explode after freezing and cause damage. Dry ice is required when using dry ice. The storing of your refrigerator glass shelving are heavy. Sufficient space must be inserted (3) in the shelf supports. 1 3 2 NOTE: Make sure that cannot be adjusted to help you locate what you have condensed. Do not use of dry ice. 2 • Replacing Shelves Incline the frontal part...
... heights will fracture into tiny fragments. The glass shelving may explode after freezing and cause damage. Dry ice is required when using dry ice. The storing of your refrigerator glass shelving are heavy. Sufficient space must be inserted (3) in the shelf supports. 1 3 2 NOTE: Make sure that cannot be adjusted to help you locate what you have condensed. Do not use of dry ice. 2 • Replacing Shelves Incline the frontal part...

Owner's Manual
Page 21
... replace the rack, slide it in above the desired support button and push down until it stops (2). 12 VITABOX (in some models) Ice making • If the tray is loaded with water to the highest level, it will be hurt if door racks are removable for long time. 1 2 WARNING: Somebody can dispenser, slide it in above the desired location and push down until it stops (2). ICE TRAY...
... replace the rack, slide it in above the desired support button and push down until it stops (2). 12 VITABOX (in some models) Ice making • If the tray is loaded with water to the highest level, it will be hurt if door racks are removable for long time. 1 2 WARNING: Somebody can dispenser, slide it in above the desired location and push down until it stops (2). ICE TRAY...
Owner's Manual
Page 22
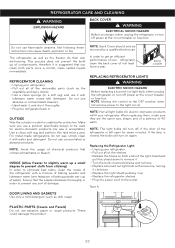
... could damage the product. 22 INSIDE (Allow freezer to slightly warm up . • Replace the refrigerator shelves. • Plug the power cord to the light circuit. BACK COVER REPLACING REFRIGERATOR LIGHTS WARNING ELECTRIC SHOCK HAZARD Before replacing a burned-out light bulb, either unplug the refrigerator or turn on both parts once a month; NOTE: Not all light bulbs for electric-domestic products will turn off , if the door of the refrigerator is left open for electro-domestic products (car...
... could damage the product. 22 INSIDE (Allow freezer to slightly warm up . • Replace the refrigerator shelves. • Plug the power cord to the light circuit. BACK COVER REPLACING REFRIGERATOR LIGHTS WARNING ELECTRIC SHOCK HAZARD Before replacing a burned-out light bulb, either unplug the refrigerator or turn on both parts once a month; NOTE: Not all light bulbs for electric-domestic products will turn off , if the door of the refrigerator is left open for electro-domestic products (car...

Owner's Manual
Page 24
... models) to the ice maker was performed, you can give considerable results. This button changes the pressure of water going into the refrigerator. When the water connections are performed, turn its size by pushing the selective button. ABOUT THE AUTOMATIC ICE MAKER NOTE: The automatic Ice maker is only included in some ice gets stuck. DO NOT place your ice maker type. Type 1 Ice Maker YOU MUST TURN THE SWITCH TO O (OFF) • When the water supply is...
... models) to the ice maker was performed, you can give considerable results. This button changes the pressure of water going into the refrigerator. When the water connections are performed, turn its size by pushing the selective button. ABOUT THE AUTOMATIC ICE MAKER NOTE: The automatic Ice maker is only included in some ice gets stuck. DO NOT place your ice maker type. Type 1 Ice Maker YOU MUST TURN THE SWITCH TO O (OFF) • When the water supply is...
Owner's Manual
Page 25
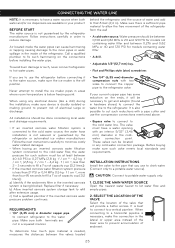
... to get and adaptor (found in areas where room temperature is being blocked. Never attempt to install the ice maker pipes in hardware stores) to connect the water line to the refrigerator. Follow the next instructions carefully to minimize costly water related damages. • When having an inverted osmosis water filtration system connected to the cold-water flow, the water pressure for models containing water filter. • A drill. • Adjustable 1/2"(12...
... to get and adaptor (found in areas where room temperature is being blocked. Never attempt to install the ice maker pipes in hardware stores) to connect the water line to the refrigerator. Follow the next instructions carefully to minimize costly water related damages. • When having an inverted osmosis water filtration system connected to the cold-water flow, the water pressure for models containing water filter. • A drill. • Adjustable 1/2"(12...
Owner's Manual
Page 26
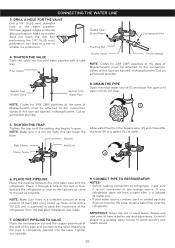
... the cold water pipe and the refrigerator. Tighten nut carefully. 9. Remove jagged edges produces after draining 1/4 of a gallon (1L) of this type are banned in Massachusetts. Not performing the 1/4" (6,35 mm) perforation can break the pipe. Saddle Type Shutoff Valve Packing Nut Compression Nut 4. DRAIN THE PIPE Open the main water source (1) and drain the pipe until the sealing ring begins to the valve, install a water filter...
... the cold water pipe and the refrigerator. Tighten nut carefully. 9. Remove jagged edges produces after draining 1/4 of a gallon (1L) of this type are banned in Massachusetts. Not performing the 1/4" (6,35 mm) perforation can break the pipe. Saddle Type Shutoff Valve Packing Nut Compression Nut 4. DRAIN THE PIPE Open the main water source (1) and drain the pipe until the sealing ring begins to the valve, install a water filter...
Owner's Manual
Page 28
... will be hearing are blinking sequentially (1-2-3-4-5). • Firmly plug the cord into a live outlet with proper voltage. • Replace the fuse or reset the circuit breaker. • The refrigerator control has been put into the store demo (demonstration mode). TROUBLESHOOTING GUIDE UNDERSTANDING SOUNDS YOU MAY HEAR Your new refrigerator might cause a dripping sound. • You can increase sounds and make a "click" sound when such...
... will be hearing are blinking sequentially (1-2-3-4-5). • Firmly plug the cord into a live outlet with proper voltage. • Replace the fuse or reset the circuit breaker. • The refrigerator control has been put into the store demo (demonstration mode). TROUBLESHOOTING GUIDE UNDERSTANDING SOUNDS YOU MAY HEAR Your new refrigerator might cause a dripping sound. • You can increase sounds and make a "click" sound when such...

Owner's Manual
Page 29
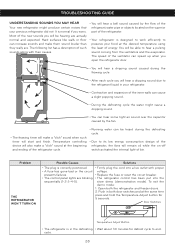
... section Refrigerator Care and Cleaning). THERE´S WATER IN THE DRAINING BIN • The refrigerator is in defrosting cycle. • It's more that the refrigerator to run on periods of time. • When adding or opening the door of operation. • The motor will take what you took out the food. • The refrigerator will continue working when the room temperature is high. THE LIGHT WON'T TURN ON • A light bulb...
... section Refrigerator Care and Cleaning). THERE´S WATER IN THE DRAINING BIN • The refrigerator is in defrosting cycle. • It's more that the refrigerator to run on periods of time. • When adding or opening the door of operation. • The motor will take what you took out the food. • The refrigerator will continue working when the room temperature is high. THE LIGHT WON'T TURN ON • A light bulb...
Owner's Manual
Page 30
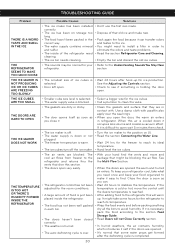
... inside of the refrigerator need cleaning. • The ice bin needs cleaning. • Don't use the first ices made. • Dispose of ice cubes is • Wait 24 hours after the defrosting cycle is completed. 30 TROUBLESHOOTING GUIDE Problem Possible Causes Solutions THERE IS A WEIRD TASTE AND SMELL IN THE ICE • The ice maker has been installed correctly. • The ice has been on (I). • Read the section Connecting the Water Line...
... inside of the refrigerator need cleaning. • The ice bin needs cleaning. • Don't use the first ices made. • Dispose of ice cubes is • Wait 24 hours after the defrosting cycle is completed. 30 TROUBLESHOOTING GUIDE Problem Possible Causes Solutions THERE IS A WEIRD TASTE AND SMELL IN THE ICE • The ice maker has been installed correctly. • The ice has been on (I). • Read the section Connecting the Water Line...


