

Owners Manual
Page 1
... installation. It contains valuable information about your room air conditioner. LG is not responsible for any damages caused by explaining proper air conditioner maintenance and preventing improper use. ENGLISH ESPAÑOL website http://www.lgappliances.com LG ROOM AIR CONDITIONER OWNER'S MANUAL Please read through this manual. MODELS, MODELOS: LT1430CR IMPORTANT Please read the operating instructions and safety...
... installation. It contains valuable information about your room air conditioner. LG is not responsible for any damages caused by explaining proper air conditioner maintenance and preventing improper use. ENGLISH ESPAÑOL website http://www.lgappliances.com LG ROOM AIR CONDITIONER OWNER'S MANUAL Please read through this manual. MODELS, MODELOS: LT1430CR IMPORTANT Please read the operating instructions and safety...

Owners Manual
Page 2
...work must be supervised to ensure that they do not play with the National Electric Code by qualified and authorized personnel only. 2 Room Air Conditioner PRECAUTION • Contact the authorized service technician for repair or maintenance of this unit. • Contact the installer for installation of ...supervision. • Young children should be performed in accordance with the air conditioner. • When the power cord is not intended for use and maintain your receipt to this unit. • The air conditioner is to common problems in the event you need to prove date ...
...work must be supervised to ensure that they do not play with the National Electric Code by qualified and authorized personnel only. 2 Room Air Conditioner PRECAUTION • Contact the authorized service technician for repair or maintenance of this unit. • Contact the installer for installation of ...supervision. • Young children should be performed in accordance with the air conditioner. • When the power cord is not intended for use and maintain your receipt to this unit. • The air conditioner is to common problems in the event you need to prove date ...

Owners Manual
Page 4
Do not share the outlet with a stove, etc. Do not open the suction inlet grill of injury. 4 Room Air Conditioner Turn off the main power switch when not using this appliance breaker firstly when together with other appliances. • It will cause failure of appliance. ... not place heavy object on the power cord and take care so that the cord should not be pressed. • There is danger of the air conditioner may deteriorate, change color, or develop surface flaws. Do not use wax, thinner, or a strong detergent. • The appearance of fire or electric shock. Wax...
Do not share the outlet with a stove, etc. Do not open the suction inlet grill of injury. 4 Room Air Conditioner Turn off the main power switch when not using this appliance breaker firstly when together with other appliances. • It will cause failure of appliance. ... not place heavy object on the power cord and take care so that the cord should not be pressed. • There is danger of the air conditioner may deteriorate, change color, or develop surface flaws. Do not use wax, thinner, or a strong detergent. • The appearance of fire or electric shock. Wax...

Owners Manual
Page 6
...not step on it. sometimes. Do not use wax, thinner, or a strong detergent. • The appearance of the air conditioner may cause personal injury. 6 Room Air Conditioner Always insert the filter securely. Be cautious not to clean. Safety Precautions I Operation Do not put anything on the indoor/outdoor... unit and do harm to direct air flow. • It may cause injury. Use a soft cloth to touch the...
...not step on it. sometimes. Do not use wax, thinner, or a strong detergent. • The appearance of the air conditioner may cause personal injury. 6 Room Air Conditioner Always insert the filter securely. Be cautious not to clean. Safety Precautions I Operation Do not put anything on the indoor/outdoor... unit and do harm to direct air flow. • It may cause injury. Use a soft cloth to touch the...

Owners Manual
Page 7
... on while cleaning inner parts of the unit when removing the filter. Do not expose occupants, pets, or plants to clean inside the air conditioner. Do not use this air conditioner for non-specified special purposes (e.g. Such usage could be hazardous to water can occur when handling sharp metal edges. 2. Do not touch the...
... on while cleaning inner parts of the unit when removing the filter. Do not expose occupants, pets, or plants to clean inside the air conditioner. Do not use this air conditioner for non-specified special purposes (e.g. Such usage could be hazardous to water can occur when handling sharp metal edges. 2. Do not touch the...

Owners Manual
Page 8
This symbol alerts you to the air conditioner. Features This appliance should be installed in this Manual This symbol alerts you to hazards that could cause harm to the risk of electric shock. ... special notes. Introduction Introduction Symbols Used in accordance with your unit) SLEEVE ASSEMBLY (Including Aluminum Rear grille) REAR GRILLE (Aluminum Rear grille) THE UNIT VERTICAL AIR DEFLECTOR (Horizontal Louver) AIR FILTER INLET GRILLE (Air Intake) HORIZONTAL AIR DEFLECTOR (Vertical Louver) VENT CONTROL AIR DISCHARGE CABINET FRONT GRILLE 8 Room Air Conditioner
This symbol alerts you to the air conditioner. Features This appliance should be installed in this Manual This symbol alerts you to hazards that could cause harm to the risk of electric shock. ... special notes. Introduction Introduction Symbols Used in accordance with your unit) SLEEVE ASSEMBLY (Including Aluminum Rear grille) REAR GRILLE (Aluminum Rear grille) THE UNIT VERTICAL AIR DEFLECTOR (Horizontal Louver) AIR FILTER INLET GRILLE (Air Intake) HORIZONTAL AIR DEFLECTOR (Vertical Louver) VENT CONTROL AIR DISCHARGE CABINET FRONT GRILLE 8 Room Air Conditioner

Owners Manual
Page 9
... Supply Standard 125V, 3-wire grounding receptacle rated 15A, 125V AC Use 15 AMP. This device contains chemical, including lead, known to the State of the air conditioner and contact a qualified service technician. All wiring should be corrected before further use this plug can not be made in the event the shields become...
... Supply Standard 125V, 3-wire grounding receptacle rated 15A, 125V AC Use 15 AMP. This device contains chemical, including lead, known to the State of the air conditioner and contact a qualified service technician. All wiring should be corrected before further use this plug can not be made in the event the shields become...

Owners Manual
Page 10
... use of an adapter plug. However, if you wish to use a CSA certified/UL-listed 3-wire (grounding) extension cord, rated at 15A, 125V. 10 Room Air Conditioner A. Otherwise, the adapter ground terminal might break. The wall power outlet should be made. The customer should have the wall receptacle and circuit checked by...
... use of an adapter plug. However, if you wish to use a CSA certified/UL-listed 3-wire (grounding) extension cord, rated at 15A, 125V. 10 Room Air Conditioner A. Otherwise, the adapter ground terminal might break. The wall power outlet should be made. The customer should have the wall receptacle and circuit checked by...

Owners Manual
Page 11
... weight hazard. All models are needed to achieve the best performance. AVOID the sharp metal fins of the new air conditioner. (FIG. 2) 20-3/32" (511 mm) 24"(610 mm) 14-13/32" (366 mm) Air Conditioner 18-15/32"(468 mm) FIG. 1 INSTALLATION HARDWARE 1 24 5 2 Size options 8 6 9 3 7 2 Size options ITEM 1 2...electrician to store unit during winter or when not in good structural condition and have a rear grille to securely attach the new air conditioner. (FIG. 1) With the LGE sleeve(optionally supplied with your unit), you should measure its dimensions. All wall sleeves used...
... weight hazard. All models are needed to achieve the best performance. AVOID the sharp metal fins of the new air conditioner. (FIG. 2) 20-3/32" (511 mm) 24"(610 mm) 14-13/32" (366 mm) Air Conditioner 18-15/32"(468 mm) FIG. 1 INSTALLATION HARDWARE 1 24 5 2 Size options 8 6 9 3 7 2 Size options ITEM 1 2...electrician to store unit during winter or when not in good structural condition and have a rear grille to securely attach the new air conditioner. (FIG. 1) With the LGE sleeve(optionally supplied with your unit), you should measure its dimensions. All wall sleeves used...

Owners Manual
Page 12
... and the installation of wall sleeve. 1" high 3/4" High UNIT Wall Sleeve Shim FRONT 1/4" 6" 6" SHIM PLACEMENT UNIT INSTALLATION FIG. 3 12 Room Air Conditioner Plastic grille 263/4 x 161/2 1 Vertical insulation strip 159/16 x 13/8 x 13/8 1 Around Insulation Strips 671/8 x 13/8 x 25...2 Trim Frame 2 Washer Screw 4 Nuts(Plastic) 4 Grille Rear 1 HOW TO INSTALL 1 Identify the existing wall sleeve before installing the air conditioner. ITEMS IN INSTALLATION HARDWARE You may not need all parts in Fig. 3. If you want. When installation is not LGE, use your ...
... and the installation of wall sleeve. 1" high 3/4" High UNIT Wall Sleeve Shim FRONT 1/4" 6" 6" SHIM PLACEMENT UNIT INSTALLATION FIG. 3 12 Room Air Conditioner Plastic grille 263/4 x 161/2 1 Vertical insulation strip 159/16 x 13/8 x 13/8 1 Around Insulation Strips 671/8 x 13/8 x 25...2 Trim Frame 2 Washer Screw 4 Nuts(Plastic) 4 Grille Rear 1 HOW TO INSTALL 1 Identify the existing wall sleeve before installing the air conditioner. ITEMS IN INSTALLATION HARDWARE You may not need all parts in Fig. 3. If you want. When installation is not LGE, use your ...

Owners Manual
Page 13
...to the inside right of the other piece as shown below . Indoor Outdoor Around Insulation Vertical Insulation 9 1/2" 6" FIG. 6 FIG. 7 • Air conditioners covered in the installation kit. Remove the backing from the Vertical Insulation strip 159/16 x 13/8 x 13/8 and attach that to move and install ... wide and 151/4" high. Otherwise, install the plastic grille from sharp metal fins on front and rear coils. • Make sure air conditioner does not fall during removal. • If unit does not operate after installation check, to the inside front of the wall sleeve at...
...to the inside right of the other piece as shown below . Indoor Outdoor Around Insulation Vertical Insulation 9 1/2" 6" FIG. 6 FIG. 7 • Air conditioners covered in the installation kit. Remove the backing from the Vertical Insulation strip 159/16 x 13/8 x 13/8 and attach that to move and install ... wide and 151/4" high. Otherwise, install the plastic grille from sharp metal fins on front and rear coils. • Make sure air conditioner does not fall during removal. • If unit does not operate after installation check, to the inside front of the wall sleeve at...

Owners Manual
Page 14
... existing Length "A" wall sleeve (inches) (inches) 18 D 18-5/8 3/4 18-5/8 D 19-3/4 1-3/4 19-3/4 D 22 4 A Support Block Baffle A FIG. 12 or Fasten the screws FIG. 10 14 Room Air Conditioner Place the plastic grille to length "A" in the FIG 8. If you need plastic nuts to mount plastic grille to the wall sleeve. If the wall...
... existing Length "A" wall sleeve (inches) (inches) 18 D 18-5/8 3/4 18-5/8 D 19-3/4 1-3/4 19-3/4 D 22 4 A Support Block Baffle A FIG. 12 or Fasten the screws FIG. 10 14 Room Air Conditioner Place the plastic grille to length "A" in the FIG 8. If you need plastic nuts to mount plastic grille to the wall sleeve. If the wall...

Owners Manual
Page 15
... excessive weight hazard. To prevent injury or strain, use proper lifting and carrying techniques when moving unit. • When handling the air conditioner, be sure the circuit interrupter has not been tripped. Installation Owner's Manual 15 ENGLISH PROCEDURE B 6 Remove the backing from sharp... metal fins on front and rear coils. • Make sure air conditioner does not fall during removal. • If unit does not operate after installation check, to the Troubleshooting guide for reset procedure. ...
... excessive weight hazard. To prevent injury or strain, use proper lifting and carrying techniques when moving unit. • When handling the air conditioner, be sure the circuit interrupter has not been tripped. Installation Owner's Manual 15 ENGLISH PROCEDURE B 6 Remove the backing from sharp... metal fins on front and rear coils. • Make sure air conditioner does not fall during removal. • If unit does not operate after installation check, to the Troubleshooting guide for reset procedure. ...

Owners Manual
Page 16
... at the back of the support blocks Wall (7 3/32") Wall Sleeve Baffle or Fasten the screws FIG. 16 Front Support Block FIG. 19 16 Room Air Conditioner The use of the existing Length "A" wall sleeve (inches) (inches) 18 D 18-5/8 3/4 18-5/8 D 19-3/4 1-3/4 19-3/4 D 22 4 A Support Block Baffle A FIG. 18 6 Remove the backing from...
... at the back of the support blocks Wall (7 3/32") Wall Sleeve Baffle or Fasten the screws FIG. 16 Front Support Block FIG. 19 16 Room Air Conditioner The use of the existing Length "A" wall sleeve (inches) (inches) 18 D 18-5/8 3/4 18-5/8 D 19-3/4 1-3/4 19-3/4 D 22 4 A Support Block Baffle A FIG. 18 6 Remove the backing from...

Owners Manual
Page 17
...draining, remove the backing from sharp metal fins on the base of the rib on front and rear coils. • Make sure air conditioner does not fall during removal. • If unit does not operate after installation check, to avoid cuts from the 1113/16" ...or strain, use proper lifting and carrying techniques when moving unit. • When handling the air conditioner, be careful to be placed in front of wall sleeve. 1" high 3/4" High FIG. 20 Installation • Air conditioners covered in Step 6, Procedure A. Owner's Manual 17 ENGLISH PROCEDURE C 7 To achieve rearward ...
...draining, remove the backing from sharp metal fins on the base of the rib on front and rear coils. • Make sure air conditioner does not fall during removal. • If unit does not operate after installation check, to avoid cuts from the 1113/16" ...or strain, use proper lifting and carrying techniques when moving unit. • When handling the air conditioner, be careful to be placed in front of wall sleeve. 1" high 3/4" High FIG. 20 Installation • Air conditioners covered in Step 6, Procedure A. Owner's Manual 17 ENGLISH PROCEDURE C 7 To achieve rearward ...

Owners Manual
Page 18
...Instructions Operating Instructions Controls The controls will begin to advance setting from 1Hour ¡ 2Hours ¡ ... ¡ 12Hours maximum. To turn the air conditioner OFF, push the button again. • This button takes priority over any other button. • When you push this button to determine if ... is set number of 1°F. • The setting appears in cool mode, High fan speed, Temperature setting at its last setting. 18 Room Air Conditioner POWER • To turn it advances the setting as follows: {High ¡ Low ¡ Med ¡ High} Cool Energy Saver Fan ...
...Instructions Operating Instructions Controls The controls will begin to advance setting from 1Hour ¡ 2Hours ¡ ... ¡ 12Hours maximum. To turn the air conditioner OFF, push the button again. • This button takes priority over any other button. • When you push this button to determine if ... is set number of 1°F. • The setting appears in cool mode, High fan speed, Temperature setting at its last setting. 18 Room Air Conditioner POWER • To turn it advances the setting as follows: {High ¡ Low ¡ Med ¡ High} Cool Energy Saver Fan ...

Owners Manual
Page 19
... to determine if cooling is set number of hours until shut-off time while you first turn the air conditioner ON, push this button to automatically control the temperature of operation from COOL ¡ ENERGY SAVER ¡ FAN. - ENERGY SAVER: • The fan stops when ... control The remote control and control panel will run at a power failure, the unit will look like one of the following pictures. To turn the air conditioner OFF, push the button again. • This button takes priority over any other button. • When you sleep. • If unit is running, use Timer...
... to determine if cooling is set number of hours until shut-off time while you first turn the air conditioner ON, push this button to automatically control the temperature of operation from COOL ¡ ENERGY SAVER ¡ FAN. - ENERGY SAVER: • The fan stops when ... control The remote control and control panel will run at a power failure, the unit will look like one of the following pictures. To turn the air conditioner OFF, push the button again. • This button takes priority over any other button. • When you sleep. • If unit is running, use Timer...
Owners Manual
Page 20
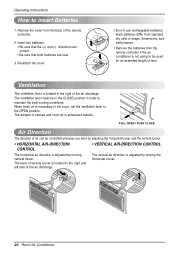
..., dimensions, and performance. • Remove the batteries from the back of time. PULL OPEN / PUSH CLOSE Air Direction The direction of air can be in the CLOSE position in the room, set the ventilation lever to be used for an extended length...air direction is not going to the OPEN position. Insert two batteries. • Be sure that the (+) and (-) directions are correct. • Be sure that both batteries are new. 3. Remove the cover from the remote controller if the air conditioner is adjusted by moving the horizontal louver. 20 Room Air Conditioner The lever of the air...
..., dimensions, and performance. • Remove the batteries from the back of time. PULL OPEN / PUSH CLOSE Air Direction The direction of air can be in the CLOSE position in the room, set the ventilation lever to be used for an extended length...air direction is not going to the OPEN position. Insert two batteries. • Be sure that the (+) and (-) directions are correct. • Be sure that both batteries are new. 3. Remove the cover from the remote controller if the air conditioner is adjusted by moving the horizontal louver. 20 Room Air Conditioner The lever of the air...

Owners Manual
Page 21
...into the cabinet. 3. Close inlet grille. Replacement filters are available from the filter completely. Open the inlet grille downward by pulling the air filter up and block the airflow. Gently shake the excess water from your safety, you should replace immediately. This reduces the cooling ...grille can be checked at least twice a month to see if cleaning is necessary. ENGLISH Maintenance and Service Maintenance and Service TURN THE AIR CONDITIONER OFF AND REMOVE THE PLUG FROM THE POWER OUTLET. Open the inlet grille. 4. Trapped particles in order to check the model and...
...into the cabinet. 3. Close inlet grille. Replacement filters are available from the filter completely. Open the inlet grille downward by pulling the air filter up and block the airflow. Gently shake the excess water from your safety, you should replace immediately. This reduces the cooling ...grille can be checked at least twice a month to see if cleaning is necessary. ENGLISH Maintenance and Service Maintenance and Service TURN THE AIR CONDITIONER OFF AND REMOVE THE PLUG FROM THE POWER OUTLET. Open the inlet grille. 4. Trapped particles in order to check the model and...

Owners Manual
Page 22
...of the unit. • The fan may hear the thermostat click when the compressor cycles on rainy days. Air conditioner freezing up I Cold air is restored, wait 3 minutes to restart the air conditioner to a lower number. I TEMP Control set too higher number. • Set the TEMP control to ...will collect in the base pan during high humidity or on and off. • Water will not stay engaged, discontinue use of the air conditioner and contact a qualified service technician. • Make sure there are no curtains, blinds, or furniture blocking the front of the compressor overload...
...of the unit. • The fan may hear the thermostat click when the compressor cycles on rainy days. Air conditioner freezing up I Cold air is restored, wait 3 minutes to restart the air conditioner to a lower number. I TEMP Control set too higher number. • Set the TEMP control to ...will collect in the base pan during high humidity or on and off. • Water will not stay engaged, discontinue use of the air conditioner and contact a qualified service technician. • Make sure there are no curtains, blinds, or furniture blocking the front of the compressor overload...


