
Owners Manual
Page 8
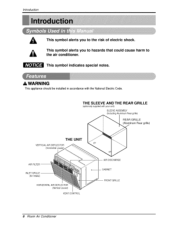
THE SLEEVE AND THE REAR GRILLE (¢©tiona.lly supp!i_ wi_hy_u_ u_) SLEEVE ASSEMBLY (Inclu,ding A_uminum Rear grilie_ REAR GRILLE Real grille) !THE UNIT VERTICAL ,A!R OEFLECTOR (Horizontal Lower VENT CONTROL AiR D_SCHARGE CABINET FRONT GRILLE 8 Room Air Con,dRioner This app_ian_ sho,uid be inst_l_ in aocordanc÷ w_ the NatJonai Electric C_e. This symbol alerts, you to the air conditioner. This symbol indicates special notes. Introduction This symbol alerts you to hazards that could cause harm to the risk of electric shock.
THE SLEEVE AND THE REAR GRILLE (¢©tiona.lly supp!i_ wi_hy_u_ u_) SLEEVE ASSEMBLY (Inclu,ding A_uminum Rear grilie_ REAR GRILLE Real grille) !THE UNIT VERTICAL ,A!R OEFLECTOR (Horizontal Lower VENT CONTROL AiR D_SCHARGE CABINET FRONT GRILLE 8 Room Air Con,dRioner This app_ian_ sho,uid be inst_l_ in aocordanc÷ w_ the NatJonai Electric C_e. This symbol alerts, you to the air conditioner. This symbol indicates special notes. Introduction This symbol alerts you to hazards that could cause harm to the risk of electric shock.

Owners Manual
Page 11
... positive grounding, Do not change plug in any way, Do not use preper I_i_g and c_ryi% _hni,qu_ when moving un_. • Cardu_ly insect I wall sleeves used to mount the new air conditioner must : _ _e same as that may _ expose; • Air ®nditione_e _e_ in use an ex:istin,# wall...
... positive grounding, Do not change plug in any way, Do not use preper I_i_g and c_ryi% _hni,qu_ when moving un_. • Cardu_ly insect I wall sleeves used to mount the new air conditioner must : _ _e same as that may _ expose; • Air ®nditione_e _e_ in use an ex:istin,# wall...

Owners Manual
Page 12
... the _mo_il of the old wa!_ sleeve and the installation of a new LG/EWail Sleeve, if you _cide to, keep the... existing wall sbeve, you have to redke_ the iou_rs at the back of p_r performance or produ_ f&lure. The u_ of pliers is recommended, ff you _, NOT redirect, you run the risk of the wail sleeve... 1 13x lxS_4 2 2 4 4 1 HOWTO INSTALL _ I_ntify the existing wall slee_ b_fo,re installing the unit from exJstlng wa_ sleeve. To achieve 1/4"' s_e, remove the backing from the 11-13/16" shim strips _d attach them ,as a stop for ins_l_atio,...
... the _mo_il of the old wa!_ sleeve and the installation of a new LG/EWail Sleeve, if you _cide to, keep the... existing wall sbeve, you have to redke_ the iou_rs at the back of p_r performance or produ_ f&lure. The u_ of pliers is recommended, ff you _, NOT redirect, you run the risk of the wail sleeve... 1 13x lxS_4 2 2 4 4 1 HOWTO INSTALL _ I_ntify the existing wall slee_ b_fo,re installing the unit from exJstlng wa_ sleeve. To achieve 1/4"' s_e, remove the backing from the 11-13/16" shim strips _d attach them ,as a stop for ins_l_atio,...

Owners Manual
Page 13
.... • Make sure air conditioner does, not fall dufiin9 remo,va],, Owne, s MaRiua[ 13 Place the piastic grille to the inside front: of the sleeve as shown _low: Remove the backing from the Around Insulation strip 1% x 3_4x ,611,_a2nd attach that to the inside of the wall... snap the t_ o,f each piece into the square holes o_ the rear flanges. ii_iiiii_iii_i_i_iiiiiiiiii!iiiiiiiii!iiiiii FIG_4, U Install the new unit int:o the wail sleeve. Wall _ emove the backing from the Ho,rizon_l insulation strip 138 X 3'8X 27S,_6and a_ach that to the inside bottom of the s_eeve as shown...
.... • Make sure air conditioner does, not fall dufiin9 remo,va],, Owne, s MaRiua[ 13 Place the piastic grille to the inside front: of the sleeve as shown _low: Remove the backing from the Around Insulation strip 1% x 3_4x ,611,_a2nd attach that to the inside of the wall... snap the t_ o,f each piece into the square holes o_ the rear flanges. ii_iiiii_iii_i_i_iiiiiiiiii!iiiiiiiii!iiiiii FIG_4, U Install the new unit int:o the wail sleeve. Wall _ emove the backing from the Ho,rizon_l insulation strip 138 X 3'8X 27S,_6and a_ach that to the inside bottom of the s_eeve as shown...

Owners Manual
Page 14
...he plastic gdlile #ore the kit, Cut the plastic griWleto 25,!/2" wMe and 15o!/4" h_h, Place the plastic ,grille to the inside of the wall sleeve iat the rear Hange,_ FIG t2 _ ,emove the meta_ rear gril!e and replace it with the piastic rear grille to improve unit energy efficiency, The... plastic nuts in the _le below. _pth"D _of the existing w,_!s_e (inches) 18 tnstatiation PROCEDURE Bi 0 edired the Ilouvers at the back of the wail sleeve to 60 ° angle as, sho,wn in the FIG 9,,The use ,o| pliers is recommended, D Remove the backiin9 from the Horizontal Insulation strip 1_'_rX...
...he plastic gdlile #ore the kit, Cut the plastic griWleto 25,!/2" wMe and 15o!/4" h_h, Place the plastic ,grille to the inside of the wall sleeve iat the rear Hange,_ FIG t2 _ ,emove the meta_ rear gril!e and replace it with the piastic rear grille to improve unit energy efficiency, The... plastic nuts in the _le below. _pth"D _of the existing w,_!s_e (inches) 18 tnstatiation PROCEDURE Bi 0 edired the Ilouvers at the back of the wail sleeve to 60 ° angle as, sho,wn in the FIG 9,,The use ,o| pliers is recommended, D Remove the backiin9 from the Horizontal Insulation strip 1_'_rX...

Owners Manual
Page 15
... the n_ unit into _e slot o| the other piece _ shown _lo,w, SHde trim over the front ot the air conditioner until trim is fklsh with sleeve as shown HG !5, S][de the Ibaffle intoslots of each piece into the wall s]eove. To assemble trim, sn@ the _b of Wal! PROCEDURE IB H anedmao_veacthhethbeam_intog...
... the n_ unit into _e slot o| the other piece _ shown _lo,w, SHde trim over the front ot the air conditioner until trim is fklsh with sleeve as shown HG !5, S][de the Ibaffle intoslots of each piece into the wall s]eove. To assemble trim, sn@ the _b of Wal! PROCEDURE IB H anedmao_veacthhethbeam_intog...

Owners Manual
Page 16
... to 26. !/2" wide, and 15olf2 '' high. in,stallation PROCEDURE C _ _ired the lieuvers at the rear flange_ FIG. the p_astic grille from the inside of the sleeve and arre pre_ed into the square holes of the rear flang_ 18 If the depth of you_ existing s[_ve is r_,mmended, _'dt_-_._ _'_-_ Rent Louvers... gO o (Top View), D Remove the backing from the Horizont_ Insulation strip 113/8 x 13i/8i X 273/16 and attach that to the insi@ bottom of the sleeve as shown belo,w_ Remo_ the bac_,ing from the Around Insulation strip 13/8 x 13/8i X _11/2 and attach that to the inside of the...
... to 26. !/2" wide, and 15olf2 '' high. in,stallation PROCEDURE C _ _ired the lieuvers at the rear flange_ FIG. the p_astic grille from the inside of the sleeve and arre pre_ed into the square holes of the rear flang_ 18 If the depth of you_ existing s[_ve is r_,mmended, _'dt_-_._ _'_-_ Rent Louvers... gO o (Top View), D Remove the backing from the Horizont_ Insulation strip 113/8 x 13i/8i X 273/16 and attach that to the insi@ bottom of the sleeve as shown belo,w_ Remo_ the bac_,ing from the Around Insulation strip 13/8 x 13/8i X _11/2 and attach that to the inside of the...

Owners Manual
Page 17
... C H Remove the backing from Me 13" shim strips ,and a_ach them as shown below in Fig 24, The higher port:ion o,f shim is flush with sleeve as ShOW[_bl elow, SIMe trim over the front of hot _r discharge that recircWates through the u_it, HG. 26 FIG. 25 _ Ilnstall the new...
... C H Remove the backing from Me 13" shim strips ,and a_ach them as shown below in Fig 24, The higher port:ion o,f shim is flush with sleeve as ShOW[_bl elow, SIMe trim over the front of hot _r discharge that recircWates through the u_it, HG. 26 FIG. 25 _ Ilnstall the new...
