
Owners Manual
Page 2
... Manual ........8 Electrical Safety 8 Temporary Use of an Adapter 10 Temporary Use of an Extension Cord 10 Operating Instructions 11 Care and Mainenance 14 Installation 15 Maintenance and Service 22 Normal Operation 22 Troubleshooting 22 FOR YOUR RECORDS Write the model and serial numbers here: Model # Serial # You con find many helpful hints on the side of the product. READ THIS MANUAL Inside you may not need it to locate the nearest ASC. • The air conditioner...
... Manual ........8 Electrical Safety 8 Temporary Use of an Adapter 10 Temporary Use of an Extension Cord 10 Operating Instructions 11 Care and Mainenance 14 Installation 15 Maintenance and Service 22 Normal Operation 22 Troubleshooting 22 FOR YOUR RECORDS Write the model and serial numbers here: Model # Serial # You con find many helpful hints on the side of the product. READ THIS MANUAL Inside you may not need it to locate the nearest ASC. • The air conditioner...
Owners Manual
Page 3
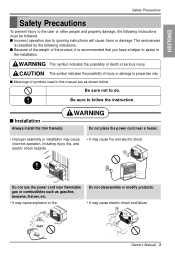
... or damage. s Installation Always install the trim frame(s). Gasolin Owner's Manual 3 s Incorrect operation due to do. WARNING This symbol indicates the possibility of injury or damage to follow the instruction. WARNING Do not place the power cord near flammable gas or combustibles such as shown below. Do not disassemble or modify products. • It may cause fire and electric shock. s Meanings...
... or damage. s Installation Always install the trim frame(s). Gasolin Owner's Manual 3 s Incorrect operation due to do. WARNING This symbol indicates the possibility of injury or damage to follow the instruction. WARNING Do not place the power cord near flammable gas or combustibles such as shown below. Do not disassemble or modify products. • It may cause fire and electric shock. s Meanings...

Owners Manual
Page 4
.... 4 Room Air Conditioner Do not use an unspecified power cord. • It will cause electric shock or • No grounding may cause electric shock. Do not damage or use the socket if it is loose or damaged. ON Do not modify power cord length. • It will cause electric shock or fire. Do not operate or stop the unit by inserting or pulling out the power plug...
.... 4 Room Air Conditioner Do not use an unspecified power cord. • It will cause electric shock or • No grounding may cause electric shock. Do not damage or use the socket if it is loose or damaged. ON Do not modify power cord length. • It will cause electric shock or fire. Do not operate or stop the unit by inserting or pulling out the power plug...

Owners Manual
Page 5
Leaving it must be operated in the air conditioner falling out of machine. Owner's Manual 5 Ventilate before operating air conditioner when gas goes out. • It may cause failure of appliance or performance deteriorate. ENGLISH If water enters the product, turn off the the power switch of the main body of the unit when removing the filter. CAUTION s Installation Never touch the metal parts of appliance. Do not block...
Leaving it must be operated in the air conditioner falling out of machine. Owner's Manual 5 Ventilate before operating air conditioner when gas goes out. • It may cause failure of appliance or performance deteriorate. ENGLISH If water enters the product, turn off the the power switch of the main body of the unit when removing the filter. CAUTION s Installation Never touch the metal parts of appliance. Do not block...

Owners Manual
Page 6
... is not sanitary and could injury the pet or speed during operation, it out. Do not drink water drained from air conditioner. Do not direct airflow at high • This could cause illness or personal injury hazard. 6 Room Air Conditioner Wax Thinner Use a soft cloth to touch the Hold the plug by the head sharp edges when when taking it may...
... is not sanitary and could injury the pet or speed during operation, it out. Do not drink water drained from air conditioner. Do not direct airflow at high • This could cause illness or personal injury hazard. 6 Room Air Conditioner Wax Thinner Use a soft cloth to touch the Hold the plug by the head sharp edges when when taking it may...

Owners Manual
Page 7
... not use this manual. Cleaning and maintenance 1. Exposure to direct airflow for operation 1. Service For repair and maintenance, contact an Authorized Service Center. Do not start/stop operation by plugging/unplugging the power cord. 5. Usage 1. Due to Operation Before Operation Preparing for an extended period of time could damage the items. 4. The air conditioner is damaged and requires replacement, have an Authorized Servicer install an exact replacement part. Do not use an extension cord. The fan rotates at...
... not use this manual. Cleaning and maintenance 1. Exposure to direct airflow for operation 1. Service For repair and maintenance, contact an Authorized Service Center. Do not start/stop operation by plugging/unplugging the power cord. 5. Usage 1. Due to Operation Before Operation Preparing for an extended period of time could damage the items. 4. The air conditioner is damaged and requires replacement, have an Authorized Servicer install an exact replacement part. Do not use an extension cord. The fan rotates at...

Owners Manual
Page 8
... circuit breaker. Tips This symbol indicates special notes. Electrical Data(For 230/208V model) Line Cord Plug Use Wall Receptacle Power Supply Do not under any circumstances cut or remove the grounding prong from the plug. Standard 250V, 3-wire grounding receptacle rated 15A, 250V AC Do not under any circumstances cut or remove the grounding prong from the plug. Refer to the nameplate for correct fusing. 8 Room Air Conditioner Electrical...
... circuit breaker. Tips This symbol indicates special notes. Electrical Data(For 230/208V model) Line Cord Plug Use Wall Receptacle Power Supply Do not under any circumstances cut or remove the grounding prong from the plug. Standard 250V, 3-wire grounding receptacle rated 15A, 250V AC Do not under any circumstances cut or remove the grounding prong from the plug. Refer to the nameplate for correct fusing. 8 Room Air Conditioner Electrical...
Owners Manual
Page 9
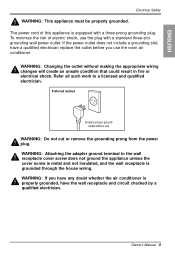
... whether the air conditioner is grounded through the house wiring. If the power outlet does not include a grounding slot, have the wall receptacle and circuit checked by a qualified electrician. WARNING: Attaching the adapter ground terminal to a licensed and qualified electrician. Owner's Manual 9 ENGLISH Electrical Safety WARNING: This appliance must be properly grounded. Refer all such work to the wall receptacle cover screw does...
... whether the air conditioner is grounded through the house wiring. If the power outlet does not include a grounding slot, have the wall receptacle and circuit checked by a qualified electrician. WARNING: Attaching the adapter ground terminal to a licensed and qualified electrician. Owner's Manual 9 ENGLISH Electrical Safety WARNING: This appliance must be properly grounded. Refer all such work to the wall receptacle cover screw does...

Owners Manual
Page 10
... the power cord from most local hardware stores. For temporary situations, use the appliance with the large slot in the receptacle for a proper polarity connection. Temporary Use of an extension cord due to avoid damaging the ground terminal. Temporary method Adapter Plug Metal Screw Receptacle Cover WARNING: Never use only CSA certified and UL listed 3-wire grounded extension cords, rated 15 A, 125 V. 10 Room Air Conditioner...
... the power cord from most local hardware stores. For temporary situations, use the appliance with the large slot in the receptacle for a proper polarity connection. Temporary Use of an extension cord due to avoid damaging the ground terminal. Temporary method Adapter Plug Metal Screw Receptacle Cover WARNING: Never use only CSA certified and UL listed 3-wire grounded extension cords, rated 15 A, 125 V. 10 Room Air Conditioner...

Owners Manual
Page 11
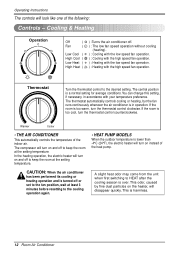
... or warmer setting, as needed. • ENERGY SAVER (optional) On : Both the fan and the compressor turn on and turn off . High Cool - Turn the Operation Knob to the largest 9 temperature mark. • FOR QUIETER OPERATION 1. Low Cool - ENGLISH Operating Instructions Operating Instructions The controls will look like one of the indoor air. Cooling Only Operation Off Med High Fan Cool Off - Turns air conditioner off together while operation knob is a good starting position). Cooling with med speed fan operation. Turn the knob so...
... or warmer setting, as needed. • ENERGY SAVER (optional) On : Both the fan and the compressor turn on and turn off . High Cool - Turn the Operation Knob to the largest 9 temperature mark. • FOR QUIETER OPERATION 1. Low Cool - ENGLISH Operating Instructions Operating Instructions The controls will look like one of the indoor air. Cooling Only Operation Off Med High Fan Cool Off - Turns air conditioner off together while operation knob is a good starting position). Cooling with med speed fan operation. Turn the knob so...
Owners Manual
Page 12
... average conditions. High Heat ( ) : Heating with the high speed fan operation. The central position is over. Cooling & Heating Operation O Off ( o ) :Turns the air conditioner off to the desired setting. Thermostat Turn the thermostat control to keep the room at the setting temperature. • HEAT PUMP MODELS When the outdoor temperature is lower than -4°C (24°F), the electric heater will turn on instead of the indoor air. Warmer Cooler • THE AIR CONDITIONER This automatically controls the temperature of the heat pump. Operating Instructions...
... average conditions. High Heat ( ) : Heating with the high speed fan operation. The central position is over. Cooling & Heating Operation O Off ( o ) :Turns the air conditioner off to the desired setting. Thermostat Turn the thermostat control to keep the room at the setting temperature. • HEAT PUMP MODELS When the outdoor temperature is lower than -4°C (24°F), the electric heater will turn on instead of the indoor air. Warmer Cooler • THE AIR CONDITIONER This automatically controls the temperature of the heat pump. Operating Instructions...

Owners Manual
Page 14
... the model and serial numbers. This reduces the cooling capacity and also causes an accumulation of the inlet grille. 2. Care and Maintenance Care and Maintenance TURN THE AIR CONDITIONER OFF AND REMOVE THE PLUG FROM THE POWER OUTLET. Tighten the screw through the front grille into the cabinet. 3. Air Filter Cleaning The air filter should be removed for cleaning or to see if cleaning is necessary. Replacement filters are available from the front grille assembly...
... the model and serial numbers. This reduces the cooling capacity and also causes an accumulation of the inlet grille. 2. Care and Maintenance Care and Maintenance TURN THE AIR CONDITIONER OFF AND REMOVE THE PLUG FROM THE POWER OUTLET. Tighten the screw through the front grille into the cabinet. 3. Air Filter Cleaning The air filter should be removed for cleaning or to see if cleaning is necessary. Replacement filters are available from the front grille assembly...

Owners Manual
Page 15
... • Electric drill • 1/4-inch drill bit Owner's Manual 15 Do not change plug in good structural condition and have a rear grille to securely attach the new air conditioner. (FIG. 1) With the LGE sleeve, you should measure its dimensions. To prevent injury or strain, use . AVOID the sharp metal fins of the new air conditioner. (FIG. 2) INSTALLATION HARDWARE 1 2 4 2 Size options 7 5 8 3 6 2 Size options 19-21/32" (499 mm) Air Conditioner 24-21...
... • Electric drill • 1/4-inch drill bit Owner's Manual 15 Do not change plug in good structural condition and have a rear grille to securely attach the new air conditioner. (FIG. 1) With the LGE sleeve, you should measure its dimensions. To prevent injury or strain, use . AVOID the sharp metal fins of the new air conditioner. (FIG. 2) INSTALLATION HARDWARE 1 2 4 2 Size options 7 5 8 3 6 2 Size options 19-21/32" (499 mm) Air Conditioner 24-21...

Owners Manual
Page 16
...-7/8 17-1/8 or 23 18-5/8 16-3/4 or 19-3/4 15 16-3/4 6 Install new unit into wall, if needed . 5 Prepare the wall sleeve for the Air Conditioner, 2 Remove old air conditioner from the listed below . Discard unused parts ITEM (inches) Qty. Good installation with special attention to use your existing wall sleeve, and it is recommended. Installation INSTALLATION CAUTION: We strongly recommend the removal of the old wall sleeve and the installation of the unit. UNIT Wall Sleeve FRONT 1/4" FIG. 3 16 Room Air Conditioner
...-7/8 17-1/8 or 23 18-5/8 16-3/4 or 19-3/4 15 16-3/4 6 Install new unit into wall, if needed . 5 Prepare the wall sleeve for the Air Conditioner, 2 Remove old air conditioner from the listed below . Discard unused parts ITEM (inches) Qty. Good installation with special attention to use your existing wall sleeve, and it is recommended. Installation INSTALLATION CAUTION: We strongly recommend the removal of the old wall sleeve and the installation of the unit. UNIT Wall Sleeve FRONT 1/4" FIG. 3 16 Room Air Conditioner

Owners Manual
Page 17
... air conditioner until trim is flush with your unit, skip to step 3. Otherwise, install the plastic grille from sharp metal fins on front and rear coils. • Make sure air conditioner does not fall during removal. PROCEDURE A 1 If you need plastic nuts to mount plastic grille to the inside of the other piece as shown below . Slide trim over the front of the sleeve...
... air conditioner until trim is flush with your unit, skip to step 3. Otherwise, install the plastic grille from sharp metal fins on front and rear coils. • Make sure air conditioner does not fall during removal. PROCEDURE A 1 If you need plastic nuts to mount plastic grille to the inside of the other piece as shown below . Slide trim over the front of the sleeve...

Owners Manual
Page 18
... wall sleeve does not have a rear grille or louvered panel, install the plastic grille from the inside of the sleeve and are pressed into the square holes of the rear flanges. If you need plastic nuts to mount plastic grille to length "A" in the table below. Otherwise, cut the baffles and the support blocks according to the inside of the wall sleeve, there are installed from the kit...
... wall sleeve does not have a rear grille or louvered panel, install the plastic grille from the inside of the sleeve and are pressed into the square holes of the rear flanges. If you need plastic nuts to mount plastic grille to length "A" in the table below. Otherwise, cut the baffles and the support blocks according to the inside of the wall sleeve, there are installed from the kit...

Owners Manual
Page 19
... on front and rear coils. • Make sure air conditioner does not fall during removal. Trim (2 ea) Wall FIG. 14 CAUTION • Air conditioners covered in this manual pose an excessive weight hazard. To prevent injury or strain, use proper lifting and carrying techniques when moving unit. • When handling the air conditioner, be careful to move and install the unit. Installation Owner's Manual 19 ENGLISH PROCEDURE B 8 To...
... on front and rear coils. • Make sure air conditioner does not fall during removal. Trim (2 ea) Wall FIG. 14 CAUTION • Air conditioners covered in this manual pose an excessive weight hazard. To prevent injury or strain, use proper lifting and carrying techniques when moving unit. • When handling the air conditioner, be careful to move and install the unit. Installation Owner's Manual 19 ENGLISH PROCEDURE B 8 To...

Owners Manual
Page 20
... 2 If the wall sleeve already has a rear grille, skip to step 4. Place the plastic grille to Length "A" in the installation kit. Slide the baffle into the square holes of the support blocks Wall Wall Sleeve Baffle (7 ) 13/16" or Fasten the screws FIG. 17 Front Support Block FIG. 20 20 Room Air Conditioner If the wall sleeve does not have a rear grille or louvered panel, install the plastic grille from the...
... 2 If the wall sleeve already has a rear grille, skip to step 4. Place the plastic grille to Length "A" in the installation kit. Slide the baffle into the square holes of the support blocks Wall Wall Sleeve Baffle (7 ) 13/16" or Fasten the screws FIG. 17 Front Support Block FIG. 20 20 Room Air Conditioner If the wall sleeve does not have a rear grille or louvered panel, install the plastic grille from the...

Owners Manual
Page 21
Installation 9 To assemble trim, snap the tab of each piece into the wall sleeve Trim (2 ea) Wall FIG. 23 CAUTION • Air conditioners covered in this manual pose an excessive weight hazard. Owner's Manual 21 To prevent injury or strain, use proper lifting and carrying techniques when moving unit. • When handling the air conditioner, be placed in Fig. 22. ENGLISH PROCEDURE C 7 Remove the backing from...
Installation 9 To assemble trim, snap the tab of each piece into the wall sleeve Trim (2 ea) Wall FIG. 23 CAUTION • Air conditioners covered in this manual pose an excessive weight hazard. Owner's Manual 21 To prevent injury or strain, use proper lifting and carrying techniques when moving unit. • When handling the air conditioner, be placed in Fig. 22. ENGLISH PROCEDURE C 7 Remove the backing from...

Owners Manual
Page 22
... replace the fuse or reset the breaker. • If power failure occurs, turn the mode control to call for open furnace floor registers and cold air returns. • Set the air conditioner's vent to the closed position. • See Air Conditioner Freezing Up below. This design feature helps remove moisture and improve efficiency. • You may not need to allow time for the room to cool down. • Check for service. s Power failure. Operating Instructions Maintenance and Service Troubleshooting...
... replace the fuse or reset the breaker. • If power failure occurs, turn the mode control to call for open furnace floor registers and cold air returns. • Set the air conditioner's vent to the closed position. • See Air Conditioner Freezing Up below. This design feature helps remove moisture and improve efficiency. • You may not need to allow time for the room to cool down. • Check for service. s Power failure. Operating Instructions Maintenance and Service Troubleshooting...


