Owner's Manual
Page 1
TYPE : Room Air Conditioner P/NO : 3828A20434H http://www.lghvac.com www.lg.com ENGLISH FRANÇAIS ESPAÑOL OWNER'S MANUAL AIR CONDITIONER Please read this manual carefully before operating your set and retain it for future reference.
TYPE : Room Air Conditioner P/NO : 3828A20434H http://www.lghvac.com www.lg.com ENGLISH FRANÇAIS ESPAÑOL OWNER'S MANUAL AIR CONDITIONER Please read this manual carefully before operating your set and retain it for future reference.
Owner's Manual
Page 2
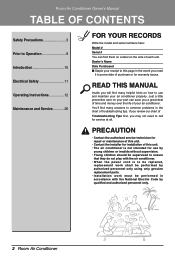
...of Troubleshooting Tips first, you may not need it to prove date of purchase or for service at all. Room Air Conditioner Ownerʼs Manual TABLE OF CONTENTS Safety Precautions 3 Prior to Operation 9 Introduction 10 Electrical Safety 11 Operating Instructions 12 Maintenance and Service 26 FOR YOUR RECORDS Write... here: Model # Serial # You can save you a great deal of time and money over the life of your air conditioner. READ THIS MANUAL Inside you will find many helpful hints on the side of each unit. Dealer's Name Date Purchased ■ Staple your air conditioner properly.
...of Troubleshooting Tips first, you may not need it to prove date of purchase or for service at all. Room Air Conditioner Ownerʼs Manual TABLE OF CONTENTS Safety Precautions 3 Prior to Operation 9 Introduction 10 Electrical Safety 11 Operating Instructions 12 Maintenance and Service 26 FOR YOUR RECORDS Write... here: Model # Serial # You can save you a great deal of time and money over the life of your air conditioner. READ THIS MANUAL Inside you will find many helpful hints on the side of each unit. Dealer's Name Date Purchased ■ Staple your air conditioner properly.
Owner's Manual
Page 3
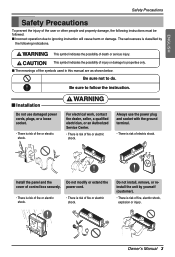
...; Installation Do not use the power plug and socket with the ground terminal. • There is risk of fire or electric shock. Ownerʼs Manual 3 Be sure to ignoring instruction will cause harm or damage. Be sure not to properties only. ■ The meanings of the symbols used in ...this manual are as shown below. ENGLISH Safety Precautions Safety Precautions To prevent the injury of the user or other people and property damage, the following ...
...; Installation Do not use the power plug and socket with the ground terminal. • There is risk of fire or electric shock. Ownerʼs Manual 3 Be sure to ignoring instruction will cause harm or damage. Be sure not to properties only. ■ The meanings of the symbols used in ...this manual are as shown below. ENGLISH Safety Precautions Safety Precautions To prevent the injury of the user or other people and property damage, the following ...
Owner's Manual
Page 5
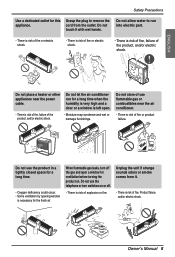
Ownerʼs Manual 5 Grasp the plug to run for a long time when the humidity is very high and a door or a window is risk of fire, failure of the ...
Ownerʼs Manual 5 Grasp the plug to run for a long time when the humidity is very high and a door or a window is risk of fire, failure of the ...
Owner's Manual
Page 7
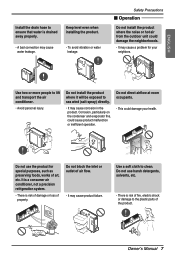
... it will be exposed to sea wind (salt spray) directly. • It may cause water leakage. • To avoid vibration or water leakage. Ownerʼs Manual 7
... it will be exposed to sea wind (salt spray) directly. • It may cause water leakage. • To avoid vibration or water leakage. Ownerʼs Manual 7
Owner's Manual
Page 9
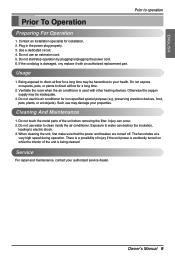
.... When cleaning the unit, first make sure that the power and breaker are turned off. Service For repair and maintenance, contact your health. Ownerʼs Manual 9 Use a dedicated circuit. 4. preserving precision devices, food, pets, plants, or art objects). Injury can destroy the insulation, leading to electric shock. 3. Exposure to clean inside...
.... When cleaning the unit, first make sure that the power and breaker are turned off. Service For repair and maintenance, contact your health. Ownerʼs Manual 9 Use a dedicated circuit. 4. preserving precision devices, food, pets, plants, or art objects). Injury can destroy the insulation, leading to electric shock. 3. Exposure to clean inside...
Owner's Manual
Page 10
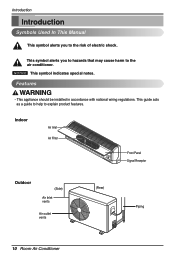
Features • This appliance should be installed in accordance with national wiring regulations. This symbol alerts you to the risk of electric shock. Indoor Air Inlet Air Filter Front Panel Signal Receptor Outdoor (Side) Air Inlet vents Air outlet vents (Rear) Piping 10 Room Air Conditioner Introduction Introduction Symbols Used In This Manual This symbol alerts you to hazards that may cause harm to the air conditioner. NOTICE This symbol indicates special notes. This guide acts as a guide to help to explain product features.
Features • This appliance should be installed in accordance with national wiring regulations. This symbol alerts you to the risk of electric shock. Indoor Air Inlet Air Filter Front Panel Signal Receptor Outdoor (Side) Air Inlet vents Air outlet vents (Rear) Piping 10 Room Air Conditioner Introduction Introduction Symbols Used In This Manual This symbol alerts you to hazards that may cause harm to the air conditioner. NOTICE This symbol indicates special notes. This guide acts as a guide to help to explain product features.
Owner's Manual
Page 11
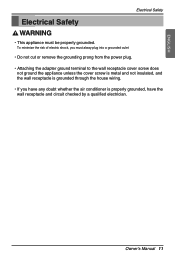
.... • If you have any doubt whether the air conditioner is properly grounded, have the wall receptacle and circuit checked by a qualified electrician. Ownerʼs Manual 11
.... • If you have any doubt whether the air conditioner is properly grounded, have the wall receptacle and circuit checked by a qualified electrician. Ownerʼs Manual 11
Owner's Manual
Page 13
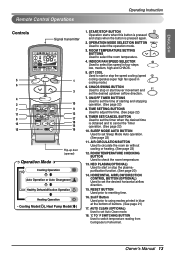
... operation. (See page 22) 8. TIME SETTING BUTTONS Used to select the operation mode. 3. AIR CIRCULATION BUTTON Used to check the room temperature. 13. Ownerʼs Manual 13 INDOOR FAN SPEED SELECTOR Used to stop or start louver movement and set the time of buttons. (See page 21) 17. AUTO CLEAN (OPTIONAL...
... operation. (See page 22) 8. TIME SETTING BUTTONS Used to select the operation mode. 3. AIR CIRCULATION BUTTON Used to check the room temperature. 13. Ownerʼs Manual 13 INDOOR FAN SPEED SELECTOR Used to stop or start louver movement and set the time of buttons. (See page 21) 17. AUTO CLEAN (OPTIONAL...
Owner's Manual
Page 15
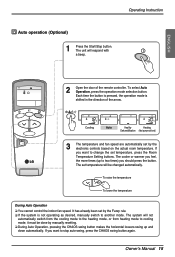
...Cooling Auto Healthy Heating Dehumidification (Heat pump model only) ON 3 The temperature and fan speed are automatically set temperature will be done by manually resetting. ❏ During Auto Operation, pressing the CHAOS swing button makes the horizontal louvers swing up to cooling mode, it must be... in the direction of the remote controller. It has already been set temperature, press the Room Temperature Setting buttons. Ownerʼs Manual 15 To raise the temperature To lower the temperature During Auto Operation ❏ You cannot control the indoor fan speed. If you...
...Cooling Auto Healthy Heating Dehumidification (Heat pump model only) ON 3 The temperature and fan speed are automatically set temperature will be done by manually resetting. ❏ During Auto Operation, pressing the CHAOS swing button makes the horizontal louvers swing up to cooling mode, it must be... in the direction of the remote controller. It has already been set temperature, press the Room Temperature Setting buttons. Ownerʼs Manual 15 To raise the temperature To lower the temperature During Auto Operation ❏ You cannot control the indoor fan speed. If you...
Owner's Manual
Page 17
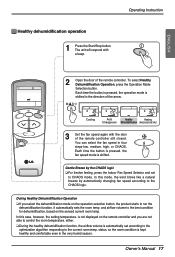
... the dehumidification mode on the sensed current room temp. ENGLISH 2 Open the door of the arrow. In this case, however, the setting temperature. Ownerʼs Manual 17 Cooling Auto Healthy Heating Changeover Dehumidification (Heat pump model only) 3 Set the fan speed again with a beep. Each time the button is pressed, the...
... the dehumidification mode on the sensed current room temp. ENGLISH 2 Open the door of the arrow. In this case, however, the setting temperature. Ownerʼs Manual 17 Cooling Auto Healthy Heating Changeover Dehumidification (Heat pump model only) 3 Set the fan speed again with a beep. Each time the button is pressed, the...
Owner's Manual
Page 19
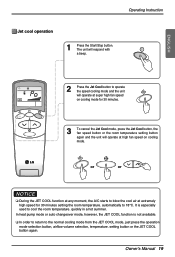
... mode. Operating Instruction Jet cool operation 1 Press the Start/Stop button. It is not available. ❏ In order to return to 18°C. Ownerʼs Manual 19
... mode. Operating Instruction Jet cool operation 1 Press the Start/Stop button. It is not available. ❏ In order to return to 18°C. Ownerʼs Manual 19
Owner's Manual
Page 21
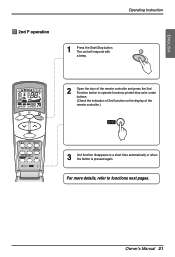
The unit will respond with a beep. 2 Open the door of the remote controller and press the 2nd Function button to functions next pages. For more details, refer to operate functions printed blue color under buttons. (Check the indication of 2nd function on the display of the remote controller.) CANCEL ON OFF SET AUTO CLEAN 3 2nd function disappears in a short time automatically or when the button is pressed again. Ownerʼs Manual 21 ENGLISH Operating Instruction 2nd F operation 1 Press the Start/Stop button.
The unit will respond with a beep. 2 Open the door of the remote controller and press the 2nd Function button to functions next pages. For more details, refer to operate functions printed blue color under buttons. (Check the indication of 2nd function on the display of the remote controller.) CANCEL ON OFF SET AUTO CLEAN 3 2nd function disappears in a short time automatically or when the button is pressed again. Ownerʼs Manual 21 ENGLISH Operating Instruction 2nd F operation 1 Press the Start/Stop button.
Owner's Manual
Page 23
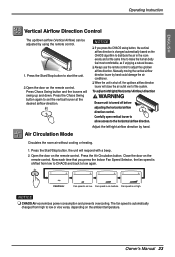
...on the remote control. Now each time that you press the CHAOS swing button, the vertical airflow direction is on low. Ownerʼs Manual 23 Press the Start/Stop button. Carefully open vertical louver to allow access to low or vice versa, depending on the remote control. Press... the Start/Stop button to distribute the air in the room evenly and at the desired airflow direction. Manually moving the vertical airflow direction louver by using the remote control. 1. the unit will close the air outlet vent of the system. Press ...
...on the remote control. Now each time that you press the CHAOS swing button, the vertical airflow direction is on low. Ownerʼs Manual 23 Press the Start/Stop button. Carefully open vertical louver to allow access to low or vice versa, depending on the remote control. Press... the Start/Stop button to distribute the air in the room evenly and at the desired airflow direction. Manually moving the vertical airflow direction louver by using the remote control. 1. the unit will close the air outlet vent of the system. Press ...

Owner's Manual
Page 25
.... To disable function - Press and hold the ON/OFF button for 6 seconds, then the buzzer sound 2 "beep" and the indicator lamp (1) brights 4 times. Ownerʼs Manual 25 As the compressor starts, the fan speed also resumes its previous setting mode. To enable function - In the initial mode, the fan operates at...
.... To disable function - Press and hold the ON/OFF button for 6 seconds, then the buzzer sound 2 "beep" and the indicator lamp (1) brights 4 times. Ownerʼs Manual 25 As the compressor starts, the fan speed also resumes its previous setting mode. To enable function - In the initial mode, the fan operates at...
Owner's Manual
Page 27
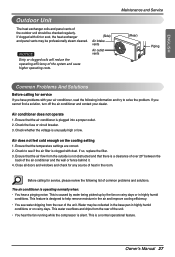
Check the fuse or circuit breaker. 3. Water may be professionally steam cleaned. Ownerʼs Manual 27 If clogged with dust. If you have problems with your dealer. Check whether the voltage is operating normally when: • You hear a pinging noise. ...
Check the fuse or circuit breaker. 3. Water may be professionally steam cleaned. Ownerʼs Manual 27 If clogged with dust. If you have problems with your dealer. Check whether the voltage is operating normally when: • You hear a pinging noise. ...


