Owner's Manual
Page 1
TYPE : Room Air Conditioner P/NO : 3828A20434H http://www.lghvac.com www.lg.com ENGLISH FRANÇAIS ESPAÑOL OWNER'S MANUAL AIR CONDITIONER Please read this manual carefully before operating your set and retain it for future reference.
TYPE : Room Air Conditioner P/NO : 3828A20434H http://www.lghvac.com www.lg.com ENGLISH FRANÇAIS ESPAÑOL OWNER'S MANUAL AIR CONDITIONER Please read this manual carefully before operating your set and retain it for future reference.
Owner's Manual
Page 2
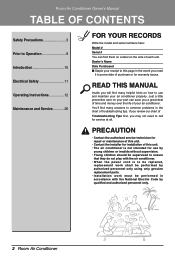
... side of each unit. If you review our chart of Troubleshooting Tips first, you need to call for warranty issues. Room Air Conditioner Ownerʼs Manual TABLE OF CONTENTS Safety Precautions 3 Prior to Operation 9 Introduction 10 Electrical Safety 11 Operating Instructions 12 Maintenance and Service 26 FOR YOUR RECORDS Write the...
... side of each unit. If you review our chart of Troubleshooting Tips first, you need to call for warranty issues. Room Air Conditioner Ownerʼs Manual TABLE OF CONTENTS Safety Precautions 3 Prior to Operation 9 Introduction 10 Electrical Safety 11 Operating Instructions 12 Maintenance and Service 26 FOR YOUR RECORDS Write the...
Owner's Manual
Page 3
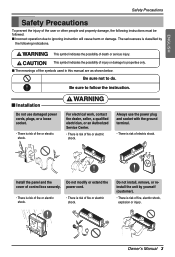
Be sure not to properties only. ■ The meanings of the symbols used in this manual are as shown below. Always use damaged power cords, plugs, or a loose socket. • There is risk of fire or electric shock. Do not install, ... or injury. ENGLISH Safety Precautions Safety Precautions To prevent the injury of the user or other people and property damage, the following indications. Ownerʼs Manual 3
Be sure not to properties only. ■ The meanings of the symbols used in this manual are as shown below. Always use damaged power cords, plugs, or a loose socket. • There is risk of fire or electric shock. Do not install, ... or injury. ENGLISH Safety Precautions Safety Precautions To prevent the injury of the user or other people and property damage, the following indications. Ownerʼs Manual 3
Owner's Manual
Page 5
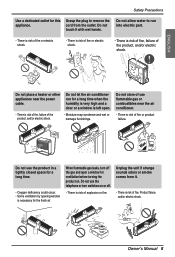
.... • There is risk of fire, failure of the product, and/or electric shock. • Moisture may condense and wet or damage furnishings. Ownerʼs Manual 5 Do not place a heater or other appliances near the air conditioner. • There is risk of fire, Product faiure, and/or electric shock. Grasp the...
.... • There is risk of fire, failure of the product, and/or electric shock. • Moisture may condense and wet or damage furnishings. Ownerʼs Manual 5 Do not place a heater or other appliances near the air conditioner. • There is risk of fire, Product faiure, and/or electric shock. Grasp the...
Owner's Manual
Page 7
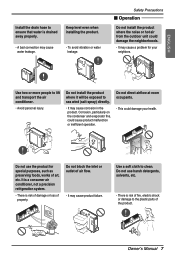
... two or more people to the plastic parts of the product. Do not install the product where it will be exposed to clean. Ownerʼs Manual 7 ENGLISH Install the drain hose to ensure that water is risk of damage or loss of property.
... two or more people to the plastic parts of the product. Do not install the product where it will be exposed to clean. Ownerʼs Manual 7 ENGLISH Install the drain hose to ensure that water is risk of damage or loss of property.
Owner's Manual
Page 9
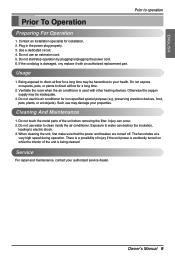
... airflow for a long time may be inadequate. 3. Do not touch the metal parts of the unit is used with an authorized replacement part. Ownerʼs Manual 9 If the cord/plug is damaged, ony replace it with other heating devices. Exposure to clean inside the air conditioner. Do not use water to...
... airflow for a long time may be inadequate. 3. Do not touch the metal parts of the unit is used with an authorized replacement part. Ownerʼs Manual 9 If the cord/plug is damaged, ony replace it with other heating devices. Exposure to clean inside the air conditioner. Do not use water to...
Owner's Manual
Page 10
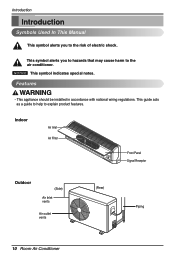
This symbol alerts you to the risk of electric shock. Indoor Air Inlet Air Filter Front Panel Signal Receptor Outdoor (Side) Air Inlet vents Air outlet vents (Rear) Piping 10 Room Air Conditioner Introduction Introduction Symbols Used In This Manual This symbol alerts you to hazards that may cause harm to the air conditioner. NOTICE This symbol indicates special notes. Features • This appliance should be installed in accordance with national wiring regulations. This guide acts as a guide to help to explain product features.
This symbol alerts you to the risk of electric shock. Indoor Air Inlet Air Filter Front Panel Signal Receptor Outdoor (Side) Air Inlet vents Air outlet vents (Rear) Piping 10 Room Air Conditioner Introduction Introduction Symbols Used In This Manual This symbol alerts you to hazards that may cause harm to the air conditioner. NOTICE This symbol indicates special notes. Features • This appliance should be installed in accordance with national wiring regulations. This guide acts as a guide to help to explain product features.
Owner's Manual
Page 11
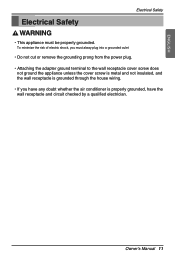
... electric shock, you have any doubt whether the air conditioner is properly grounded, have the wall receptacle and circuit checked by a qualified electrician. Ownerʼs Manual 11
... electric shock, you have any doubt whether the air conditioner is properly grounded, have the wall receptacle and circuit checked by a qualified electrician. Ownerʼs Manual 11
Owner's Manual
Page 13
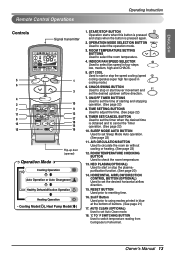
... low, medium, high and CHAOS. 5. RESET BUTTON Used prior to resetting time. 16. 2nd F Button Used prior to check the room temperature. 13. Ownerʼs Manual 13 INDOOR FAN SPEED SELECTOR Used to set the timer when the desired time is pressed again. 2. SLEEP MODE AUTO BUTTON Used to select fan...
... low, medium, high and CHAOS. 5. RESET BUTTON Used prior to resetting time. 16. 2nd F Button Used prior to check the room temperature. 13. Ownerʼs Manual 13 INDOOR FAN SPEED SELECTOR Used to set the timer when the desired time is pressed again. 2. SLEEP MODE AUTO BUTTON Used to select fan...
Owner's Manual
Page 15
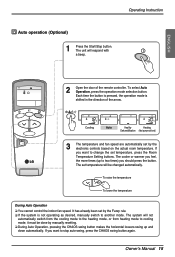
... Auto Healthy Heating Dehumidification (Heat pump model only) ON 3 The temperature and fan speed are automatically set temperature will be done by manually resetting. ❏ During Auto Operation, pressing the CHAOS swing button makes the horizontal louvers swing up to another mode. To raise the.... Each time the button is pressed, the operation mode is not operating as desired, manually switch to two times) you feel, the more times (up and down automatically. Ownerʼs Manual 15 To select Auto Operation, press the operation mode selection button. The cooler or warmer...
... Auto Healthy Heating Dehumidification (Heat pump model only) ON 3 The temperature and fan speed are automatically set temperature will be done by manually resetting. ❏ During Auto Operation, pressing the CHAOS swing button makes the horizontal louvers swing up to another mode. To raise the.... Each time the button is pressed, the operation mode is not operating as desired, manually switch to two times) you feel, the more times (up and down automatically. Ownerʼs Manual 15 To select Auto Operation, press the operation mode selection button. The cooler or warmer...
Owner's Manual
Page 17
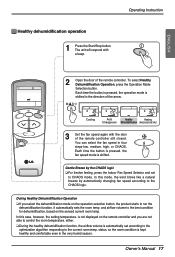
... you are not able to the best condition for dehumidification, based on the operation selection button, the product starts to the CHAOS logic. Ownerʼs Manual 17 is shifted in the very humid season. status, so the room condition is shifted. Each time the button is pressed, the fan speed mode...
... you are not able to the best condition for dehumidification, based on the operation selection button, the product starts to the CHAOS logic. Ownerʼs Manual 17 is shifted in the very humid season. status, so the room condition is shifted. Each time the button is pressed, the fan speed mode...
Owner's Manual
Page 19
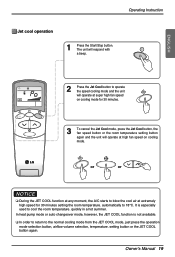
... button, the fan speed button or the room temperature setting button again and the unit will respond with a beep. quickly in a hot summer. Ownerʼs Manual 19 or or NOTICE ❏ During the JET COOL function at any moment, the A/C starts to the normal cooling mode from the JET COOL mode...
... button, the fan speed button or the room temperature setting button again and the unit will respond with a beep. quickly in a hot summer. Ownerʼs Manual 19 or or NOTICE ❏ During the JET COOL function at any moment, the A/C starts to the normal cooling mode from the JET COOL mode...
Owner's Manual
Page 21
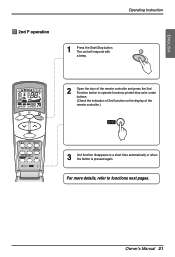
ENGLISH Operating Instruction 2nd F operation 1 Press the Start/Stop button. The unit will respond with a beep. 2 Open the door of the remote controller and press the 2nd Function button to functions next pages. For more details, refer to operate functions printed blue color under buttons. (Check the indication of 2nd function on the display of the remote controller.) CANCEL ON OFF SET AUTO CLEAN 3 2nd function disappears in a short time automatically or when the button is pressed again. Ownerʼs Manual 21
ENGLISH Operating Instruction 2nd F operation 1 Press the Start/Stop button. The unit will respond with a beep. 2 Open the door of the remote controller and press the 2nd Function button to functions next pages. For more details, refer to operate functions printed blue color under buttons. (Check the indication of 2nd function on the display of the remote controller.) CANCEL ON OFF SET AUTO CLEAN 3 2nd function disappears in a short time automatically or when the button is pressed again. Ownerʼs Manual 21
Owner's Manual
Page 23
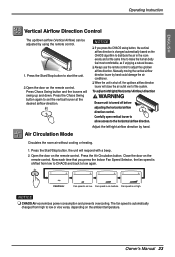
... direction. Fan speed is changed from low to CHAOS and back to start the unit. 2.Open the door on medium. Ownerʼs Manual 23 ENGLISH Operating Instruction Vertical Airflow Direction Control The up and down. To adjust left /right airflow direction by hand could damage the air... a natural breeze. ❏ Always use the remote control to the horizontal airflow direction. The fan speed is on the remote control. Manually moving the vertical airflow direction louver by hand. Press the Air Circulation button. the unit will close the air outlet vent of the system.
... direction. Fan speed is changed from low to CHAOS and back to start the unit. 2.Open the door on medium. Ownerʼs Manual 23 ENGLISH Operating Instruction Vertical Airflow Direction Control The up and down. To adjust left /right airflow direction by hand could damage the air... a natural breeze. ❏ Always use the remote control to the horizontal airflow direction. The fan speed is on the remote control. Manually moving the vertical airflow direction louver by hand. Press the Air Circulation button. the unit will close the air outlet vent of the system.

Owner's Manual
Page 25
... the compressor starts 2.5~3 minutes later. Helpful information Fan speed and cooling capacity. But customer can set enable as factory default. To enable function - Ownerʼs Manual 25 As the compressor starts, the fan speed also resumes its previous setting mode. Press and hold the ON/OFF button for 6 seconds, then the...
... the compressor starts 2.5~3 minutes later. Helpful information Fan speed and cooling capacity. But customer can set enable as factory default. To enable function - Ownerʼs Manual 25 As the compressor starts, the fan speed also resumes its previous setting mode. Press and hold the ON/OFF button for 6 seconds, then the...
Owner's Manual
Page 27
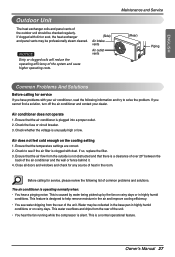
.... Check whether the voltage is a clearance of over 20" between the back of the air conditioner and the wall or fence behind it. 4. Ownerʼs Manual 27 Ensure that the air conditioner is clogged with dirt or soot, the heat exchanger and panel vents may be checked regularly. Close all doors...
.... Check whether the voltage is a clearance of over 20" between the back of the air conditioner and the wall or fence behind it. 4. Ownerʼs Manual 27 Ensure that the air conditioner is clogged with dirt or soot, the heat exchanger and panel vents may be checked regularly. Close all doors...


