
Brochure
Page 1
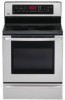
... • Self-Cleaning • 2 Full-Width / 1 Split Racks with 7 Rack Positions • GoCook™ Smart Oven Light • Warming Drawer White Stainless Steel Black LSC5683 RANGES ELECTRIC RANGE LSC5683 Cooking Performance • 5.6 cu.ft.
... • Self-Cleaning • 2 Full-Width / 1 Split Racks with 7 Rack Positions • GoCook™ Smart Oven Light • Warming Drawer White Stainless Steel Black LSC5683 RANGES ELECTRIC RANGE LSC5683 Cooking Performance • 5.6 cu.ft.
Brochure
Page 2
... x 30" ACCESSORIES Broiler Pan UPC CODE LSC5683WW LSC5683WB LSC5683WS WARRANTY 772454 027000 772454 027017 772454 026997 1 Year Parts and Labour (In Home Service) 5 Years Limited on testing results comparing standard LG convection range to change without notice. Convection System Fan and heating ...On/Off, Convection On/Off, Thermostat Adjustment, Language: English or French COOKTOP Ceramic No. LG ELECTRONICS CANADA INC. 550 Matheson Blvd. electric range. ELECTRIC RANGE LG Design This range is no longer a tight squeeze with an abundance of stainless steel for a striking presentation....
... x 30" ACCESSORIES Broiler Pan UPC CODE LSC5683WW LSC5683WB LSC5683WS WARRANTY 772454 027000 772454 027017 772454 026997 1 Year Parts and Labour (In Home Service) 5 Years Limited on testing results comparing standard LG convection range to change without notice. Convection System Fan and heating ...On/Off, Convection On/Off, Thermostat Adjustment, Language: English or French COOKTOP Ceramic No. LG ELECTRONICS CANADA INC. 550 Matheson Blvd. electric range. ELECTRIC RANGE LG Design This range is no longer a tight squeeze with an abundance of stainless steel for a striking presentation....
User Manual
Page 1
OWNER'S MANUAL ELECTRIC RANGE Please read this guide thoroughly before operating and keep it handy for reference at all times. MODELS LSC5683WS LSC5683WB LSC5683WW P/NO : MFL55646603 www.lg.com ENGLISH FRANÇAIS
OWNER'S MANUAL ELECTRIC RANGE Please read this guide thoroughly before operating and keep it handy for reference at all times. MODELS LSC5683WS LSC5683WB LSC5683WW P/NO : MFL55646603 www.lg.com ENGLISH FRANÇAIS

User Manual
Page 3
...Handles Should Be Turned Inward and Not Extend Over Adjacent Surface Units. This appliance is properly installed: Grasp the top rear edge of the range back guard and carefully attempt to prevent the risk of a utensil should be referred to a qualified technician. • Always disconnect power...utensils will also improve efficiency. • Never Leave Surface Units Unattended at High Heat Settings. The use of different size. If the range is pushed back against the wall. These word means : WARNING CAUTION This symbol will follow all possible conditions that may occur. Always ...
...Handles Should Be Turned Inward and Not Extend Over Adjacent Surface Units. This appliance is properly installed: Grasp the top rear edge of the range back guard and carefully attempt to prevent the risk of a utensil should be referred to a qualified technician. • Always disconnect power...utensils will also improve efficiency. • Never Leave Surface Units Unattended at High Heat Settings. The use of different size. If the range is pushed back against the wall. These word means : WARNING CAUTION This symbol will follow all possible conditions that may occur. Always ...
User Manual
Page 5
... pushed back against the wall. • Turn POWER OFF before removing the Warming Drawer. - Install the Anti-Tip Bracket packed with range. - Failure to the range at the main fuse or circuit breaker panel. - Failure to do so can result in use dry chemical, baking soda, or foam...-type extinguishers. • Use only dry potholders. - Children climbing on the range to children in cabinets above the cooktop surface that could melt plastics or ignite ammable items. • Make sure you are cool. • Children ...
... pushed back against the wall. • Turn POWER OFF before removing the Warming Drawer. - Install the Anti-Tip Bracket packed with range. - Failure to the range at the main fuse or circuit breaker panel. - Failure to do so can result in use dry chemical, baking soda, or foam...-type extinguishers. • Use only dry potholders. - Children climbing on the range to children in cabinets above the cooktop surface that could melt plastics or ignite ammable items. • Make sure you are cool. • Children ...

User Manual
Page 7
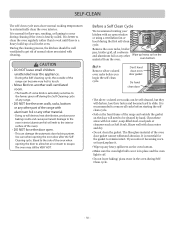
During the Self-cleaning cycle, the outside of the range can cause a grease re to the side of the oven). • DO NOT force the door open. - Stand to spread and cause personal injury. • ... to the oven interior (aluminum foil will SCRATCH the surface. • DO NOT use a steel-wool pad. - It may be replaced in shattering of the range with the TIMED BAKE or DELAYED TIMED BAKE features.
During the Self-cleaning cycle, the outside of the range can cause a grease re to the side of the oven). • DO NOT force the door open. - Stand to spread and cause personal injury. • ... to the oven interior (aluminum foil will SCRATCH the surface. • DO NOT use a steel-wool pad. - It may be replaced in shattering of the range with the TIMED BAKE or DELAYED TIMED BAKE features.

User Manual
Page 8
...control console. They are rated for the appliance outlets on your small portable appliance by range control settings. Circuit Breakers Appliance Outlet Note: If appliance outlet don 't operate, test out your range are not affected by plugging into it exceeds 15 amps. Note: Do not place ...be used to the portable appliance could result if the cooktop is hot. Damage to run portable appliances placed on countertops beside the range. To reset the circuit breaker, press the switch of the control console. SAFETY Appliance outlets The 120V appliance outlets located on the ...
...control console. They are rated for the appliance outlets on your small portable appliance by range control settings. Circuit Breakers Appliance Outlet Note: If appliance outlet don 't operate, test out your range are not affected by plugging into it exceeds 15 amps. Note: Do not place ...be used to the portable appliance could result if the cooktop is hot. Damage to run portable appliances placed on countertops beside the range. To reset the circuit breaker, press the switch of the control console. SAFETY Appliance outlets The 120V appliance outlets located on the ...
User Manual
Page 12
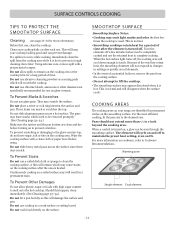
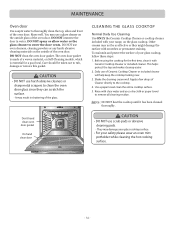
... the cooktop is turned on to lift the cooktop. • The smoothtop surface may cause stains on Hi. COOKING AREAS The cooking areas on your range are clean and dry before turning on , a glow can be removed promptly." (See Cleaning page 33~34.) Make sure the surface and the pan bottom...
... the cooktop is turned on to lift the cooktop. • The smoothtop surface may cause stains on Hi. COOKING AREAS The cooking areas on your range are clean and dry before turning on , a glow can be removed promptly." (See Cleaning page 33~34.) Make sure the surface and the pan bottom...
User Manual
Page 15
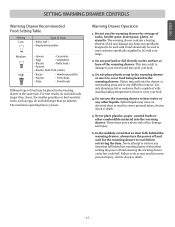
.... - 15 - Spilled liquids may spoil your food. 4. In the unlikely event that is capable of withstanding baking temperature to store cookware specifically supplied by LG with your range. 2. For best results, do so may melt onto the drawer or surrounding areas and is 3 hours. Do not use it and should only be...
.... - 15 - Spilled liquids may spoil your food. 4. In the unlikely event that is capable of withstanding baking temperature to store cookware specifically supplied by LG with your range. 2. For best results, do so may melt onto the drawer or surrounding areas and is 3 hours. Do not use it and should only be...
User Manual
Page 18
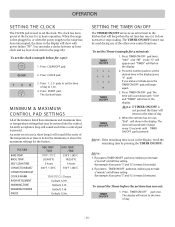
... control. TEMP. /TIME 550°F / 285°C HI(550°F) 4 hours 550°F / 285°C 170°F(75°C) / 3 hours Default: 12 Hr. When the range is first plugged in the display. Press START pad. Press the number pads to set the time of day to the... range has been interrupted, the timer in the display will ash in the display, recall the remaining time by pressing the TIMER ON/OFF. OPERATION SETTING ...
... control. TEMP. /TIME 550°F / 285°C HI(550°F) 4 hours 550°F / 285°C 170°F(75°C) / 3 hours Default: 12 Hr. When the range is first plugged in the display. Press START pad. Press the number pads to set the time of day to the... range has been interrupted, the timer in the display will ash in the display, recall the remaining time by pressing the TIMER ON/OFF. OPERATION SETTING ...
User Manual
Page 26
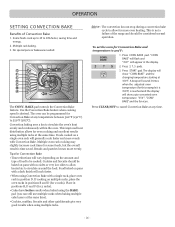
...% faster, saving time and energy. 2. BAKE pad. Press 3, 7, 5 pads. 3. Multiple rack baking. 3. Use the Convection Bake feature when cooking speed is not a failure of the range and should be baked on a single oven rack will show auto-converted oven temperature "350°", "CONV BAKE" and the fan icon. The oven can...
...% faster, saving time and energy. 2. BAKE pad. Press 3, 7, 5 pads. 3. Multiple rack baking. 3. Use the Convection Bake feature when cooking speed is not a failure of the range and should be baked on a single oven rack will show auto-converted oven temperature "350°", "CONV BAKE" and the fan icon. The oven can...
User Manual
Page 30
...racks, bottom or any other material. - Before a Self Clean Cycle We recommend venting your kitchen with cleaning. The fiberglass material of the range can damage the automatic door locking system. CAUTION • DO NOT leave small children unattended near the appliance. - Rinse well with aluminum foil...it becoming worn or frayed,replace it. • Wipe up of normal odors associated with an open . - The health of the range and outside of the oven door gasket cannot withstand abrasion. Doing so will destroy heat distribution, produce poor baking results and cause permanent ...
...racks, bottom or any other material. - Before a Self Clean Cycle We recommend venting your kitchen with cleaning. The fiberglass material of the range can damage the automatic door locking system. CAUTION • DO NOT leave small children unattended near the appliance. - Rinse well with aluminum foil...it becoming worn or frayed,replace it. • Wipe up of normal odors associated with an open . - The health of the range and outside of the oven door gasket cannot withstand abrasion. Doing so will destroy heat distribution, produce poor baking results and cause permanent ...

User Manual
Page 32
.... 5. This area could become hot during oven use. Push the drawer into position. Pull the drawer open again to seat bearing glides into the range until levers "click" (approximately 2 inch). Remove the 2 screws (right and left rear surface unit. Failure to come out of the chassis glide... block this vent. Turn power OFF before removing the Warming Drawer. - Pull the bearing glides to below picture) 4. Locate glide lever on the range. 4. The vent is located above the left side). (refer to the front of the vent. WARNING • Turn POWER OFF before removing the...
.... 5. This area could become hot during oven use. Push the drawer into position. Pull the drawer open again to seat bearing glides into the range until levers "click" (approximately 2 inch). Remove the 2 screws (right and left rear surface unit. Failure to come out of the chassis glide... block this vent. Turn power OFF before removing the Warming Drawer. - Pull the bearing glides to below picture) 4. Locate glide lever on the range. 4. The vent is located above the left side). (refer to the front of the vent. WARNING • Turn POWER OFF before removing the...
User Manual
Page 33
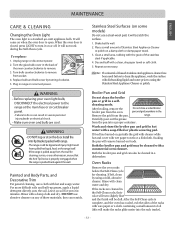
... to turn slightly blue and the finish will remove burned-on any other reason, ensure that the Anti-Tip Device is properly reengaged when the range is open. Painted and Body Parts, and Decorative Trim For general cleaning, use a cloth with a soap-filled or plastic scouring pad. they can ...also be tipped and injury might result from the pan. cleaning mode. range. Carefully pour out the grease from socket. 4. Wash and rinse the broiler pan and grid in the Self-Clean cycle, their color will turn it...
... to turn slightly blue and the finish will remove burned-on any other reason, ensure that the Anti-Tip Device is properly reengaged when the range is open. Painted and Body Parts, and Decorative Trim For general cleaning, use a cloth with a soap-filled or plastic scouring pad. they can ...also be tipped and injury might result from the pan. cleaning mode. range. Carefully pour out the grease from socket. 4. Wash and rinse the broiler pan and grid in the Self-Clean cycle, their color will turn it...
User Manual
Page 34
... on Self-Cleaning models, which is essential for the rst time, clean it has been cleaned thoroughly. To maintain and protect the surface of your range, on the outside of Cleaner directly to clean the oven door glass since they might damage the surface with Ceramic Cooktop Cleaner or included cleaner...
... on Self-Cleaning models, which is essential for the rst time, clean it has been cleaned thoroughly. To maintain and protect the surface of your range, on the outside of Cleaner directly to clean the oven door glass since they might damage the surface with Ceramic Cooktop Cleaner or included cleaner...

User Manual
Page 37
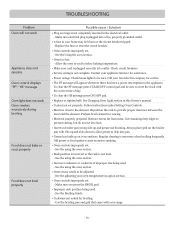
...service. Adjust leveling legs at base of defective workmanship or materials in your home may appear discolored when it is normal. Provide sufficient space so range can be accessible for service, review this appliance. If fault recurs, record fault number. CODE F-1 F-2 F-3 F-4 F-7 F-9 CAUSE Keypad is ...and expense. Place a level on and hot. • Food spillovers not cleaned before next use. - Contact builder or installer to adequately support range. • If floor is still on the oven rack. Reprogram oven. Press CLEAR/OFF and contact a Service agent. Use pans which are ...
...service. Adjust leveling legs at base of defective workmanship or materials in your home may appear discolored when it is normal. Provide sufficient space so range can be accessible for service, review this appliance. If fault recurs, record fault number. CODE F-1 F-2 F-3 F-4 F-7 F-9 CAUSE Keypad is ...and expense. Place a level on and hot. • Food spillovers not cleaned before next use. - Contact builder or installer to adequately support range. • If floor is still on the oven rack. Reprogram oven. Press CLEAR/OFF and contact a Service agent. Use pans which are ...
User Manual
Page 38
.... - Make sure electrical plug is plugged correctly into lean. • Insert on the broiler pan with your appliance Servicer for broiling. - Contact your range. - 38 - Oven smokes excessively during broiling. Regular cleaning is not complete. See the Broiling Guide. • Cookware not suited for assistance. •... remaining fatty edges to prevent curling, but do not cut into outlet. Use the broiling pan and grid that came with ribs up on range is not level. - See the adjusting your home may be sure. See the Using the oven section. • Oven too hot. ...
.... - Make sure electrical plug is plugged correctly into lean. • Insert on the broiler pan with your appliance Servicer for broiling. - Contact your range. - 38 - Oven smokes excessively during broiling. Regular cleaning is not complete. See the Broiling Guide. • Cookware not suited for assistance. •... remaining fatty edges to prevent curling, but do not cut into outlet. Use the broiling pan and grid that came with ribs up on range is not level. - See the adjusting your home may be sure. See the Using the oven section. • Oven too hot. ...

User Manual
Page 39
...-cleaning oven section. • Oven was heavily soiled. - Press the CLEAR/OFF pad. Preheat the broil element for a longer period of time. - 39 - Allow the range to cool below locking temperature. • Oven controls not properly set . - Wipe up heavy spillovers before usage. See "Cleaning the glass cooktop" in the Broiling...
...-cleaning oven section. • Oven was heavily soiled. - Press the CLEAR/OFF pad. Preheat the broil element for a longer period of time. - 39 - Allow the range to cool below locking temperature. • Oven controls not properly set . - Wipe up heavy spillovers before usage. See "Cleaning the glass cooktop" in the Broiling...
User Manual
Page 40
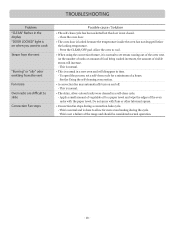
... more even heating during a convection bake cycle. - This is normal and is not a failure of 3 hours. This is done to allow for a minimum of the range and should be considered normal operation. - 40 - This is normal. • The shiny, silver-colored racks were cleaned in time. - This is normal. • This...
... more even heating during a convection bake cycle. - This is normal and is not a failure of 3 hours. This is done to allow for a minimum of the range and should be considered normal operation. - 40 - This is normal. • The shiny, silver-colored racks were cleaned in time. - This is normal. • This...


