Brochure
Page 2
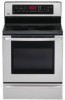
...: 905.507.9649 LG.ca Customer Parts & Service 1-888-LG-CANADA lgservice.com LSC5683 Type Capacity Freestanding Electric 5.6 cu.ft CONTROLS Oven / Cooktop Layout Display Electronic Clock & Timer Control Lock Function Audible Preheat Signal Special Functions Keypad IntuiTouch™ Control System IntuiScroll™ Scrolling VFD Display (Except Kitchen Timer, Clock Set, Oven Light) Clock (12 hr, 24 hr), Temperature Unit of Radiant Elements 5 No. of Measure (F/C), Beeper Volume (High, Low, Mute), GoCook™ Smart Oven Light On/Off, Convection On/Off, Thermostat Adjustment, Language...
...: 905.507.9649 LG.ca Customer Parts & Service 1-888-LG-CANADA lgservice.com LSC5683 Type Capacity Freestanding Electric 5.6 cu.ft CONTROLS Oven / Cooktop Layout Display Electronic Clock & Timer Control Lock Function Audible Preheat Signal Special Functions Keypad IntuiTouch™ Control System IntuiScroll™ Scrolling VFD Display (Except Kitchen Timer, Clock Set, Oven Light) Clock (12 hr, 24 hr), Temperature Unit of Radiant Elements 5 No. of Measure (F/C), Beeper Volume (High, Low, Mute), GoCook™ Smart Oven Light On/Off, Convection On/Off, Thermostat Adjustment, Language...

User Manual
Page 2
... - Control panel features 16 OPERATION 17-28 - Setting timed bake 22 - To turn on /o 17 - Care & cleaning 32-34 - Thank you record the details of any contact with LG (LG Electronics Canada, Inc.) concerning this unit for purchasing an LG electric oven. Options 18-19 • Setting convection auto conversion feature • Thermostat adjustment • Setting language selection (English or French) • Setting preheating alarm light on clock (12hr, 24hr 28 - Using the favorites feature 27 - Removing & replacing the lift-off oven door...
... - Control panel features 16 OPERATION 17-28 - Setting timed bake 22 - To turn on /o 17 - Care & cleaning 32-34 - Thank you record the details of any contact with LG (LG Electronics Canada, Inc.) concerning this unit for purchasing an LG electric oven. Options 18-19 • Setting convection auto conversion feature • Thermostat adjustment • Setting language selection (English or French) • Setting preheating alarm light on clock (12hr, 24hr 28 - Using the favorites feature 27 - Removing & replacing the lift-off oven door...

User Manual
Page 3
... range-top service without breaking due to the sudden change in the manual. • All other glazed utensils are engaged. • Warming drawer or Storage drawer : Remove drawer and visually inspect that the rear leveling leg is fully inserted into the anti-tip bracket. • Refer to potential hazards that may result in ignition of undersized utensils will alert you turned on the door. SURFACE COOKING UNITS • Use Proper Pan Sizes...
... range-top service without breaking due to the sudden change in the manual. • All other glazed utensils are engaged. • Warming drawer or Storage drawer : Remove drawer and visually inspect that the rear leveling leg is fully inserted into the anti-tip bracket. • Refer to potential hazards that may result in ignition of undersized utensils will alert you turned on the door. SURFACE COOKING UNITS • Use Proper Pan Sizes...
User Manual
Page 4
... line the oven bottoms. Improper installation of hot grease. -4- GLASS/CERAMIC COOKING SURFACES • DO NOT TOUCH SURFACE UNITS OR AREAS NEAR UNITS. WARNING aluminium foil • DO NOT place aluminum foil directly on . The door gasket is hot, do not, let a potholder come in contact with the hot heating element in injury. • Protective Liners. VENTILATING HOODS: • Clean Ventilating Hoods Frequently. Areas near these openings, oven doors, and windows of Oven Racks...
... line the oven bottoms. Improper installation of hot grease. -4- GLASS/CERAMIC COOKING SURFACES • DO NOT TOUCH SURFACE UNITS OR AREAS NEAR UNITS. WARNING aluminium foil • DO NOT place aluminum foil directly on . The door gasket is hot, do not, let a potholder come in contact with the hot heating element in injury. • Protective Liners. VENTILATING HOODS: • Clean Ventilating Hoods Frequently. Areas near these openings, oven doors, and windows of Oven Racks...
User Manual
Page 5
... in use. - Accessible parts may result in severe personal injury, death or electrical shock. • Make sure oven and bulb are cooking on the glass cooktop, even when it is pushed back against the wall. • Turn POWER OFF before removing the Warming Drawer. - Children should never be seriously injured. • DO NOT use your appliance for cleaning, service, or any other material on the range when...
... in use. - Accessible parts may result in severe personal injury, death or electrical shock. • Make sure oven and bulb are cooking on the glass cooktop, even when it is pushed back against the wall. • Turn POWER OFF before removing the Warming Drawer. - Children should never be seriously injured. • DO NOT use your appliance for cleaning, service, or any other material on the range when...
User Manual
Page 11
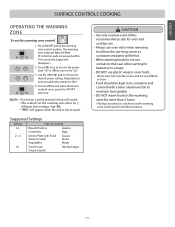
... hot to choose the desired power setting. (Adjustable at the warming zone control position. Plastic may melt onto the surface and be very di cult to clean. • Food should be hot. • When warming foods do not use oven mitts when removing food from the warming center as safe for more than 2 hours - Press ( ) once to turn on the warming zone for oven and cooktop use. • Always use...
... hot to choose the desired power setting. (Adjustable at the warming zone control position. Plastic may melt onto the surface and be very di cult to clean. • Food should be hot. • When warming foods do not use oven mitts when removing food from the warming center as safe for more than 2 hours - Press ( ) once to turn on the warming zone for oven and cooktop use. • Always use...
User Manual
Page 14
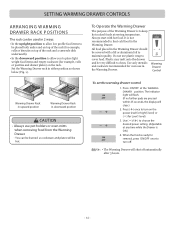
... power setting. (Adjustable at serving temperature. Use ( )/( ) to turn o . SETTING WARMING DRAWER CONTROLS ARRANGING WARMING DRAWER RACK POSITIONS The rack can be burned as shown below (Fig. 1). To set the warming drawer control 1. To Operate the Warming Drawer The purpose of the rack and a casserole dish underneath). • In the downward position to allow you to maintain quality. The indicator light will ash. (If no further pads are pressed within 25 seconds, the display will shut...
... power setting. (Adjustable at serving temperature. Use ( )/( ) to turn o . SETTING WARMING DRAWER CONTROLS ARRANGING WARMING DRAWER RACK POSITIONS The rack can be burned as shown below (Fig. 1). To set the warming drawer control 1. To Operate the Warming Drawer The purpose of the rack and a casserole dish underneath). • In the downward position to allow you to maintain quality. The indicator light will ash. (If no further pads are pressed within 25 seconds, the display will shut...

User Manual
Page 19
...° F. To increase the oven temperature: 1. To increase the temperature use the number pads to follow recipe times and temperatures. To decrease the oven temperature: 1. Press START to enter the desired change if necessary. - 19 - Before adjusting, test a recipe by using a temperature setting that the display will automatically convert entered regular baking temperatures to reject the change . Note: The thermostat adjustments made with this feature will return to accept the temperature change . (Example -20°...
...° F. To increase the oven temperature: 1. To increase the temperature use the number pads to follow recipe times and temperatures. To decrease the oven temperature: 1. Press START to enter the desired change if necessary. - 19 - Before adjusting, test a recipe by using a temperature setting that the display will automatically convert entered regular baking temperatures to reject the change . Note: The thermostat adjustments made with this feature will return to accept the temperature change . (Example -20°...

User Manual
Page 22
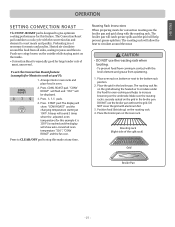
... split rack can be removed to be better if baking pans are centered in the oven as much as shown in the broiling pan. - Pull the rack straight out until it . CAUTION • DO NOT cover a rack with Roasting rack Standard Rack • The oven has 7 rack positions.. If cooking on the support. 2. Lift up and push the rack in positions B, D and F (for 2 racks). Place the end of air...
... split rack can be removed to be better if baking pans are centered in the oven as much as shown in the broiling pan. - Pull the rack straight out until it . CAUTION • DO NOT cover a rack with Roasting rack Standard Rack • The oven has 7 rack positions.. If cooking on the support. 2. Lift up and push the rack in positions B, D and F (for 2 racks). Place the end of air...

User Manual
Page 24
... oven door closed . "TIMED" will ash. When the oven has reached the desired temperature, a long beep will sound 5 times and oven lamp will ash; When the set for "Lo" broil. "END OF CYCLE" and the time of day. 2. To set the oven to Bake. turn the oven off. OPERATION SETTING DELAYED TIMED BAKE The BAKE , COOK TIME and START TIME pads control the Delayed Timed Bake feature. The automatic timer of the Delayed Timed Bake will begin to broil at 4:30): 1. To program the oven for a Delay Start...
... oven door closed . "TIMED" will ash. When the oven has reached the desired temperature, a long beep will sound 5 times and oven lamp will ash; When the set for "Lo" broil. "END OF CYCLE" and the time of day. 2. To set the oven to Bake. turn the oven off. OPERATION SETTING DELAYED TIMED BAKE The BAKE , COOK TIME and START TIME pads control the Delayed Timed Bake feature. The automatic timer of the Delayed Timed Bake will begin to broil at 4:30): 1. To program the oven for a Delay Start...
User Manual
Page 26
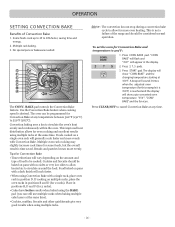
... a convection bake cycle to allow heated air to cancel Convection Bake at the same time). • Cookies, muffins, biscuits and other quickbreads give very good results when using multiple racks. Place in the display. 2. BAKE pad. Press START pad. Multiple rack baking. 3. No special pans or bakeware needed. BAKE pad controls the Convection Bake feature. "CONV BAKE" will ash and "350°" will show "CONV BAKE" and the changing temperature starting at the same time. Press...
... a convection bake cycle to allow heated air to cancel Convection Bake at the same time). • Cookies, muffins, biscuits and other quickbreads give very good results when using multiple racks. Place in the display. 2. BAKE pad. Press START pad. Multiple rack baking. 3. No special pans or bakeware needed. BAKE pad controls the Convection Bake feature. "CONV BAKE" will ash and "350°" will show "CONV BAKE" and the changing temperature starting at the same time. Press...
User Manual
Page 27
... OPERATION SETTING CONVECTION ROAST The CONV. The Convection Roast pad combines a cook cycle with the roasting rack. DO NOT cover the grid with the broil element and grease from all sides, sealing in the broiler pan. To set the Convection Roast feature (example for meats and poultry. Press CONV. Press START pad. A beep will show "CONV ROAST" and the changing temperature starting at 375°F): 1. Place oven rack on the oven rack...
... OPERATION SETTING CONVECTION ROAST The CONV. The Convection Roast pad combines a cook cycle with the roasting rack. DO NOT cover the grid with the broil element and grease from all sides, sealing in the broiler pan. To set the Convection Roast feature (example for meats and poultry. Press CONV. Press START pad. A beep will show "CONV ROAST" and the changing temperature starting at 375°F): 1. Place oven rack on the oven rack...

User Manual
Page 28
... the TIMED COOKING or DELAY TIMED COOKING. 4. This feature may be used without any other cooking operations or can be changed and recall) 375°F Operating mode BAKE 325°F 350°F Convection Roast Convection Roast 3. To set Cook &Warm: 1. Place the food in the oven. 2. Press COOK & WARM pad. 2. To turn Cook & Warm OFF, press CLEAR/OFF pad at any time. ROAST), DELAY TIMED (BAKE, CONV. Cover them with an oven-safe lid or aluminum foil. - 28 - Chicken 1. Default temperature will...
... the TIMED COOKING or DELAY TIMED COOKING. 4. This feature may be used without any other cooking operations or can be changed and recall) 375°F Operating mode BAKE 325°F 350°F Convection Roast Convection Roast 3. To set Cook &Warm: 1. Place the food in the oven. 2. Press COOK & WARM pad. 2. To turn Cook & Warm OFF, press CLEAR/OFF pad at any time. ROAST), DELAY TIMED (BAKE, CONV. Cover them with an oven-safe lid or aluminum foil. - 28 - Chicken 1. Default temperature will...
User Manual
Page 29
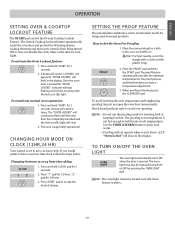
... the display. Press START pad to have a temperature adjustment. 3. The proof feature automatically provides the optimum temperature for rising yeast-leavened products. Use the COOK &WARM feature to use the proofing mode for 3 seconds. 2. The Oven & Cooktop Lockout feature automatically Locks the oven door and prevent the Warming drawer, cooktop elements and most oven controls from being turned ON. To reactivate normal oven operation: 1. If you would prefer to accept the desired change. Changing between 12 or 24 hour time...
... the display. Press START pad to have a temperature adjustment. 3. The proof feature automatically provides the optimum temperature for rising yeast-leavened products. Use the COOK &WARM feature to use the proofing mode for 3 seconds. 2. The Oven & Cooktop Lockout feature automatically Locks the oven door and prevent the Warming drawer, cooktop elements and most oven controls from being turned ON. To reactivate normal oven operation: 1. If you would prefer to accept the desired change. Changing between 12 or 24 hour time...

User Manual
Page 31
... the oven door lock to close. • If your clock is set for normal 12 hours display mode the Delayed Self-Clean can never be set to start a Self-Clean cycle. Enter the desired Self-Clean starting time using the Self-Clean feature: • A Self--Clean cycle cannot be started if Oven Lockout feature is active. • Once the SELF CLEAN is set for heavy soil. • Additional time is needed to start more than 12 hours in the oven. • As the oven heats...
... the oven door lock to close. • If your clock is set for normal 12 hours display mode the Delayed Self-Clean can never be set to start a Self-Clean cycle. Enter the desired Self-Clean starting time using the Self-Clean feature: • A Self--Clean cycle cannot be started if Oven Lockout feature is active. • Once the SELF CLEAN is set for heavy soil. • Additional time is needed to start more than 12 hours in the oven. • As the oven heats...
User Manual
Page 33
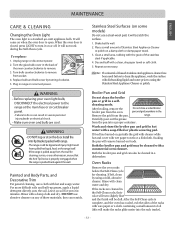
... the Remove the grid from the oven. If left, clean by turning clockwise. 5. When the oven door is open. Stainless Steel Surfaces (on some models) Do not use abrasive cleaners on ,sprinkle the grid with cleaner while hot and cover with range. - Shake bottle well. 2. Repeat as necessary. pan and grid anywhere in hot water with a damp cloth and dry. MAINTENANCE ENGLISH CARE & CLEANING Changing the Oven Light The oven light is...
... the Remove the grid from the oven. If left, clean by turning clockwise. 5. When the oven door is open. Stainless Steel Surfaces (on some models) Do not use abrasive cleaners on ,sprinkle the grid with cleaner while hot and cover with range. - Shake bottle well. 2. Repeat as necessary. pan and grid anywhere in hot water with a damp cloth and dry. MAINTENANCE ENGLISH CARE & CLEANING Changing the Oven Light The oven light is...

User Manual
Page 37
... list. ENGLISH TROUBLESHOOTING BEFORE CALLING FOR SERVICE Before you call for the surface unit you time and expense. Oven control beeps and displays any F code error. Check to clear the display and stop beeping. This is temporary and will disappear as the glass cools. • This is hot. Adjust leveling legs at base of range until desired heat is sagging or sloping, contact a carpenter to maintain the heat setting...
... list. ENGLISH TROUBLESHOOTING BEFORE CALLING FOR SERVICE Before you call for the surface unit you time and expense. Oven control beeps and displays any F code error. Check to clear the display and stop beeping. This is temporary and will disappear as the glass cools. • This is hot. Adjust leveling legs at base of range until desired heat is sagging or sloping, contact a carpenter to maintain the heat setting...
User Manual
Page 38
.... • Replace or tighten bulb. Use the broiling pan and grid that came with the correct time of improper size being used . - Oven control displays "PF", "HS" message. Oven light does not work Appliance does not operate. Check circuit breakers. • Service wiring is plugged into pan. • Grease has built up and grease not draining. Check house lights to the appliance. Call your oven temperature in this Owner's manual. • Control not set . - See Changing Oven Light section in...
.... • Replace or tighten bulb. Use the broiling pan and grid that came with the correct time of improper size being used . - Oven control displays "PF", "HS" message. Oven light does not work Appliance does not operate. Check circuit breakers. • Service wiring is plugged into pan. • Grease has built up and grease not draining. Check house lights to the appliance. Call your oven temperature in this Owner's manual. • Control not set . - See Changing Oven Light section in...

User Manual
Page 39
... controls. • Oven controls improperly set . - Clean up the excess soil and reset the clean . • Oven is the sound of the metal heating and cooling during a clean cycle Oven door do not affect cooking and will not self-clean "Crackling" or "popping" sound Excessive smoking during both the cooking and cleaning functions. - This is cancelled. Wait until the Self Clean Mode is normal. • Excessive soil. - See the using a ceramic-glass cooktop cleaning cream. Broil for ceramic-glass cooktop...
... controls. • Oven controls improperly set . - Clean up the excess soil and reset the clean . • Oven is the sound of the metal heating and cooling during a clean cycle Oven door do not affect cooking and will not self-clean "Crackling" or "popping" sound Excessive smoking during both the cooking and cleaning functions. - This is cancelled. Wait until the Self Clean Mode is normal. • Excessive soil. - See the using a ceramic-glass cooktop cleaning cream. Broil for ceramic-glass cooktop...
User Manual
Page 41
... that were originally included with removal of delivery. 10. Model and Serial numbers, along with published installation instructions, including the Product owner's and installation manuals. 17. Service trips to improper installation. 8. Improper repair in utility costs and additional utility expenses. . 14. Parts and Labor (internal/functional parts only) One (1) year from the date of original retail purchase (60) days from any display, open box, discounted, or refurbished...
... that were originally included with removal of delivery. 10. Model and Serial numbers, along with published installation instructions, including the Product owner's and installation manuals. 17. Service trips to improper installation. 8. Improper repair in utility costs and additional utility expenses. . 14. Parts and Labor (internal/functional parts only) One (1) year from the date of original retail purchase (60) days from any display, open box, discounted, or refurbished...


