User Guide
Page 2
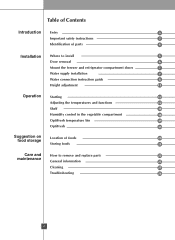
Table of Contents Introduction Entry 3 Important safety instructions 3 Identification of parts 4 Installation Where to install 5 Door removal 6 Mount the freezer and refrigerator compartment doors 7 Water supply installation 7 Water connection instruction guide 8 Height adjustment 11 Operation Starting 12 Adjusting the temperatures and functions 12 Shelf 18 Humidity control in the ...
Table of Contents Introduction Entry 3 Important safety instructions 3 Identification of parts 4 Installation Where to install 5 Door removal 6 Mount the freezer and refrigerator compartment doors 7 Water supply installation 7 Water connection instruction guide 8 Height adjustment 11 Operation Starting 12 Adjusting the temperatures and functions 12 Shelf 18 Humidity control in the ...
User Guide
Page 6
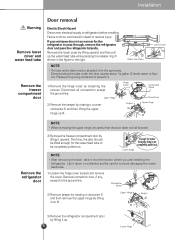
...could result in the figure to flow out. Installation Warning Remove lower cover and water feed tube Remove the freezer compartment door Door removal Electric Shock Hazard Disconnect electrical supply to prevent it. 1) Remove the hinge cover by loosening the screws. Failure to avoid ...except the ground line. If your entrance door is deformed or abraded, trim the part away. Upper Hinge 2) Remove the keeper by lifting upward, and then pull up . Remove the refrigerator door 3) Remove the freezer compartment door by lifting it counter clockwise and then lifting...
...could result in the figure to flow out. Installation Warning Remove lower cover and water feed tube Remove the freezer compartment door Door removal Electric Shock Hazard Disconnect electrical supply to prevent it. 1) Remove the hinge cover by loosening the screws. Failure to avoid ...except the ground line. If your entrance door is deformed or abraded, trim the part away. Upper Hinge 2) Remove the keeper by lifting upward, and then pull up . Remove the refrigerator door 3) Remove the freezer compartment door by lifting it counter clockwise and then lifting...
User Guide
Page 7
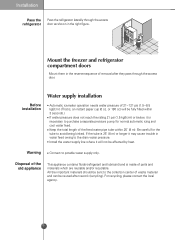
...Min 1 2 TFERMZP TREEMFP 3 4 5 Max Mount the freezer and refrigerator compartment doors Mount them in water feed owing to the drain water pressure. Water supply installation...Warning Connect to the collection center of parts and materials which are reusable and/or recyclable. Disposal of removal after rework (recycling). Keep the total length of the feed water pipe tube within 3 seconds.) If...where it will be reused after they pass through the access door as shown in the right figure. Installation Pass the refrigerator Pass the refrigerator laterally through the access...
...Min 1 2 TFERMZP TREEMFP 3 4 5 Max Mount the freezer and refrigerator compartment doors Mount them in water feed owing to the drain water pressure. Water supply installation...Warning Connect to the collection center of parts and materials which are reusable and/or recyclable. Disposal of removal after rework (recycling). Keep the total length of the feed water pipe tube within 3 seconds.) If...where it will be reused after they pass through the access door as shown in the right figure. Installation Pass the refrigerator Pass the refrigerator laterally through the access...
User Guide
Page 17
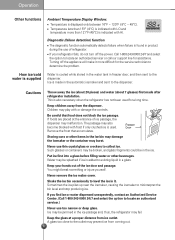
... This is cooled while stored in the water tank in product during the use thin crystal glass or crockery to determine the problem. Never remove the ice maker cover. If foods are placed at a proper distance from ice outlet. Storing cans or other beverages. Keep your refrigerator ...accumulates. A glass too close to misinterpret the bin level and stop producing ice. Turning off the power. Never use of the ice door and passage. The passage may be broken, and glass fragments could be splashed if ice is indicated with LO and temperature more difficult ...
... This is cooled while stored in the water tank in product during the use thin crystal glass or crockery to determine the problem. Never remove the ice maker cover. If foods are placed at a proper distance from ice outlet. Storing cans or other beverages. Keep your refrigerator ...accumulates. A glass too close to misinterpret the bin level and stop producing ice. Turning off the power. Never use of the ice door and passage. The passage may be broken, and glass fragments could be splashed if ice is indicated with LO and temperature more difficult ...
User Guide
Page 19
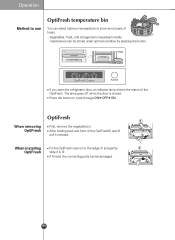
... through ON➔ OFF➔ ON. The lamp goes off when the door is closed. If forced, the connecting parts can be damaged. 19 OptiFresh When removing OptiFresh First, remove the vegetable bin. OptiFresh Crisper Activate If you open the refrigerator door, an indicator lamp shows the status of the OptiFresh and pull it...
... through ON➔ OFF➔ ON. The lamp goes off when the door is closed. If forced, the connecting parts can be damaged. 19 OptiFresh When removing OptiFresh First, remove the vegetable bin. OptiFresh Crisper Activate If you open the refrigerator door, an indicator lamp shows the status of the OptiFresh and pull it...
User Guide
Page 22
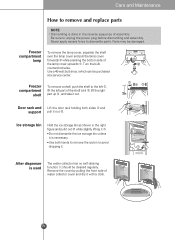
... the reverse sequence of the shelf a bit , lift the right part up ➂ , and take it out. 1 2 1 2 3 Door rack and Lift the door rack holding both hands to remove the ice bin to avoid dropping it. 2 1 After dispenser is necessary. It should be damaged. Be sure to dismantle parts. Freezer... compartment lamp To remove the lamp cover, separate the shelf over the lamp cover and pull the lamp cover ...
... the reverse sequence of the shelf a bit , lift the right part up ➂ , and take it out. 1 2 1 2 3 Door rack and Lift the door rack holding both hands to remove the ice bin to avoid dropping it. 2 1 After dispenser is necessary. It should be damaged. Be sure to dismantle parts. Freezer... compartment lamp To remove the lamp cover, separate the shelf over the lamp cover and pull the lamp cover ...
User Guide
Page 23
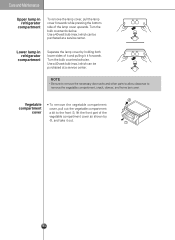
... Maintenance Upper lamp in refrigerator compartment Separate the lamp cover by , and take it forwards. Turn the bulb counterclockwise. NOTE • Be sure to remove the necessary door racks and other parts to allow clearance to the front , lift the front part of the vegetable compartment cover as shown by holding both...
... Maintenance Upper lamp in refrigerator compartment Separate the lamp cover by , and take it forwards. Turn the bulb counterclockwise. NOTE • Be sure to remove the necessary door racks and other parts to allow clearance to the front , lift the front part of the vegetable compartment cover as shown by holding both...
User Guide
Page 25
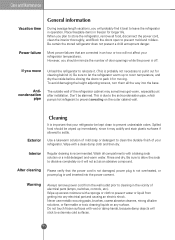
...touch frozen surfaces with a clean damp cloth and then dry. When you plan to store the refrigerator, remove all compartments with a sponge or cloth to prevent water or liquid from the wall outlet prior to let...(This is due to the anti-condensation pipe, which pumps hot refrigerant to clean the durable finish of door openings while the power is well inserted into the power consent. The outside wall of electrical parts (lamps... room temperature, and dry the inside before closing the doors to extremely cold surfaces. 25 Warning Always remove power cord from getting into the base.
...touch frozen surfaces with a clean damp cloth and then dry. When you plan to store the refrigerator, remove all compartments with a sponge or cloth to prevent water or liquid from the wall outlet prior to let...(This is due to the anti-condensation pipe, which pumps hot refrigerant to clean the durable finish of door openings while the power is well inserted into the power consent. The outside wall of electrical parts (lamps... room temperature, and dry the inside before closing the doors to extremely cold surfaces. 25 Warning Always remove power cord from getting into the base.
User Guide
Page 28
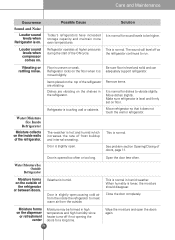
... See problem section Opening/Closing of the refrigerator are vibrating on . This is lower, the moisture should disappear. Close the door completely. Remove items. It is normal. This is normal for dishes to vibrate slightly. Water/Moisture /Ice Inside Refrigerator Moisture collects on ...the outside . Open the door less often. Care and Maintenance Occurrence Sound and Noise Louder sound levels when Refrigerator is ...
... See problem section Opening/Closing of the refrigerator are vibrating on . This is lower, the moisture should disappear. Close the door completely. Remove items. It is normal. This is normal for dishes to vibrate slightly. Water/Moisture /Ice Inside Refrigerator Moisture collects on ...the outside . Open the door less often. Care and Maintenance Occurrence Sound and Noise Louder sound levels when Refrigerator is ...
User Guide
Page 30
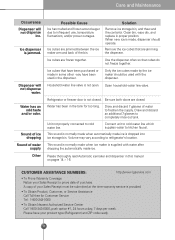
... NUMBERS: http://www.lgservice.com To Prove Warranty Coverage Retain your product type (Refrigerator) and ZIP code ready. 30 Be sure both doors are jamming the dispenser. Volume may vary according to freshen the supply. Draw and discard 7 glasses of your Sales Receipt must be used... when automatically made by the ice maker should operate. To Obtain Product, Customer, or Service Assistance Call Toll-free for too long. Solution Remove ice storage bin, and thaw and the contents. Clean bin, wipe dry, and replace in the tank for Customer Service Tel : 1-800...
... NUMBERS: http://www.lgservice.com To Prove Warranty Coverage Retain your product type (Refrigerator) and ZIP code ready. 30 Be sure both doors are jamming the dispenser. Volume may vary according to freshen the supply. Draw and discard 7 glasses of your Sales Receipt must be used... when automatically made by the ice maker should operate. To Obtain Product, Customer, or Service Assistance Call Toll-free for too long. Solution Remove ice storage bin, and thaw and the contents. Clean bin, wipe dry, and replace in the tank for Customer Service Tel : 1-800...


