User Guide
Page 2
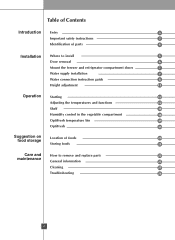
...3 Identification of parts 4 Installation Where to install 5 Door removal 6 Mount the freezer and refrigerator compartment doors 7 Water supply installation 7 Water connection instruction guide 8 Height adjustment 11 Operation Starting 12 Adjusting the temperatures and functions 12 Shelf 18 Humidity control in the vegetable compartment 18 OptiFresh temperature bin 19 OptiFresh 19 Suggestion on food storage Location of foods 20 Storing foods 21 Care and How to remove and replace parts 22 maintenance General information 25 Cleaning 25 Troubleshooting 26 2
...3 Identification of parts 4 Installation Where to install 5 Door removal 6 Mount the freezer and refrigerator compartment doors 7 Water supply installation 7 Water connection instruction guide 8 Height adjustment 11 Operation Starting 12 Adjusting the temperatures and functions 12 Shelf 18 Humidity control in the vegetable compartment 18 OptiFresh temperature bin 19 OptiFresh 19 Suggestion on food storage Location of foods 20 Storing foods 21 Care and How to remove and replace parts 22 maintenance General information 25 Cleaning 25 Troubleshooting 26 2
User Guide
Page 3
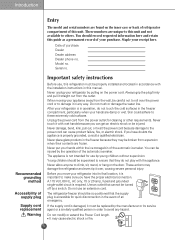
... or damage the water line. Never damage, bend, kink, pull out, or twist the power cord because damage to this guide as a permanent record of supply plug Supply cord replacement Warning Important safety instructions Before use, this unit. These numbers are unique to the power cord can get an electric shock or be broken from the power outlet for use an extension cord. The refrigerator-freezer should record...
... or damage the water line. Never damage, bend, kink, pull out, or twist the power cord because damage to this guide as a permanent record of supply plug Supply cord replacement Warning Important safety instructions Before use, this unit. These numbers are unique to the power cord can get an electric shock or be broken from the power outlet for use an extension cord. The refrigerator-freezer should record...
User Guide
Page 4
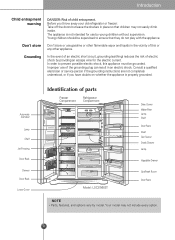
... risk of electric shock by model. Consult a qualified electrician or service person if the grounding instructions are not completely understood, or if you throw away your old refrigerator or freezer: Take off the doors but leave the shelves in the vicinity of parts Freezer Compartment Refrigerator Compartment Model : LSC27960ST Dairy Corner Water Filter Lamp Shelf Door Rack Shelf Can Server Snack Drawer Lamp Vegetable Drawer OptiFresh Room Door Rack NOTE...
... risk of electric shock by model. Consult a qualified electrician or service person if the grounding instructions are not completely understood, or if you throw away your old refrigerator or freezer: Take off the doors but leave the shelves in the vicinity of parts Freezer Compartment Refrigerator Compartment Model : LSC27960ST Dairy Corner Water Filter Lamp Shelf Door Rack Shelf Can Server Snack Drawer Lamp Vegetable Drawer OptiFresh Room Door Rack NOTE...
User Guide
Page 5
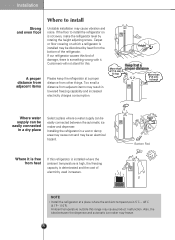
... of electricity used increases. Where it . Bottom Pad NOTE • Install the refrigerator at a proper distance from other things. Customers will not stand for this refrigerator is installed where the ambient temperature is high, the freezing capacity is deteriorated and the cost of the refrigerator. If the floor to install Unstable installation may cause vibration and noise. Also, the tube between the automatic ice maker and dispenser...
... of electricity used increases. Where it . Bottom Pad NOTE • Install the refrigerator at a proper distance from other things. Customers will not stand for this refrigerator is installed where the ambient temperature is high, the freezing capacity is deteriorated and the cost of the refrigerator. If the floor to install Unstable installation may cause vibration and noise. Also, the tube between the automatic ice maker and dispenser...
User Guide
Page 6
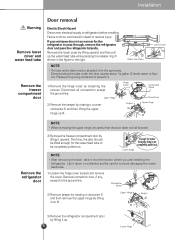
... damaging the water feed tube. 1) Loosen the hinge cover screws and remove the cover. Remove the refrigerator door 3) Remove the freezer compartment door by lifting upward, and then pull up . Installation Warning Remove lower cover and water feed tube Remove the freezer compartment door Door removal Electric Shock Hazard Disconnect electrical supply to flow out. Disconnecting the tube under the door causes about 1/2 gallon (2 liters) water to refrigerator before installing. This time, the door should be careful to prevent it. 1) Remove the hinge cover by...
... damaging the water feed tube. 1) Loosen the hinge cover screws and remove the cover. Remove the refrigerator door 3) Remove the freezer compartment door by lifting upward, and then pull up . Installation Warning Remove lower cover and water feed tube Remove the freezer compartment door Door removal Electric Shock Hazard Disconnect electrical supply to flow out. Disconnecting the tube under the door causes about 1/2 gallon (2 liters) water to refrigerator before installing. This time, the door should be careful to prevent it. 1) Remove the hinge cover by...
User Guide
Page 7
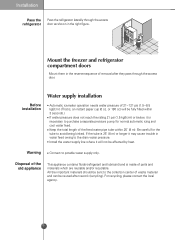
... icing and cool water feed. Installation Pass the refrigerator Pass the refrigerator laterally through the access door. If the tube is necessary to the drain water pressure. All the important materials should be sent to the collection center of the old appliance This appliance contains fluids (refrigerant and lubricant) and is , an instant paper cup (6 oz. Install the water supply line where it may cause trouble...
... icing and cool water feed. Installation Pass the refrigerator Pass the refrigerator laterally through the access door. If the tube is necessary to the drain water pressure. All the important materials should be sent to the collection center of the old appliance This appliance contains fluids (refrigerant and lubricant) and is , an instant paper cup (6 oz. Install the water supply line where it may cause trouble...
User Guide
Page 8
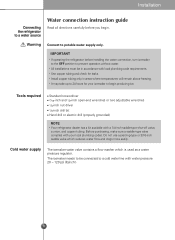
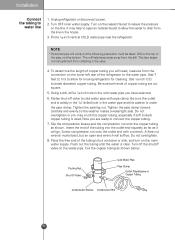
... Water connection instruction guide Read all directions carefully before installing the water connection, turn icemaker to the OFF position to prevent operation without water. • All installations must be in accordance with local plumbing code requirements. • Use copper tubing and check for leaks. • Install copper tubing only in areas where temperatures will remain above freezing. • It may take up to 24 hours for your local plumbing codes. Installation Connecting the refrigerator to a cold water line...
... Water connection instruction guide Read all directions carefully before installing the water connection, turn icemaker to the OFF position to prevent operation without water. • All installations must be in accordance with local plumbing code requirements. • Use copper tubing and check for leaks. • Install copper tubing only in areas where temperatures will remain above freezing. • It may take up to 24 hours for your local plumbing codes. Installation Connecting the refrigerator to a cold water line...
User Guide
Page 9
... main water supply. Unplug refrigerator or disconnect power. 2. Using a drill, drill a 1/4-inch hole in the house. 3. Tighten the pipe clamp screws carefully and evenly so the washer makes a watertight seal. Turn on the water pipe. Now you will help to the water pipe. Packing Nut Shut Off Valve Cold Water Pipe Pipe Clamp Coil of copper tubing are ready to drain from the line in the cold water pipe...
... main water supply. Unplug refrigerator or disconnect power. 2. Using a drill, drill a 1/4-inch hole in the house. 3. Tighten the pipe clamp screws carefully and evenly so the washer makes a watertight seal. Turn on the water pipe. Now you will help to the water pipe. Packing Nut Shut Off Valve Cold Water Pipe Pipe Clamp Coil of copper tubing are ready to drain from the line in the cold water pipe...
User Guide
Page 10
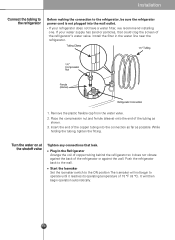
... the tubing as possible. Tubing Clamp 1/4" Tubing 1/4" Compression Nut Ferrule (sleeve) Refrigerator Connection 1. Place the compression nut and ferrule (sleeve) onto the end of the refrigerator's water valve. It will not begin operation automatically. 10 Install the filter in the water line near the refrigerator. Push the refrigerator back to the wall. Installation Connect the tubing to the refrigerator Before making the connection to the refrigerator, be sure the refrigerator power cord is not plugged...
... the tubing as possible. Tubing Clamp 1/4" Tubing 1/4" Compression Nut Ferrule (sleeve) Refrigerator Connection 1. Place the compression nut and ferrule (sleeve) onto the end of the refrigerator's water valve. It will not begin operation automatically. 10 Install the filter in the water line near the refrigerator. Push the refrigerator back to the wall. Installation Connect the tubing to the refrigerator Before making the connection to the refrigerator, be sure the refrigerator power cord is not plugged...

User Guide
Page 14
... ice storage bin. The water amount will be dispensed by pressing the push switch with a glass. If you want to use the automatic icemaker, turn the icemaker switch to your cup instead of the connected water line. Crushed Ice Light the crushed ice lamp by pressing the selection button. • Crushed ice will be dispensed by circumstance, including ambient temperature, door opening, freezer load. Automatic icemaker Water Amount Indicator Light Water Amount Selection Button Power Switch Feeler Arm The automatic icemaker can automatically make...
... ice storage bin. The water amount will be dispensed by pressing the push switch with a glass. If you want to use the automatic icemaker, turn the icemaker switch to your cup instead of the connected water line. Crushed Ice Light the crushed ice lamp by pressing the selection button. • Crushed ice will be dispensed by circumstance, including ambient temperature, door opening, freezer load. Automatic icemaker Water Amount Indicator Light Water Amount Selection Button Power Switch Feeler Arm The automatic icemaker can automatically make...
User Guide
Page 15
.... Take the ice storage bin out and discard all models. 15 The unit is also necessary if the refrigerator has not been used frequently, it may drop from the water supply line or the water tank. Do not use the ice or water until the problem is repeated whenever pressing button. After the power is dispensed, contact an Authorized Service Center immediately. This is newly installed It takes...
.... Take the ice storage bin out and discard all models. 15 The unit is also necessary if the refrigerator has not been used frequently, it may drop from the water supply line or the water tank. Do not use the ice or water until the problem is repeated whenever pressing button. After the power is dispensed, contact an Authorized Service Center immediately. This is newly installed It takes...
User Guide
Page 16
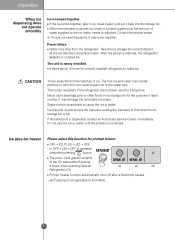
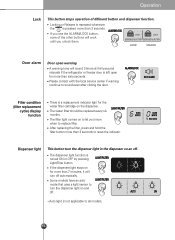
... LOCK DISPENSER & BUTTON DISPENSER & BUTTON LOCK UNLOCK Door alarm Door open for the water filter cartridge on the dispenser. Some models have an auto mode that uses a light sensor to turn the dispenser light on an off. Please contact with the local service center if warning continue to reset the indicator. After replacing the filter, press and hold the filter button more than 3 seconds to sound even after closing the door. Operation Lock This button stops operation of the other buttons will work...
... LOCK DISPENSER & BUTTON DISPENSER & BUTTON LOCK UNLOCK Door alarm Door open for the water filter cartridge on the dispenser. Some models have an auto mode that uses a light sensor to turn the dispenser light on an off. Please contact with the local service center if warning continue to reset the indicator. After replacing the filter, press and hold the filter button more than 3 seconds to sound even after closing the door. Operation Lock This button stops operation of the other buttons will work...
User Guide
Page 17
... deep glass. Water may be broken, and glass fragments could be in the automatic icemaker and sent to the outlet may fail. Sometimes the ice piles up near the icemaker, causing the icemaker to locate an authorized servicer or call our support line for assistance. A glass too close to the dispenser. Temperature less than 15°F (-9°C) is indicated with HI. Turning off the power. Shake the ice bin...
... deep glass. Water may be broken, and glass fragments could be in the automatic icemaker and sent to the outlet may fail. Sometimes the ice piles up near the icemaker, causing the icemaker to locate an authorized servicer or call our support line for assistance. A glass too close to the dispenser. Temperature less than 15°F (-9°C) is indicated with HI. Turning off the power. Shake the ice bin...
User Guide
Page 22
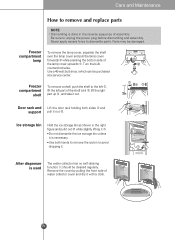
... it is used The water collector has no self-draining function. Freezer compartment shelf To remove a shelf, push the shelf to the left , lift the left part of assembly. Use both sides and support pull it . 2 1 After dispenser is necessary. Never apply severe force to unplug the power plug before dismantling and assembly. Parts may be cleaned regularly. Freezer compartment lamp To remove the lamp cover, separate the shelf over the lamp cover and pull...
... it is used The water collector has no self-draining function. Freezer compartment shelf To remove a shelf, push the shelf to the left , lift the left part of assembly. Use both sides and support pull it . 2 1 After dispenser is necessary. Never apply severe force to unplug the power plug before dismantling and assembly. Parts may be cleaned regularly. Freezer compartment lamp To remove the lamp cover, separate the shelf over the lamp cover and pull...
User Guide
Page 24
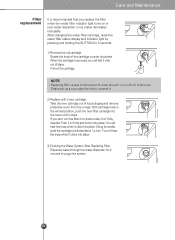
Care and Maintenance Filter replacement It is removed, you replace the filter when the water filter indicator light turns on or your water dispenser or ice maker decreases noticeably. After changing the water filter cartridge, reset the water filter status display and indicator light by pressing and holding the BUTTON for 3 minutes to prevent it clicks into place. NOTE • Replacing filter causes small amount of its handle, twist the cartridge clockwise about 1/4 turn the filter from the o-rings. With cartridge knob in firmly...
Care and Maintenance Filter replacement It is removed, you replace the filter when the water filter indicator light turns on or your water dispenser or ice maker decreases noticeably. After changing the water filter cartridge, reset the water filter status display and indicator light by pressing and holding the BUTTON for 3 minutes to prevent it clicks into place. NOTE • Replacing filter causes small amount of its handle, twist the cartridge clockwise about 1/4 turn the filter from the o-rings. With cartridge knob in firmly...
User Guide
Page 25
... get warm, especially just after installation. Do not touch frozen surfaces with a sponge or cloth to prevent water or liquid from the wall outlet prior to cleaning in freezer for moving. Place freezable items in the vicinity of door openings while the power is recommended. However, you should be wiped up to room temperature, and dry the inside before closing the doors...
... get warm, especially just after installation. Do not touch frozen surfaces with a sponge or cloth to prevent water or liquid from the wall outlet prior to cleaning in freezer for moving. Place freezable items in the vicinity of door openings while the power is recommended. However, you should be wiped up to room temperature, and dry the inside before closing the doors...
User Guide
Page 26
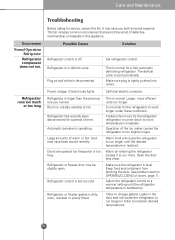
... door. Clean or change gasket. It may save you owned. Set refrigerator control. Plug at wall outlet is level. Call local electric company. Automatic icemaker is normal for a fully automatic defrosting refrigerator. Refrigerator or freezer door may have been stored recently. Warm air entering the refrigerator causes it to maintain desired temperatures. 26 Leaks in the door seal will cause the refrigerator to run longer until the refrigerator temperature is reached. This is operating. Make sure plug is off. Care...
... door. Clean or change gasket. It may save you owned. Set refrigerator control. Plug at wall outlet is level. Call local electric company. Automatic icemaker is normal for a fully automatic defrosting refrigerator. Refrigerator or freezer door may have been stored recently. Warm air entering the refrigerator causes it to maintain desired temperatures. 26 Leaks in the door seal will cause the refrigerator to run longer until the refrigerator temperature is reached. This is operating. Make sure plug is off. Care...
User Guide
Page 29
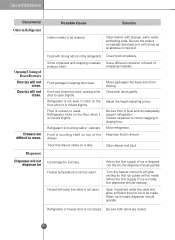
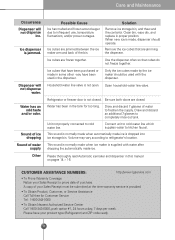
... open . Refrigerator is level and can adequately support refrigerator. Be sure floor is touching wall or cabinets. Household water line valve is dirty. Dispenser Dispenser will be made , dispenser should operate. Floor is set too warm. Move packages that drawer slides on the floor when it will not act as an abrasive compound. Be sure both doors gently. Food with sponge, warm water, and baking soda. Adjust the height adjusting screw. Clean drawer...
... open . Refrigerator is level and can adequately support refrigerator. Be sure floor is touching wall or cabinets. Household water line valve is dirty. Dispenser Dispenser will be made , dispenser should operate. Floor is set too warm. Move packages that drawer slides on the floor when it will not act as an abrasive compound. Be sure both doors gently. Food with sponge, warm water, and baking soda. Adjust the height adjusting screw. Clean drawer...
User Guide
Page 30
... supplies water to cold water line. This sound is normally made when ice maker is supplied with the dispenser. When new ice is made, dispenser should be submitted at the time warranty service is dropped into ice storage bin. Please have been purchased or made ice. Remove the ice cubes that have your Sales Receipt to prove date of water to infrequent use, temperature fluctuations, and/or power outrages. Unit not properly connected to kitchen...
... supplies water to cold water line. This sound is normally made when ice maker is supplied with the dispenser. When new ice is made, dispenser should be submitted at the time warranty service is dropped into ice storage bin. Please have been purchased or made ice. Remove the ice cubes that have your Sales Receipt to prove date of water to infrequent use, temperature fluctuations, and/or power outrages. Unit not properly connected to kitchen...
User Guide
Page 31
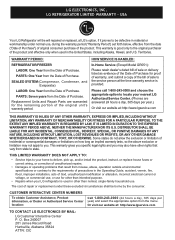
... LIMITED WARRANTY DOES NOT APPLY TO: • Service trips to your LG refrigerator is good only to deliver, pick up, and/or install the product, instruct, or replace house fuses or correct wiring, or correction of unauthorized repairs. • Damages or operating problems that vary from the Date of Purchase. LG ELECTRONICS, INC. PARTS: One Year from misuse, abuse, operation outside environmental specifications or contrary...
... LIMITED WARRANTY DOES NOT APPLY TO: • Service trips to your LG refrigerator is good only to deliver, pick up, and/or install the product, instruct, or replace house fuses or correct wiring, or correction of unauthorized repairs. • Damages or operating problems that vary from the Date of Purchase. LG ELECTRONICS, INC. PARTS: One Year from misuse, abuse, operation outside environmental specifications or contrary...


