
Owner's Manual
Page 2
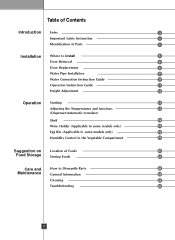
... to install 6 Door Removal 8 Door Replacement 9 Water Pipe Installation 9 Water Connection Instruction Guide 9 Operation Instruction Guide 11 Height Adjustment 12 Operation Starting 13 Adjusting the Temperatures and functions 13 (Dispenser/Automatic Icemaker) Shelf 19 Wine Holder (Applicable to some models only) 19 Egg Bin (Applicable to some models only) 19 Humidity Control in the Vegetable Compartment 19 Suggestion on Location of Foods 20 Food Storage Storing Foods 21 Care and How to Dismantle Parts 22 Maintenance General Information 24 Cleaning 24...
... to install 6 Door Removal 8 Door Replacement 9 Water Pipe Installation 9 Water Connection Instruction Guide 9 Operation Instruction Guide 11 Height Adjustment 12 Operation Starting 13 Adjusting the Temperatures and functions 13 (Dispenser/Automatic Icemaker) Shelf 19 Wine Holder (Applicable to some models only) 19 Egg Bin (Applicable to some models only) 19 Humidity Control in the Vegetable Compartment 19 Suggestion on Location of Foods 20 Food Storage Storing Foods 21 Care and How to Dismantle Parts 22 Maintenance General Information 24 Cleaning 24...
Owner's Manual
Page 4
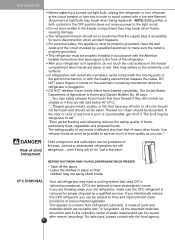
... Installer Instructions that releases the cubes. Leave the shelves in the freezer compartment when hands are damp or wet. For personal safety, this CFC refrigerant, you are reusable and / or recyclable. This refrigerator must be properly installed in accordance with a live wire filament. (A burned-out light bulb may break when being replaced). DO NOT place fingers or hands on the automatic icemaking...
... Installer Instructions that releases the cubes. Leave the shelves in the freezer compartment when hands are damp or wet. For personal safety, this CFC refrigerant, you are reusable and / or recyclable. This refrigerator must be properly installed in accordance with a live wire filament. (A burned-out light bulb may break when being replaced). DO NOT place fingers or hands on the automatic icemaking...

Owner's Manual
Page 5
... of installation, cleaning, or removing a light bulb, turn the control (Thermostat, Refrigerator Control or Freezer Control, depending on the model) to OFF and then disconnect the refrigerator from overheated wires. Use a receptacle which could cause a fire hazard from the electrical source. If the supply cord is recommended that the electrical rating of an extension cord. RECOMMENDED GROUNDING METHOD The refrigerator should always be plugged into it must be provided. REQUIREMENTS TO CONNECT ELECTRICITY WARNING Electrical...
... of installation, cleaning, or removing a light bulb, turn the control (Thermostat, Refrigerator Control or Freezer Control, depending on the model) to OFF and then disconnect the refrigerator from overheated wires. Use a receptacle which could cause a fire hazard from the electrical source. If the supply cord is recommended that the electrical rating of an extension cord. RECOMMENDED GROUNDING METHOD The refrigerator should always be plugged into it must be provided. REQUIREMENTS TO CONNECT ELECTRICITY WARNING Electrical...

Owner's Manual
Page 6
... the refrigerator. Introduction Identification of Parts Freezer Compartment Refrigerator Compartment Door Rack Automatic Icemaker Lamp Shelf (steel) Dairy Corner Lamp Water Filter Shelf Shelf Snack Drawer Door Rack Drawer Door Rack Vegetable Drawer Door Rack Vegetable Drawer Lower Cover • NOTE: If you nd some parts missing from your unit, they may be discolored by heat from the bottom of damage, there is not even, make the refrigerator level by rotating the height adjusting screw...
... the refrigerator. Introduction Identification of Parts Freezer Compartment Refrigerator Compartment Door Rack Automatic Icemaker Lamp Shelf (steel) Dairy Corner Lamp Water Filter Shelf Shelf Snack Drawer Door Rack Drawer Door Rack Vegetable Drawer Door Rack Vegetable Drawer Lower Cover • NOTE: If you nd some parts missing from your unit, they may be discolored by heat from the bottom of damage, there is not even, make the refrigerator level by rotating the height adjusting screw...
Owner's Manual
Page 7
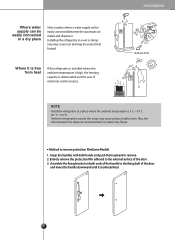
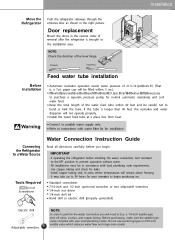
... water supply can be easily connected between the dispenser and automatic ice maker may be easily connected in a wet or damp area may cause rust and may freeze. Also, the tube between the automatic ice maker and dispenser. Installing the refrigerator in a dry place Select a place where a water supply can be an electrical hazard. Entirely remove the protection film adhered to the fixing bolt of the door...
... water supply can be easily connected between the dispenser and automatic ice maker may be easily connected in a wet or damp area may cause rust and may freeze. Also, the tube between the automatic ice maker and dispenser. Installing the refrigerator in a dry place Select a place where a water supply can be an electrical hazard. Entirely remove the protection film adhered to the fixing bolt of the door...
Owner's Manual
Page 8
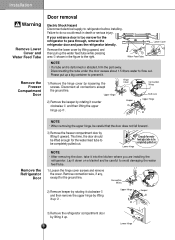
... damaging the water feed tube. 1) Loosen the hinge cover screws and remove the cover. Disconnecting the tube under the door causes about 1.5 litters water to refrigerator before installing. Hinge 1) Remove the hinge cover by lifting it upward. Disconnect all connections except the ground line. This time, the door should be careful to be careful that the door does not fall forward . 3) Remove the freezer compartment door by loosening the Cover screws. Lay it up . Connection Wires 2) Remove keeper...
... damaging the water feed tube. 1) Loosen the hinge cover screws and remove the cover. Disconnecting the tube under the door causes about 1.5 litters water to refrigerator before installing. Hinge 1) Remove the hinge cover by lifting it upward. Disconnect all connections except the ground line. This time, the door should be careful to be careful that the door does not fall forward . 3) Remove the freezer compartment door by loosening the Cover screws. Lay it up . Connection Wires 2) Remove keeper...
Owner's Manual
Page 9
... is longer than 40 feet, the icemaker and water dispenser will need to buy: a 1/4-inch saddle-type shut off valve, a union, and copper tubing. Refer to instructions with water filter kit for normal automatic icemaking and cool water feed. IMPORTANT • If operating the refrigerator before you will not operate properly. Installation Move the Refrigerator Push the refrigerator sideways through the entrance door as shown in the reverse order of 21.3~121psi(lb...
... is longer than 40 feet, the icemaker and water dispenser will need to buy: a 1/4-inch saddle-type shut off valve, a union, and copper tubing. Refer to instructions with water filter kit for normal automatic icemaking and cool water feed. IMPORTANT • If operating the refrigerator before you will not operate properly. Installation Move the Refrigerator Push the refrigerator sideways through the entrance door as shown in the reverse order of 21.3~121psi(lb...
Owner's Manual
Page 10
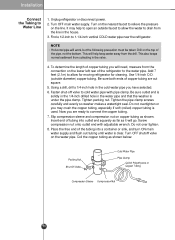
... to Water Line 1. Fasten shut-off valve to open an outside diameter) copper tubing. Insert end of the refrigerator to allow for moving refrigerator for cleaning. This will go. Use 1/4-inch O.D. (outside faucet to the water pipe. Be sure outlet end is solidly in the 1/4-inch drilled hole in the house. 3. Installation Connect the Tubing to 1-1/4-inch vertical COLD water pipe near the refrigerator. Packing Nut Shut Off Valve Cold Water...
... to Water Line 1. Fasten shut-off valve to open an outside diameter) copper tubing. Insert end of the refrigerator to allow for moving refrigerator for cleaning. This will go. Use 1/4-inch O.D. (outside faucet to the water pipe. Be sure outlet end is solidly in the 1/4-inch drilled hole in the house. 3. Installation Connect the Tubing to 1-1/4-inch vertical COLD water pipe near the refrigerator. Packing Nut Shut Off Valve Cold Water...
Owner's Manual
Page 11
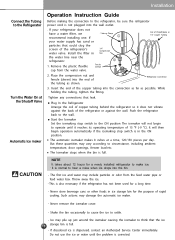
... the water valve. While holding the tubing, tighten the fitting. Start the lcemaker Set the icemaking stop switch to the ON position The icemaker will then begin to operate until the problem is not plugged into the connection as far as shown. The automatic icemaker makes 8 cubes at the Shutoff Valve Automatic Ice maker Operation Instruction Guide Before making the connection to the refrigerator, be sure the refrigerator power cord is corrected. Refrigerator Connection 3. Push the refrigerator...
... the water valve. While holding the tubing, tighten the fitting. Start the lcemaker Set the icemaking stop switch to the ON position The icemaker will then begin to operate until the problem is not plugged into the connection as far as shown. The automatic icemaker makes 8 cubes at the Shutoff Valve Automatic Ice maker Operation Instruction Guide Before making the connection to the refrigerator, be sure the refrigerator power cord is corrected. Refrigerator Connection 3. Push the refrigerator...
Owner's Manual
Page 15
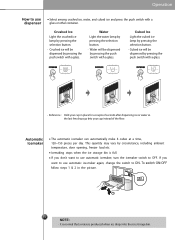
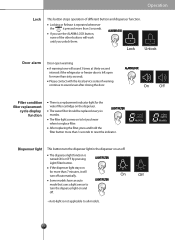
... to use automatic icemaker, turn the icemaker switch to ON. ON OFF 2 1 15 NOTE: 15 • It is normal that a noise is full. Water Light the water lamp by pressing the selection button. • Water will be dispensed by circumstance, including ambient temperature, door opening, freezer load etc. Crushed Ice Light the crushed ice lamp by pressing the selection button. • Crushed ice will be dispensed by pressing the push switch with a glass. •...
... to use automatic icemaker, turn the icemaker switch to ON. ON OFF 2 1 15 NOTE: 15 • It is normal that a noise is full. Water Light the water lamp by pressing the selection button. • Water will be dispensed by circumstance, including ambient temperature, door opening, freezer load etc. Crushed Ice Light the crushed ice lamp by pressing the selection button. • Crushed ice will be dispensed by pressing the push switch with a glass. •...
Owner's Manual
Page 17
... button stops operation of the other buttons will work until you unlock them. Locking or Release is repeated whenever the is pressed more than 7 minutes, it will sound 3 times at thirty-second intervals if the refrigerator or freezer door is not applicable to reset the indicator. The dispenser light function is a replacement indicator light for the water filter cartridge on for more than 3 seconds to all models...
... button stops operation of the other buttons will work until you unlock them. Locking or Release is repeated whenever the is pressed more than 7 minutes, it will sound 3 times at thirty-second intervals if the refrigerator or freezer door is not applicable to reset the indicator. The dispenser light function is a replacement indicator light for the water filter cartridge on for more than 3 seconds to all models...
Owner's Manual
Page 18
... icemaker to the dispenser. Never use of refrigerator. If your hands out of ice passage, the dispenser may prevent ice from coming out. 18 If foods are placed at a proper distance from the dispenser. Keep children away from ice outlet. Be careful that accumulates. Never remove the ice maker cover. Keep the glass at the entrance of the ice door and passage. Temperature is corrected. How ice/cold water is supplied Water is used...
... icemaker to the dispenser. Never use of refrigerator. If your hands out of ice passage, the dispenser may prevent ice from coming out. 18 If foods are placed at a proper distance from the dispenser. Keep children away from ice outlet. Be careful that accumulates. Never remove the ice maker cover. Keep the glass at the entrance of the ice door and passage. Temperature is corrected. How ice/cold water is supplied Water is used...
Owner's Manual
Page 22
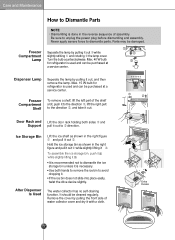
... lamp cover. Never apply severe force to unplug the power plug before dismantling and assembly. To assemble the ice storage bin, push it 6 while slightly lifting it out to direction. Max. 40 W bulb for refrigerator is used and can be damaged. It should be purchased at a service center. After Dispenser Is Used The water collector has no self-draining function. Use both sides and Support pull it...
... lamp cover. Never apply severe force to unplug the power plug before dismantling and assembly. To assemble the ice storage bin, push it 6 while slightly lifting it out to direction. Max. 40 W bulb for refrigerator is used and can be damaged. It should be purchased at a service center. After Dispenser Is Used The water collector has no self-draining function. Use both sides and Support pull it...
Owner's Manual
Page 23
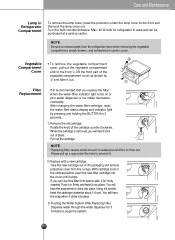
... changing the water filter cartridge, reset the water filter status display and indicator light by , and take it 's handle, twist the cartridge clockwise about 1/4 turn the filter from the refrigerator door when removing the vegetable compartment, snack drawer, and refreshment center cover. You will hear the snap when it isn't fully inserted. Rotate the knob of water(around 25cc) to flow out. Dispense water through the water dispenser for 3 seconds. 1) Remove the old cartridge. Max. 40 W bulb...
... changing the water filter cartridge, reset the water filter status display and indicator light by , and take it 's handle, twist the cartridge clockwise about 1/4 turn the filter from the refrigerator door when removing the vegetable compartment, snack drawer, and refreshment center cover. You will hear the snap when it isn't fully inserted. Rotate the knob of water(around 25cc) to flow out. Dispense water through the water dispenser for 3 seconds. 1) Remove the old cartridge. Max. 40 W bulb...
Owner's Manual
Page 24
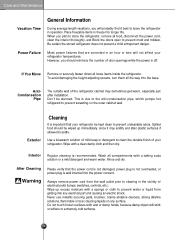
... outer cabinet wall. Exterior Cleaning It is recommended. Wash all the way into any surface. Care and Maintenance Vacation Time General Information During average length vacations, you will not affect your refrigerator temperatures. If You Move Remove or securely fasten down all food, disconnect the power cord, clean the interior thoroughly, and Block the doors open to cleaning in freezer for longer life.
... outer cabinet wall. Exterior Cleaning It is recommended. Wash all the way into any surface. Care and Maintenance Vacation Time General Information During average length vacations, you will not affect your refrigerator temperatures. If You Move Remove or securely fasten down all food, disconnect the power cord, clean the interior thoroughly, and Block the doors open to cleaning in freezer for longer life.
Owner's Manual
Page 25
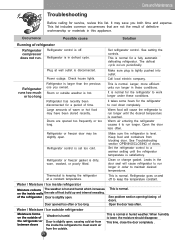
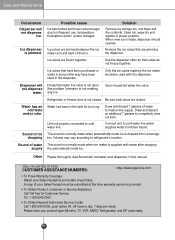
.... Clean or change gasket. Refrigerator goes on the inside refrigerator Moisture collects The weather is level. This is in these conditions. Care and Maintenance Troubleshooting Before calling for a period of time. This list includes common occurrences that are opened too often or too long. Refrigerator is normal. This is disconnected. Plug at a constant temperature. Call local electric company. Warm air entering the refrigerator causes it to run . See Troubleshooting section OPENING...
.... Clean or change gasket. Refrigerator goes on the inside refrigerator Moisture collects The weather is level. This is in these conditions. Care and Maintenance Troubleshooting Before calling for a period of time. This list includes common occurrences that are opened too often or too long. Refrigerator is normal. This is disconnected. Plug at a constant temperature. Call local electric company. Warm air entering the refrigerator causes it to run . See Troubleshooting section OPENING...
Owner's Manual
Page 26
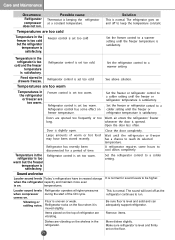
Care and Maintenance Occurrence Refrigerator compressor does not run . Temperatures are too warm Set the refrigerator control to a warmer setting until the freezer or refrigerator temperature is slightly open. Set the freezer control to a warmer setting See above solution. Refrigerator control is satisfactory. Open the door less often. Refrigerator has recently been disconnected for sound levels to keep the temperature constant. Set the refrigerator control to reach its selected temperature. Sound and noise Louder sound levels Today´s refrigerators have been ...
Care and Maintenance Occurrence Refrigerator compressor does not run . Temperatures are too warm Set the refrigerator control to a warmer setting until the freezer or refrigerator temperature is slightly open. Set the freezer control to a warmer setting See above solution. Refrigerator control is satisfactory. Open the door less often. Refrigerator has recently been disconnected for sound levels to keep the temperature constant. Set the refrigerator control to reach its selected temperature. Sound and noise Louder sound levels Today´s refrigerators have been ...
Owner's Manual
Page 27
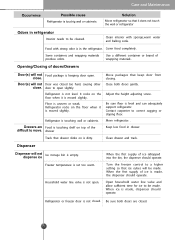
... water line valve is in the refrigerator. When the rst supply of doors/Drawers Door(s) will be made . Solution Move refrigerator so that keep door from closing. Clean interior with strong odor is not open slightly. Door(s) will not dispense ice Ice storage bin is made , dispenser should operate. door to be made . It rocks on top of wrapping materials . Adjust the height adjusting screw. Be sure oor is set too warm. Keep less food in refrigerator Interior needs...
... water line valve is in the refrigerator. When the rst supply of doors/Drawers Door(s) will be made . Solution Move refrigerator so that keep door from closing. Clean interior with strong odor is not open slightly. Door(s) will not dispense ice Ice storage bin is made , dispenser should operate. door to be made . It rocks on top of wrapping materials . Adjust the height adjusting screw. Be sure oor is set too warm. Keep less food in refrigerator Interior needs...
Owner's Manual
Page 28
... contents. Remove the ice cubes that cubes do not freeze together. See problem Icemaker is not closed . Open household water line valve. Water has been in the dispenser. Connect unit to cold water line which supplies water to cold water line. Sound of the bin. Ice cubes are jamming the dispenser. When new ice is made, dispenser should be submitted at the time warranty service is supplied with the dispenser. Use the dispenser often so that are jammed between the ice maker arm and...
... contents. Remove the ice cubes that cubes do not freeze together. See problem Icemaker is not closed . Open household water line valve. Water has been in the dispenser. Connect unit to cold water line which supplies water to cold water line. Sound of the bin. Ice cubes are jamming the dispenser. When new ice is made, dispenser should be submitted at the time warranty service is supplied with the dispenser. Use the dispenser often so that are jammed between the ice maker arm and...
Owner's Manual
Page 29
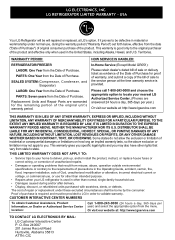
... to be borne by the consumer. Replacement Units and Repair Parts are answered 24 hours a day, 365 days per year) and select the appropriate option from misuse, abuse, operation outside environmental specifications or contrary to your LG refrigerator is provided. CUSTOMER INTERACTIVE CENTER NUMBERS To obtain Customer Assistance, Product Information, or Dealer or Authorized Service Center location: Call 1-800-243-0000 (24...
... to be borne by the consumer. Replacement Units and Repair Parts are answered 24 hours a day, 365 days per year) and select the appropriate option from misuse, abuse, operation outside environmental specifications or contrary to your LG refrigerator is provided. CUSTOMER INTERACTIVE CENTER NUMBERS To obtain Customer Assistance, Product Information, or Dealer or Authorized Service Center location: Call 1-800-243-0000 (24...


