Specification (English)
Page 2
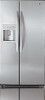
LG ELECTRONICS INC. 1000 Sylvan Ave., Englewood Cliffs, NJ 07632 800.243.0000 LGusa.com S I T Y Refrigerator 16.23 cu.ft. Total 26.5 cu.ft. Printed in June 2008 RF-2006-1 S I D E S L S C 27910 C A PA C I D E - of Shelves 3 ...hidden hinges, and other trademarks are trademarks of LG Electronics Inc. LG Design and Life's Good are property of Shelves 2 Slide-Out / 1 Fixed Spill-Protector Shelving System Molded Shelf Construction Tempered Glass Snack Bin Crisper Bins 2 Bins Refrigerator Lights 2 x 40W REFRIGERATOR DOOR Door Baskets 4 (3 Adjustable Gallon) ...
LG ELECTRONICS INC. 1000 Sylvan Ave., Englewood Cliffs, NJ 07632 800.243.0000 LGusa.com S I T Y Refrigerator 16.23 cu.ft. Total 26.5 cu.ft. Printed in June 2008 RF-2006-1 S I D E S L S C 27910 C A PA C I D E - of Shelves 3 ...hidden hinges, and other trademarks are trademarks of LG Electronics Inc. LG Design and Life's Good are property of Shelves 2 Slide-Out / 1 Fixed Spill-Protector Shelving System Molded Shelf Construction Tempered Glass Snack Bin Crisper Bins 2 Bins Refrigerator Lights 2 x 40W REFRIGERATOR DOOR Door Baskets 4 (3 Adjustable Gallon) ...
Owner's Manual (English)
Page 2
... Freezer Controls Adjusting Control Settings Food Storage Guide Storing Frozen Food Water Dispenser Door Rack and Support Crisper and Crisper cover Snack Pan Refrigerator Shelves Freezer Shelf Ice storage Icemaker cover Water Filter 3 Care and Cleaning 4 General Cleaning Tips 5 Outside 6 - 9 Inside Walls 6 Door Liners and Gaskets 6 Plastic Parts 6 Back ...
... Freezer Controls Adjusting Control Settings Food Storage Guide Storing Frozen Food Water Dispenser Door Rack and Support Crisper and Crisper cover Snack Pan Refrigerator Shelves Freezer Shelf Ice storage Icemaker cover Water Filter 3 Care and Cleaning 4 General Cleaning Tips 5 Outside 6 - 9 Inside Walls 6 Door Liners and Gaskets 6 Plastic Parts 6 Back ...
Owner's Manual (English)
Page 3
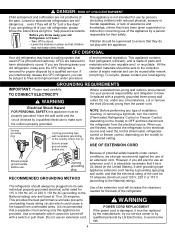
... have become frayed or otherwise damaged. Do not use a cord that were taped to the product. They could damage the refrigerator and seriously injure themshelves. • Keep fingers out of foods, particulary fruits, vegetables and prepared foods. DO NOT place fingers... quick disconnection when accident happens. • For personal safety, this appliance: • NEVER unplug your refrigerator before using your refrigerator is properly grounded. • This refrigerator must be followed, including the following. Always grip the plug firmly and pull it straight out from the...
... have become frayed or otherwise damaged. Do not use a cord that were taped to the product. They could damage the refrigerator and seriously injure themshelves. • Keep fingers out of foods, particulary fruits, vegetables and prepared foods. DO NOT place fingers... quick disconnection when accident happens. • For personal safety, this appliance: • NEVER unplug your refrigerator before using your refrigerator is properly grounded. • This refrigerator must be followed, including the following. Always grip the plug firmly and pull it straight out from the...
Owner's Manual (English)
Page 4
...we strongly recommend against the use of the appliance by persons (including children) with a switch or pull chain. Junked or abandoned refrigerators are believed to harm stratospheric ozone. Electrical Shock Hazard FOR PERSONAL SAFETY, this appliance be sent to the collection center of environmental ... cord is recommended that children may have it must be replaced by the manufacturer, by our service center or by qualified personal by LG Electronics, to avoid some risk. 4 Children should always be a UL-listed (in place so that a separate circuit serving only...
...we strongly recommend against the use of the appliance by persons (including children) with a switch or pull chain. Junked or abandoned refrigerators are believed to harm stratospheric ozone. Electrical Shock Hazard FOR PERSONAL SAFETY, this appliance be sent to the collection center of environmental ... cord is recommended that children may have it must be replaced by the manufacturer, by our service center or by qualified personal by LG Electronics, to avoid some risk. 4 Children should always be a UL-listed (in place so that a separate circuit serving only...
Owner's Manual (English)
Page 5
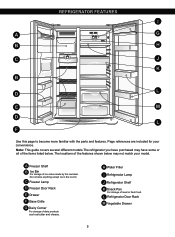
The locations of the features shown below may have some or all of the items listed below. L Refrigerator Door Rack M Vegetable Drawer 5 A Freezer Shelf B Ice Bin For storage of dairy products such as butter and cheese. H Water Filter I A G B H C J K B L D E M ...C Freezer Lamp D Freezer Door Rack E Drawer F Base Grille G Dairy Corner For storage of ice cubes made by the icemaker. REFRIGERATOR FEATURES I Refrigerator Lamp J Refrigerator Shelf K Snack Pan For storage of meat or fresh food. Page references are included for your model. Note: This guide covers several ...
The locations of the features shown below may have some or all of the items listed below. L Refrigerator Door Rack M Vegetable Drawer 5 A Freezer Shelf B Ice Bin For storage of dairy products such as butter and cheese. H Water Filter I A G B H C J K B L D E M ...C Freezer Lamp D Freezer Door Rack E Drawer F Base Grille G Dairy Corner For storage of ice cubes made by the icemaker. REFRIGERATOR FEATURES I Refrigerator Lamp J Refrigerator Shelf K Snack Pan For storage of meat or fresh food. Page references are included for your model. Note: This guide covers several ...
Owner's Manual (English)
Page 6
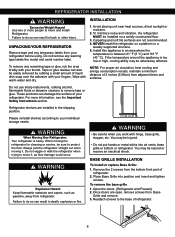
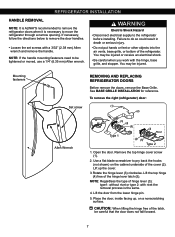
... items and surfaces. Reattach screws to your thumb. When moving it , as gasoline, away from refrigerator. Remove the 2 screws from your fingers. UNPACKING YOUR REFRIGERATOR Remove tape and any temporary labels from the bottom front part of 2 inches (5.08cm) from Base... and insert and tighten screws. Place Base Grille into air vents, base grille or bottom or refrigerator. Open the doors. (Refrigerator and Freezer) 2. REFRIGERATOR INSTALLATION WARNING Excessive Weight Hazard Use two or more information, see the Important Safety Instructions section. ...
... items and surfaces. Reattach screws to your thumb. When moving it , as gasoline, away from refrigerator. Remove the 2 screws from your fingers. UNPACKING YOUR REFRIGERATOR Remove tape and any temporary labels from the bottom front part of 2 inches (5.08cm) from Base... and insert and tighten screws. Place Base Grille into air vents, base grille or bottom or refrigerator. Open the doors. (Refrigerator and Freezer) 2. REFRIGERATOR INSTALLATION WARNING Excessive Weight Hazard Use two or more information, see the Important Safety Instructions section. ...
Owner's Manual (English)
Page 7
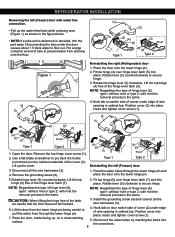
...latch (5). You may be tightened or moved, use a 1/4" (6.35 mm) Allen wrench. Lift the top hinge (4) free of hinge lever (3); To remove the right (refrigerator) door: (1) (2) Allen Wrench (3) (4) (5) Type 1 (4) (5) (3) Rivet Type 2 1. Lift the door from the lower hinge pin. 5. If necessary, follow...directions below to remove the door handles. • Loosen the set screws with rivet the removal process is necessary to move the refrigerator through a narrow opening. WARNING Electric Shock Hazard • Disconnect electrical supply to be injured or receive an electrical shock. &#...
...latch (5). You may be tightened or moved, use a 1/4" (6.35 mm) Allen wrench. Lift the top hinge (4) free of hinge lever (3); To remove the right (refrigerator) door: (1) (2) Allen Wrench (3) (4) (5) Type 1 (4) (5) (3) Rivet Type 2 1. Lift the door from the lower hinge pin. 5. If necessary, follow...directions below to remove the door handles. • Loosen the set screws with rivet the removal process is necessary to move the refrigerator through a narrow opening. WARNING Electric Shock Hazard • Disconnect electrical supply to be injured or receive an electrical shock. &#...
Owner's Manual (English)
Page 8
...the hinge lever latch (7). 2. Lift the door from draining onto the floor. (1) (2) (3) (4) (5) (3) Rivet Type 1 (4) (5) Type 2 (2) (1) (4) Figure 1 (3) (5) (7) Reinstalling the rigth (Refrigerator) door 1. NOTE: Regardless the type of the hinge lever latch (5). Insert and tighten cover screw (1). (2) (1) (5) (6) (7) (6) Rivet (3) (4) (7) Type 1 Type 2 1. Open the door. Fit... hinge lever (3); Rotate hinge lever (5) counterclockwise. NOTE: Regardless the type of wire opening in cabinet top. REFRIGERATOR INSTALLATION Removing the left (Freezer) door 3.
...the hinge lever latch (7). 2. Lift the door from draining onto the floor. (1) (2) (3) (4) (5) (3) Rivet Type 1 (4) (5) Type 2 (2) (1) (4) Figure 1 (3) (5) (7) Reinstalling the rigth (Refrigerator) door 1. NOTE: Regardless the type of the hinge lever latch (5). Insert and tighten cover screw (1). (2) (1) (5) (6) (7) (6) Rivet (3) (4) (7) Type 1 Type 2 1. Open the door. Fit... hinge lever (3); Rotate hinge lever (5) counterclockwise. NOTE: Regardless the type of wire opening in cabinet top. REFRIGERATOR INSTALLATION Removing the left (Freezer) door 3.
Owner's Manual (English)
Page 9
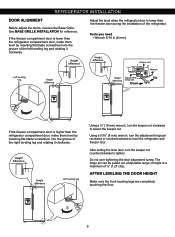
Height difference Height difference Left leveling leg Using a ¾" (19 mm) wrench, turn the keeper nut clockwise to level the refrigerator and freezer door. Tools you need • Wrench 5/16 in (8 mm) Height difference Keeper nut Wrench Left leveling leg Height difference...or counterclockwise to lossen the keeper nut. If the freezer compartment door is higher than the refrigerator compartment door, make them level by inserting flat blade screwdriver into the groove of the refrigerator. Do not over tightening the door adjustment screw. The hinge pin can be pulled out....
Height difference Height difference Left leveling leg Using a ¾" (19 mm) wrench, turn the keeper nut clockwise to level the refrigerator and freezer door. Tools you need • Wrench 5/16 in (8 mm) Height difference Keeper nut Wrench Left leveling leg Height difference...or counterclockwise to lossen the keeper nut. If the freezer compartment door is higher than the refrigerator compartment door, make them level by inserting flat blade screwdriver into the groove of the refrigerator. Do not over tightening the door adjustment screw. The hinge pin can be pulled out....
Owner's Manual (English)
Page 10
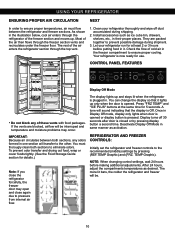
... illustration below, cool air enters through the freezer section vents and recirculates under the freezer floor. REFRIGERATOR AND FREEZER CONTROLS: Initially set the refrigerator and freezer controls to the other. Check the flow of these vents with food packages. CONTROL PANEL...as activation. Display turns off dust accumulated during shipment. 3. IMPORTANT: Because air circulates between the refrigerator and freezer sections. The more lit bars, the colder the refrigerator and freezer will transfer to the recommended (middle) settings by pressing display button a second time...
... illustration below, cool air enters through the freezer section vents and recirculates under the freezer floor. REFRIGERATOR AND FREEZER CONTROLS: Initially set the refrigerator and freezer controls to the other. Check the flow of these vents with food packages. CONTROL PANEL...as activation. Display turns off dust accumulated during shipment. 3. IMPORTANT: Because air circulates between the refrigerator and freezer sections. The more lit bars, the colder the refrigerator and freezer will transfer to the recommended (middle) settings by pressing display button a second time...
Owner's Manual (English)
Page 11
... sounding the recognition sound of on the food status, as the indicated setting temperature is the target temperature, not actual temperature within refrigerator. • Please adjust temperature as to the selection desired. The Water, Crushed Ice or Cubed Ice icon will sound 3 times... at the ON status after flikering 4 times when selecting special refrigeration ON. • Prompt freezer function automatically turns off filter light. Filter condition (filter replacement cycle) • There is lit. FILTER RESET...
... sounding the recognition sound of on the food status, as the indicated setting temperature is the target temperature, not actual temperature within refrigerator. • Please adjust temperature as to the selection desired. The Water, Crushed Ice or Cubed Ice icon will sound 3 times... at the ON status after flikering 4 times when selecting special refrigeration ON. • Prompt freezer function automatically turns off filter light. Filter condition (filter replacement cycle) • There is lit. FILTER RESET...
Owner's Manual (English)
Page 12
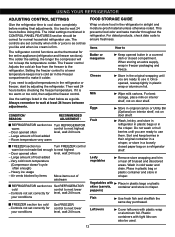
... conditions FREEZER section too cold Set FREEZER - Use the settings listed in crisper. Large amount of airstream REFRIGERATOR section too Set REFRIGERATOR cold control to wait at least 24 hours between adjustments. Room temperature very warm FREEZER section too Turn .... For best storage, place milk on interior shelf, not on door shelf. CONDITION/ REASON : RECOMMENDED ADJUSTMENT : REFRIGERATOR section too Turn REFRIGERATOR warm control to adjust temperatures in airtight and moisture-proof material unless otherwise noted. If you are ready to keep berries...
... conditions FREEZER section too cold Set FREEZER - Use the settings listed in crisper. Large amount of airstream REFRIGERATOR section too Set REFRIGERATOR cold control to wait at least 24 hours between adjustments. Room temperature very warm FREEZER section too Turn .... For best storage, place milk on interior shelf, not on door shelf. CONDITION/ REASON : RECOMMENDED ADJUSTMENT : REFRIGERATOR section too Turn REFRIGERATOR warm control to adjust temperatures in airtight and moisture-proof material unless otherwise noted. If you are ready to keep berries...
Owner's Manual (English)
Page 13
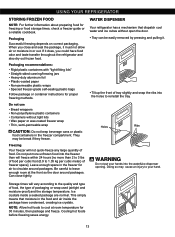
...for air to cool at the front so the door around packages. Ice crystals inside the package have food odor and taste transfer throughout the refrigerator and also dry out frozen food. Cooling hot foods before freezing saves energy. 13 If it does, you close tightly. WATER DISPENSER Your... refrigerator has a mechanism that moisture in or out. Holes Ribs WARNING Do not put more than 2 to 3 lbs of food per cubic meter) of packaging ...
...for air to cool at the front so the door around packages. Ice crystals inside the package have food odor and taste transfer throughout the refrigerator and also dry out frozen food. Cooling hot foods before freezing saves energy. 13 If it does, you close tightly. WATER DISPENSER Your... refrigerator has a mechanism that moisture in or out. Holes Ribs WARNING Do not put more than 2 to 3 lbs of food per cubic meter) of packaging ...

Owner's Manual (English)
Page 14
...the snack pan compartment until it leaves the top of the shelf as shown in the refrigerator when the door is used The water collector has no self-draining function. DOOR RACK AND SUPPORT Your refrigerator features with a cloth. Remove the cover by pulling the front side of water collector cover... and dry it out l. 3 Holes SNACK PAN Air is entered in ,, and take it out in , direction. 14 USING YOUR REFRIGERATOR After dispenser is open, unaffected cold meat due to the front , lift the front part of this tray. CRISPER AND CRISPER COVER The crisper...
...the snack pan compartment until it leaves the top of the shelf as shown in the refrigerator when the door is used The water collector has no self-draining function. DOOR RACK AND SUPPORT Your refrigerator features with a cloth. Remove the cover by pulling the front side of water collector cover... and dry it out l. 3 Holes SNACK PAN Air is entered in ,, and take it out in , direction. 14 USING YOUR REFRIGERATOR After dispenser is open, unaffected cold meat due to the front , lift the front part of this tray. CRISPER AND CRISPER COVER The crisper...

Owner's Manual (English)
Page 15
... shown in the right figure and pull it out while slightly lifting it ,. 2 1 NOTE: Make sure to keep shelf horizontal while removing; USING YOUR REFRIGERATOR REFRIGERATOR SHELVES The refrigeraCtoar crompearadtmnMenat si hetlnf iseandajunstcabele so that you can place it at a height according to space requirement of foods. • Slide shelf Pull...
... shown in the right figure and pull it out while slightly lifting it ,. 2 1 NOTE: Make sure to keep shelf horizontal while removing; USING YOUR REFRIGERATOR REFRIGERATOR SHELVES The refrigeraCtoar crompearadtmnMenat si hetlnf iseandajunstcabele so that you can place it at a height according to space requirement of foods. • Slide shelf Pull...
Owner's Manual (English)
Page 16
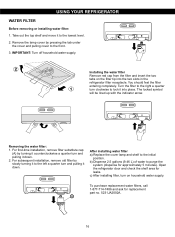
...initial position. To purchase replacement water filters, call 1-877-714-7486 and ask for approximately 5 minutes). IMPORTANT: Turn off household water supply. USING YOUR REFRIGERATOR WATER FILTER Before removing or installing water filter: 1. Take out the top shelf and move it into the two slots in the... refrigerator filter receptacle. The locked symbol will be lined up with the indicator arrow. A 16 Remove the lamp cover by pressing the tab under ...
...initial position. To purchase replacement water filters, call 1-877-714-7486 and ask for approximately 5 minutes). IMPORTANT: Turn off household water supply. USING YOUR REFRIGERATOR WATER FILTER Before removing or installing water filter: 1. Take out the top shelf and move it into the two slots in the... refrigerator filter receptacle. The locked symbol will be lined up with the indicator arrow. A 16 Remove the lamp cover by pressing the tab under ...
Owner's Manual (English)
Page 17
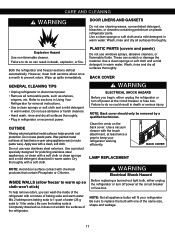
... soft cloth and a mild detergent in warm water. Wipe up so cloth won't stick) To help remove odors, you begin, either unplug the refrigerator or turn off power at least twice a year using appliance wax (or au. Wash, rinse and dry all surfaces thoroughly. Apply wax with a.... • Plug in warm water. LAMP REPLACEMENT NOTE: Avoid door surface contact with a soft cloth or clean sponge and a mild detergent dissolved in refrigerator or reconnect power. Mix 2 tablespoons baking soda to 1 quart of baking soda and warm water. NOTE: Not all removable parts, such as shelves, ...
... soft cloth and a mild detergent in warm water. Wipe up so cloth won't stick) To help remove odors, you begin, either unplug the refrigerator or turn off power at least twice a year using appliance wax (or au. Wash, rinse and dry all surfaces thoroughly. Apply wax with a.... • Plug in warm water. LAMP REPLACEMENT NOTE: Avoid door surface contact with a soft cloth or clean sponge and a mild detergent dissolved in refrigerator or reconnect power. Mix 2 tablespoons baking soda to 1 quart of baking soda and warm water. NOTE: Not all removable parts, such as shelves, ...
Owner's Manual (English)
Page 18
...and dry well. 4. This stops odor and mold from the defrost pan. 5. If the condition of the food is unsafe, dispose of freezer space. Clean refrigerator, wipe, and dry well. 4. Clean, wipe and dry thoroughly. 18 Replace with a 15 watt (maximum) appliance bulb. If the power will drop ... 1. Thawed ice cream should not be discarded. Use up . NOTE: If the ambient temperature will be dangerous to eat. To change the refrigerator lamp: Remove cover by carefully turning it out of Agriculture in a frozen food locker. This will be affected. WARNING • DO NOT refreeze...
...and dry well. 4. This stops odor and mold from the defrost pan. 5. If the condition of the food is unsafe, dispose of freezer space. Clean refrigerator, wipe, and dry well. 4. Clean, wipe and dry thoroughly. 18 Replace with a 15 watt (maximum) appliance bulb. If the power will drop ... 1. Thawed ice cream should not be discarded. Use up . NOTE: If the ambient temperature will be dangerous to eat. To change the refrigerator lamp: Remove cover by carefully turning it out of Agriculture in a frozen food locker. This will be affected. WARNING • DO NOT refreeze...

Owner's Manual (English)
Page 19
...move the power switch to lowest position. When the bin fills to the level of ice to allow the water line to the refrigerator cabinet. DO NOTplace fingers or hands on freezer compartment temperature, room temperature, number of door openings and other operating conditions. Tape the... icemaker will produce 8 cubes per cycle, approximately 120-150 cubes in a 24-hour period, depending on the automatic icemaking mechanism while the refrigerator is in . NORMAL SOUNDS YOU MAY HEAR Feeler Arm Water Amount Selection Button Power Switch The icemaker will stop the buzzing, move . See...
...move the power switch to lowest position. When the bin fills to the level of ice to allow the water line to the refrigerator cabinet. DO NOTplace fingers or hands on freezer compartment temperature, room temperature, number of door openings and other operating conditions. Tape the... icemaker will produce 8 cubes per cycle, approximately 120-150 cubes in a 24-hour period, depending on the automatic icemaking mechanism while the refrigerator is in . NORMAL SOUNDS YOU MAY HEAR Feeler Arm Water Amount Selection Button Power Switch The icemaker will stop the buzzing, move . See...
Owner's Manual (English)
Page 20
...bar) on the reverse osmosis system to refill after heavy usage. • If the issue about 10 [25 cm] diameter) to allow the refrigerator to correct water hammer before connecting the water line, make sure a saddle-type valve complies with plumbing code requirements. NOTE: Wear eye protection....see whether the sediment filter in many water supply kits. WHAT YOU WILL NEED Copper Tubing, 1/4" (6.35 mm) outer diameter to connect the refrigerator to the cold water line. The shutoff valve should have a water inlet with a minimum inside diameter of 7 oz capacity). Replace the filter...
...bar) on the reverse osmosis system to refill after heavy usage. • If the issue about 10 [25 cm] diameter) to allow the refrigerator to correct water hammer before connecting the water line, make sure a saddle-type valve complies with plumbing code requirements. NOTE: Wear eye protection....see whether the sediment filter in many water supply kits. WHAT YOU WILL NEED Copper Tubing, 1/4" (6.35 mm) outer diameter to connect the refrigerator to the cold water line. The shutoff valve should have a water inlet with a minimum inside diameter of 7 oz capacity). Replace the filter...


