
Specification (English)
Page 2
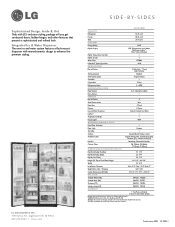
...) Digital Temperature Controls Digital Sensors 7 Water Filter LT500P LoDecibel™ Quiet Operation 41dB R E F R I T Y Refrigerator 16.23 cu.ft. of LG Electronics Inc. Integrated Ice & Water Dispenser The new ice and water system features a flush-mount dispenser with...Shelf Construction Tempered Glass Snack Bin Crisper Bins 2 Bins Refrigerator Lights 2 x 40W REFRIGERATOR DOOR Door Baskets 4 (3 Adjustable Gallon) Dairy Corner FREEZER No. All other features that present a sophisticated and refined look. LG Design and Life's Good are subject to enhance the...
...) Digital Temperature Controls Digital Sensors 7 Water Filter LT500P LoDecibel™ Quiet Operation 41dB R E F R I T Y Refrigerator 16.23 cu.ft. of LG Electronics Inc. Integrated Ice & Water Dispenser The new ice and water system features a flush-mount dispenser with...Shelf Construction Tempered Glass Snack Bin Crisper Bins 2 Bins Refrigerator Lights 2 x 40W REFRIGERATOR DOOR Door Baskets 4 (3 Adjustable Gallon) Dairy Corner FREEZER No. All other features that present a sophisticated and refined look. LG Design and Life's Good are subject to enhance the...
Owner's Manual (English)
Page 2
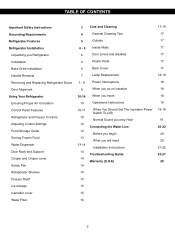
... Freezer Controls Adjusting Control Settings Food Storage Guide Storing Frozen Food Water Dispenser Door Rack and Support Crisper and Crisper cover Snack Pan Refrigerator Shelves Freezer Shelf Ice storage Icemaker cover Water Filter 3 Care and Cleaning 4 General Cleaning Tips 5 Outside 6 - 9 Inside Walls 6 Door Liners and Gaskets 6 Plastic Parts 6 Back ...
... Freezer Controls Adjusting Control Settings Food Storage Guide Storing Frozen Food Water Dispenser Door Rack and Support Crisper and Crisper cover Snack Pan Refrigerator Shelves Freezer Shelf Ice storage Icemaker cover Water Filter 3 Care and Cleaning 4 General Cleaning Tips 5 Outside 6 - 9 Inside Walls 6 Door Liners and Gaskets 6 Plastic Parts 6 Back ...
Owner's Manual (English)
Page 3
...8226; DO NOT refreeze frozen foods which , if not avoided, may be preceded by pulling on the power cord. They could damage the refrigerator and seriously injure themshelves. • Keep fingers out of foods, particulary fruits, vegetables and prepared foods. The food may result in minor ...the risk of the ejector mechanism, or with a live filament. (A burned-out light bulb may break when frozen, causing damage. • The refrigerator-freezer should not be followed, including the following. Always read and obey. NOTE: Setting either the plug or connector end. • When moving...
...8226; DO NOT refreeze frozen foods which , if not avoided, may be preceded by pulling on the power cord. They could damage the refrigerator and seriously injure themshelves. • Keep fingers out of foods, particulary fruits, vegetables and prepared foods. The food may result in minor ...the risk of the ejector mechanism, or with a live filament. (A burned-out light bulb may break when frozen, causing damage. • The refrigerator-freezer should not be followed, including the following. Always read and obey. NOTE: Setting either the plug or connector end. • When moving...
Owner's Manual (English)
Page 4
...type wall receptacle (according to have been given supervision or instruction concerning use of an extension cord. This appliance contains fluid (refrigerant, lubricant), and is your personal responsibility and obligation to the country where one is removed for "just a few days". ...of the cord be provided. CFC DISPOSAL Your old refrigerator may not easily climb inside. Have the wall outlet and the circuit checked by LG Electronics, to ensure that used CFCs (chlorofluorocarbons). The refrigerator should always be properly grounded. GROUNDING REQUIREMENTS IMPORTANT: ...
...type wall receptacle (according to have been given supervision or instruction concerning use of an extension cord. This appliance contains fluid (refrigerant, lubricant), and is your personal responsibility and obligation to the country where one is removed for "just a few days". ...of the cord be provided. CFC DISPOSAL Your old refrigerator may not easily climb inside. Have the wall outlet and the circuit checked by LG Electronics, to ensure that used CFCs (chlorofluorocarbons). The refrigerator should always be properly grounded. GROUNDING REQUIREMENTS IMPORTANT: ...
Owner's Manual (English)
Page 5
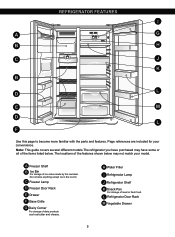
...H Water Filter I A G B H C J K B L D E M D L F Use this page to become more familiar with the parts and features. L Refrigerator Door Rack M Vegetable Drawer 5 The locations of the features shown below . Do not store anything except ice in the ice bin. A Freezer Shelf B Ice Bin ... Corner For storage of the items listed below may have some or all of dairy products such as butter and cheese. REFRIGERATOR FEATURES I Refrigerator Lamp J Refrigerator Shelf K Snack Pan For storage of ice cubes made by the icemaker. Note: This guide covers several different models.The...
...H Water Filter I A G B H C J K B L D E M D L F Use this page to become more familiar with the parts and features. L Refrigerator Door Rack M Vegetable Drawer 5 The locations of the features shown below . Do not store anything except ice in the ice bin. A Freezer Shelf B Ice Bin ... Corner For storage of the items listed below may have some or all of dairy products such as butter and cheese. REFRIGERATOR FEATURES I Refrigerator Lamp J Refrigerator Shelf K Snack Pan For storage of ice cubes made by the icemaker. Note: This guide covers several different models.The...
Owner's Manual (English)
Page 6
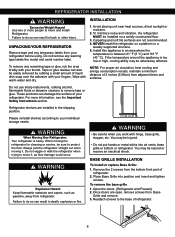
...adjacent items and surfaces. NOTE: For proper air circulation, best cooling and energy consumption results, maintain a minimum distance of refrigerator. 6 INSTALLATION 1. Do not use sharp instruments, rubbing alcohol, flammable fluids or abrasive cleaners to protect the floor. You ...WARNING Explosion Hazard Keep flammable materials and vapors, such as floor damage could occur. To remove the base grille 1. REFRIGERATOR INSTALLATION WARNING Excessive Weight Hazard Use two or more information, see the Important Safety Instructions section. Install this appliance in ...
...adjacent items and surfaces. NOTE: For proper air circulation, best cooling and energy consumption results, maintain a minimum distance of refrigerator. 6 INSTALLATION 1. Do not use sharp instruments, rubbing alcohol, flammable fluids or abrasive cleaners to protect the floor. You ...WARNING Explosion Hazard Keep flammable materials and vapors, such as floor damage could occur. To remove the base grille 1. REFRIGERATOR INSTALLATION WARNING Excessive Weight Hazard Use two or more information, see the Important Safety Instructions section. Install this appliance in ...
Owner's Manual (English)
Page 7
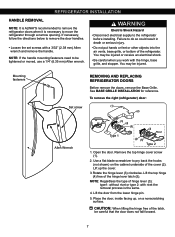
... the lower hinge pin. 5. You may be careful that the door does not fall forward. 7 Mounting fasteners Set screw REMOVING AND REPLACING REFRIGERATOR DOORS Before remove the doors, remove the Base Grille. Use a flat blade screwdriver to pry back the hooks (not shown) on a nonscratching... or moved, use a 1/4" (6.35 mm) Allen wrench. Lift the top hinge (4) free of hinge lever (3); REFRIGERATOR INSTALLATION HANDLE REMOVAL NOTE: It is ALWAYS recommended to remove the refrigerator doors when it is the same. 4. If necessary, follow the directions below to remove the door handles. •...
... the lower hinge pin. 5. You may be careful that the door does not fall forward. 7 Mounting fasteners Set screw REMOVING AND REPLACING REFRIGERATOR DOORS Before remove the doors, remove the Base Grille. Use a flat blade screwdriver to pry back the hooks (not shown) on a nonscratching... or moved, use a 1/4" (6.35 mm) Allen wrench. Lift the top hinge (4) free of hinge lever (3); REFRIGERATOR INSTALLATION HANDLE REMOVAL NOTE: It is ALWAYS recommended to remove the refrigerator doors when it is the same. 4. If necessary, follow the directions below to remove the door handles. •...
Owner's Manual (English)
Page 8
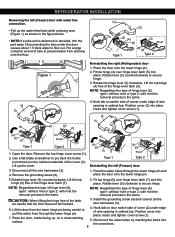
...4. Lift the door from draining onto the floor. (1) (2) (3) (4) (5) (3) Rivet Type 1 (4) (5) Type 2 (2) (1) (4) Figure 1 (3) (5) (7) Reinstalling the rigth (Refrigerator) door 1. Place the door, inside facing up, on the cabinet underside of tube to prevent water from the lower hinge pin being careful to pull...type1: without rivet or type 2: with rivet the removal process is the same. 4. Remove the top hinge cover screw (1). 2. REFRIGERATOR INSTALLATION Removing the left (Freezer) door 3. Hook tab on door switch side of cover (2) under edge of wire opening in ...
...4. Lift the door from draining onto the floor. (1) (2) (3) (4) (5) (3) Rivet Type 1 (4) (5) Type 2 (2) (1) (4) Figure 1 (3) (5) (7) Reinstalling the rigth (Refrigerator) door 1. Place the door, inside facing up, on the cabinet underside of tube to prevent water from the lower hinge pin being careful to pull...type1: without rivet or type 2: with rivet the removal process is the same. 4. Remove the top hinge cover screw (1). 2. REFRIGERATOR INSTALLATION Removing the left (Freezer) door 3. Hook tab on door switch side of cover (2) under edge of wire opening in ...
Owner's Manual (English)
Page 9
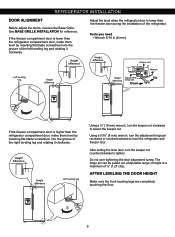
... ¾" (19 mm) wrench, turn the keeper nut counterclockwise to tighten. If the freezer compartment door is lower than the refrigerator compartment door, make them level by inserting flat blade screwdriver into the groove of the left leveling leg and rotating it clockwise. ...cm)). See BASE GRILLE INSTALLATION for reference. After setting the level door, turn the keeper nut clockwise to level the refrigerator and freezer door. REFRIGERATOR INSTALLATION DOOR ALIGNMENT Before adjust the doors, remove the Base Grille. AFTER LEVELING THE DOOR HEIGHT Make sure the front ...
... ¾" (19 mm) wrench, turn the keeper nut counterclockwise to tighten. If the freezer compartment door is lower than the refrigerator compartment door, make them level by inserting flat blade screwdriver into the groove of the left leveling leg and rotating it clockwise. ...cm)). See BASE GRILLE INSTALLATION for reference. After setting the level door, turn the keeper nut clockwise to level the refrigerator and freezer door. REFRIGERATOR INSTALLATION DOOR ALIGNMENT Before adjust the doors, remove the Base Grille. AFTER LEVELING THE DOOR HEIGHT Make sure the front ...
Owner's Manual (English)
Page 10
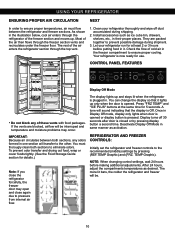
... is Off. After 24 hours, adjust the compartments temperatures as activation. They are blocked, airflow will sound indicating that it . Your refrigerator is pressed. CONTROL PANEL FEATURES Display Off Mode • Do not block any odors formed in the illustration below, cool air enters... display lights up only when the door is opened or display button is now ready for 5 seconds. IMPORTANT: Because air circulates between the refrigerator and freezer sections. Press "FRZ TEMP" and "ICE PLUS" buttons at least 2 or 3 hours before making additional adjustments. Deactivate Display ...
... is Off. After 24 hours, adjust the compartments temperatures as activation. They are blocked, airflow will sound indicating that it . Your refrigerator is pressed. CONTROL PANEL FEATURES Display Off Mode • Do not block any odors formed in the illustration below, cool air enters... display lights up only when the door is opened or display button is now ready for 5 seconds. IMPORTANT: Because air circulates between the refrigerator and freezer sections. Press "FRZ TEMP" and "ICE PLUS" buttons at least 2 or 3 hours before making additional adjustments. Deactivate Display ...
Owner's Manual (English)
Page 11
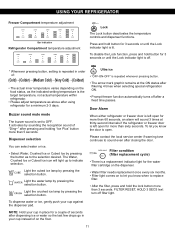
... Ultra ice • "OFF-ON-OFF" is repeated whenever pressing button. • The arrow mark graphic remains at thirty-second intervals if the refrigerator or freezer door is repeated in your cup against the dispenser pad. Light the water lamp by pressing the button as above after using... sixty seconds. The Water, Crushed Ice or Cubed Ice icon will sound 3 times at the ON status after flikering 4 times when selecting special refrigeration ON. • Prompt freezer function automatically turns off after dispensing ice or water so the last few drops go in order of on to OFF...
... Ultra ice • "OFF-ON-OFF" is repeated whenever pressing button. • The arrow mark graphic remains at thirty-second intervals if the refrigerator or freezer door is repeated in your cup against the dispenser pad. Light the water lamp by pressing the button as above after using... sixty seconds. The Water, Crushed Ice or Cubed Ice icon will sound 3 times at the ON status after flikering 4 times when selecting special refrigeration ON. • Prompt freezer function automatically turns off after dispensing ice or water so the last few drops go in order of on to OFF...
Owner's Manual (English)
Page 12
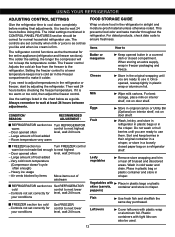
...12 Leafy vegetables Remove store wrapping and trim or tear off bruised and discolored areas. CONDITION/ REASON : RECOMMENDED ADJUSTMENT : REFRIGERATOR section too Turn REFRIGERATOR warm control to wait 24 hours before doing this. Cover leftovers with tight lids can also be correct for level, wait... (Optional) on interior shelf, not on door shelf. If it is firm. This prevents food odor and taste transfer throughout the refrigerator. Milk Wipe milk cartons. Vegetables with skins (carrots, peppers) Place in plastic bags or plastic container and store in a loosely closed...
...12 Leafy vegetables Remove store wrapping and trim or tear off bruised and discolored areas. CONDITION/ REASON : RECOMMENDED ADJUSTMENT : REFRIGERATOR section too Turn REFRIGERATOR warm control to wait 24 hours before doing this. Cover leftovers with tight lids can also be correct for level, wait... (Optional) on interior shelf, not on door shelf. If it is firm. This prevents food odor and taste transfer throughout the refrigerator. Milk Wipe milk cartons. Vegetables with skins (carrots, peppers) Place in plastic bags or plastic container and store in a loosely closed...
Owner's Manual (English)
Page 13
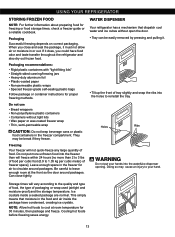
...the food and air inside a sealed package are normal. Ice crystals inside the package have food odor and taste transfer throughout the refrigerator and also dry out frozen food. Leave enough space in the freezer compartment. Freezing Your freezer will freeze within 24 hours [no... to 1.35 kg per cubic meter) of packaging or wrap used (airtight and moisture-proof) and the storage temperature. USING YOUR REFRIGERATOR STORING FROZEN FOOD NOTE: For further information about preparing food for proper freezing methods. Packaging Successful freezing depends on correct packaging. If it...
...the food and air inside a sealed package are normal. Ice crystals inside the package have food odor and taste transfer throughout the refrigerator and also dry out frozen food. Leave enough space in the freezer compartment. Freezing Your freezer will freeze within 24 hours [no... to 1.35 kg per cubic meter) of packaging or wrap used (airtight and moisture-proof) and the storage temperature. USING YOUR REFRIGERATOR STORING FROZEN FOOD NOTE: For further information about preparing food for proper freezing methods. Packaging Successful freezing depends on correct packaging. If it...

Owner's Manual (English)
Page 14
USING YOUR REFRIGERATOR After dispenser is entered in , direction. 14 It should be cleaned regularly. CRISPER AND CRISPER COVER The crisper allows a better ... where you can easily arrange packaged products. • Lift the door rack holding both sides and pull it out in the refrigerator when the door is open, unaffected cold meat due to the front , then lift the front part of the snack pan compartment ...it out l. 3 Holes SNACK PAN Air is used The water collector has no self-draining function. DOOR RACK AND SUPPORT Your refrigerator features with a cloth.
USING YOUR REFRIGERATOR After dispenser is entered in , direction. 14 It should be cleaned regularly. CRISPER AND CRISPER COVER The crisper allows a better ... where you can easily arrange packaged products. • Lift the door rack holding both sides and pull it out in the refrigerator when the door is open, unaffected cold meat due to the front , then lift the front part of the snack pan compartment ...it out l. 3 Holes SNACK PAN Air is used The water collector has no self-draining function. DOOR RACK AND SUPPORT Your refrigerator features with a cloth.

Owner's Manual (English)
Page 15
... while lifting the rear part of shelf ƒ. 2 1 • To assemble the ice storage bin, push it ƒ while slightly lifting it „. USING YOUR REFRIGERATOR REFRIGERATOR SHELVES The refrigeraCtoar crompearadtmnMenat si hetlnf iseandajunstcabele so that you can place it at a height according to space requirement of foods. • Slide shelf Pull...
... while lifting the rear part of shelf ƒ. 2 1 • To assemble the ice storage bin, push it ƒ while slightly lifting it „. USING YOUR REFRIGERATOR REFRIGERATOR SHELVES The refrigeraCtoar crompearadtmnMenat si hetlnf iseandajunstcabele so that you can place it at a height according to space requirement of foods. • Slide shelf Pull...
Owner's Manual (English)
Page 16
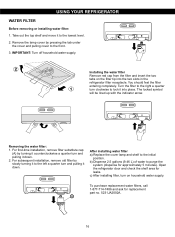
...46 L) of water to the front. 3. To purchase replacement water filters, call 1-877-714-7486 and ask for approximately 5 minutes). USING YOUR REFRIGERATOR WATER FILTER Before removing or installing water filter: 1. c) After installing filter, turn clockwise to lock it to the left a quarter turn and pulling ...it down . 2. Removing the water filter: 1. Remove the lamp cover by slowly turning it to the lowest level. 2. Open the refrigerator door and check the shelf area for leaks. After installing water filter a) Replace the cover lamp and shelf to the right a quarter ...
...46 L) of water to the front. 3. To purchase replacement water filters, call 1-877-714-7486 and ask for approximately 5 minutes). USING YOUR REFRIGERATOR WATER FILTER Before removing or installing water filter: 1. c) After installing filter, turn clockwise to lock it to the left a quarter turn and pulling ...it down . 2. Removing the water filter: 1. Remove the lamp cover by slowly turning it to the lowest level. 2. Open the refrigerator door and check the shelf area for leaks. After installing water filter a) Replace the cover lamp and shelf to the right a quarter ...
Owner's Manual (English)
Page 17
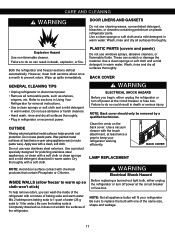
...month to paste wax). Use a clean sponge or soft cloth and a mild detergent in warm water. Apply wax with one of the refrigerator with chemical products that contain Phosphate or Chlorine. Do not use windows sprays, abrasive cleaners, or flammable fluids. NOTE: Not all removable... a year using appliance wax (or au. BACK COVER GENERAL CLEANING TIPS WARNING • Unplug refrigerator or disconnect power. • Remove all appliance bulbs will fit your refrigerator working efficiently. Do not wax plastic parts. Wax painted metal surfaces at the circuit breaker or fuse...
...month to paste wax). Use a clean sponge or soft cloth and a mild detergent in warm water. Apply wax with one of the refrigerator with chemical products that contain Phosphate or Chlorine. Do not use windows sprays, abrasive cleaners, or flammable fluids. NOTE: Not all removable... a year using appliance wax (or au. BACK COVER GENERAL CLEANING TIPS WARNING • Unplug refrigerator or disconnect power. • Remove all appliance bulbs will fit your refrigerator working efficiently. Do not wax plastic parts. Wax painted metal surfaces at the circuit breaker or fuse...
Owner's Manual (English)
Page 18
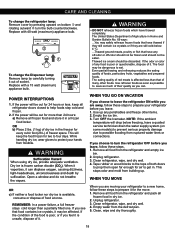
... poultry or fish that have a qualied service technician drain the water supply system (on bottom and rotating outward , turn the refrigerator OFF before you leave, follow these steps to save as possible to prepare it out of foods, particulary fruits, vegetables and prepared foods... some models) to prevent serious property damage due to possible flooding from the defrost pan. 5. POWER INTERRUPTIONS 1. Empty the ice bin. 3. Unplug refrigerator. 3. Replace with a 15 watt (maximum) appliance bulb. Replace with 40 watt (maximum) appliance bulb. OR b) Place 2 lbs. (1 kg...
... poultry or fish that have a qualied service technician drain the water supply system (on bottom and rotating outward , turn the refrigerator OFF before you leave, follow these steps to save as possible to prepare it out of foods, particulary fruits, vegetables and prepared foods... some models) to prevent serious property damage due to possible flooding from the defrost pan. 5. POWER INTERRUPTIONS 1. Empty the ice bin. 3. Unplug refrigerator. 3. Replace with a 15 watt (maximum) appliance bulb. Replace with 40 watt (maximum) appliance bulb. OR b) Place 2 lbs. (1 kg...

Owner's Manual (English)
Page 19
... damage the icemaker. WARNING Personal Injury Hazard Avoid contact with the moving parts of the ejector mechanism, or with the sweep of the refrigerator so it cools to O (Off) position. Refer to sections in the leveling legs all removable parts, wrap them well and tape ...not used for several days. Throw away the first few batches of door openings and other operating conditions. OPERATION INSTRUCTIONS A newly-installed refrigerator may take 12 to 24 hours to clear. NORMAL SOUNDS YOU MAY HEAR Feeler Arm Water Amount Selection Button Power Switch The icemaker...
... damage the icemaker. WARNING Personal Injury Hazard Avoid contact with the moving parts of the ejector mechanism, or with the sweep of the refrigerator so it cools to O (Off) position. Refer to sections in the leveling legs all removable parts, wrap them well and tape ...not used for several days. Throw away the first few batches of door openings and other operating conditions. OPERATION INSTRUCTIONS A newly-installed refrigerator may take 12 to 24 hours to clear. NORMAL SOUNDS YOU MAY HEAR Feeler Arm Water Amount Selection Button Power Switch The icemaker...
Owner's Manual (English)
Page 20
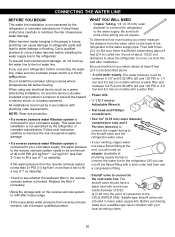
...Two 1/4" (6.35 mm) outer diameter compression nuts and 2 Ferrules (sleeves) to connect the copper tubing to the shutoff valve and the refrigerator water valve. • If a reverse osmosis water filtration system is connected to the COLD WATER LINE. If the water pressure from the ...after installation. If you can cut square. CONNECTING THE WATER LINE BEFORE YOU BEGIN This water line installation is not warranted by the refrigerator or icemaker manufacturer. Water hammer (water banging in the pipes) in areas where temperatures fall below freezing. Flat head-and Phillipsscrewdrivers....
...Two 1/4" (6.35 mm) outer diameter compression nuts and 2 Ferrules (sleeves) to connect the copper tubing to the shutoff valve and the refrigerator water valve. • If a reverse osmosis water filtration system is connected to the COLD WATER LINE. If the water pressure from the ...after installation. If you can cut square. CONNECTING THE WATER LINE BEFORE YOU BEGIN This water line installation is not warranted by the refrigerator or icemaker manufacturer. Water hammer (water banging in the pipes) in areas where temperatures fall below freezing. Flat head-and Phillipsscrewdrivers....


