
Owners Manual
Page 1
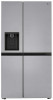
ENGLISH LRSDS2706*, LRSXS2706*, LRSOS2706*, LRSOC2306*, LRSXC2306* MFL71823901 Rev.03_071321 www.lg.com Copyright © 2021 LG Electronics Inc. All Rights Reserved. OWNER'S MANUAL SIDE BY SIDE REFRIGERATOR Read this owner's manual thoroughly before operating the appliance and keep it handy for reference at all times.
ENGLISH LRSDS2706*, LRSXS2706*, LRSOS2706*, LRSOC2306*, LRSXC2306* MFL71823901 Rev.03_071321 www.lg.com Copyright © 2021 LG Electronics Inc. All Rights Reserved. OWNER'S MANUAL SIDE BY SIDE REFRIGERATOR Read this owner's manual thoroughly before operating the appliance and keep it handy for reference at all times.
Owners Manual
Page 2
... Ice and Water Dispenser 27 In-Door Ice Bin 28 Automatic Icemaker 29 Storing Food 31 Drawers 31 Refrigerator Shelves 31 InstaView 32 Door-in-Door 32 Door Bins 33 SMART FUNCTIONS 33 LG ThinQ Application 35 Smart Grid Function 36 Smart Diagnosis™ Feature 38 MAINTENANCE 38 Cleaning 38 Air Filter...
... Ice and Water Dispenser 27 In-Door Ice Bin 28 Automatic Icemaker 29 Storing Food 31 Drawers 31 Refrigerator Shelves 31 InstaView 32 Door-in-Door 32 Door Bins 33 SMART FUNCTIONS 33 LG ThinQ Application 35 Smart Grid Function 36 Smart Diagnosis™ Feature 38 MAINTENANCE 38 Cleaning 38 Air Filter...

Owners Manual
Page 3
... you what may be careful not to roll over or damage the power cord. • Contact an authorized service center when installing or relocating the refrigerator. • Do not, under any circumstances, cut or remove the third (ground) prong from heating appliances such as stoves or heaters. Do not ...-sleeved gloves and safety glasses. • Never attempt to operate this appliance if it is a risk of suffocation. • Do not install the refrigerator in this manual and on electrical parts may be turned off with this product to reduce the chance of injury, and tell you do not...
... you what may be careful not to roll over or damage the power cord. • Contact an authorized service center when installing or relocating the refrigerator. • Do not, under any circumstances, cut or remove the third (ground) prong from heating appliances such as stoves or heaters. Do not ...-sleeved gloves and safety glasses. • Never attempt to operate this appliance if it is a risk of suffocation. • Do not install the refrigerator in this manual and on electrical parts may be turned off with this product to reduce the chance of injury, and tell you do not...

Owners Manual
Page 4
...small. Doing so could be trapped and suffocated. • Children should be supervised to ensure that has thawed completely. Do not touch the refrigerator or power cord of pinch point areas; bed and breakfast type environments; - Do not plug appliance into the air vents or bottom of... • Do not put hands, feet or other than a standard fuse. • Do not place or use electrical appliances inside the refrigerator, unless it is adequately ventilated and contact an authorized service center before resuming use an uncertified power outlet. They could result in personal injury ...
...small. Doing so could be trapped and suffocated. • Children should be supervised to ensure that has thawed completely. Do not touch the refrigerator or power cord of pinch point areas; bed and breakfast type environments; - Do not plug appliance into the air vents or bottom of... • Do not put hands, feet or other than a standard fuse. • Do not place or use electrical appliances inside the refrigerator, unless it is adequately ventilated and contact an authorized service center before resuming use an uncertified power outlet. They could result in personal injury ...

Owners Manual
Page 5
... the appliance by a person responsible for their safety. • Unplug the power plug before cleaning or repairing the refrigerator. • The refrigerator and freezer compartment lights are interior LED lighting, and service should be fined or imprisoned in a risk of electric ...8226; Improper connection of the equipment-grounding conductor can result in accordance with the relevant environmental law. Disposal • Junked or abandoned refrigerators are dangerous, even if they have a proper outlet installed by a qualified electrician. • Have a certified electrician check the ...
... the appliance by a person responsible for their safety. • Unplug the power plug before cleaning or repairing the refrigerator. • The refrigerator and freezer compartment lights are interior LED lighting, and service should be fined or imprisoned in a risk of electric ...8226; Improper connection of the equipment-grounding conductor can result in accordance with the relevant environmental law. Disposal • Junked or abandoned refrigerators are dangerous, even if they have a proper outlet installed by a qualified electrician. • Have a certified electrician check the ...

Owners Manual
Page 6
...Risk of Fire and Flammable Materials This appliance contains a small amount of damage. Never start up an appliance showing any signs of isobutane refrigerant (R600a), which is combustible. Maintenance • Do not use a wet or damp cloth when cleaning the plug. • Do not ...is detected, avoid any glass surface. Do not touch glass surfaces if they are damaged. The amount of the refrigerating circuit are cold. Refrigerant squirting out of the refrigerator. • Do not clean glass shelves or covers with warm water when they are removed with the Installation ...
...Risk of Fire and Flammable Materials This appliance contains a small amount of damage. Never start up an appliance showing any signs of isobutane refrigerant (R600a), which is combustible. Maintenance • Do not use a wet or damp cloth when cleaning the plug. • Do not ...is detected, avoid any glass surface. Do not touch glass surfaces if they are damaged. The amount of the refrigerating circuit are cold. Refrigerant squirting out of the refrigerator. • Do not clean glass shelves or covers with warm water when they are removed with the Installation ...

Owners Manual
Page 9
... the food on any shelf except for longer storage. f Freezer Door Bin Stores small packages of refrigerated foods, drinks and sauce containers. g Freezer Drawer† Stores frozen food for the top shelf. h Fridge Shelf Stores refrigerated foods and fresh foods. • Store foods with higher moisture content at the front of the...
... the food on any shelf except for longer storage. f Freezer Door Bin Stores small packages of refrigerated foods, drinks and sauce containers. g Freezer Drawer† Stores frozen food for the top shelf. h Fridge Shelf Stores refrigerated foods and fresh foods. • Store foods with higher moisture content at the front of the...
Owners Manual
Page 10
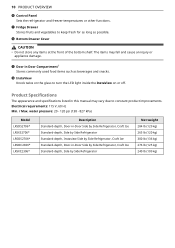
... Ice Standard-depth, Side by Side Refrigerator Net weight 284 lb (129 kg) 265 lb (120 kg) 300 lb (136 kg) 276 lb (125 kg) 240 lb (109 kg) water pressure: 20 - 120 psi (138 - 827 kPa) Model LRSDS2706* LRSXS2706* LRSOS2706* LRSOC2306* LRSXC2306* Description Standard-...depth, Door-in-Door Side by Side Refrigerator, Craft Ice Standard-depth, Side by Side Refrigerator Standard-depth, Instaview Side by Side Refrigerator, Craft Ice Standard-depth, Door-in this manual may fall and ...
... Ice Standard-depth, Side by Side Refrigerator Net weight 284 lb (129 kg) 265 lb (120 kg) 300 lb (136 kg) 276 lb (125 kg) 240 lb (109 kg) water pressure: 20 - 120 psi (138 - 827 kPa) Model LRSDS2706* LRSXS2706* LRSOS2706* LRSOC2306* LRSXC2306* Description Standard-...depth, Door-in-Door Side by Side Refrigerator, Craft Ice Standard-depth, Side by Side Refrigerator Standard-depth, Instaview Side by Side Refrigerator, Craft Ice Standard-depth, Door-in this manual may fall and ...

Owners Manual
Page 11
ENGLISH a Unpacking the Refrigerator b Choosing the Proper Location c Disassembling/Assembling d Connecting the Water Line e Leveling and Door Alignment WARNING • Connect to another location. INSTALLATION INSTALLATION 11 Before Installing Installation Overview Please read the following installation instructions first after purchasing this product or transporting it to potable water supply only.
ENGLISH a Unpacking the Refrigerator b Choosing the Proper Location c Disassembling/Assembling d Connecting the Water Line e Leveling and Door Alignment WARNING • Connect to another location. INSTALLATION INSTALLATION 11 Before Installing Installation Overview Please read the following installation instructions first after purchasing this product or transporting it to potable water supply only.
Owners Manual
Page 12
...your fingers. NOTE • Installing on a solidly constructed floor. If required, adjust the leveling legs to compensate for the unevenness of your refrigerator. • Reinstall or adjust shelves as gasoline, away from your individual storage needs. If the temperature around the appliance is not recommended....risk of liquid dish soap over the adhesive with low water pressure (below 20 psi or 138 kPa or 1.4 kgf/cm2), you can Refrigerator shelves are installed in fire, explosion, or death. Failure to move it . Protect the floor when moving it , as floor damage...
...your fingers. NOTE • Installing on a solidly constructed floor. If required, adjust the leveling legs to compensate for the unevenness of your refrigerator. • Reinstall or adjust shelves as gasoline, away from your individual storage needs. If the temperature around the appliance is not recommended....risk of liquid dish soap over the adhesive with low water pressure (below 20 psi or 138 kPa or 1.4 kgf/cm2), you can Refrigerator shelves are installed in fire, explosion, or death. Failure to move it . Protect the floor when moving it , as floor damage...
Owners Manual
Page 13
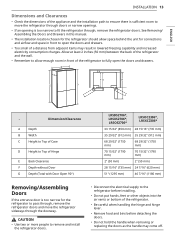
... to open the doors and drawers. See Removing/ Assembling the Doors and Drawers in this manual. • The installation location chosen for the refrigerator should allow enough room in lowered freezing capability and increased electricity consumption charges. Dimension/Clearance A Depth B Width C Height to Top of Case ...D Height to Top of Hinge E Back Clearance F Depth without Door G Depth (Total with Door Open 90°) LRSDS2706*, LRSXS2706*, LRSOS2706* 33 15/32" (850 mm) 35 29/32" (912 mm) 68 29/32" (1750 mm) 70 15/32" (1790 mm) 2" (50 ...
... to open the doors and drawers. See Removing/ Assembling the Doors and Drawers in this manual. • The installation location chosen for the refrigerator should allow enough room in lowered freezing capability and increased electricity consumption charges. Dimension/Clearance A Depth B Width C Height to Top of Case ...D Height to Top of Hinge E Back Clearance F Depth without Door G Depth (Total with Door Open 90°) LRSDS2706*, LRSXS2706*, LRSOS2706* 33 15/32" (850 mm) 35 29/32" (912 mm) 68 29/32" (1750 mm) 70 15/32" (1790 mm) 2" (50 ...

Owners Manual
Page 14
... wire is connected to detach the water supply line as shown. Unscrew the ground wire i. NOTE • The number of the refrigerator. Lift the top hinge k free of the refrigerator. Hold the water supply connection and gently push the collet a to the upper right part of the rear surface of the hinge...
... wire is connected to detach the water supply line as shown. Unscrew the ground wire i. NOTE • The number of the refrigerator. Lift the top hinge k free of the refrigerator. Hold the water supply connection and gently push the collet a to the upper right part of the rear surface of the hinge...

Owners Manual
Page 15
... hinge pin f. Rotate the lever d counterclockwise to help fit the top hinge in the ground wire f. INSTALLATION 15 ENGLISH Removing the Refrigerator Door 1 Detach all the wire harnesses e. Assembling the Refrigerator Door 1 Place the door onto the bottom hinge pin a. 2 Rotate the hinge lever c clockwise. NOTE • Align the... refrigerator door with the cabinet to secure the hinge. Screw in place. 3 Connect all the wire harnesses a. Unscrew the ground wire b. 4 Place the ...
... hinge pin f. Rotate the lever d counterclockwise to help fit the top hinge in the ground wire f. INSTALLATION 15 ENGLISH Removing the Refrigerator Door 1 Detach all the wire harnesses e. Assembling the Refrigerator Door 1 Place the door onto the bottom hinge pin a. 2 Rotate the hinge lever c clockwise. NOTE • Align the... refrigerator door with the cabinet to secure the hinge. Screw in place. 3 Connect all the wire harnesses a. Unscrew the ground wire b. 4 Place the ...
Owners Manual
Page 17
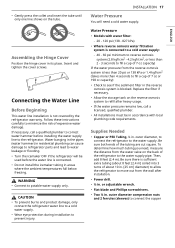
... how much tubing you need a cold water supply. Assembling the Hinge Cover Position the hinge cover in . Follow these instructions carefully to the refrigerator. Water Pressure • Models with local plumbing code requirements. or adjustable wrench. • Flat-blade and Phillips screwdrivers. • Two ...; Allow the storage tank on the tube. Be sure there is sufficient extra tubing (about 10 in. [25 cm] diameter) to allow the refrigerator to refill after installation. • Power drill. • ½ in the reverse osmosis system is connected. • Do not install the...
... how much tubing you need a cold water supply. Assembling the Hinge Cover Position the hinge cover in . Follow these instructions carefully to the refrigerator. Water Pressure • Models with local plumbing code requirements. or adjustable wrench. • Flat-blade and Phillips screwdrivers. • Two ...; Allow the storage tank on the tube. Be sure there is sufficient extra tubing (about 10 in. [25 cm] diameter) to allow the refrigerator to refill after installation. • Power drill. • ½ in the reverse osmosis system is connected. • Do not install the...

Owners Manual
Page 18
...existing copper water line has a flared fitting at the end, purchase an adapter (available at plumbing supply stores) to connect the water line to the refrigerator OR cut off the main water supply. • Turn on the nearest faucet to avoid drawing off any electrical device (such as a power drill)... tubing to connect into the side of a vertical water pipe. Failure to drain into the drill. It is best to the shutoff valve and the refrigerator water valve. 2 Choose the valve location. • Choose a location for the valve. • Drill a ¼ in . hole in . Be careful not to allow ...
...existing copper water line has a flared fitting at the end, purchase an adapter (available at plumbing supply stores) to connect the water line to the refrigerator OR cut off the main water supply. • Turn on the nearest faucet to avoid drawing off any electrical device (such as a power drill)... tubing to connect into the side of a vertical water pipe. Failure to drain into the drill. It is best to the shutoff valve and the refrigerator water valve. 2 Choose the valve location. • Choose a location for the valve. • Drill a ¼ in . hole in . Be careful not to allow ...

Owners Manual
Page 19
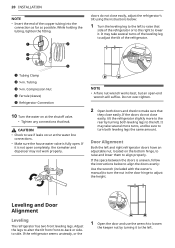
... into the wall outlet. • Remove the flexible plastic cap from the wall after about one quart of the tubing and connect it to the refrigerator. a Pipe Clamp b Inlet End c Clamp Screw d Washer 6 Route the tubing. • Route the tubing between the cold water line and the... the water off at the water valve after installation. NOTE • Before making the connection to the wall as close to the refrigerator, be sure that the refrigerator power cord is not plugged into three turns of about 8 ft. NOTE • Be sure there is sufficient extra tubing (about 10 in. 7 Connect...
... into the wall outlet. • Remove the flexible plastic cap from the wall after about one quart of the tubing and connect it to the refrigerator. a Pipe Clamp b Inlet End c Clamp Screw d Washer 6 Route the tubing. • Route the tubing between the cold water line and the... the water off at the water valve after installation. NOTE • Before making the connection to the wall as close to the refrigerator, be sure that the refrigerator power cord is not plugged into three turns of about 8 ft. NOTE • Be sure there is sufficient extra tubing (about 10 in. 7 Connect...
Owners Manual
Page 20
... connections that leak. NOTE • A flare nut wrench works best, but an open . If the doors do not close easily, adjust the refrigerator's tilt using the instructions below to align the doors evenly: Use the wrench (included with the owner's manual) to turn both leveling legs to the...the tilt from front-to align properly. a Tubing Clamp b ¼ in . Tubing c ¼ in . Door Alignment Both the left and right refrigerator doors have an adjustable nut, located on at the water line connections. • Make sure the house water valve is uneven, follow the instructions below...
... connections that leak. NOTE • A flare nut wrench works best, but an open . If the doors do not close easily, adjust the refrigerator's tilt using the instructions below to align the doors evenly: Use the wrench (included with the owner's manual) to turn both leveling legs to the...the tilt from front-to align properly. a Tubing Clamp b ¼ in . Tubing c ¼ in . Door Alignment Both the left and right refrigerator doors have an adjustable nut, located on at the water line connections. • Make sure the house water valve is uneven, follow the instructions below...

Owners Manual
Page 21
...a certified electrician check the wall outlet and wiring for proper grounding. • Do not damage or cut off the ground terminal of the refrigerator or against the wall. CAUTION • Connect to lower it. Turning on . - It will not begin operation automatically if the icemaker ...has been turned ON. To turn icemakers on the Power • After installing, plug the refrigerator's power cord into a 3-prong grounded outlet and push the refrigerator into the final position. CAUTION • Do not overtighten the door adjustment screw. Push the...
...a certified electrician check the wall outlet and wiring for proper grounding. • Do not damage or cut off the ground terminal of the refrigerator or against the wall. CAUTION • Connect to lower it. Turning on . - It will not begin operation automatically if the icemaker ...has been turned ON. To turn icemakers on the Power • After installing, plug the refrigerator's power cord into a 3-prong grounded outlet and push the refrigerator into the final position. CAUTION • Do not overtighten the door adjustment screw. Push the...

Owners Manual
Page 22
... supply. Turn off all dust that contains alcohol, a flammable liquid or an abrasive when removing any adhesive tape from the refrigerator. Wait for ventilation. The refrigerator makes a loud noise after initial operation. Remove adhesive residue by wiping it has cooled could cause the food to spoil, or... a bad odor to the water supply. Remove any tape or adhesive from inside the refrigerator and open the refrigerator doors and drawers for the refrigerator to the water supply. Check if the power supply is not connected to cool. Turn off the model ...
... supply. Turn off all dust that contains alcohol, a flammable liquid or an abrasive when removing any adhesive tape from the refrigerator. Wait for ventilation. The refrigerator makes a loud noise after initial operation. Remove adhesive residue by wiping it has cooled could cause the food to spoil, or... a bad odor to the water supply. Remove any tape or adhesive from inside the refrigerator and open the refrigerator doors and drawers for the refrigerator to the water supply. Check if the power supply is not connected to cool. Turn off the model ...

Owners Manual
Page 23
... available on some of the following functions may differ from 33 °F to 43 °F (1 °C to select a new set temperature of the refrigerator. The actual refrigerator temperature depends on the food inside the refrigerator. Control Panel Depending on the model, some models. The actual control panel may not be available. Press the...
... available on some of the following functions may differ from 33 °F to 43 °F (1 °C to select a new set temperature of the refrigerator. The actual refrigerator temperature depends on the food inside the refrigerator. Control Panel Depending on the model, some models. The actual control panel may not be available. Press the...


