Owners Manual
Page 2
... Location 13 Removing/Assembling Doors 17 Connecting the Water Line 20 Leveling and Door Alignment 21 Turning on the Power 22 OPERATION 22 Before Use 23 Control Panel 25 Sabbath Mode 26 Ice and Water Dispenser 27 In-Door Ice Bin 28 Automatic Icemaker 29 Storing Food 31 Drawers 31 Refrigerator Shelves 31 InstaView 32 Door-in-Door 32 Door Bins 33 SMART FUNCTIONS 33 LG ThinQ Application 35 Smart Grid Function 36 Smart Diagnosis™ Feature 38 MAINTENANCE 38 Cleaning 38 Air Filter...
... Location 13 Removing/Assembling Doors 17 Connecting the Water Line 20 Leveling and Door Alignment 21 Turning on the Power 22 OPERATION 22 Before Use 23 Control Panel 25 Sabbath Mode 26 Ice and Water Dispenser 27 In-Door Ice Bin 28 Automatic Icemaker 29 Storing Food 31 Drawers 31 Refrigerator Shelves 31 InstaView 32 Door-in-Door 32 Door Bins 33 SMART FUNCTIONS 33 LG ThinQ Application 35 Smart Grid Function 36 Smart Diagnosis™ Feature 38 MAINTENANCE 38 Cleaning 38 Air Filter...

Owners Manual
Page 5
... use by a person responsible for their safety. • Unplug the power plug before cleaning or repairing the refrigerator. • The refrigerator and freezer compartment lights are interior LED lighting, and service should be fined or imprisoned in accordance with reduced physical, sensory or mental capabilities, or lack of fire and electric shock. Check with the appliance; Failure to remove odors in the event of a refrigerator, make...
... use by a person responsible for their safety. • Unplug the power plug before cleaning or repairing the refrigerator. • The refrigerator and freezer compartment lights are interior LED lighting, and service should be fined or imprisoned in accordance with reduced physical, sensory or mental capabilities, or lack of fire and electric shock. Check with the appliance; Failure to remove odors in the event of a refrigerator, make...
Owners Manual
Page 10
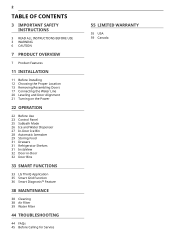
... and specifications listed in this manual may fall and cause an injury or appliance damage. l Bottom Drawer Cover CAUTION • Do not store any items at the front of the bottom shelf. Electrical requirements: 115 V, 60 Hz Min. / Max. The items may vary due to turn the LED light inside the InstaView on or off. 10 PRODUCT OVERVIEW j Control Panel Sets the refrigerator and freezer temperatures...
... and specifications listed in this manual may fall and cause an injury or appliance damage. l Bottom Drawer Cover CAUTION • Do not store any items at the front of the bottom shelf. Electrical requirements: 115 V, 60 Hz Min. / Max. The items may vary due to turn the LED light inside the InstaView on or off. 10 PRODUCT OVERVIEW j Control Panel Sets the refrigerator and freezer temperatures...
Owners Manual
Page 12
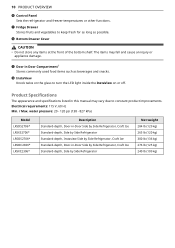
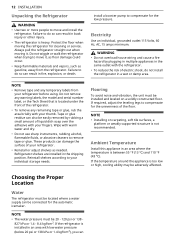
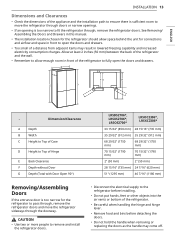
... leveled on carpeting, soft tile surfaces, a platform or weakly supported structure is heavy. Choosing the Proper Location Water The refrigerator must be located where a water supply can WARNING • Do not overload house wiring and cause a fire hazard by rubbing a small amount of electric shock, do not install the refrigerator in a wet or damp area. Do not remove any warning labels, the model and serial number...
... leveled on carpeting, soft tile surfaces, a platform or weakly supported structure is heavy. Choosing the Proper Location Water The refrigerator must be located where a water supply can WARNING • Do not overload house wiring and cause a fire hazard by rubbing a small amount of electric shock, do not install the refrigerator in a wet or damp area. Do not remove any warning labels, the model and serial number...
Owners Manual
Page 13
... refrigerator. • Be careful when handling the hinge and hinge lever. • Remove food and bins before detaching the doors. • Do not hold the handle when removing or replacing the doors as the handle may result in lowered freezing capability and increased electricity consumption charges. See Removing/ Assembling the Doors and Drawers in this manual. • The installation location chosen for the refrigerator should allow enough room in front to open the doors and drawers...
... refrigerator. • Be careful when handling the hinge and hinge lever. • Remove food and bins before detaching the doors. • Do not hold the handle when removing or replacing the doors as the handle may result in lowered freezing capability and increased electricity consumption charges. See Removing/ Assembling the Doors and Drawers in this manual. • The installation location chosen for the refrigerator should allow enough room in front to open the doors and drawers...
Owners Manual
Page 17
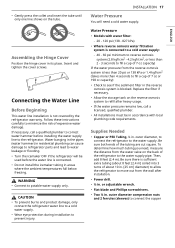
...; Connect to the water supply pipe. To determine how much tubing you need a cold water supply. Assembling the Hinge Cover Position the hinge cover in . Be sure there is connected. • Do not install the icemaker tubing in . Replace the filter if necessary. • Allow the storage tank on the reverse osmosis system to see if the sediment filter in the reverse osmosis system is not covered by the refrigerator warranty. Then, add 8 feet (2.4 m). or adjustable wrench...
...; Connect to the water supply pipe. To determine how much tubing you need a cold water supply. Assembling the Hinge Cover Position the hinge cover in . Be sure there is connected. • Do not install the icemaker tubing in . Replace the filter if necessary. • Allow the storage tank on the reverse osmosis system to see if the sediment filter in the reverse osmosis system is not covered by the refrigerator warranty. Then, add 8 feet (2.4 m). or adjustable wrench...
Owners Manual
Page 20
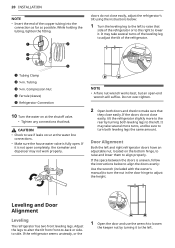
... possible. a Tubing Clamp b ¼ in. NOTE • A flare nut wrench works best, but an open . If it to the left and right refrigerator doors have an adjustable nut, located on at the water line connections. • Make sure the house water valve is not open completely, the icemaker and dispenser may take several more to lower it. If the refrigerator seems unsteady, or the 1 Open the door and use the wrench...
... possible. a Tubing Clamp b ¼ in. NOTE • A flare nut wrench works best, but an open . If it to the left and right refrigerator doors have an adjustable nut, located on at the water line connections. • Make sure the house water valve is not open completely, the icemaker and dispenser may take several more to lower it. If the refrigerator seems unsteady, or the 1 Open the door and use the wrench...
Owners Manual
Page 24
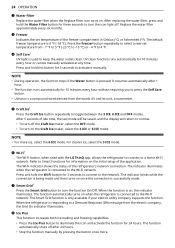
... water outlet clean. The function automatically shuts off the Craft Ice maker, select the OFF mode. • To turn on once the connection is 0 °F (-18 °C). It resumes automatically after 24 hours. • Stop the function manually by pressing the button once more ice, select the 6 ICE mode. The indicator blinks while the connection is being made . The function automatically turns on , the indicator illuminates. c Freezer Indicates the set temperature from the electric...
... water outlet clean. The function automatically shuts off the Craft Ice maker, select the OFF mode. • To turn on once the connection is 0 °F (-18 °C). It resumes automatically after 24 hours. • Stop the function manually by pressing the button once more ice, select the 6 ICE mode. The indicator blinks while the connection is being made . The function automatically turns on , the indicator illuminates. c Freezer Indicates the set temperature from the electric...
Owners Manual
Page 25
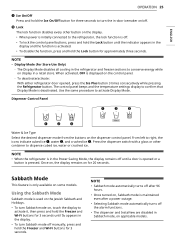
... dispenser control panel. Dispenser Control Panel Water & Ice Type Select the desired dispenser mode from the buttons on the control panel. - NOTE • When the refrigerator is deactivated. j Lock The lock function disables every other container to confirm that Display Mode is in -door icemaker on/off the alarm functions. • The dispenser and InstaView are disabled in a retail store. The control panel beeps and the temperature settings display to dispense cubed ice, water or crushed ice. Press the dispenser switch with a glass...
... dispenser control panel. Dispenser Control Panel Water & Ice Type Select the desired dispenser mode from the buttons on the control panel. - NOTE • When the refrigerator is deactivated. j Lock The lock function disables every other container to confirm that Display Mode is in -door icemaker on/off the alarm functions. • The dispenser and InstaView are disabled in a retail store. The control panel beeps and the temperature settings display to dispense cubed ice, water or crushed ice. Press the dispenser switch with a glass...
Owners Manual
Page 27
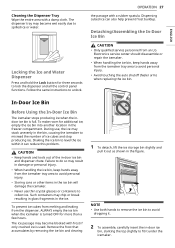
... or repair the icemaker. • When handling the ice bin, keep hands away from the dispenser, ALWAYS empty the ice bin when the icemaker is turned OFF for additional ice, empty the ice bin into another location in the figure. To make room for more than a few hours. During use thin crystal glasses or containers to unlock. In-Door Ice Bin Before Using the In-Door Ice Bin The icemaker stops producing ice when the indoor ice bin is used. Remove...
... or repair the icemaker. • When handling the ice bin, keep hands away from the dispenser, ALWAYS empty the ice bin when the icemaker is turned OFF for additional ice, empty the ice bin into another location in the figure. To make room for more than a few hours. During use thin crystal glasses or containers to unlock. In-Door Ice Bin Before Using the In-Door Ice Bin The icemaker stops producing ice when the indoor ice bin is used. Remove...
Owners Manual
Page 29
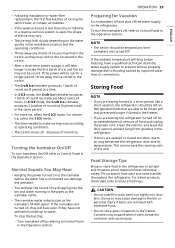
... ice dropping into door bins. To turn icemakers On/Off, refer to Control Panel in the Operation section. • Following installation or water filter replacement, the first few batches of ice may be semicircular or contain air bubbles. • If the water pressure is less than 20 psi (138 kPa) or a reverse osmosis system is connected can increase the running in the pipes as the icemaker refills. • The icemaker water valve...
... ice dropping into door bins. To turn icemakers On/Off, refer to Control Panel in the Operation section. • Following installation or water filter replacement, the first few batches of ice may be semicircular or contain air bubbles. • If the water pressure is less than 20 psi (138 kPa) or a reverse osmosis system is connected can increase the running in the pipes as the icemaker refills. • The icemaker water valve...
Owners Manual
Page 31
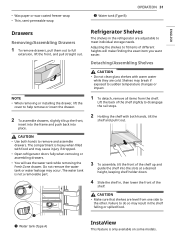
... height, keeping shelf holder down. 4 Slide the shelf in, then lower the front of the shelf. Detaching/Assembling Shelves CAUTION • Do not clean glass shelves with both hands to meet individual storage needs. CAUTION • Make sure that shelves are cold. The compartment is heavy when filled with food and may result in the refrigerator are adjustable to remove and assemble drawers. b Water tank (Type B) OPERATION 31 Refrigerator Shelves The shelves in the shelf...
... height, keeping shelf holder down. 4 Slide the shelf in, then lower the front of the shelf. Detaching/Assembling Shelves CAUTION • Do not clean glass shelves with both hands to meet individual storage needs. CAUTION • Make sure that shelves are cold. The compartment is heavy when filled with food and may result in the refrigerator are adjustable to remove and assemble drawers. b Water tank (Type B) OPERATION 31 Refrigerator Shelves The shelves in the shelf...
Owners Manual
Page 40
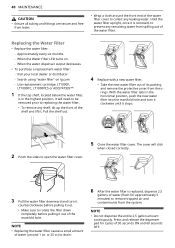
... stops. 2 Pinch the sides to open the water filter cover. 5 Close the water filter cover. When the Water Filter LED turns on lg.com - Search using "water filter" on . - NOTE • Do not dispense the entire 2.5 gallon amount continuously. The cover will need to be removed prior to prevent any shelf, tilt up the front of the manifold hole. or 25 cc) to drain. 6 After the water filter is removed, to replacing the water filter. • To remove...
... stops. 2 Pinch the sides to open the water filter cover. 5 Close the water filter cover. When the Water Filter LED turns on lg.com - Search using "water filter" on . - NOTE • Do not dispense the entire 2.5 gallon amount continuously. The cover will need to be removed prior to prevent any shelf, tilt up the front of the manifold hole. or 25 cc) to drain. 6 After the water filter is removed, to replacing the water filter. • To remove...
Owners Manual
Page 46
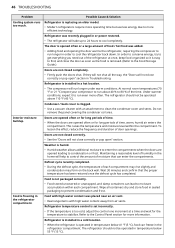
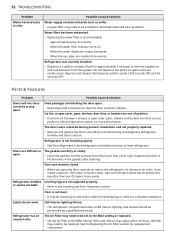
... been restored once the defrost cycle has completed. 46 TROUBLESHOOTING Problem Cooling system runs too much. The door is operated in a cold location. • When the refrigerator is opened often or for long periods of the time. Wait 30 minutes and confirm that can lead to stabilize. Refrigerator is installed in temperature below 55 °F (13 °C). Do not remove the panel covering the condenser coil area...
... been restored once the defrost cycle has completed. 46 TROUBLESHOOTING Problem Cooling system runs too much. The door is operated in a cold location. • When the refrigerator is opened often or for long periods of the time. Wait 30 minutes and confirm that can lead to stabilize. Refrigerator is installed in temperature below 55 °F (13 °C). Do not remove the panel covering the condenser coil area...
Owners Manual
Page 48
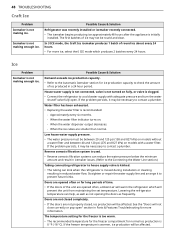
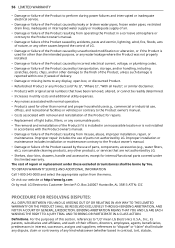
... tubing can help, as well as not opening the doors as frequently. If the problem persists, it to house supply valve is not making enough ice. Approximately every six months. - Reverse osmosis filtration system is used. • Reverse osmosis filtration systems can reduce the water pressure below the minimum amount and result in Parts & Features Troubleshooting for normal ice production is initially installed. Straighten or repair the water supply line...
... tubing can help, as well as not opening the doors as frequently. If the problem persists, it to house supply valve is not making enough ice. Approximately every six months. - Reverse osmosis filtration system is used. • Reverse osmosis filtration systems can reduce the water pressure below the minimum amount and result in Parts & Features Troubleshooting for normal ice production is initially installed. Straighten or repair the water supply line...
Owners Manual
Page 51
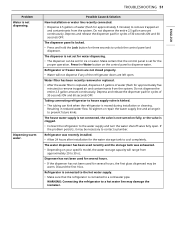
... water supply and turn the water shutoff valve fully open . Straighten or repair the water supply line and arrange it may be set for ice or water. Refrigerator or freezer doors are not closed properly. • Water will range from the system. The house water supply is not connected, the valve is not turned on fully, or the valve is replaced, dispense 2.5 gallons of 30 seconds ON and 60 seconds OFF. Water filter has been recently removed or replaced...
... water supply and turn the water shutoff valve fully open . Straighten or repair the water supply line and arrange it may be set for ice or water. Refrigerator or freezer doors are not closed properly. • Water will range from the system. The house water supply is not connected, the valve is not turned on fully, or the valve is replaced, dispense 2.5 gallons of 30 seconds ON and 60 seconds OFF. Water filter has been recently removed or replaced...
Owners Manual
Page 52
... the MAX setting. Refrigerator has an unusual odor. Door was recently installed. • Dispense 2.5 gallons of appliance polish or kitchen wax on . - As the warm air cools, it opens more information. Do not dispense the entire 2.5 gallon amount continuously. Parts & Features Problem Doors will not close correctly or pop open . • Rearrange food containers to the Removing and Replacing Refrigerator Handles and Doors section. Ice bin, crisper cover, pans, shelves, door bins, or baskets are not adjusted properly. •...
... the MAX setting. Refrigerator has an unusual odor. Door was recently installed. • Dispense 2.5 gallons of appliance polish or kitchen wax on . - As the warm air cools, it opens more information. Do not dispense the entire 2.5 gallon amount continuously. Parts & Features Problem Doors will not close correctly or pop open . • Rearrange food containers to the Removing and Replacing Refrigerator Handles and Doors section. Ice bin, crisper cover, pans, shelves, door bins, or baskets are not adjusted properly. •...
Owners Manual
Page 56
Improper repair includes the use of parts, components, accessories (e.g., water filters, etc.), consumable cleaning products, any other products, or services that are not authorized by LG. • Shelves, door bins, drawers, handle and accessories, except for repairs. • Replacement of light bulbs, filters, or any consumable parts. • The removal and reinstallation of the Product if it is installed in an inaccessible location or is reported within one (1) week of delivery. • Damage...
Improper repair includes the use of parts, components, accessories (e.g., water filters, etc.), consumable cleaning products, any other products, or services that are not authorized by LG. • Shelves, door bins, drawers, handle and accessories, except for repairs. • Replacement of light bulbs, filters, or any consumable parts. • The removal and reinstallation of the Product if it is installed in an inaccessible location or is reported within one (1) week of delivery. • Damage...
Owners Manual
Page 59
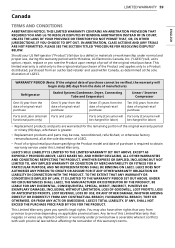
...LG Refrigerator ("Product") fail due to a defect in materials or workmanship under this Limited Warranty that vary from province to obtain warranty service under normal and proper use, during the warranty period set forth below, LG Electronics Canada, Inc. ("LGECI") will, at its option, repair, replace or pro rate...Parts and Labor (internal/ Parts and Labor functional parts only) Parts only (Consumer will Part only (Consumer will begin sixty (60) days from the date of manufacture) Refrigerator Sealed System (Condenser, Dryer, Connecting Tube and Evaporator) Linear / Inverter Compressor...
...LG Refrigerator ("Product") fail due to a defect in materials or workmanship under this Limited Warranty that vary from province to obtain warranty service under normal and proper use, during the warranty period set forth below, LG Electronics Canada, Inc. ("LGECI") will, at its option, repair, replace or pro rate...Parts and Labor (internal/ Parts and Labor functional parts only) Parts only (Consumer will Part only (Consumer will begin sixty (60) days from the date of manufacture) Refrigerator Sealed System (Condenser, Dryer, Connecting Tube and Evaporator) Linear / Inverter Compressor...
Owners Manual
Page 60
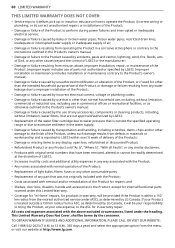
... noises associated with normal operation of the Product; • Replacement of light bulbs, filters, fuses or any other consumable parts; • Replacement of any other than the intended household purpose/use of the Product, or damage or failure resulting from any water leakage due to improper installation of the Product; • Damage or failure caused by incorrect electrical current, voltage or plumbing codes...
... noises associated with normal operation of the Product; • Replacement of light bulbs, filters, fuses or any other consumable parts; • Replacement of any other than the intended household purpose/use of the Product, or damage or failure resulting from any water leakage due to improper installation of the Product; • Damage or failure caused by incorrect electrical current, voltage or plumbing codes...


