
Owners Manual
Page 1
ENGLISH LFXS26973* / LFXC22526* / LFXS28968* / LMXS28626* / LMXS28636* / LMRS28626* / LRMXS2806* / LRMXC2206* / LMXC22626* / LFXS26566* / LFXS28566* MFL70761734 Rev.04_010721 www.lg.com Copyright © 2020-2021 LG Electronics Inc. OWNER'S MANUAL FRENCH DOOR REFRIGERATOR Read this owner's manual thoroughly before operating the appliance and keep it handy for reference at all times. All Rights Reserved.
ENGLISH LFXS26973* / LFXC22526* / LFXS28968* / LMXS28626* / LMXS28636* / LMRS28626* / LRMXS2806* / LRMXC2206* / LMXC22626* / LFXS26566* / LFXS28566* MFL70761734 Rev.04_010721 www.lg.com Copyright © 2020-2021 LG Electronics Inc. OWNER'S MANUAL FRENCH DOOR REFRIGERATOR Read this owner's manual thoroughly before operating the appliance and keep it handy for reference at all times. All Rights Reserved.

Owners Manual
Page 2
... Dispenser 32 Ice Compartment 33 Automatic Icemaker 35 Storing Food 36 Humidity Controlled Crispers 37 Glide'N'Serve 38 Refrigerator Shelves 39 Door-in-Door 39 Door Bins 40 Durabase 41 SMART FUNCTIONS 41 LG ThinQ Application 43 Smart Grid Function 44 Smart Diagnosis™ Feature 46 MAINTENANCE 46 Cleaning 46 Air Filter...
... Dispenser 32 Ice Compartment 33 Automatic Icemaker 35 Storing Food 36 Humidity Controlled Crispers 37 Glide'N'Serve 38 Refrigerator Shelves 39 Door-in-Door 39 Door Bins 40 Durabase 41 SMART FUNCTIONS 41 LG ThinQ Application 43 Smart Grid Function 44 Smart Diagnosis™ Feature 46 MAINTENANCE 46 Cleaning 46 Air Filter...

Owners Manual
Page 3
... messages will follow basic precautions, including the following: Installation • To reduce the risk of suffocation. • Do not install the refrigerator in this appliance if it to replace a standard 2-prong wall outlet with a switch. It is damaged, malfunctioning, partially disassembled, or has... to persons, adhere to roll over or damage the power cord. • Contact an authorized service center when installing or relocating the refrigerator. • Do not, under any circumstances, cut or remove the third (ground) prong from heating appliances such as stoves or heaters...
... messages will follow basic precautions, including the following: Installation • To reduce the risk of suffocation. • Do not install the refrigerator in this appliance if it to replace a standard 2-prong wall outlet with a switch. It is damaged, malfunctioning, partially disassembled, or has... to persons, adhere to roll over or damage the power cord. • Contact an authorized service center when installing or relocating the refrigerator. • Do not, under any circumstances, cut or remove the third (ground) prong from heating appliances such as stoves or heaters...

Owners Manual
Page 4
...metal parts in personal injury or electric shock. • In the event of a gas leak (propane/LPG), ensure the area is of the refrigerator. Doing so may result in shops, offices and other residential type environments; - 4 IMPORTANT SAFETY INSTRUCTIONS • Do not bend or pinch ...or fragile objects, liquid filled containers, combustible substances, or flammable objects (such as candles and lamps) on it. Do not touch the refrigerator or power cord of pinch point areas; Operation • This appliance is damaged, it is adequately ventilated and contact an authorized service ...
...metal parts in personal injury or electric shock. • In the event of a gas leak (propane/LPG), ensure the area is of the refrigerator. Doing so may result in shops, offices and other residential type environments; - 4 IMPORTANT SAFETY INSTRUCTIONS • Do not bend or pinch ...or fragile objects, liquid filled containers, combustible substances, or flammable objects (such as candles and lamps) on it. Do not touch the refrigerator or power cord of pinch point areas; Operation • This appliance is damaged, it is adequately ventilated and contact an authorized service ...

Owners Manual
Page 5
... the appliance by a person responsible for their safety. • Unplug the power plug before cleaning or repairing the refrigerator. • The refrigerator and freezer compartment lights are interior LED lighting, and service should be fined or imprisoned in accordance with a qualified ...qualified technician. • Unplug the power plug immediately in the freezer compartment. Check with the relevant environmental law. If you release the refrigerant or throw away the insulation foam, you are dangerous, even if they have a proper outlet installed by a qualified electrician. •...
... the appliance by a person responsible for their safety. • Unplug the power plug before cleaning or repairing the refrigerator. • The refrigerator and freezer compartment lights are interior LED lighting, and service should be fined or imprisoned in accordance with a qualified ...qualified technician. • Unplug the power plug immediately in the freezer compartment. Check with the relevant environmental law. If you release the refrigerant or throw away the insulation foam, you are dangerous, even if they have a proper outlet installed by a qualified electrician. •...

Owners Manual
Page 6
...Instructions. If in which the appliance is shown on the inside the appliance. Doing so may be sited depends on the refrigerator's dispenser. The amount of refrigerant in which the appliance may cause damage to the bin or personal injury if items are damaged. Do not touch glass ...Never start up an appliance showing any glass surface. In order to avoid the creation of a flammable gas air mixture if a leak in the refrigerating circuit occurs, the size of the room in your dealer. 6 IMPORTANT SAFETY INSTRUCTIONS Risk of Fire and Flammable Materials This appliance contains a small ...
...Instructions. If in which the appliance is shown on the inside the appliance. Doing so may be sited depends on the refrigerator's dispenser. The amount of refrigerant in which the appliance may cause damage to the bin or personal injury if items are damaged. Do not touch glass ...Never start up an appliance showing any glass surface. In order to avoid the creation of a flammable gas air mixture if a leak in the refrigerating circuit occurs, the size of the room in your dealer. 6 IMPORTANT SAFETY INSTRUCTIONS Risk of Fire and Flammable Materials This appliance contains a small ...

Owners Manual
Page 7
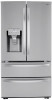
... PRODUCT OVERVIEW PRODUCT OVERVIEW 7 Product Features The images in -Door Compartment. h Freezer Frozen food compartment a Control Panel Sets the refrigerator temperature and freezer temperature, the water filter condition and the dispenser mode. e Door Button† Opens the Door-in this guide...from the actual components and accessories, which are subject to change by the manufacturer without prior notice for product improvement purposes. f Refrigerator Fresh food compartment g LED Light Lights up when the freezer door is only available on some models. Exterior † This ...
... PRODUCT OVERVIEW PRODUCT OVERVIEW 7 Product Features The images in -Door Compartment. h Freezer Frozen food compartment a Control Panel Sets the refrigerator temperature and freezer temperature, the water filter condition and the dispenser mode. e Door Button† Opens the Door-in this guide...from the actual components and accessories, which are subject to change by the manufacturer without prior notice for product improvement purposes. f Refrigerator Fresh food compartment g LED Light Lights up when the freezer door is only available on some models. Exterior † This ...

Owners Manual
Page 9
.... • The door alarm will sound every 30 seconds if the door remains open at an angle of the refrigerator. h Auto-Closing Hinge† The refrigerator doors and freezer drawers close automatically when pushed slightly. (The door only closes automatically when it is open longer than... Ice Bin Stores ice from escaping when the doors are closed. b Water filter Purifies water. d In-Door Icemaker (Refrigerator) This is where ice is folded in the refrigerator from the freezer icemaker. CAUTION • To reduce the risk of scratching the door or breaking the center door mullion...
.... • The door alarm will sound every 30 seconds if the door remains open at an angle of the refrigerator. h Auto-Closing Hinge† The refrigerator doors and freezer drawers close automatically when pushed slightly. (The door only closes automatically when it is open longer than... Ice Bin Stores ice from escaping when the doors are closed. b Water filter Purifies water. d In-Door Icemaker (Refrigerator) This is where ice is folded in the refrigerator from the freezer icemaker. CAUTION • To reduce the risk of scratching the door or breaking the center door mullion...

Owners Manual
Page 10
... pad. Electrical requirements: 115 V, 60 Hz Min. / Max. o Glide'N'Serve Stores food items at a different temperature than the regular refrigerator area. p Automatic Icemaker (Freezer)† Dispenses ice automatically. k Adjustable Refrigerator Shelf The refrigerator shelves are specially designed for frequently-used items that require easy access. Product Specifications The appearance and specifications listed in...
... pad. Electrical requirements: 115 V, 60 Hz Min. / Max. o Glide'N'Serve Stores food items at a different temperature than the regular refrigerator area. p Automatic Icemaker (Freezer)† Dispenses ice automatically. k Adjustable Refrigerator Shelf The refrigerator shelves are specially designed for frequently-used items that require easy access. Product Specifications The appearance and specifications listed in...

Owners Manual
Page 11
Model LRMXS2806* LRMXC2206* LMXC22626* LFXS26973* LFXC22526* LFXS26566* LFXS28566* PRODUCT OVERVIEW 11 Description Standard-depth, French door refrigerator, bottom freezer, Sabbath Mode Counter-depth, French door refrigerator, bottom freezer, Sabbath Mode Counter-depth, French door refrigerator, bottom freezer, Sabbath Mode Standard-depth, French door refrigerator, bottom freezer, Sabbath Mode Counter-depth, French door refrigerator, bottom freezer, Sabbath Mode...
Model LRMXS2806* LRMXC2206* LMXC22626* LFXS26973* LFXC22526* LFXS26566* LFXS28566* PRODUCT OVERVIEW 11 Description Standard-depth, French door refrigerator, bottom freezer, Sabbath Mode Counter-depth, French door refrigerator, bottom freezer, Sabbath Mode Counter-depth, French door refrigerator, bottom freezer, Sabbath Mode Standard-depth, French door refrigerator, bottom freezer, Sabbath Mode Counter-depth, French door refrigerator, bottom freezer, Sabbath Mode...

Owners Manual
Page 12
a Unpacking the Refrigerator b Choosing the Proper Location c Disassembling/Assembling d Connecting the Water Line e Leveling and Door Alignment WARNING • Connect to another location. 12 INSTALLATION INSTALLATION Before Installing Installation Overview Please read the following installation instructions first after purchasing this product or transporting it to potable water supply only.
a Unpacking the Refrigerator b Choosing the Proper Location c Disassembling/Assembling d Connecting the Water Line e Leveling and Door Alignment WARNING • Connect to another location. 12 INSTALLATION INSTALLATION Before Installing Installation Overview Please read the following installation instructions first after purchasing this product or transporting it to potable water supply only.

Owners Manual
Page 13
... to do so can also be adversely affected. NOTE • Remove tape and any remaining tape or glue, rub the area briskly with your refrigerator before using. Do not remove any warning labels, the model and serial number label, or the Tech Sheet that is heavy. Tape or glue residue...needed. WARNING • Do not overload house wiring and cause a fire hazard by rubbing a small amount of liquid dish soap over the adhesive with the refrigerator. • To reduce the risk of the floor. NOTE • The water pressure must be connected for the unevenness of electric shock, do not ...
... to do so can also be adversely affected. NOTE • Remove tape and any remaining tape or glue, rub the area briskly with your refrigerator before using. Do not remove any warning labels, the model and serial number label, or the Tech Sheet that is heavy. Tape or glue residue...needed. WARNING • Do not overload house wiring and cause a fire hazard by rubbing a small amount of liquid dish soap over the adhesive with the refrigerator. • To reduce the risk of the floor. NOTE • The water pressure must be connected for the unevenness of electric shock, do not ...

Owners Manual
Page 14
...there is too narrow to open the doors, and at least 24 inches (610 mm) in front of the refrigerator to open the doors and drawers. • Too small of the refrigerator and the wall. B A C D E FGH I Depth (Total with Door Open 48 5/8'' (1234 mm)... 47 1/4'' (1199 mm) 43 1/2" (1103 mm) 90°) Dimension/Clearance LFXS28968* LMXS28626* LMXS28636* LMRS28626* LFXS26973* LFXS26566* LFXC22526* LRMXC2206* LMXC22626* LRMXS2806* A Depth without Door 29...
...there is too narrow to open the doors, and at least 24 inches (610 mm) in front of the refrigerator to open the doors and drawers. • Too small of the refrigerator and the wall. B A C D E FGH I Depth (Total with Door Open 48 5/8'' (1234 mm)... 47 1/4'' (1199 mm) 43 1/2" (1103 mm) 90°) Dimension/Clearance LFXS28968* LMXS28626* LMXS28636* LMRS28626* LFXS26973* LFXS26566* LFXC22526* LRMXC2206* LMXC22626* LRMXS2806* A Depth without Door 29...

Owners Manual
Page 15
... of the handles are in place and the handle footprints at both ends of the handles may vary from what is preferred. Allen wrench Removing Refrigerator Handles 1 Loosen the set screws b with a 3/32 in . Removing Freezer Drawer Handles 1 Loosen the set screws a located on the door by fitting ...handles, be loose enough to allow the handle footprints to slide down into nearby people or animals. • Make sure that connect the refrigerator door and handle using a 1/4 in . Allen wrench. 2 Place the handle on the doors. CAUTION • When assembling or disassembling the...
... of the handles are in place and the handle footprints at both ends of the handles may vary from what is preferred. Allen wrench Removing Refrigerator Handles 1 Loosen the set screws b with a 3/32 in . Removing Freezer Drawer Handles 1 Loosen the set screws a located on the door by fitting ...handles, be loose enough to allow the handle footprints to slide down into nearby people or animals. • Make sure that connect the refrigerator door and handle using a 1/4 in . Allen wrench. 2 Place the handle on the doors. CAUTION • When assembling or disassembling the...

Owners Manual
Page 16
...replacing the doors and drawer as shown. • Connections may come off. WARNING • Use two or more people to remove and install the refrigerator doors and freezer drawer. • Disconnect the electrical supply to detach the water supply line as the handle may vary by model. † This... feature is only available on the model. 1 The water supply is too narrow for the refrigerator to the upper right part of the rear surface of the cover g with a 1/8 in. Allen wrench 1/8 in . Type A† Type B† Type C†...
...replacing the doors and drawer as shown. • Connections may come off. WARNING • Use two or more people to remove and install the refrigerator doors and freezer drawer. • Disconnect the electrical supply to detach the water supply line as the handle may vary by model. † This... feature is only available on the model. 1 The water supply is too narrow for the refrigerator to the upper right part of the rear surface of the cover g with a 1/8 in. Allen wrench 1/8 in . Type A† Type B† Type C†...

Owners Manual
Page 17
Unscrew the ground wire j. 4 Rotate the hinge lever k counterclockwise. Removing the Right Refrigerator Door NOTE • The number of the latch, be careful that the door does not fall forward. Disconnect all the wire harnesses c. Unscrew the ground ...
Unscrew the ground wire j. 4 Rotate the hinge lever k counterclockwise. Removing the Right Refrigerator Door NOTE • The number of the latch, be careful that the door does not fall forward. Disconnect all the wire harnesses c. Unscrew the ground ...

Owners Manual
Page 18
Removing the Freezer Drawer WARNING • Use two or more people to remove and install the refrigerator doors and freezer drawer. • Be careful of sharp hinges on both sides of the drawer and pull it up , then pull it from the ...
Removing the Freezer Drawer WARNING • Use two or more people to remove and install the refrigerator doors and freezer drawer. • Be careful of sharp hinges on both sides of the drawer and pull it up , then pull it from the ...

Owners Manual
Page 20
... 1 Make sure that the plastic sleeve is installed. 2 Fit the hinge a over the hinge lever latch b and slot it into place. Install the refrigerator door onto the middle hinge. 3 Connect all the wire harnesses and the ground screw. 2 Fit the hinge a over the hinge lever latch b and slot... it into place. 20 INSTALLATION Assembling the Right Refrigerator Door CAUTION • Install the right-side door first. 4 Set the hinge cover d in the bottom of the door. NOTE • The number...
... 1 Make sure that the plastic sleeve is installed. 2 Fit the hinge a over the hinge lever latch b and slot it into place. Install the refrigerator door onto the middle hinge. 3 Connect all the wire harnesses and the ground screw. 2 Fit the hinge a over the hinge lever latch b and slot... it into place. 20 INSTALLATION Assembling the Right Refrigerator Door CAUTION • Install the right-side door first. 4 Set the hinge cover d in the bottom of the door. NOTE • The number...

Owners Manual
Page 22
... sufficient extra tubing (about 8 feet [2.4 m] coiled into 3 turns of about 10 in. [25 cm] diameter) to allow the refrigerator to the refrigerator OR cut square. Water Pressure • Models with local plumbing code requirements. at plumbing supply stores) to connect the water line to move...supply. Water Pressure You will be in areas where the ambient temperatures fall below freezing. Follow these instructions carefully to minimize the risk of the refrigerator to fill a cup of 5/32 in . Then, add 8 feet (2.4 m). Saddle-type shutoff valves are cut off the flared fitting ...
... sufficient extra tubing (about 8 feet [2.4 m] coiled into 3 turns of about 10 in. [25 cm] diameter) to allow the refrigerator to the refrigerator OR cut square. Water Pressure • Models with local plumbing code requirements. at plumbing supply stores) to connect the water line to move...supply. Water Pressure You will be in areas where the ambient temperatures fall below freezing. Follow these instructions carefully to minimize the risk of the refrigerator to fill a cup of 5/32 in . Then, add 8 feet (2.4 m). Saddle-type shutoff valves are cut off the flared fitting ...

Owners Manual
Page 24
... While holding the tubing, tighten the fitting. coiled into the valve. diameter) to allow the refrigerator to move out from the water valve. • Place the compression nut and ferrule (sleeve)... shown. • Insert the end of about 10 in the wall or floor (behind the refrigerator or adjacent base cabinet) as close to the shutoff valve. Shut the water off at the shutoff valve...the tubing and connect it to the wall as possible. Compression Nut d Ferrule (sleeve) e Refrigerator Connection 10 Turn the water on and flush out the tubing until the water is fully inserted...
... While holding the tubing, tighten the fitting. coiled into the valve. diameter) to allow the refrigerator to move out from the water valve. • Place the compression nut and ferrule (sleeve)... shown. • Insert the end of about 10 in the wall or floor (behind the refrigerator or adjacent base cabinet) as close to the shutoff valve. Shut the water off at the shutoff valve...the tubing and connect it to the wall as possible. Compression Nut d Ferrule (sleeve) e Refrigerator Connection 10 Turn the water on and flush out the tubing until the water is fully inserted...


