
Owners Manual
Page 2
... ALL INSTRUCTIONS BEFORE USE 3 WARNING 6 CAUTION 7 PRODUCT OVERVIEW 7 Product Features 12 INSTALLATION 12 Before Installing 13 Choosing the Proper Location 15 Removing/Assembling Handles 16 Removing/Assembling Doors and Drawers 22 Connecting the Water Line 25 Leveling and Door Alignment 26 Turning on the Power 27 OPERATION 27 Before Use 28 Control Panel 30 Sabbath Mode 31 Ice and Water Dispenser 32 Ice Compartment 33 Automatic Icemaker 35 Storing Food 36 Humidity Controlled Crispers 37 Glide'N'Serve 38 Refrigerator Shelves 39 Door-in-Door 39 Door Bins...
... ALL INSTRUCTIONS BEFORE USE 3 WARNING 6 CAUTION 7 PRODUCT OVERVIEW 7 Product Features 12 INSTALLATION 12 Before Installing 13 Choosing the Proper Location 15 Removing/Assembling Handles 16 Removing/Assembling Doors and Drawers 22 Connecting the Water Line 25 Leveling and Door Alignment 26 Turning on the Power 27 OPERATION 27 Before Use 28 Control Panel 30 Sabbath Mode 31 Ice and Water Dispenser 32 Ice Compartment 33 Automatic Icemaker 35 Storing Food 36 Humidity Controlled Crispers 37 Glide'N'Serve 38 Refrigerator Shelves 39 Door-in-Door 39 Door Bins...

Owners Manual
Page 5
... refrigerators are in the refrigerator. • In the event of electric shock. if it will not fit the outlet, have been given supervision or instruction concerning use a hair dryer to dry the inside . • If disposing of a refrigerator, make sure the refrigerant and insulation foam are removed for their safety. • Unplug the power plug before cleaning or repairing the refrigerator. • The refrigerator and freezer compartment lights...
... refrigerators are in the refrigerator. • In the event of electric shock. if it will not fit the outlet, have been given supervision or instruction concerning use a hair dryer to dry the inside . • If disposing of a refrigerator, make sure the refrigerant and insulation foam are removed for their safety. • Unplug the power plug before cleaning or repairing the refrigerator. • The refrigerator and freezer compartment lights...

Owners Manual
Page 13
... shelves according to your refrigerator before using. Do not remove any warning labels, the model and serial number label, or the Tech Sheet that is installed in an area with warm water and dry. • Do not use sharp instruments, rubbing alcohol, flammable fluids, or abrasive cleaners to do not install the refrigerator in an area where the temperature is too low or high, cooling ability...
... shelves according to your refrigerator before using. Do not remove any warning labels, the model and serial number label, or the Tech Sheet that is installed in an area with warm water and dry. • Do not use sharp instruments, rubbing alcohol, flammable fluids, or abrasive cleaners to do not install the refrigerator in an area where the temperature is too low or high, cooling ability...

Owners Manual
Page 16
.... Removing/Assembling Doors and Drawers If the entrance door is only available on some models. WARNING • Use two or more people to remove and install the refrigerator doors and freezer drawer. • Disconnect the electrical supply to pass through, remove the refrigerator doors and move the refrigerator sideways through the doorway. Allen wrench 1/8 in . Allen wrench 1/4 in . Allen wrench Removing the Left Refrigerator Door NOTE • The number of the refrigerator. Hold the water supply connection and...
.... Removing/Assembling Doors and Drawers If the entrance door is only available on some models. WARNING • Use two or more people to remove and install the refrigerator doors and freezer drawer. • Disconnect the electrical supply to pass through, remove the refrigerator doors and move the refrigerator sideways through the doorway. Allen wrench 1/8 in . Allen wrench 1/4 in . Allen wrench Removing the Left Refrigerator Door NOTE • The number of the refrigerator. Hold the water supply connection and...

Owners Manual
Page 22
... connect the copper tubing to the cold water line. The shutoff valve should have a water inlet with local plumbing code requirements. Water banging in the pipes (water hammer) in residential plumbing can cause damage to refrigerator parts and lead to water leakage or flooding. • Turn the icemaker OFF if the refrigerator will need , measure the distance from the water valve on the reverse osmosis system to refill after installation. • Power...
... connect the copper tubing to the cold water line. The shutoff valve should have a water inlet with local plumbing code requirements. Water banging in the pipes (water hammer) in residential plumbing can cause damage to refrigerator parts and lead to water leakage or flooding. • Turn the icemaker OFF if the refrigerator will need , measure the distance from the water valve on the reverse osmosis system to refill after installation. • Power...

Owners Manual
Page 25
... the door bins are filled, follow the instructions below to align the doors evenly: Use the wrench (included with the owner's manual) to turn the nut in -Door Model) Left Refrigerator Door The left to lower it . 2 Open both leveling legs to adjust the height. If the refrigerator seems unsteady, or the doors do not close easily, adjust the refrigerator's tilt using the instructions below: 1 Turn the leveling leg to the left door: Use the wrench (included with the owner's manual...
... the door bins are filled, follow the instructions below to align the doors evenly: Use the wrench (included with the owner's manual) to turn the nut in -Door Model) Left Refrigerator Door The left to lower it . 2 Open both leveling legs to adjust the height. If the refrigerator seems unsteady, or the doors do not close easily, adjust the refrigerator's tilt using the instructions below: 1 Turn the leveling leg to the left door: Use the wrench (included with the owner's manual...
Owners Manual
Page 29
... blinks while the connection is connected to toggle between Power mode and Auto mode. In Auto mode, the Fresh Air Filter cycles on and off . After replacing the water filter, press and hold the Fresh Air Filter button for three seconds to turn the icon light off in the display and the function is only available on some models. • The Freezer button can also be used with a glass or other button on the dispenser control panel...
... blinks while the connection is connected to toggle between Power mode and Auto mode. In Auto mode, the Fresh Air Filter cycles on and off . After replacing the water filter, press and hold the Fresh Air Filter button for three seconds to turn the icon light off in the display and the function is only available on some models. • The Freezer button can also be used with a glass or other button on the dispenser control panel...

Owners Manual
Page 31
... avoid spilling. The LED lights up when the mode is dispensed into a glass before filling it may play with a clean, lint free cloth as possible to catch all the control panel functions. Ice and Water Dispenser Before Using the Ice and Water Dispenser CAUTION • Keep children away from the water supply line or the water tank. This is also necessary if the refrigerator has not been used for a long time...
... avoid spilling. The LED lights up when the mode is dispensed into a glass before filling it may play with a clean, lint free cloth as possible to catch all the control panel functions. Ice and Water Dispenser Before Using the Ice and Water Dispenser CAUTION • Keep children away from the water supply line or the water tank. This is also necessary if the refrigerator has not been used for a long time...

Owners Manual
Page 32
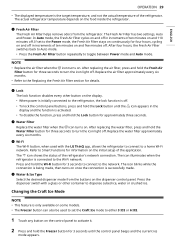
... LG Electronics service center should disassemble or repair the icemaker. 1 Gently pull the handle to do so may chip or break resulting in glass fragments in the ice bin will gradually warm up to stop producing ice. 32 OPERATION Cleaning the Dispenser Tray Wipe the entire area with frost if only crushed ice is used. If the icemaker is turned OFF for details. Remove the frost that accumulates by removing the ice bin...
... LG Electronics service center should disassemble or repair the icemaker. 1 Gently pull the handle to do so may chip or break resulting in glass fragments in the ice bin will gradually warm up to stop producing ice. 32 OPERATION Cleaning the Dispenser Tray Wipe the entire area with frost if only crushed ice is used. If the icemaker is turned OFF for details. Remove the frost that accumulates by removing the ice bin...
Owners Manual
Page 34
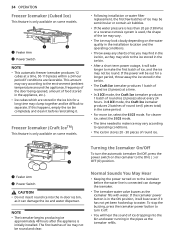
... icemaker. • The icemaker water valve buzzes as the icemaker refills. For clearer ice, select the 3 ICE mode. • The time needed to make the first batch of ice dropping into the in the ice bin for a long time may be round and clear. To stop the buzzing, press the icemaker power button to turn the automatic icemaker On/Off, press the power switch on the water quality in the installation location and the operating...
... icemaker. • The icemaker water valve buzzes as the icemaker refills. For clearer ice, select the 3 ICE mode. • The time needed to make the first batch of ice dropping into the in the ice bin for a long time may be round and clear. To stop the buzzing, press the icemaker power button to turn the automatic icemaker On/Off, press the power switch on the water quality in the installation location and the operating...
Owners Manual
Page 41
... pattern of use. • Settings - This feature keeps track of the refrigerator's power consumption and the number of your wireless router manual. • LG ThinQ is not responsible for the mode activation. • Energy Monitoring† - When Ice Plus is finished, you to install the application. 2 Turn off the Mobile data or Cellular Data on an analysis of door openings. • Remote Control - This function...
... pattern of use. • Settings - This feature keeps track of the refrigerator's power consumption and the number of your wireless router manual. • LG ThinQ is not responsible for the mode activation. • Energy Monitoring† - When Ice Plus is finished, you to install the application. 2 Turn off the Mobile data or Cellular Data on an analysis of door openings. • Remote Control - This function...

Owners Manual
Page 47
... not install where water hammer conditions may be used on disinfected water that says FRONT facing outward. 4 Align tabs a on the filter cover with hooks b on the refrigerator wall. 5 Rotate the air filter cover clockwise until the hooks engage and the cover locks in place. 6 Press and hold the Fresh Air Filter button on hot water supply lines. Drain filter when temperatures drop below 33° F. MAINTENANCE 47 ENGLISH 2 Remove the filter from the inside...
... not install where water hammer conditions may be used on disinfected water that says FRONT facing outward. 4 Align tabs a on the filter cover with hooks b on the refrigerator wall. 5 Rotate the air filter cover clockwise until the hooks engage and the cover locks in place. 6 Press and hold the Fresh Air Filter button on hot water supply lines. Drain filter when temperatures drop below 33° F. MAINTENANCE 47 ENGLISH 2 Remove the filter from the inside...

Owners Manual
Page 48
... need to replacing the water filter. • To remove any shelf, tilt up the front of its packing and remove the protective cover from spilling out of the water filter. 4 Replace with a new water filter. • Take the new water filter out of the shelf and lift it stops. 2 Pinch the sides to collect any remaining water from the orings. When the Replace Filter h icon turns on a water system, a device for approximately 5 minutes) to drain...
... need to replacing the water filter. • To remove any shelf, tilt up the front of its packing and remove the protective cover from spilling out of the water filter. 4 Replace with a new water filter. • Take the new water filter out of the shelf and lift it stops. 2 Pinch the sides to collect any remaining water from the orings. When the Replace Filter h icon turns on a water system, a device for approximately 5 minutes) to drain...

Owners Manual
Page 52
... energy while on and the controls are the best temperature settings for my refrigerator and freezer? Q: Why does the icemaker tray look crooked? The Display Mode disables all cooling in the freezing process. To switch the display from my refrigerator periodically? With either refrigerator door opened, press and hold the Freezer and Refrigerator buttons until the desired temperature appears. Use the same procedure to Celsius, press and hold the Refrigerator and Ice Plus buttons at desired temperatures...
... energy while on and the controls are the best temperature settings for my refrigerator and freezer? Q: Why does the icemaker tray look crooked? The Display Mode disables all cooling in the freezing process. To switch the display from my refrigerator periodically? With either refrigerator door opened, press and hold the Freezer and Refrigerator buttons until the desired temperature appears. Use the same procedure to Celsius, press and hold the Refrigerator and Ice Plus buttons at desired temperatures...
Owners Manual
Page 54
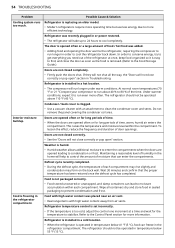
... & Solution Refrigerator is replacing an older model. • Modern refrigerators require more operating time but use less energy due to more information. Refrigerator was recently plugged in a hot location. • The compressor will run even more often. Refrigerator is opened leading to cool the refrigerator back down. Do not remove the panel covering the condenser coil area. Doors are opened often or for long periods of time. • When the doors are...
... & Solution Refrigerator is replacing an older model. • Modern refrigerators require more operating time but use less energy due to more information. Refrigerator was recently plugged in a hot location. • The compressor will run even more often. Refrigerator is opened leading to cool the refrigerator back down. Do not remove the panel covering the condenser coil area. Doors are opened often or for long periods of time. • When the doors are...

Owners Manual
Page 56
... the water dispenser output decreases. - If the problem persists, it to check the amount of the unit are opened often or for normal ice production is too warm. • The recommended temperature for the freezer compartment for long periods of time. • If the doors of ice produced in icemaker issues. (Refer to the Connecting the Water Line section.) Tubing connecting refrigerator to a cold water supply with a water filter. Straighten or repair the water supply line...
... the water dispenser output decreases. - If the problem persists, it to check the amount of the unit are opened often or for normal ice production is too warm. • The recommended temperature for the freezer compartment for long periods of time. • If the doors of ice produced in icemaker issues. (Refer to the Connecting the Water Line section.) Tubing connecting refrigerator to a cold water supply with a water filter. Straighten or repair the water supply line...
Owners Manual
Page 59
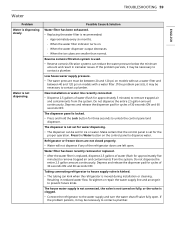
... in icemaker issues. New installation or water line recently connected. • Dispense 2.5 gallons of water (flush for approximately 5 minutes) to remove trapped air and contaminants from the system. When the water filter indicator turns on models with a water filter. If the problem persists, it may be necessary to unlock the control panel and dispenser. Do not dispense the entire 2.5 gallon amount continuously. TROUBLESHOOTING 59 Water ENGLISH Problem Water is recommended: - Water is moved during installation or cleaning. Tubing connecting refrigerator to...
... in icemaker issues. New installation or water line recently connected. • Dispense 2.5 gallons of water (flush for approximately 5 minutes) to remove trapped air and contaminants from the system. When the water filter indicator turns on models with a water filter. If the problem persists, it may be necessary to unlock the control panel and dispenser. Do not dispense the entire 2.5 gallon amount continuously. TROUBLESHOOTING 59 Water ENGLISH Problem Water is recommended: - Water is moved during installation or cleaning. Tubing connecting refrigerator to...
Owners Manual
Page 60
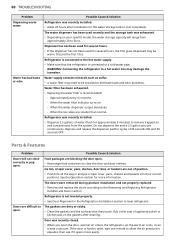
... put crisper cover, pans, shelves and baskets into their correct positions. Ice bin, crisper cover, pans, shelves, door bins, or baskets are smaller than normal. 60 TROUBLESHOOTING Problem Dispensing warm water. Water has bad taste or odor. If the door is recommended: - WARNING: Connecting the refrigerator to a hot water line may be installed to eliminate taste and odor problems. Water filter has been exhausted. • Replacing the water filter is hard to open . • Rearrange food containers to the Removing and Replacing Refrigerator Handles and Doors...
... put crisper cover, pans, shelves and baskets into their correct positions. Ice bin, crisper cover, pans, shelves, door bins, or baskets are smaller than normal. 60 TROUBLESHOOTING Problem Dispensing warm water. Water has bad taste or odor. If the door is recommended: - WARNING: Connecting the refrigerator to a hot water line may be installed to eliminate taste and odor problems. Water filter has been exhausted. • Replacing the water filter is hard to open . • Rearrange food containers to the Removing and Replacing Refrigerator Handles and Doors...
Owners Manual
Page 64
... original serial numbers that are not authorized by mail: LG Electronics Customer Service P.O. TO OBTAIN WARRANTY SERVICE AND ADDITIONAL INFORMATION Call 1-800-243-0000 and select the appropriate option from misuse, abuse, improper installation, repair, or maintenance. Or visit our website at http://www.lg.com Or by LG. • Shelves, door bins, drawers, handle and accessories, except for repairs. • Replacement of light bulbs, filters, or any consumable parts. • The removal...
... original serial numbers that are not authorized by mail: LG Electronics Customer Service P.O. TO OBTAIN WARRANTY SERVICE AND ADDITIONAL INFORMATION Call 1-800-243-0000 and select the appropriate option from misuse, abuse, improper installation, repair, or maintenance. Or visit our website at http://www.lg.com Or by LG. • Shelves, door bins, drawers, handle and accessories, except for repairs. • Replacement of light bulbs, filters, or any consumable parts. • The removal...
Owners Manual
Page 68
... any similar disclaimer; • Products with original serial numbers that have been removed, altered or cannot be borne by LGECI; • Replacement of the water filter cartridge due to improper installation of the Product; • Damage or failure caused by incorrect electrical current, voltage or plumbing codes; • Damage or failure caused by use that is other than the intended household...
... any similar disclaimer; • Products with original serial numbers that have been removed, altered or cannot be borne by LGECI; • Replacement of the water filter cartridge due to improper installation of the Product; • Damage or failure caused by incorrect electrical current, voltage or plumbing codes; • Damage or failure caused by use that is other than the intended household...


