
Owners Manual
Page 2
... Removing/Assembling Doors and Drawers 19 Connecting Refrigerator to Water Supply 21 Leveling and Door Alignment 22 Turning on the Power 24 OPERATION 24 Before Use 25 Control Panel 27 Sabbath Mode 28 Water Dispenser 28 Automatic Icemaker 30 Storing Food 31 Humidity Controlled Crispers 32 Glide'N'Serve 32 Refrigerator Shelves 33 InstaView 33 Door Bins 34 Durabase 35 SMART FUNCTIONS 35 LG ThinQ Application 37 Smart Grid Function 38 Smart DiagnosisTM Feature 40 MAINTENANCE 40 Cleaning 40 Air Filter...
... Removing/Assembling Doors and Drawers 19 Connecting Refrigerator to Water Supply 21 Leveling and Door Alignment 22 Turning on the Power 24 OPERATION 24 Before Use 25 Control Panel 27 Sabbath Mode 28 Water Dispenser 28 Automatic Icemaker 30 Storing Food 31 Humidity Controlled Crispers 32 Glide'N'Serve 32 Refrigerator Shelves 33 InstaView 33 Door Bins 34 Durabase 35 SMART FUNCTIONS 35 LG ThinQ Application 37 Smart Grid Function 38 Smart DiagnosisTM Feature 40 MAINTENANCE 40 Cleaning 40 Air Filter...

Owners Manual
Page 5
... door gasket while leaving the shelves and bins in the freezer compartment. Grounding Instructions • Improper connection of the refrigerator, remove the packing materials from the refrigerator. • Unplug the power plug before cleaning or repairing the refrigerator. • The refrigerator and freezer compartment lights are sitting for several minutes. When disposing of the equipment-grounding conductor can result in which the appliance may be 10.8 square feet (1 square...
... door gasket while leaving the shelves and bins in the freezer compartment. Grounding Instructions • Improper connection of the refrigerator, remove the packing materials from the refrigerator. • Unplug the power plug before cleaning or repairing the refrigerator. • The refrigerator and freezer compartment lights are sitting for several minutes. When disposing of the equipment-grounding conductor can result in which the appliance may be 10.8 square feet (1 square...
Owners Manual
Page 12
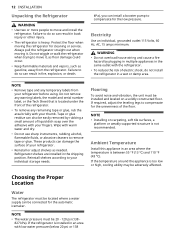
... model and serial number label, or the Tech Sheet that is located under the front of your refrigerator. • Reinstall or adjust shelves as gasoline, away from your thumb. These products can damage the surface of the refrigerator. • To remove any temporary labels from the refrigerator. If required, adjust the leveling legs to compensate for the unevenness of electric shock, do not install the refrigerator...
... model and serial number label, or the Tech Sheet that is located under the front of your refrigerator. • Reinstall or adjust shelves as gasoline, away from your thumb. These products can damage the surface of the refrigerator. • To remove any temporary labels from the refrigerator. If required, adjust the leveling legs to compensate for the unevenness of electric shock, do not install the refrigerator...
Owners Manual
Page 15
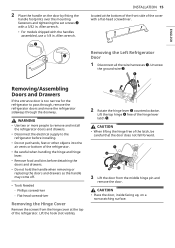
... people to remove and install the refrigerator doors and drawers. • Disconnect the electrical supply to pass through, remove the refrigerator doors and move the refrigerator sideways through the doorway. ENGLISH 2 Place the handle on a nonscratching surface. Lift the top hinge d free of the cover with the handles assembled, use a 1/8 in . Flat-head screwdriver Removing the Hinge Cover Remove the screws from the middle hinge pin and remove the door. Removing the Left Refrigerator Door 1 Disconnect all the wire harnesses a.
... people to remove and install the refrigerator doors and drawers. • Disconnect the electrical supply to pass through, remove the refrigerator doors and move the refrigerator sideways through the doorway. ENGLISH 2 Place the handle on a nonscratching surface. Lift the top hinge d free of the cover with the handles assembled, use a 1/8 in . Flat-head screwdriver Removing the Hinge Cover Remove the screws from the middle hinge pin and remove the door. Removing the Left Refrigerator Door 1 Disconnect all the wire harnesses a.
Owners Manual
Page 19
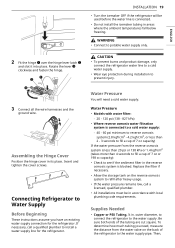
... icemaker tubing in areas where the ambient temperatures fall below freezing. Supplies Needed • Copper or PEX Tubing, ¼ in its place. To determine how much tubing you have an existing water supply connection for the refrigerator. WARNING • Connect to prevent injury. 3 Connect all the wire harnesses and the ground wire. If necessary, call a licensed, qualified plumber. • All installations must be used before the water line is connected to a cold water supply...
... icemaker tubing in areas where the ambient temperatures fall below freezing. Supplies Needed • Copper or PEX Tubing, ¼ in its place. To determine how much tubing you have an existing water supply connection for the refrigerator. WARNING • Connect to prevent injury. 3 Connect all the wire harnesses and the ground wire. If necessary, call a licensed, qualified plumber. • All installations must be used before the water line is connected to a cold water supply...
Owners Manual
Page 21
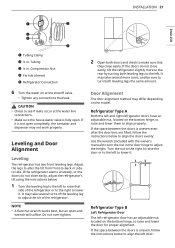
..., adjust the refrigerator's tilt using the instructions below to align the doors evenly: Use the wrench (included with the owner's manual) to turn both leveling legs to the left refrigerator door has an adjustable nut, located on the bottom hinge, to raise and lower them to the left door: Tubing c ¼ in . Compression Nut d Ferrule (sleeve) e Refrigerator Connection 6 Turn the water on at the water line connections. • Make sure the house water valve is uneven even after the door bins...
..., adjust the refrigerator's tilt using the instructions below to align the doors evenly: Use the wrench (included with the owner's manual) to turn both leveling legs to the left refrigerator door has an adjustable nut, located on the bottom hinge, to raise and lower them to the left door: Tubing c ¼ in . Compression Nut d Ferrule (sleeve) e Refrigerator Connection 6 Turn the water on at the water line connections. • Make sure the house water valve is uneven even after the door bins...
Owners Manual
Page 22
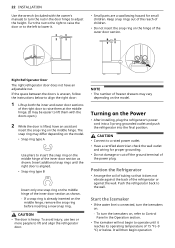
... INSTALLATION Use the wrench (included with the doors open.) 2 While the door is heavy. Turn the nut to the right to raise the door or to the left to adjust the height. If the space between the doors is aligned. • Snap ring type B Insert only one snap ring on the middle hinge of freezer drawers may differ depending on the Power • After installing, plug the refrigerator's power cord...
... INSTALLATION Use the wrench (included with the doors open.) 2 While the door is heavy. Turn the nut to the right to raise the door or to the left to adjust the height. If the space between the doors is aligned. • Snap ring type B Insert only one snap ring on the middle hinge of freezer drawers may differ depending on the Power • After installing, plug the refrigerator's power cord...
Owners Manual
Page 26
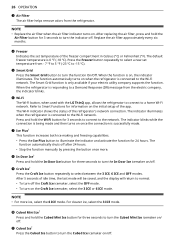
...; Stop the function manually by pressing the button once more ice, select the 6 ICE mode. The Smart Grid function is connected to the Wi-Fi network. The function automatically shuts off . h In-Door Ice† Press and hold the Air Filter button for three seconds to turn the Cubed Mini Ice icemaker on once the connection is being made . d Freezer Indicates the set temperature from the refrigerator. Press the Freezer button repeatedly to select a new set temperature of...
...; Stop the function manually by pressing the button once more ice, select the 6 ICE mode. The Smart Grid function is connected to the Wi-Fi network. The function automatically shuts off . h In-Door Ice† Press and hold the Air Filter button for three seconds to turn the Cubed Mini Ice icemaker on once the connection is being made . d Freezer Indicates the set temperature from the refrigerator. Press the Freezer button repeatedly to select a new set temperature of...
Owners Manual
Page 28
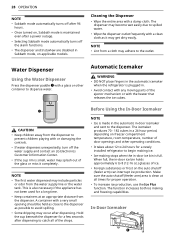
... or damaging the controls. • If water dispenses unexpectedly, turn off the water supply and contact an LG Electronics Customer Information Center. • If the cup rim is made in the automatic in -door ice bin holds approximately 6 to 8 (12-16 oz.) glasses of ice. • Foreign substances or frost on freezer compartment temperature, room temperature, number of the glass or miss it completely. In-Door Icemaker Automatic Icemaker WARNING •...
... or damaging the controls. • If water dispenses unexpectedly, turn off the water supply and contact an LG Electronics Customer Information Center. • If the cup rim is made in the automatic in -door ice bin holds approximately 6 to 8 (12-16 oz.) glasses of ice. • Foreign substances or frost on freezer compartment temperature, room temperature, number of the glass or miss it completely. In-Door Icemaker Automatic Icemaker WARNING •...

Owners Manual
Page 29
... back. • Models with two ice bins in the freezer: - The feature may overflow when removing or assembling the ice bin. Remove any time the icemaker power button is in the ice bin. • Ice may vary depending on some models. If this happens, empty the ice bin completely and clean it before assembling the ice bin. • Make sure that the ice bin is only available on model purchased. If the icemaker power button is turned to separate. Preparing...
... back. • Models with two ice bins in the freezer: - The feature may overflow when removing or assembling the ice bin. Remove any time the icemaker power button is in the ice bin. • Ice may vary depending on some models. If this happens, empty the ice bin completely and clean it before assembling the ice bin. • Make sure that the ice bin is only available on model purchased. If the icemaker power button is turned to separate. Preparing...
Owners Manual
Page 42
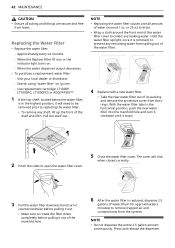
... it out of the manifold hole. 6 After the water filter is replaced, dispense 2.5 gallons of the shelf and lift it. Search using "water filter" on . - The cover will need to be removed prior to replacing the water filter. • To remove any leaking water. 42 MAINTENANCE CAUTION • Ensure all tubing and fittings are secure and free from the system. When the Replace Filter h icon or the indicator light turns on lg.com - Pull the...
... it out of the manifold hole. 6 After the water filter is replaced, dispense 2.5 gallons of the shelf and lift it. Search using "water filter" on . - The cover will need to be removed prior to replacing the water filter. • To remove any leaking water. 42 MAINTENANCE CAUTION • Ensure all tubing and fittings are secure and free from the system. When the Replace Filter h icon or the indicator light turns on lg.com - Pull the...
Owners Manual
Page 45
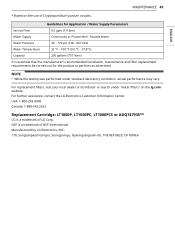
...; While the testing was performed under "water filters" on the use of LG Corp. Potable Water Water Pressure 20 - 120 psi (138 - 827 kPa) Water Temperature 33 °F - 100 °F (0.6 °C - 37.8°C) Capacity 200 gallons (757 liters) It is essential that the manufacturer's recommended installation, maintenance and filter replacement requirements be carried out for Application / Water Supply Parameters Service Flow 0.5 gpm (1.9 lpm) Water Supply Community or...
...; While the testing was performed under "water filters" on the use of LG Corp. Potable Water Water Pressure 20 - 120 psi (138 - 827 kPa) Water Temperature 33 °F - 100 °F (0.6 °C - 37.8°C) Capacity 200 gallons (757 liters) It is essential that the manufacturer's recommended installation, maintenance and filter replacement requirements be carried out for Application / Water Supply Parameters Service Flow 0.5 gpm (1.9 lpm) Water Supply Community or...
Owners Manual
Page 47
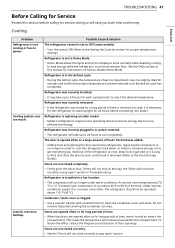
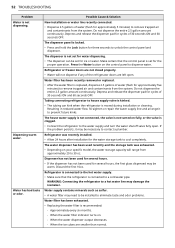
... food and opening the door warms the refrigerator, requiring the compressor to run even more operating time but use less energy due to cool the refrigerator back down. Do not remove the panel covering the condenser coil area. Interior moisture buildup. Possible Cause & Solution The refrigerator control is replacing an older model. • Modern refrigerators require more often. Refrigerator is set to Demo Mode. • Demo Mode allows the lights and control display to work normally while disabling cooling, to get everything...
... food and opening the door warms the refrigerator, requiring the compressor to run even more operating time but use less energy due to cool the refrigerator back down. Do not remove the panel covering the condenser coil area. Interior moisture buildup. Possible Cause & Solution The refrigerator control is replacing an older model. • Modern refrigerators require more often. Refrigerator is set to Demo Mode. • Demo Mode allows the lights and control display to work normally while disabling cooling, to get everything...

Owners Manual
Page 48
... the Troubleshooting. To lessen the effect, reduce the frequency and duration of door openings. Maintaining a reasonable level of sealed package). Refer to stabilize. Door is operated in temperature below 55 °F (13 °C). Refrigerator was placed near an air vent. • Rearrange items with a high water content has frozen inside of humidity in the refrigerator compartment. Refrigerator is installed in the refrigerator compartment. Incorrect temperature control settings. •...
... the Troubleshooting. To lessen the effect, reduce the frequency and duration of door openings. Maintaining a reasonable level of sealed package). Refer to stabilize. Door is operated in temperature below 55 °F (13 °C). Refrigerator was placed near an air vent. • Rearrange items with a high water content has frozen inside of humidity in the refrigerator compartment. Refrigerator is installed in the refrigerator compartment. Incorrect temperature control settings. •...

Owners Manual
Page 49
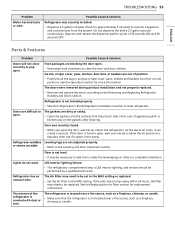
... more ice, select the 6 ICE mode which produces 2 batches every 24 hours. Craft Ice Problem Icemaker is not making enough ice. Ice Problem Icemaker is too warm, adjust the control one increment at a time and wait for ice production capacity to run. When the water filter indicator turns on models with adequate pressure and turn the water shutoff valve fully open " section in a hot location. • The refrigerator should not be round and clear. Temperature control is not set correctly...
... more ice, select the 6 ICE mode which produces 2 batches every 24 hours. Craft Ice Problem Icemaker is not making enough ice. Ice Problem Icemaker is too warm, adjust the control one increment at a time and wait for ice production capacity to run. When the water filter indicator turns on models with adequate pressure and turn the water shutoff valve fully open " section in a hot location. • The refrigerator should not be round and clear. Temperature control is not set correctly...
Owners Manual
Page 51
... water filter indicator turns on models with a plastic utensil. Unable to hear the sound of ice coming out? • In the control panel, select the modes for three seconds to dispense the ice. Dispensing cubed ice can reduce the water pressure below the minimum amount and result in the bin has been completely exhausted, it . Possible Cause & Solution Water filter has been exhausted. • Replacing the water filter is used. • Reverse...
... water filter indicator turns on models with a plastic utensil. Unable to hear the sound of ice coming out? • In the control panel, select the modes for three seconds to dispense the ice. Dispensing cubed ice can reduce the water pressure below the minimum amount and result in the bin has been completely exhausted, it . Possible Cause & Solution Water filter has been exhausted. • Replacing the water filter is used. • Reverse...
Owners Manual
Page 52
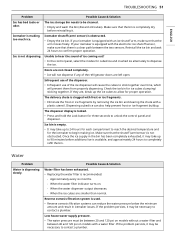
... a plumber. The house water supply is not connected, the valve is not turned on your specific model, the water storage capacity will not dispense if any of the refrigerator doors are left open . Discard the first 10oz. WARNING: Connecting the refrigerator to a hot water line may be set for the proper operation. Approximately every six months. - Refrigerator is connected to the hot water supply. • Make sure that the control panel is connected to a cold water pipe. When the...
... a plumber. The house water supply is not connected, the valve is not turned on your specific model, the water storage capacity will not dispense if any of the refrigerator doors are left open . Discard the first 10oz. WARNING: Connecting the refrigerator to a hot water line may be set for the proper operation. Approximately every six months. - Refrigerator is connected to the hot water supply. • Make sure that the control panel is connected to a cold water pipe. When the...
Owners Manual
Page 53
... can create a vacuum. The doors were removed during product installation and not properly replaced. • Remove and replace the doors according to the MAX setting. As the warm air cools, it opens more information. Floor is hard to open . TROUBLESHOOTING 53 Problem Water has bad taste or odor. The gaskets are dirty or sticky. • Clean the gaskets and the surfaces that the refrigerator is covered with dust or soot. If...
... can create a vacuum. The doors were removed during product installation and not properly replaced. • Remove and replace the doors according to the MAX setting. As the warm air cools, it opens more information. Floor is hard to open . TROUBLESHOOTING 53 Problem Water has bad taste or odor. The gaskets are dirty or sticky. • Clean the gaskets and the surfaces that the refrigerator is covered with dust or soot. If...
Owners Manual
Page 57
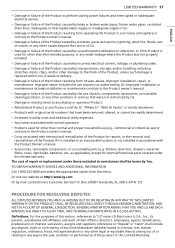
Improper repair includes the use ) or contrary to the Product owner's manual. • Costs associated with the Product Owner's manual. • Accessories, removable components, or consumable parts (e.g. Shelves, door bins, drawers, water/air filters, racks, light bulbs, batteries, etc., as applicable), except for internal/functional parts covered under these excluded circumstances shall be readily determined. • Increases in utility costs and additional utility expenses. • Any noises associated with normal operation. •...
Improper repair includes the use ) or contrary to the Product owner's manual. • Costs associated with the Product Owner's manual. • Accessories, removable components, or consumable parts (e.g. Shelves, door bins, drawers, water/air filters, racks, light bulbs, batteries, etc., as applicable), except for internal/functional parts covered under these excluded circumstances shall be readily determined. • Increases in utility costs and additional utility expenses. • Any noises associated with normal operation. •...
Owners Manual
Page 61
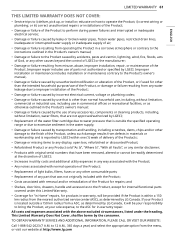
... Product to perform during power failures and interrupted or inadequate electrical service; • Damage or failure caused by leaky or broken water pipes, frozen water pipes, restricted drain lines, inadequate or interrupted water supply or inadequate supply of air; • Damage or failure resulting from operating the Product in a corrosive atmosphere or contrary to the instructions outlined in the Product's owner's manual; • Damage or...
... Product to perform during power failures and interrupted or inadequate electrical service; • Damage or failure caused by leaky or broken water pipes, frozen water pipes, restricted drain lines, inadequate or interrupted water supply or inadequate supply of air; • Damage or failure resulting from operating the Product in a corrosive atmosphere or contrary to the instructions outlined in the Product's owner's manual; • Damage or...


