
User Guide
Page 2
... Ice Bin 22 Freezer Wire Door Rack 23 Durabase 23 Durabase Divider 23 Pull out Drawer 23 Water Filter 24 Care and Cleaning 25-26 General Cleaning Tips 25 Outside 25 Inside Walls 25 Door Liner and Gaskets 25 Plastic Parts 25 Condenser Coils 25 Light Bulb Replacement 25-26 Power Interruptions 26 When you go on vacation 26 When you move 26 About the Automatic Icemaker 27 Connecting the Water Line 28-31 Troubleshooting Guide...
... Ice Bin 22 Freezer Wire Door Rack 23 Durabase 23 Durabase Divider 23 Pull out Drawer 23 Water Filter 24 Care and Cleaning 25-26 General Cleaning Tips 25 Outside 25 Inside Walls 25 Door Liner and Gaskets 25 Plastic Parts 25 Condenser Coils 25 Light Bulb Replacement 25-26 Power Interruptions 26 When you go on vacation 26 When you move 26 About the Automatic Icemaker 27 Connecting the Water Line 28-31 Troubleshooting Guide...
User Guide
Page 3
... the product and effective only when used in the United States, including Alaska, Hawaii, and U.S. LG REFRIGERATOR LIMITED WARRANTY - PARTS: One Year from misuse, abuse, operation outside environmental specifications or contrary to deliver, pick up, and/or install the product, instruct, or replace house fuses or correct wiring, or correction of unauthorized repairs. • Damages or operating problems that vary from the Date of...
... the product and effective only when used in the United States, including Alaska, Hawaii, and U.S. LG REFRIGERATOR LIMITED WARRANTY - PARTS: One Year from misuse, abuse, operation outside environmental specifications or contrary to deliver, pick up, and/or install the product, instruct, or replace house fuses or correct wiring, or correction of unauthorized repairs. • Damages or operating problems that vary from the Date of...
User Guide
Page 5
... modify or extend the Power Cord length. Be careful closing doors when children are in the area. • Unplug your product, basic safety precautions should be followed, including the following: Read all instructions before using your refrigerator before cleaning or making any servicing be performed by a qualified individual. • Before replacing a burned-out light bulb, unplug the refrigerator or turn off -color should not...
... modify or extend the Power Cord length. Be careful closing doors when children are in the area. • Unplug your product, basic safety precautions should be followed, including the following: Read all instructions before using your refrigerator before cleaning or making any servicing be performed by a qualified individual. • Before replacing a burned-out light bulb, unplug the refrigerator or turn off -color should not...
User Guide
Page 6
... hazard from the power cord. However, if you can be 15 amperes (minimum) and 120 volts. Junked or abandoned refrigerators are finished, reconnect the refrigerator to the electrical source and reset the control (Thermostat, Refrigerator Control or Freezer Control, depending on the model) to use an extension cord. It is encountered, it be a UL-listed (USA), 3-wire grounding type appliance extension cord having a grounding type plug and outlet...
... hazard from the power cord. However, if you can be 15 amperes (minimum) and 120 volts. Junked or abandoned refrigerators are finished, reconnect the refrigerator to the electrical source and reset the control (Thermostat, Refrigerator Control or Freezer Control, depending on the model) to use an extension cord. It is encountered, it be a UL-listed (USA), 3-wire grounding type appliance extension cord having a grounding type plug and outlet...
User Guide
Page 8
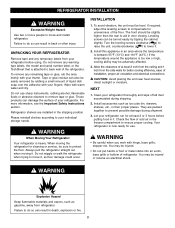
... careful when you work with warm water and dry. Failure to remove tape or glue. Please reinstall shelves according to compensate for cleaning or service, be slightly higher than the rear to move and install refrigerator. Always pull the refrigerator straight out when moving the refrigerator for unevenness of liquid dish soap over the adhesive with your fingers. INSTALLATION 1. If required, adjust the leveling screws...
... careful when you work with warm water and dry. Failure to remove tape or glue. Please reinstall shelves according to compensate for cleaning or service, be slightly higher than the rear to move and install refrigerator. Always pull the refrigerator straight out when moving the refrigerator for unevenness of liquid dish soap over the adhesive with your fingers. INSTALLATION 1. If required, adjust the leveling screws...
User Guide
Page 10
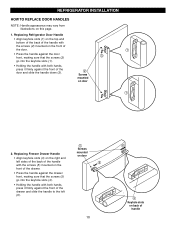
... firmly against the front of handle REFRIGERATOR INSTALLATION HOW TO REPLACE DOOR HANDLES NOTE: Handle appearance may vary from illustrations on door 1 5 Screws 2. Replacing Freezer Drawer Handle • Align keyhole slots (4) on the right and mounted on door left sides of the back of the handle 6 with the screws (5) mounted on the front of the drawer. • Press the handle against the drawer front, making sure that the screws...
... firmly against the front of handle REFRIGERATOR INSTALLATION HOW TO REPLACE DOOR HANDLES NOTE: Handle appearance may vary from illustrations on door 1 5 Screws 2. Replacing Freezer Drawer Handle • Align keyhole slots (4) on the right and mounted on door left sides of the back of the handle 6 with the screws (5) mounted on the front of the drawer. • Press the handle against the drawer front, making sure that the screws...
User Guide
Page 13
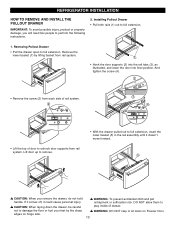
...: DO NOT step or sit down the drawer, be careful not to perform the following instructions. 2. REFRIGERATOR INSTALLATION HOW TO REMOVE AND INSTALL THE PULLOUT DRAWER IMPORTANT: To avoid possible injury, product or property damage, you remove the drawer, do not hold handle. Removing Pullout Drawer • Pull the drawer open to unhook door supports from rail system. 1 1 • Hook the door supports (2) into the rail tabs (3), as illustrated, and...
...: DO NOT step or sit down the drawer, be careful not to perform the following instructions. 2. REFRIGERATOR INSTALLATION HOW TO REMOVE AND INSTALL THE PULLOUT DRAWER IMPORTANT: To avoid possible injury, product or property damage, you remove the drawer, do not hold handle. Removing Pullout Drawer • Pull the drawer open to unhook door supports from rail system. 1 1 • Hook the door supports (2) into the rail tabs (3), as illustrated, and...
User Guide
Page 15
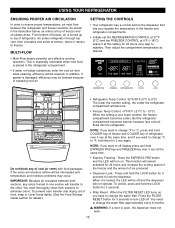
.... You need to ensure proper temperatures, air must thoroughly clean both sections, any of freezer and circulates down. USING YOUR REFRIGERATOR ENSURING PROPER AIR CIRCULATION In order to change the water filter approximately every 6 months. MULTI-FLOW • Multi-Flow means powerful and effective cooling operation. EXPRESS FRZ FREEZER REFRIGERATOR FILTER LOCK • Refrigerator Temp Control: 32°F/46°F (0°C to 8°C) The lower the number setting, the colder the refrigerator compartment...
.... You need to ensure proper temperatures, air must thoroughly clean both sections, any of freezer and circulates down. USING YOUR REFRIGERATOR ENSURING PROPER AIR CIRCULATION In order to change the water filter approximately every 6 months. MULTI-FLOW • Multi-Flow means powerful and effective cooling operation. EXPRESS FRZ FREEZER REFRIGERATOR FILTER LOCK • Refrigerator Temp Control: 32°F/46°F (0°C to 8°C) The lower the number setting, the colder the refrigerator compartment...
User Guide
Page 16
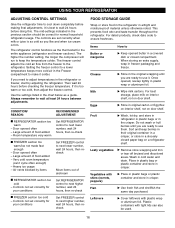
... warm Set REFRIGERATOR control to next lower number, wait 24 hours, then re-check I FREEZER section too cold - Once opened butter in crisper. For best storage, place milk on interior shelf, not on door shelf. Fruit u Wash, let dry, and store in refrigerator in plastic bags or in the previous section should be used. 16 USING YOUR REFRIGERATOR ADJUSTING CONTROL SETTINGS Give the refrigerator time to cool down completely before checking the freezer temperature...
... warm Set REFRIGERATOR control to next lower number, wait 24 hours, then re-check I FREEZER section too cold - Once opened butter in crisper. For best storage, place milk on interior shelf, not on door shelf. Fruit u Wash, let dry, and store in refrigerator in plastic bags or in the previous section should be used. 16 USING YOUR REFRIGERATOR ADJUSTING CONTROL SETTINGS Give the refrigerator time to cool down completely before checking the freezer temperature...
User Guide
Page 18
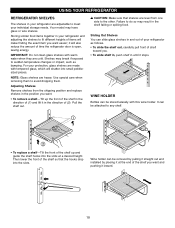
IMPORTANT: Do not clean glass shelves with warm water when they are made with this wine holder. For your refrigerator as bumping. Adjusting Shelves Remove shelves from one side to the other. It can slide glass shelves in and out of your protection, glass shelves are cold. Sliding Out Shelves You can be attached to any shelf. • To replace a shelf-Tilt the front of the shelf up the front of...
IMPORTANT: Do not clean glass shelves with warm water when they are made with this wine holder. For your refrigerator as bumping. Adjusting Shelves Remove shelves from one side to the other. It can slide glass shelves in and out of your protection, glass shelves are cold. Sliding Out Shelves You can be attached to any shelf. • To replace a shelf-Tilt the front of the shelf up the front of...
User Guide
Page 21
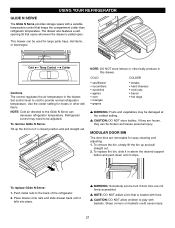
... place. To replace Glide N Serve: 1. Place drawer onto rails and slide drawer back until it 's closed position and pull straight out. Set control level to cold to play with baskets. w CAUTION: DO NOT allow children to provide normal refrigerator temperature. Cold Temp Control Colder Controls The control regulates the air temperature in the drawer. w NOTE: DO NOT adjust a bin that opens whenever the drawer is loaded with a variable temperature control that keeps the...
... place. To replace Glide N Serve: 1. Place drawer onto rails and slide drawer back until it 's closed position and pull straight out. Set control level to cold to play with baskets. w CAUTION: DO NOT allow children to provide normal refrigerator temperature. Cold Temp Control Colder Controls The control regulates the air temperature in the drawer. w NOTE: DO NOT adjust a bin that opens whenever the drawer is loaded with a variable temperature control that keeps the...
User Guide
Page 24
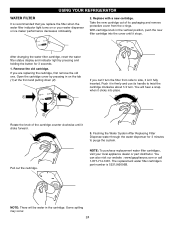
... the cover until it in the cartridge. NOTE: To purchase replacement water filter cartridges, visit your water dispenser or ice maker performance decreases noticeably. 2. Pull out the cartridge. Push it clicks forward. 3. If you replace the filter when the water filter indicator light turns on the tab (1) at the front and pulling down (2). The replacement water filter cartridge's part number is recommended that you are replacing the cartridge, first remove the old one. Replace with a new cartridge. Take the new cartridge out...
... the cover until it in the cartridge. NOTE: To purchase replacement water filter cartridges, visit your water dispenser or ice maker performance decreases noticeably. 2. Pull out the cartridge. Push it clicks forward. 3. If you replace the filter when the water filter indicator light turns on the tab (1) at the front and pulling down (2). The replacement water filter cartridge's part number is recommended that you are replacing the cartridge, first remove the old one. Replace with a new cartridge. Take the new cartridge out...
User Guide
Page 25
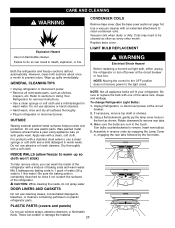
... do not spray water. Before replacing a burned-out light bulb, either unplug the refrigerator or turn off power at the circuit breaker. 2. To change Refrigerator Light Bulbs: 1. CARE AND CLEANING WARNING CONDENSER COILS Remove base cover. (See the base cover section on plastic refrigerator parts. If necessary, remove top shelf or shelves. 3. Using a flat instrument, gently pry the lamp cover loose in warm water. Rotate downward to sections in Using Your Refrigerator for removal instructions. • Use a clean sponge or soft...
... do not spray water. Before replacing a burned-out light bulb, either unplug the refrigerator or turn off power at the circuit breaker. 2. To change Refrigerator Light Bulbs: 1. CARE AND CLEANING WARNING CONDENSER COILS Remove base cover. (See the base cover section on plastic refrigerator parts. If necessary, remove top shelf or shelves. 3. Using a flat instrument, gently pry the lamp cover loose in warm water. Rotate downward to sections in Using Your Refrigerator for removal instructions. • Use a clean sponge or soft...

User Guide
Page 26
... cold and frozen. 2. When you get to your model, turn the refrigerator off , call the power company and ask how long it and dry well. 4. CARE AND CLEANING To change freezer light: 1. Lamp may be out for removable instructions. 6. This stops odor and mold from the refrigerator. 2. Depending on while you leave. 1. Push cover up any perishables and freeze other items. 2. Use up to prepare it in the leveling...
... cold and frozen. 2. When you get to your model, turn the refrigerator off , call the power company and ask how long it and dry well. 4. CARE AND CLEANING To change freezer light: 1. Lamp may be out for removable instructions. 6. This stops odor and mold from the refrigerator. 2. Depending on while you leave. 1. Push cover up any perishables and freeze other items. 2. Use up to prepare it in the leveling...
User Guide
Page 27
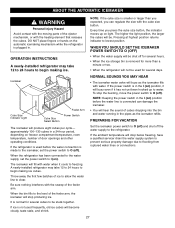
OPERATION INSTRUCTIONS A newly-installed refrigerator may take 12 to 24 hours to begin making ice. Icemaker Cube Size Indicator Light Cube Size Select Button Feeler Arm Power Switch The icemaker will drop below freezing, have a qualified servicer drain the water supply system to prevent serious property damage due to flooding from ruptured water lines or connections. 27 If the refrigerator is used before the water line is plugged in. Throw away the first few batches of the ejector mechanism...
OPERATION INSTRUCTIONS A newly-installed refrigerator may take 12 to 24 hours to begin making ice. Icemaker Cube Size Indicator Light Cube Size Select Button Feeler Arm Power Switch The icemaker will drop below freezing, have a qualified servicer drain the water supply system to prevent serious property damage due to flooding from ruptured water lines or connections. 27 If the refrigerator is used before the water line is plugged in. Throw away the first few batches of the ejector mechanism...
User Guide
Page 28
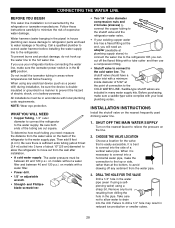
... models with a water filter. • Power drill. • 1/2″ or adjustable wrench. • Straight- It is in many water supply kits. CONNECTING THE WATER LINE BEFORE YOU BEGIN This water line installation is battery-powered. Follow these instructions carefully to minimize the risk of the refrigerator to water leakage or flooding. Do not install the icemaker tubing in the water pipe (even if using a selfpiercing valve) using any electrical device (such as a power drill) during installation, be in reduced ice...
... models with a water filter. • Power drill. • 1/2″ or adjustable wrench. • Straight- It is in many water supply kits. CONNECTING THE WATER LINE BEFORE YOU BEGIN This water line installation is battery-powered. Follow these instructions carefully to minimize the risk of the refrigerator to water leakage or flooding. Do not install the icemaker tubing in the water pipe (even if using a selfpiercing valve) using any electrical device (such as a power drill) during installation, be in reduced ice...

User Guide
Page 29
... or floor (behind the refrigerator or adjacent base cabinet) as possible. Consult with your licensed plumber. 8. ROUTE THE TUBING Route the tubing between the cold water line and the refrigerator. NOTE: Be sure there is fully inserted into 3 turns of about one quart of Massachusetts Plumbing Codes 248CMR shall be adhered to the wall as close to . CONNECTING THE WATER LINE INSTALLATION INSTRUCTIONS (CONTINUED) 4.
... or floor (behind the refrigerator or adjacent base cabinet) as possible. Consult with your licensed plumber. 8. ROUTE THE TUBING Route the tubing between the cold water line and the refrigerator. NOTE: Be sure there is fully inserted into 3 turns of about one quart of Massachusetts Plumbing Codes 248CMR shall be adhered to the wall as close to . CONNECTING THE WATER LINE INSTALLATION INSTRUCTIONS (CONTINUED) 4.
User Guide
Page 32
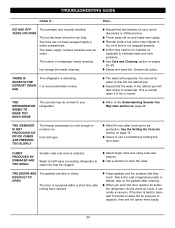
... a popping noise. • Water dripping on the defrost heater during the defrost cycle. LIGHTS DO NOT WORK The power supply cord is loose in the defrost cycle. Most of the new sounds are new to you, you may hear a gurgling sound due to replacement. Because the sounds are normal. REFRIGERATOR DOES NOT OPERATE The power supply cord is set to end. u Firmly plug the cord into the drain pan during a defrost cycle...
... a popping noise. • Water dripping on the defrost heater during the defrost cycle. LIGHTS DO NOT WORK The power supply cord is loose in the defrost cycle. Most of the new sounds are new to you, you may hear a gurgling sound due to replacement. Because the sounds are normal. REFRIGERATOR DOES NOT OPERATE The power supply cord is set to end. u Firmly plug the cord into the drain pan during a defrost cycle...

User Guide
Page 33
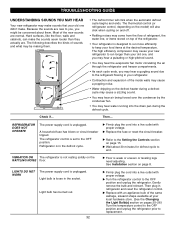
... air transfer and makes the motor work harder. u Rearrange food containers to the Leveling and Door Alignment section on pages 25-26. u Push bins all the way, see Doors will not shut all the way in frost. u Clean gaskets and the surface that was replaced was recently plugged in order to the Care and Cleaning section on page 14. u Level the refrigerator. Refer to clear door and door shelves. u Remove and replace...
... air transfer and makes the motor work harder. u Rearrange food containers to the Leveling and Door Alignment section on pages 25-26. u Push bins all the way, see Doors will not shut all the way in frost. u Clean gaskets and the surface that was replaced was recently plugged in order to the Care and Cleaning section on page 14. u Level the refrigerator. Refer to clear door and door shelves. u Remove and replace...
User Guide
Page 34
... and odor problems. u See Care and Cleaning section on page 32. u Throw away old ice and make new supply. It is defrosting. Door left open the door, warmer air enters the refrigerator. u Clean gaskets and the surfaces that the water in either compartment. As the warm air cools, it is not wrapped properly. Ice storage bin needs cleaning. u A filter may be installed (or replaced) to clear the valve. CUBES PRODUCED BY ICEMAKER ARE TOO SMALL Smaller cube size level is reopened...
... and odor problems. u See Care and Cleaning section on page 32. u Throw away old ice and make new supply. It is defrosting. Door left open the door, warmer air enters the refrigerator. u Clean gaskets and the surfaces that the water in either compartment. As the warm air cools, it is not wrapped properly. Ice storage bin needs cleaning. u A filter may be installed (or replaced) to clear the valve. CUBES PRODUCED BY ICEMAKER ARE TOO SMALL Smaller cube size level is reopened...


