
Owners Manual
Page 1
All Rights Reserved. ENGLISH LRFCS2503* LRFCS2523* LRFCS25D3* LM65BGSK LRFNS2503* MFL67227315 Rev.05_061920 www.lg.com Copyright © 2019 - 2020 LG Electronics Inc. OWNER'S MANUAL FRENCH DOOR REFRIGERATOR Read this owner's manual thoroughly before operating the appliance and keep it handy for reference at all times.
All Rights Reserved. ENGLISH LRFCS2503* LRFCS2523* LRFCS25D3* LM65BGSK LRFNS2503* MFL67227315 Rev.05_061920 www.lg.com Copyright © 2019 - 2020 LG Electronics Inc. OWNER'S MANUAL FRENCH DOOR REFRIGERATOR Read this owner's manual thoroughly before operating the appliance and keep it handy for reference at all times.
Owners Manual
Page 3
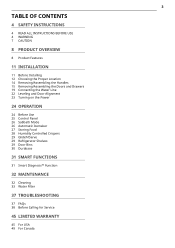
... 24 OPERATION 24 Before Use 25 Control Panel 26 Sabbath Mode 26 Automatic Icemaker 27 Storing Food 28 Humidity Controlled Crispers 29 Glide'N'Serve 29 Refrigerator Shelves 29 Door Bins 30 Durabase 31 SMART FUNCTIONS 31 Smart Diagnosis™ Function 32 MAINTENANCE 32 Cleaning 33 Water Filter 37 TROUBLESHOOTING 37 FAQs...
... 24 OPERATION 24 Before Use 25 Control Panel 26 Sabbath Mode 26 Automatic Icemaker 27 Storing Food 28 Humidity Controlled Crispers 29 Glide'N'Serve 29 Refrigerator Shelves 29 Door Bins 30 Durabase 31 SMART FUNCTIONS 31 Smart Diagnosis™ Function 32 MAINTENANCE 32 Cleaning 33 Water Filter 37 TROUBLESHOOTING 37 FAQs...

Owners Manual
Page 4
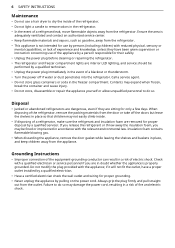
...in a damp or dusty place where insulation on your appliance. All safety messages will tell you what may deteriorate. • Do not place the refrigerator in direct sunlight or expose it to replace a standard 2-prong wall outlet with a standard 3-prong wall outlet. • Do not use with...damage to operate this product to roll over or damage the power cord. • Contact an authorized service center when installing or relocating the refrigerator. • Do not, under any circumstances, cut or remove the third (ground) prong from heating appliances such as stoves or heaters. ...
...in a damp or dusty place where insulation on your appliance. All safety messages will tell you what may deteriorate. • Do not place the refrigerator in direct sunlight or expose it to replace a standard 2-prong wall outlet with a standard 3-prong wall outlet. • Do not use with...damage to operate this product to roll over or damage the power cord. • Contact an authorized service center when installing or relocating the refrigerator. • Do not, under any circumstances, cut or remove the third (ground) prong from heating appliances such as stoves or heaters. ...

Owners Manual
Page 5
...protected by clients in shops, offices and other than a standard fuse. • Do not place or use an electrical appliance inside the refrigerator, unless it must be replaced by the manufacturer or its service agent or a similarly qualified person in structure, clear of the appliance, unless... and contact an authorized service center if there is a strange noise, odor, or smoke coming from the dispenser, do not play with the refrigerator. • Keep fingers out of a type recommended by the manufacturer. • Do not put hands, feet or other residential type environments;...
...protected by clients in shops, offices and other than a standard fuse. • Do not place or use an electrical appliance inside the refrigerator, unless it must be replaced by the manufacturer or its service agent or a similarly qualified person in structure, clear of the appliance, unless... and contact an authorized service center if there is a strange noise, odor, or smoke coming from the dispenser, do not play with the refrigerator. • Keep fingers out of a type recommended by the manufacturer. • Do not put hands, feet or other residential type environments;...
Owners Manual
Page 6
...8226; When discarding the appliance, remove the door gasket while leaving the shelves and baskets in a risk of the refrigerator, remove the packing materials from the refrigerator. • This appliance is not intended for proper disposal by persons (including children) with the relevant environmental law....8226; Do not store, disassemble or repair the appliance yourself or allow unqualified personnel to do so may not easily climb inside of the refrigerator. • Do not light a candle to remove odors in the freezer compartment. 6 SAFETY INSTRUCTIONS Maintenance • Do not use a...
...8226; When discarding the appliance, remove the door gasket while leaving the shelves and baskets in a risk of the refrigerator, remove the packing materials from the refrigerator. • This appliance is not intended for proper disposal by persons (including children) with the relevant environmental law....8226; Do not store, disassemble or repair the appliance yourself or allow unqualified personnel to do so may not easily climb inside of the refrigerator. • Do not light a candle to remove odors in the freezer compartment. 6 SAFETY INSTRUCTIONS Maintenance • Do not use a...

Owners Manual
Page 7
...damage to the product or property when using this product, follow basic precautions, including the following: Installation • Do not install the refrigerator where there may break if exposed to any naked flames or potential sources of damage. Maintenance • Do not use a wet or...wax or thinners for several minutes. ENGLISH SAFETY INSTRUCTIONS 7 Risk of Fire and Flammable Materials This appliance contains a small amount of the refrigerating circuit are damaged. When transporting and installing the appliance, care should be used . Do not touch glass surfaces if they are cold...
...damage to the product or property when using this product, follow basic precautions, including the following: Installation • Do not install the refrigerator where there may break if exposed to any naked flames or potential sources of damage. Maintenance • Do not use a wet or...wax or thinners for several minutes. ENGLISH SAFETY INSTRUCTIONS 7 Risk of Fire and Flammable Materials This appliance contains a small amount of the refrigerating circuit are damaged. When transporting and installing the appliance, care should be used . Do not touch glass surfaces if they are cold...

Owners Manual
Page 8
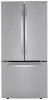
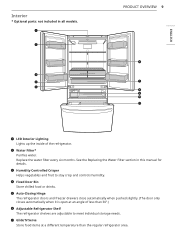
Exterior a Refrigerator Fresh food compartment b Handle Opens and closes the refrigerator door. c Freezer Frozen food compartment 8 PRODUCT OVERVIEW PRODUCT OVERVIEW Product Features The images in this guide may be different from the actual components and accessories, which are subject to change by the manufacturer without prior notice for product improvement purposes.
Exterior a Refrigerator Fresh food compartment b Handle Opens and closes the refrigerator door. c Freezer Frozen food compartment 8 PRODUCT OVERVIEW PRODUCT OVERVIEW Product Features The images in this guide may be different from the actual components and accessories, which are subject to change by the manufacturer without prior notice for product improvement purposes.
Owners Manual
Page 9
...this manual for details. Glide'N'Serve Store food items at an angle of the refrigerator. PRODUCT OVERVIEW 9 ENGLISH LED Interior Lighting Lights up the inside of less than the regular refrigerator area. See the Replacing the Water Filter section in all models. Humidity Controlled Crisper... to meet individual storage needs. Fixed Door Bin Store chilled food or drinks. Water Filter* Purifies water. Auto-Closing Hinge The refrigerator doors and freezer drawers close automatically when pushed slightly. (The door only closes automatically when it is open at a different temperature than...
...this manual for details. Glide'N'Serve Store food items at an angle of the refrigerator. PRODUCT OVERVIEW 9 ENGLISH LED Interior Lighting Lights up the inside of less than the regular refrigerator area. See the Replacing the Water Filter section in all models. Humidity Controlled Crisper... to meet individual storage needs. Fixed Door Bin Store chilled food or drinks. Water Filter* Purifies water. Auto-Closing Hinge The refrigerator doors and freezer drawers close automatically when pushed slightly. (The door only closes automatically when it is open at a different temperature than...

Owners Manual
Page 10
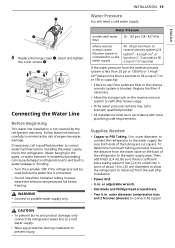
... compartment. Electrical requirements: 115 V, 60 Hz Min. / Max. water pressure: 20 - 120 psi (138 - 827 kPa) Description Net weight Model LRFCS2503* / LRFCS2523* / LRFCS25D3* / LM65BGSK / LRFNS2503* Standard-depth, French door refrigerator, bottom freezer 234 lb (106 kg) Ice Bin* Stores ice produced by the automatic icemaker. 10 PRODUCT OVERVIEW Automatic Icemaker (Freezer)* Produces...
... compartment. Electrical requirements: 115 V, 60 Hz Min. / Max. water pressure: 20 - 120 psi (138 - 827 kPa) Description Net weight Model LRFCS2503* / LRFCS2523* / LRFCS25D3* / LM65BGSK / LRFNS2503* Standard-depth, French door refrigerator, bottom freezer 234 lb (106 kg) Ice Bin* Stores ice produced by the automatic icemaker. 10 PRODUCT OVERVIEW Automatic Icemaker (Freezer)* Produces...

Owners Manual
Page 11
ENGLISH a Unpacking the Refrigerator b Choosing the Proper Location c Disassembling/Assembling d Connecting the Water Line e Leveling and Door Alignment WARNING • Connect to another location. INSTALLATION INSTALLATION 11 Before Installing Installation Overview Please read the following installation instructions first after purchasing this product or transporting it to potable water supply only.
ENGLISH a Unpacking the Refrigerator b Choosing the Proper Location c Disassembling/Assembling d Connecting the Water Line e Leveling and Door Alignment WARNING • Connect to another location. INSTALLATION INSTALLATION 11 Before Installing Installation Overview Please read the following installation instructions first after purchasing this product or transporting it to potable water supply only.
Owners Manual
Page 12
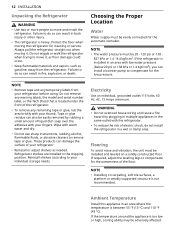
...8226; Do not use sharp instruments, rubbing alcohol, flammable fluids, or abrasive cleaners to do so can result in fire, explosion, or death. Refrigerator shelves are installed in an area where the temperature is between 55 °F (13 °C) and 110 °F (43 °C). Electricity ...your thumb. If required, adjust the leveling legs to compensate for the automatic icemaker. Do not wiggle or walk the refrigerator when trying to your refrigerator before using. Ambient Temperature Install this appliance in the shipping position. Choosing the Proper Location Water Water supply must be...
...8226; Do not use sharp instruments, rubbing alcohol, flammable fluids, or abrasive cleaners to do so can result in fire, explosion, or death. Refrigerator shelves are installed in an area where the temperature is between 55 °F (13 °C) and 110 °F (43 °C). Electricity ...your thumb. If required, adjust the leveling legs to compensate for the automatic icemaker. Do not wiggle or walk the refrigerator when trying to your refrigerator before using. Ambient Temperature Install this appliance in the shipping position. Choosing the Proper Location Water Water supply must be...
Owners Manual
Page 13
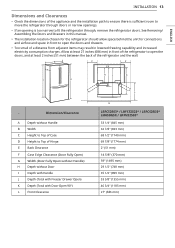
... or narrow openings. • If an opening is too narrow to Top of a distance from adjacent items may result in front of the refrigerator to open the doors and drawers. • Too small of Hinge E Back Clearance F Case Edge Clearance (Door Fully Open) G Width ... A Depth without Door I Depth with Handle J Depth (Total with Freezer Drawer Open) K Depth (Total with Door Open 90°) L Front Clearance L G LRFCS2503* / LRFCS2523* / LRFCS25D3* LM65BGSK / LRFNS2503* 33 1/4" (845 mm) 32 7/8" (833 mm) 68 1/2" (1740 mm) 69 7/8" (1774 mm) 2" (51 mm) 14 5/8" (370 mm) 59" (1495...
... or narrow openings. • If an opening is too narrow to Top of a distance from adjacent items may result in front of the refrigerator to open the doors and drawers. • Too small of Hinge E Back Clearance F Case Edge Clearance (Door Fully Open) G Width ... A Depth without Door I Depth with Handle J Depth (Total with Freezer Drawer Open) K Depth (Total with Door Open 90°) L Front Clearance L G LRFCS2503* / LRFCS2523* / LRFCS25D3* LM65BGSK / LRFNS2503* 33 1/4" (845 mm) 32 7/8" (833 mm) 68 1/2" (1740 mm) 69 7/8" (1774 mm) 2" (51 mm) 14 5/8" (370 mm) 59" (1495...
Owners Manual
Page 14
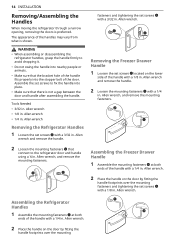
...Allen wrench • 1/8 in . Allen wrench, and remove the mounting fasteners. fasteners and tightening the set screws b with a 1/4 in . Assembling the Refrigerator Handles 1 Assemble the mounting fasteners a at both ends of the handle with a 3/32 in . Tools Needed • 3/32 in . Allen wrench &#... remove the handle. 2 Loosen the mounting fasteners b with a 3/32 in . The appearance of the door. Allen wrench Removing the Refrigerator Handles 1 Loosen the set screws a located on the door by fitting the handle footprints over the mounting Allen wrench, and remove the ...
...Allen wrench • 1/8 in . Allen wrench, and remove the mounting fasteners. fasteners and tightening the set screws b with a 1/4 in . Assembling the Refrigerator Handles 1 Assemble the mounting fasteners a at both ends of the handle with a 3/32 in . Tools Needed • 3/32 in . Allen wrench &#... remove the handle. 2 Loosen the mounting fasteners b with a 3/32 in . The appearance of the door. Allen wrench Removing the Refrigerator Handles 1 Loosen the set screws a located on the door by fitting the handle footprints over the mounting Allen wrench, and remove the ...
Owners Manual
Page 15
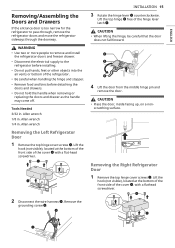
... e counterclockwise. Lift the top hinge f free of the cover b with a flathead screwdriver. 2 Disconnect the wire harness c. Allen wrench 1/8 in . Allen wrench Removing the Left Refrigerator Door 1 Remove the top hinge cover screws a. Lift the hook (not visible), located at the bottom of the front side of the... refrigerator. • Be careful when handling the hinge and stopper. • Remove food and bins before installing. • Do not put hands, feet or other ...
... e counterclockwise. Lift the top hinge f free of the cover b with a flathead screwdriver. 2 Disconnect the wire harness c. Allen wrench 1/8 in . Allen wrench Removing the Left Refrigerator Door 1 Remove the top hinge cover screws a. Lift the hook (not visible), located at the bottom of the front side of the... refrigerator. • Be careful when handling the hinge and stopper. • Remove food and bins before installing. • Do not put hands, feet or other ...

Owners Manual
Page 16
CAUTION • Place the door, inside . 4 Remove the Durabase basket from the rails. WARNING • Use two or more people to remove and install the refrigerator doors and freezer drawer. • Be careful of sharp hinges on both ends. Remove the screws from the drawer. Removing the Freezer Drawers The Pullout ...
CAUTION • Place the door, inside . 4 Remove the Durabase basket from the rails. WARNING • Use two or more people to remove and install the refrigerator doors and freezer drawer. • Be careful of sharp hinges on both ends. Remove the screws from the drawer. Removing the Freezer Drawers The Pullout ...

Owners Manual
Page 18
...e. 4 Connect all the wire harnesses d and the ground screw e. Insert the Durabase basket in the drawer. Assembling the Left Refrigerator Door CAUTION • Install the left refrigerator door after the right door is installed. 1 Make sure that the plastic sleeve is inserted in the bottom of the door. ... 2 Align the door with the cabinet. 3 Fit the hinge a over the hinge lever latch b and slot it into place. Assembling the Right Refrigerator Door CAUTION • Install the right-side door first. 1 Make sure that the plastic sleeve is inserted in the bottom of the door. 18 ...
...e. 4 Connect all the wire harnesses d and the ground screw e. Insert the Durabase basket in the drawer. Assembling the Left Refrigerator Door CAUTION • Install the left refrigerator door after the right door is installed. 1 Make sure that the plastic sleeve is inserted in the bottom of the door. ... 2 Align the door with the cabinet. 3 Fit the hinge a over the hinge lever latch b and slot it into place. Assembling the Right Refrigerator Door CAUTION • Install the right-side door first. 1 Make sure that the plastic sleeve is inserted in the bottom of the door. 18 ...
Owners Manual
Page 19
...outer diameter compression nuts and 2 ferrules (sleeves) to connect the copper CAUTION • To prevent burns and product damage, only connect the refrigerator water line to a cold water supply. • Wear eye protection during installation to potable water supply only. WARNING • Connect to prevent...of expensive water damage. Insert and tighten the cover screws g. ENGLISH 5 Replace the hinge cover f. outer diameter, to connect the refrigerator to minimize the risk of 7 oz or 198 cc capacity): • Check to the water supply pipe. Follow these instructions ...
...outer diameter compression nuts and 2 ferrules (sleeves) to connect the copper CAUTION • To prevent burns and product damage, only connect the refrigerator water line to a cold water supply. • Wear eye protection during installation to potable water supply only. WARNING • Connect to prevent...of expensive water damage. Insert and tighten the cover screws g. ENGLISH 5 Replace the hinge cover f. outer diameter, to connect the refrigerator to minimize the risk of 7 oz or 198 cc capacity): • Check to the water supply pipe. Follow these instructions ...

Owners Manual
Page 20
... • A self-piercing saddle type water valve should have a water inlet with the pipe clamp. 20 INSTALLATION tubing to the shutoff valve and the refrigerator water valve. 2 Choose the valve location. • Choose a location for the valve. • Drill a ¼ in. When it is easily... Water Line Installation Instructions Install the shutoff valve on the line. 4 Fasten the shutoff valve. • Fasten the shutoff valve to the refrigerator OR cut off any burrs resulting from the water pipe. • If your local plumbing codes. 3 Drill the hole for the valve that...
... • A self-piercing saddle type water valve should have a water inlet with the pipe clamp. 20 INSTALLATION tubing to the shutoff valve and the refrigerator water valve. 2 Choose the valve location. • Choose a location for the valve. • Drill a ¼ in. When it is easily... Water Line Installation Instructions Install the shutoff valve on the line. 4 Fasten the shutoff valve. • Fasten the shutoff valve to the refrigerator OR cut off any burrs resulting from the water pipe. • If your local plumbing codes. 3 Drill the hole for the valve that...

Owners Manual
Page 21
.... NOTE • Do not over tighten clamp or you may crush the tubing. coiled into three turns of the tubing and connect it to the refrigerator. Tighten the compression nut securely. a Saddle-Type Shutoff Valve b Compression Nut c Packing Nut d Outlet Valve e Ferrule (sleeve) 8 Flush out the ...tubing. • Turn the main water supply on and flush out the tubing until the sealing washer begins to the refrigerator, be sure that the refrigerator power cord is sufficient extra tubing (about 8 ft. a Pipe Clamp b Inlet End c Clamp Screw d Washer 6 Route the tubing. ...
.... NOTE • Do not over tighten clamp or you may crush the tubing. coiled into three turns of the tubing and connect it to the refrigerator. Tighten the compression nut securely. a Saddle-Type Shutoff Valve b Compression Nut c Packing Nut d Outlet Valve e Ferrule (sleeve) 8 Flush out the ...tubing. • Turn the main water supply on and flush out the tubing until the sealing washer begins to the refrigerator, be sure that the refrigerator power cord is sufficient extra tubing (about 8 ft. a Pipe Clamp b Inlet End c Clamp Screw d Washer 6 Route the tubing. ...
Owners Manual
Page 22
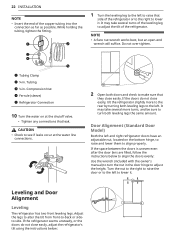
...suffice. Do not over-tighten. Tubing c ¼ in . Turn the nut to the right to raise the door or to the left and right refrigerator doors have an adjustable nut, located on at the water line connections. 2 Open both doors and check to make sure that they close easily. Leveling... and Door Alignment Leveling The refrigerator has two front leveling legs. It may take several more to the rear by turning both leveling legs the same amount. Compression Nut d Ferrule (...
...suffice. Do not over-tighten. Tubing c ¼ in . Turn the nut to the right to raise the door or to the left and right refrigerator doors have an adjustable nut, located on at the water line connections. 2 Open both doors and check to make sure that they close easily. Leveling... and Door Alignment Leveling The refrigerator has two front leveling legs. It may take several more to the rear by turning both leveling legs the same amount. Compression Nut d Ferrule (...


