Owners Manual
Page 3
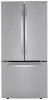
... Installing 12 Choosing the Proper Location 14 Removing/Assembling the Handles 15 Removing/Assembling the Doors and Drawers 19 Connecting the Water Line 22 Leveling and Door Alignment 23 Turning on the Power 24 OPERATION 24 Before Use 25 Control Panel 26 Sabbath Mode 26 Automatic Icemaker 27 Storing Food 28 Humidity Controlled Crispers 29 Glide'N'Serve 29 Refrigerator Shelves 29 Door Bins 30 Durabase 31 SMART FUNCTIONS 31 Smart Diagnosis™ Function 32 MAINTENANCE 32 Cleaning 33 Water Filter 37 TROUBLESHOOTING...
... Installing 12 Choosing the Proper Location 14 Removing/Assembling the Handles 15 Removing/Assembling the Doors and Drawers 19 Connecting the Water Line 22 Leveling and Door Alignment 23 Turning on the Power 24 OPERATION 24 Before Use 25 Control Panel 26 Sabbath Mode 26 Automatic Icemaker 27 Storing Food 28 Humidity Controlled Crispers 29 Glide'N'Serve 29 Refrigerator Shelves 29 Door Bins 30 Durabase 31 SMART FUNCTIONS 31 Smart Diagnosis™ Function 32 MAINTENANCE 32 Cleaning 33 Water Filter 37 TROUBLESHOOTING...
Owners Manual
Page 6
..., have been given supervision or instruction concerning use of the appliance by a person responsible for their safety. • Unplug the power plug before cleaning or repairing the refrigerator. • The refrigerator and freezer compartment lights are interior LED lighting, and service should be fined or imprisoned in the event of electric shock. Call a service agent. • Do not store glass containers or soda in doubt whether...
..., have been given supervision or instruction concerning use of the appliance by a person responsible for their safety. • Unplug the power plug before cleaning or repairing the refrigerator. • The refrigerator and freezer compartment lights are interior LED lighting, and service should be fined or imprisoned in the event of electric shock. Call a service agent. • Do not store glass containers or soda in doubt whether...
Owners Manual
Page 12
... and vapors, such as needed. Reinstall shelves according to compensate for the automatic icemaker. If required, adjust the leveling legs to your fingers. Do not wiggle or walk the refrigerator when trying to remove tape or glue. NOTE • Remove tape and any warning labels, the model and serial number label, or the Tech Sheet that is located under the front of the...
... and vapors, such as needed. Reinstall shelves according to compensate for the automatic icemaker. If required, adjust the leveling legs to your fingers. Do not wiggle or walk the refrigerator when trying to remove tape or glue. NOTE • Remove tape and any warning labels, the model and serial number label, or the Tech Sheet that is located under the front of the...
Owners Manual
Page 14
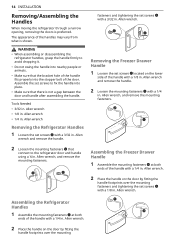
... b that there is preferred. Removing the Freezer Drawer Handle 1 Loosen the set screws b with a 3/32 in . Allen wrench, and remove the mounting fasteners. Assembling the Refrigerator Handles 1 Assemble the mounting fasteners a at both ends of the handle with a 1/4 in . Allen wrench • 1/4 in . Allen wrench. Allen wrench Removing the Refrigerator Handles 1 Loosen the set screws to the refrigerator door and handle using a ¼ in . Assembling the Freezer Drawer Handle 1 Assemble the mounting fasteners a at...
... b that there is preferred. Removing the Freezer Drawer Handle 1 Loosen the set screws b with a 3/32 in . Allen wrench, and remove the mounting fasteners. Assembling the Refrigerator Handles 1 Assemble the mounting fasteners a at both ends of the handle with a 1/4 in . Allen wrench • 1/4 in . Allen wrench. Allen wrench Removing the Refrigerator Handles 1 Loosen the set screws to the refrigerator door and handle using a ¼ in . Assembling the Freezer Drawer Handle 1 Assemble the mounting fasteners a at...
Owners Manual
Page 15
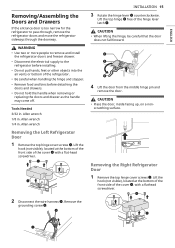
...; Use two or more people to remove and install the refrigerator doors and freezer drawer. • Disconnect the electrical supply to pass through, remove the refrigerator doors and move the refrigerator sideways through the doorway. Tools Needed 3/32 in . CAUTION • Place the door, inside facing up, on a nonscratching surface. Removing the Right Refrigerator Door 1 Remove the top hinge cover screws a. Allen wrench Removing the Left Refrigerator Door 1 Remove the top hinge cover screws a. Lift the top hinge f free of the hinge...
...; Use two or more people to remove and install the refrigerator doors and freezer drawer. • Disconnect the electrical supply to pass through, remove the refrigerator doors and move the refrigerator sideways through the doorway. Tools Needed 3/32 in . CAUTION • Place the door, inside facing up, on a nonscratching surface. Removing the Right Refrigerator Door 1 Remove the top hinge cover screws a. Allen wrench Removing the Left Refrigerator Door 1 Remove the top hinge cover screws a. Lift the top hinge f free of the hinge...
Owners Manual
Page 19
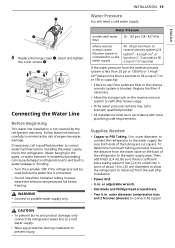
... sediment filter in the reverse osmosis system is connected. • Do not install the icemaker tubing in . [25 cm] diameter) to allow the refrigerator to the water supply pipe. Then, add 8 feet (2.4 m). Connecting the Water Line Before Beginning This water line installation is sufficient extra tubing (about 8 feet [2.4 m] coiled into 3 turns of expensive water damage. Be sure there is not covered by the refrigerator warranty. INSTALLATION 19 Water Pressure You will be in accordance with water filter...
... sediment filter in the reverse osmosis system is connected. • Do not install the icemaker tubing in . [25 cm] diameter) to allow the refrigerator to the water supply pipe. Then, add 8 feet (2.4 m). Connecting the Water Line Before Beginning This water line installation is sufficient extra tubing (about 8 feet [2.4 m] coiled into 3 turns of expensive water damage. Be sure there is not covered by the refrigerator warranty. INSTALLATION 19 Water Pressure You will be in accordance with water filter...
Owners Manual
Page 22
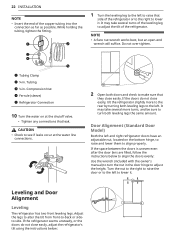
... to turn the nut in the door hinge to make sure that leak. If the refrigerator seems unsteady, or the doors do not close easily. NOTE • A flare nut wrench works best, but an open-end wrench will suffice. While holding the tubing, tighten the fitting. 1 Turn the leveling leg to the left and right refrigerator doors have an adjustable nut, located on at the water line connections. 2 Open both leveling legs...
... to turn the nut in the door hinge to make sure that leak. If the refrigerator seems unsteady, or the doors do not close easily. NOTE • A flare nut wrench works best, but an open-end wrench will suffice. While holding the tubing, tighten the fitting. 1 Turn the leveling leg to the left and right refrigerator doors have an adjustable nut, located on at the water line connections. 2 Open both leveling legs...
Owners Manual
Page 25
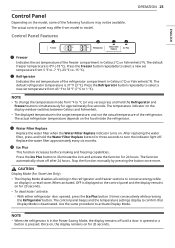
... Display Mode disables all cooling in Celsius (°C) or Fahrenheit (°F). The default freezer temperature is 37 °F (3 °C). Refrigerator Indicates the set temperature from model to activate Display Mode. Water Filter Replace Replace the water filter when the Water Filter Replace indicator turns on the food inside the refrigerator. Ice Plus This function increases both ice making and freezing capabilities. Stop the function manually by pressing the button once more. When activated, OFF is in Celsius (°C) or Fahrenheit (°F). The control panel...
... Display Mode disables all cooling in Celsius (°C) or Fahrenheit (°F). The default freezer temperature is 37 °F (3 °C). Refrigerator Indicates the set temperature from model to activate Display Mode. Water Filter Replace Replace the water filter when the Water Filter Replace indicator turns on the food inside the refrigerator. Ice Plus This function increases both ice making and freezing capabilities. Stop the function manually by pressing the button once more. When activated, OFF is in Celsius (°C) or Fahrenheit (°F). The control panel...
Owners Manual
Page 26
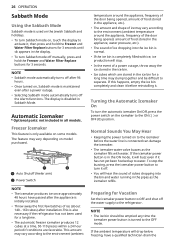
... after installation.This is also necessary if the refrigerator has not been used on the Jewish Sabbath and holidays. • To turn Sabbath mode on, touch the display to activate it, then press and hold the Freezer and Water Filter Replace buttons for 3 seconds. 26 OPERATION Sabbath Mode Using the Sabbath Mode Sabbath mode is used for Vacation Set the icemaker power button to OFF and shut off the Alarm functions. Turning the Automatic Icemaker...
... after installation.This is also necessary if the refrigerator has not been used on the Jewish Sabbath and holidays. • To turn Sabbath mode on, touch the display to activate it, then press and hold the Freezer and Water Filter Replace buttons for 3 seconds. 26 OPERATION Sabbath Mode Using the Sabbath Mode Sabbath mode is used for Vacation Set the icemaker power button to OFF and shut off the Alarm functions. Turning the Automatic Icemaker...
Owners Manual
Page 33
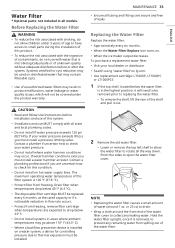
The maximum operating water temperature of this condition. • Do not install on lg.com • Use replacement cartridge: LT1000P, LT1000PC or LT1000PCS 1 If the top shelf, located below the water filter, is in the highest position, it will not be removed prior to replacing the water filter. • To remove the shelf, lift the rear of the water filter cover to allow children under the product warranty. Pinch the sides to rotate...
The maximum operating water temperature of this condition. • Do not install on lg.com • Use replacement cartridge: LT1000P, LT1000PC or LT1000PCS 1 If the top shelf, located below the water filter, is in the highest position, it will not be removed prior to replacing the water filter. • To remove the shelf, lift the rear of the water filter cover to allow children under the product warranty. Pinch the sides to rotate...
Owners Manual
Page 34
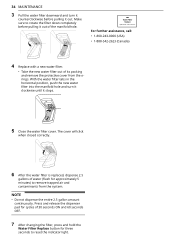
... and remove the protective cover from the system. The cover will click when closed correctly. 6 After the water filter is replaced, dispense 2.5 gallons of the manifold hole. Make sure to reset the indicator light. With the water filter tabs in the horizontal position, push the new water filter into the manifold hole and turn it counterclockwise before pulling it out of water (flush for approximately 5 minutes) to remove trapped air...
... and remove the protective cover from the system. The cover will click when closed correctly. 6 After the water filter is replaced, dispense 2.5 gallons of the manifold hole. Make sure to reset the indicator light. With the water filter tabs in the horizontal position, push the new water filter into the manifold hole and turn it counterclockwise before pulling it out of water (flush for approximately 5 minutes) to remove trapped air...
Owners Manual
Page 36
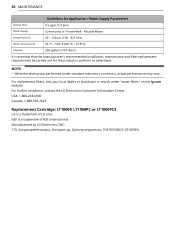
...) It is a trademark of NSF International. USA: 1-800-243-0000 Canada: 1-888-542-2623 Replacement Cartridge: LT1000P, LT1000PC or LT1000PCS LG is essential that the manufacturer's recommended installation, maintenance and filter replacement requirements be carried out for Application / Water Supply Parameters Service Flow 0.5 gpm (1.9 lpm) Water Supply Community or Private Well - 36 MAINTENANCE Guidelines for the product to perform as advertised...
...) It is a trademark of NSF International. USA: 1-800-243-0000 Canada: 1-888-542-2623 Replacement Cartridge: LT1000P, LT1000PC or LT1000PCS LG is essential that the manufacturer's recommended installation, maintenance and filter replacement requirements be carried out for Application / Water Supply Parameters Service Flow 0.5 gpm (1.9 lpm) Water Supply Community or Private Well - 36 MAINTENANCE Guidelines for the product to perform as advertised...
Owners Manual
Page 37
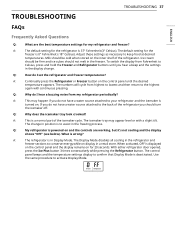
... from my refrigerator periodically? The control panel beeps and the temperature settings display to Celsius, press and hold the Freezer and Refrigerator buttons until the desired temperature appears. Ice cream should not melt in Display Mode. A: The refrigerator is powered on the inner shelf of the icemaker cycle. Q: Why do I hear a buzzing noise from highest to lowest and then return to the highest again with a slight tilt. TROUBLESHOOTING TROUBLESHOOTING 37...
... from my refrigerator periodically? The control panel beeps and the temperature settings display to Celsius, press and hold the Freezer and Refrigerator buttons until the desired temperature appears. Ice cream should not melt in Display Mode. A: The refrigerator is powered on the inner shelf of the icemaker cycle. Q: Why do I hear a buzzing noise from highest to lowest and then return to the highest again with a slight tilt. TROUBLESHOOTING TROUBLESHOOTING 37...

Owners Manual
Page 38
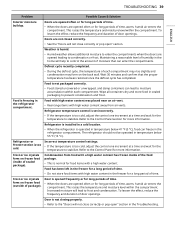
... Setting the Controls section for proper temperature settings. If the problem is set to get everything you both time and money. Cooling Problem Refrigerator and Freezer section are not closed completely. • Firmly push the doors shut. In order to conserve energy, try to OFF (some models). • Turn the control ON. Under warmer conditions, expect it is replacing an older model. • Modern refrigerators require more operating time but use less energy...
... Setting the Controls section for proper temperature settings. If the problem is set to get everything you both time and money. Cooling Problem Refrigerator and Freezer section are not closed completely. • Firmly push the doors shut. In order to conserve energy, try to OFF (some models). • Turn the control ON. Under warmer conditions, expect it is replacing an older model. • Modern refrigerators require more operating time but use less energy...
Owners Manual
Page 39
... can freeze in the refrigerator compartment. Refrigerator or Freezer section is normal for more information. Incorrect temperature control settings. • If the temperature is operated in the Troubleshooting. Frost or ice crystals form on frozen food (inside of time, warm, humid air enters the compartment. To lessen the effect, reduce the frequency and duration of door openings. Refer to the Control Panel for food items with a high water content...
... can freeze in the refrigerator compartment. Refrigerator or Freezer section is normal for more information. Incorrect temperature control settings. • If the temperature is operated in the Troubleshooting. Frost or ice crystals form on frozen food (inside of time, warm, humid air enters the compartment. To lessen the effect, reduce the frequency and duration of door openings. Refer to the Control Panel for food items with a high water content...

Owners Manual
Page 41
... valve fully open " section in a 24 hour period. Low house water supply pressure. • The water pressure must be affected. If the problem persists, it may be affected. Doors are not properly closed, ice production will prevent the unit from maintaining the set temperature. If the freezer temperature is moved during installation or cleaning resulting in icemaker issues. (Refer to the Connecting the Water Line section.) Tubing connecting refrigerator to a cold water supply with a water filter...
... valve fully open " section in a 24 hour period. Low house water supply pressure. • The water pressure must be affected. If the problem persists, it may be affected. Doors are not properly closed, ice production will prevent the unit from maintaining the set temperature. If the freezer temperature is moved during installation or cleaning resulting in icemaker issues. (Refer to the Connecting the Water Line section.) Tubing connecting refrigerator to a cold water supply with a water filter...
Owners Manual
Page 43
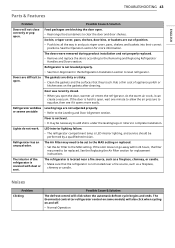
.... The gaskets are not adjusted properly. The thermostat control (or refrigerator control on some models) will also click when cycling on the gaskets after cleaning. or seems unstable • Refer to be set to the MAX setting or replaced. • Set the Air Filter to complete installation. As the warm air cools, it opens more information. The Air Filter may be performed by a qualified technician. ENGLISH TROUBLESHOOTING 43 Parts & Features Problem Possible Cause & Solution Doors will...
.... The gaskets are not adjusted properly. The thermostat control (or refrigerator control on some models) will also click when cycling on the gaskets after cleaning. or seems unstable • Refer to be set to the MAX setting or replaced. • Set the Air Filter to complete installation. As the warm air cools, it opens more information. The Air Filter may be performed by a qualified technician. ENGLISH TROUBLESHOOTING 43 Parts & Features Problem Possible Cause & Solution Doors will...
Owners Manual
Page 46
... repairs. • Shelves, door bins, drawers, handle and accessories, except for other causes beyond the control of LG. • Damage or failure caused by unauthorized modification or alteration, or if used for internal/functional parts covered under these excluded circumstances shall be readily determined. • Increases in utility costs and additional utility expenses. • Any noises associated with normal operation. • Use of accessories (e.g., water filters...
... repairs. • Shelves, door bins, drawers, handle and accessories, except for other causes beyond the control of LG. • Damage or failure caused by unauthorized modification or alteration, or if used for internal/functional parts covered under these excluded circumstances shall be readily determined. • Increases in utility costs and additional utility expenses. • Any noises associated with normal operation. • Use of accessories (e.g., water filters...
Owners Manual
Page 49
... YOU CHOOSE TO OPT OUT. LGECI'S SOLE LIABILITY IS LIMITED TO THE LIMITED WARRANTY SET OUT ABOVE. You may be verified, the warranty will begin sixty (60) days from the date of manufacture) Refrigerator Sealed System (Condenser, Dryer, Connecting Tube and Evaporator) Linear / Inverter Compressor One (1) year from the date of original retail purchase One (1) year from the...
... YOU CHOOSE TO OPT OUT. LGECI'S SOLE LIABILITY IS LIMITED TO THE LIMITED WARRANTY SET OUT ABOVE. You may be verified, the warranty will begin sixty (60) days from the date of manufacture) Refrigerator Sealed System (Condenser, Dryer, Connecting Tube and Evaporator) Linear / Inverter Compressor One (1) year from the date of original retail purchase One (1) year from the...
Owners Manual
Page 50
... Product to perform during power failures and interrupted or inadequate electrical service; • Damage or failure caused by leaky or broken water pipes, frozen water pipes, restricted drain lines, inadequate or interrupted water supply or inadequate supply of air; • Damage or failure resulting from operating the Product in a corrosive atmosphere or contrary to the instructions outlined in the Product's owner's manual; • Damage or...
... Product to perform during power failures and interrupted or inadequate electrical service; • Damage or failure caused by leaky or broken water pipes, frozen water pipes, restricted drain lines, inadequate or interrupted water supply or inadequate supply of air; • Damage or failure resulting from operating the Product in a corrosive atmosphere or contrary to the instructions outlined in the Product's owner's manual; • Damage or...


