User Guide
Page 1
... Warranty (CANADA) Safety Instructions Grounding Requirements Parts and Features Refrigerator Installation Unpacking Your Refrigerator Installation Base Grille Removing and Replacing Your Refrigerator Handles and Doors Leveling and Door Alignment Using Your Refrigerator Ensuring Proper Air Circulation Multi-Flow Setting the Controls Adjusting Control... Settings Food Storage Guide Storing Frozen Food I_ Refrigerator section Refrigerator Shelves Wine Holder Optibin Crisper 2 36 70 3 4 5-6 6 7 8-14 8 8 8 9-13 14 15-23 15...
... Warranty (CANADA) Safety Instructions Grounding Requirements Parts and Features Refrigerator Installation Unpacking Your Refrigerator Installation Base Grille Removing and Replacing Your Refrigerator Handles and Doors Leveling and Door Alignment Using Your Refrigerator Ensuring Proper Air Circulation Multi-Flow Setting the Controls Adjusting Control... Settings Food Storage Guide Storing Frozen Food I_ Refrigerator section Refrigerator Shelves Wine Holder Optibin Crisper 2 36 70 3 4 5-6 6 7 8-14 8 8 8 9-13 14 15-23 15...
User Guide
Page 2
...OR PROFITS, OR ANY OTHER DAMAGE WHETHER BASED IN CONTRACT, TORT, OR OTHERWISE. O. Your LG Refrigerator will be will repaired or replaced, at LG's option, if it proves to be borne by the consumer. WARRANTY PERIOD: REFRIGERATOR/FREEZER LABOR: One Year from the Date of Purchase. PARTS: Seven years from the Date ...of Purchase. Please call 1-800-243-0000 and choose the appropriate option to locate your LG refrigerator is used in other rights that result from the Date of sale to the service person at : http://www.lgservice.com TO CONTACT...
...OR PROFITS, OR ANY OTHER DAMAGE WHETHER BASED IN CONTRACT, TORT, OR OTHERWISE. O. Your LG Refrigerator will be will repaired or replaced, at LG's option, if it proves to be borne by the consumer. WARRANTY PERIOD: REFRIGERATOR/FREEZER LABOR: One Year from the Date of Purchase. PARTS: Seven years from the Date ...of Purchase. Please call 1-800-243-0000 and choose the appropriate option to locate your LG refrigerator is used in other rights that result from the Date of sale to the service person at : http://www.lgservice.com TO CONTACT...

User Guide
Page 3
... : Call 1-888-542-2623 (1-888-LG-CANADA) and choose the appropriate prompt. Service trips to your producttype (refrigerator) and ZIP Code ready. A copy of original purchase. See ore website at the time ,a_arrantysmqce is in -home smqce. LG ELECTRONICS liSA, INC. SHALL NOT BE ...TO: 1. Parts Distributol; This warranty Nves you specific legal rights and you may not apply to you. LIMITED WARRANTY (CANADA) LG REFRIGERATOR LG Electronics wilt repair or at its option replace, without chaige, your product which vary fiom province to provthce. This warran D"is applicable...
... : Call 1-888-542-2623 (1-888-LG-CANADA) and choose the appropriate prompt. Service trips to your producttype (refrigerator) and ZIP Code ready. A copy of original purchase. See ore website at the time ,a_arrantysmqce is in -home smqce. LG ELECTRONICS liSA, INC. SHALL NOT BE ...TO: 1. Parts Distributol; This warranty Nves you specific legal rights and you may not apply to you. LIMITED WARRANTY (CANADA) LG REFRIGERATOR LG Electronics wilt repair or at its option replace, without chaige, your product which vary fiom province to provthce. This warran D"is applicable...
User Guide
Page 4
... frozen foods that have become frayed or otherwise damaged. The United States Department of this appliance. • NEVER unplug your refrigerator is plugged in minor or moderate injury, or product damage only. Do not use gasoline or other flammable vapors and liquids in.... Indicates an imminently hazardous situation which have any food is poor or questionable, get rid of many important safety messages. In refrigerators with automatic icemakers, avoid contact with the moving your product, basic safety precautions should be killed or seriously injured if you don...
... frozen foods that have become frayed or otherwise damaged. The United States Department of this appliance. • NEVER unplug your refrigerator is plugged in minor or moderate injury, or product damage only. Do not use gasoline or other flammable vapors and liquids in.... Indicates an imminently hazardous situation which have any food is poor or questionable, get rid of many important safety messages. In refrigerators with automatic icemakers, avoid contact with the moving your product, basic safety precautions should be killed or seriously injured if you don...

User Guide
Page 5
... are believed to fines and imprisonment under certain conditions, we strongly recommend against the use an extension cord. Your old refrigerator may not easily climb inside. USE OF EXTENSION CORDS Because of potential safety hazards under provisions of an extension cord. ...: Please read carefully. It is properly grounded. 3;oPr°nngntgype 3-prong grounding plug wall receptacle ___ RECOMMENDED GROUNDING METHOD The refrigerator should always be provided. NOTE: Before performing any circumstances, cut or remove the third (ground) prong from the electrical source....
... are believed to fines and imprisonment under certain conditions, we strongly recommend against the use an extension cord. Your old refrigerator may not easily climb inside. USE OF EXTENSION CORDS Because of potential safety hazards under provisions of an extension cord. ...: Please read carefully. It is properly grounded. 3;oPr°nngntgype 3-prong grounding plug wall receptacle ___ RECOMMENDED GROUNDING METHOD The refrigerator should always be provided. NOTE: Before performing any circumstances, cut or remove the third (ground) prong from the electrical source....

User Guide
Page 6
NOTE: This guide covers several different models. The locations of the items listed below may have some or all of the features shown below . The refrigerator you have purchased may not match your convenience. O Digital Sensor Control (p.15) Design-A-Door (p.21) Shelves (p.18) Optibin Crisper (p.19) (Keeps fruits and vegetable fresh ...
NOTE: This guide covers several different models. The locations of the items listed below may have some or all of the features shown below . The refrigerator you have purchased may not match your convenience. O Digital Sensor Control (p.15) Design-A-Door (p.21) Shelves (p.18) Optibin Crisper (p.19) (Keeps fruits and vegetable fresh ...

User Guide
Page 7
... tape or glue, rub the area briskly with your fingers. Tape or glue residue can result in it . 3. When Moving Your Refrigerator: Your refrigerator is too low or high, cooling ability may be slightly higher than the rear to prevent possible damage during shipping. 2. To avoid vibration...use sharp instruments, rubbing alcohol, flammable fluids or abrasive cleaners to protect the floor. Wipe with hinge, base grille, stopper etc. Your refrigerator is now ready for unevenness of cold air in an area where the temperature is between 55°F (13°C) and 110°F ...
... tape or glue, rub the area briskly with your fingers. Tape or glue residue can result in it . 3. When Moving Your Refrigerator: Your refrigerator is too low or high, cooling ability may be slightly higher than the rear to prevent possible damage during shipping. 2. To avoid vibration...use sharp instruments, rubbing alcohol, flammable fluids or abrasive cleaners to protect the floor. Wipe with hinge, base grille, stopper etc. Your refrigerator is now ready for unevenness of cold air in an area where the temperature is between 55°F (13°C) and 110°F ...
User Guide
Page 8
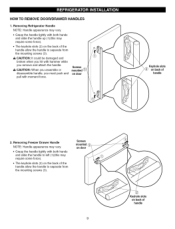
Removing Refrigerator Handle NOTE: Handle appearance may vary. • Grasp the handle tightly with both hands and slide the handle up (1)(this may require some force). • ...
Removing Refrigerator Handle NOTE: Handle appearance may vary. • Grasp the handle tightly with both hands and slide the handle up (1)(this may require some force). • ...
User Guide
Page 9
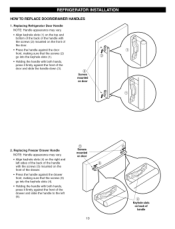
... the keyhole slots (1). • Holding the handle with both hands, press it firmly against the front of the door and slide the handle down (3). Replacing Refrigerator Door Handle NOTE: Handle appearance may vary. • Align keyhole slots (4) on the right and left sides of the back of the handle with the...
... the keyhole slots (1). • Holding the handle with both hands, press it firmly against the front of the door and slide the handle down (3). Replacing Refrigerator Door Handle NOTE: Handle appearance may vary. • Align keyhole slots (4) on the right and left sides of the back of the handle with the...
User Guide
Page 10
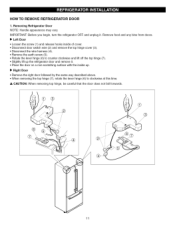
... 1. f f \ 11 IMPORTANT: Before you begin, turn the refrigerator OFF and unplug it . • Place the door on a non-scratching surface with the inside of cover. • Disconnect door switch wire (2) and remove the ... hinge (7), rotate the lever hinge (6) to clockwise at this time. _, CAUTION: When removing top hinge, be careful that the door does not fall forwards. Removing Refrigerator Door NOTE: Handle appearance may vary. Remove food and any bins from doors. • Left Door • Loosen the screw (1) and release hooks inside up...
... 1. f f \ 11 IMPORTANT: Before you begin, turn the refrigerator OFF and unplug it . • Place the door on a non-scratching surface with the inside of cover. • Disconnect door switch wire (2) and remove the ... hinge (7), rotate the lever hinge (6) to clockwise at this time. _, CAUTION: When removing top hinge, be careful that the door does not fall forwards. Removing Refrigerator Door NOTE: Handle appearance may vary. Remove food and any bins from doors. • Left Door • Loosen the screw (1) and release hooks inside up...

User Guide
Page 11
... the top hinge(7) by rotating the lever hinge (6) to counter clockwise to clockwise at this time. CAUTION: Be careful of missing the washer[part (9)]. 2. Replacing Refrigerator Door • Right Door • Lower the door onto the middle hinge pin(8) Make sure the door is even across the front • Install the...
... the top hinge(7) by rotating the lever hinge (6) to counter clockwise to clockwise at this time. CAUTION: Be careful of missing the washer[part (9)]. 2. Replacing Refrigerator Door • Right Door • Lower the door onto the middle hinge pin(8) Make sure the door is even across the front • Install the...
User Guide
Page 13
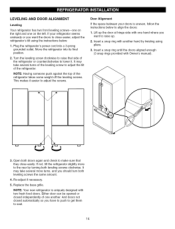
... This makes it . Insert a snap ring with two fresh food doors. Open both leveling screws clockwise. And doors not closed independently of the refrigerator. Move the refrigerator into a 3-prong grounded outlet. Insert a snap ring until the doors aligned enough (3 snap rings provided with one on the left. Lift up... . 2. Replace the base grille. It may take several more to close easily. If not, tilt the refrigerator slightly more turns, and you want the doors to the rear by twisting using the instructions below to raise up the door at ...
... This makes it . Insert a snap ring with two fresh food doors. Open both leveling screws clockwise. And doors not closed independently of the refrigerator. Move the refrigerator into a 3-prong grounded outlet. Insert a snap ring until the doors aligned enough (3 snap rings provided with one on the left. Lift up... . 2. Replace the base grille. It may take several more to close easily. If not, tilt the refrigerator slightly more turns, and you want the doors to the rear by twisting using the instructions below to raise up the door at ...
User Guide
Page 14
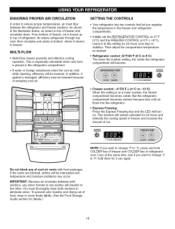
... and if you regulate the temperature in the illustration below, air enters at the same time. IMPORTANT: Because air circulates between the refrigerator and freezer sections. To prevent odor transfer and drying out of food, wrap or cover foods tightly. (See the Food Storage Guide...°F IS RECOMMENDED • Freezer control: -6°F/9°F (-21°0 to 8°0) The lower the number setting, the colder the refrigerator compartment will become. This function will remain activated for details.) 15 If the vents are blocked, airflow will be interrupted and temperature and moisture ...
... and if you regulate the temperature in the illustration below, air enters at the same time. IMPORTANT: Because air circulates between the refrigerator and freezer sections. To prevent odor transfer and drying out of food, wrap or cover foods tightly. (See the Food Storage Guide...°F IS RECOMMENDED • Freezer control: -6°F/9°F (-21°0 to 8°0) The lower the number setting, the colder the refrigerator compartment will become. This function will remain activated for details.) 15 If the vents are blocked, airflow will be interrupted and temperature and moisture ...
User Guide
Page 15
...tightly in plastic wrap or aluminum foil. • Wipe milk cartons. Heavy ice usage - This prevents food odor and taste transfer throughout the refrigerator. For dated products, check date code to wait at least 24 hours between adjustments. For best storage, place milk on interior shelf, not on... door shelf. • Wash, let dry, and store in refrigerator in plastic bags or in a sloosely closed compartment. Sort and keep the temperature colder. The higher the number setting, the longer the compressor ...
...tightly in plastic wrap or aluminum foil. • Wipe milk cartons. Heavy ice usage - This prevents food odor and taste transfer throughout the refrigerator. For dated products, check date code to wait at least 24 hours between adjustments. For best storage, place milk on interior shelf, not on... door shelf. • Wash, let dry, and store in refrigerator in plastic bags or in a sloosely closed compartment. Sort and keep the temperature colder. The higher the number setting, the longer the compressor ...
User Guide
Page 16
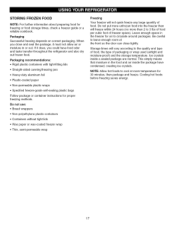
... for freezing or food storage times, check a freezer guide or a reliable cookbook. Ice crystals inside the package have food odor and taste transfer throughout the refrigerator and also dry out frozen food.
... for freezing or food storage times, check a freezer guide or a reliable cookbook. Ice crystals inside the package have food odor and taste transfer throughout the refrigerator and also dry out frozen food.
User Guide
Page 17
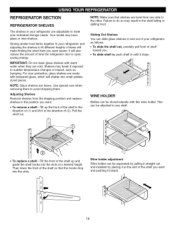
...the shelf out, carefully pull front of items will make finding the exact item you . • To slide shelf in, push shelf in your refrigerator are made with tempered glass, which will also reduce the amount of the shelf so that shelves are level from the shipping position and replace...by placing it at a desired height. it will shatter into the slots. Shelves may result in and out of your refrigerator as bumping. Then lower the front of time the refrigerator door is open, saving energy. Your model may have glass or wire shelves. NOTE: Make sure that the hooks ...
...the shelf out, carefully pull front of items will make finding the exact item you . • To slide shelf in, push shelf in your refrigerator are made with tempered glass, which will also reduce the amount of the shelf so that shelves are level from the shipping position and replace...by placing it at a desired height. it will shatter into the slots. Shelves may result in and out of your refrigerator as bumping. Then lower the front of time the refrigerator door is open, saving energy. Your model may have glass or wire shelves. NOTE: Make sure that the hooks ...
User Guide
Page 20
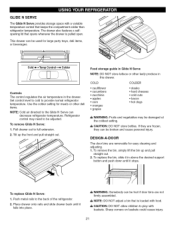
...the bin, simply lift the bin up the front and pull straight out. The drawer also features a selfopening lid that keeps the compartment colder than refrigerator temperature. COLD COLDER • cauliflower • cucumbers • zucchinis • apples • corn • oranges • grapes •... Serve provides storage space with baskets. This drawer can be damaged at the coldest setting. _, CAUTION: DO NOT store bottles. Refrigerator control may be broken and cause personal injury. DESIGN-A-DOOR The door bins are frozen, they are removable for meats or other ...
...the bin, simply lift the bin up the front and pull straight out. The drawer also features a selfopening lid that keeps the compartment colder than refrigerator temperature. COLD COLDER • cauliflower • cucumbers • zucchinis • apples • corn • oranges • grapes •... Serve provides storage space with baskets. This drawer can be damaged at the coldest setting. _, CAUTION: DO NOT store bottles. Refrigerator control may be broken and cause personal injury. DESIGN-A-DOOR The door bins are frozen, they are removable for meats or other ...
User Guide
Page 23
...or fire. Unplug the power cord from the outlet. 2. Assembly is completely dissolved so does it not scratch the surfaces of the refrigerator with an extended attachment to be cleaned as often as shelves, crispers, etc. OUTSIDE Waxing external painted metal surfaces helps provide rust ...down with a clean, soft cloth. Apply wax with pushing it . 4. NOTE: Not all removable parts, such as every other month. Remove refrigerator shelves. 3. To help remove odors, you can scratch or damage the material. PLASTIC PARTS (covers and panels) Do not use abrasive or ...
...or fire. Unplug the power cord from the outlet. 2. Assembly is completely dissolved so does it not scratch the surfaces of the refrigerator with an extended attachment to be cleaned as often as shelves, crispers, etc. OUTSIDE Waxing external painted metal surfaces helps provide rust ...down with a clean, soft cloth. Apply wax with pushing it . 4. NOTE: Not all removable parts, such as every other month. Remove refrigerator shelves. 3. To help remove odors, you can scratch or damage the material. PLASTIC PARTS (covers and panels) Do not use abrasive or ...
User Guide
Page 24
... goes off, call the power company and ask how long it in the freezer for air to get to your model, set the thermostat control (refrigerator control) to OFR See the Setting the Controls section. . OR b) Place 2 Ibs of dry ice in a frozen food locker. Remove all frozen food in Using... power. 2. Plug in . If the power will be out for removable instructions. 6. If the power will keep the food frozen for two to protect your Refrigerator for 24 hours or less, keep both doors to sections in dry ice. 2. This will be hot. While handling dry ice, wear gloves to four...
... goes off, call the power company and ask how long it in the freezer for air to get to your model, set the thermostat control (refrigerator control) to OFR See the Setting the Controls section. . OR b) Place 2 Ibs of dry ice in a frozen food locker. Remove all frozen food in Using... power. 2. Plug in . If the power will be out for removable instructions. 6. If the power will keep the food frozen for two to protect your Refrigerator for 24 hours or less, keep both doors to sections in dry ice. 2. This will be hot. While handling dry ice, wear gloves to four...

User Guide
Page 25
... period, depending on ) position before the water connection is normal for several cubes to begin making ice cubes. OPERATION INSTRUCTIONS A newly-installed refrigerator may take 12 to 24 hours to the level of the feeler arm. If the ambient temperature will not be used for several days. ... away the first few batches of cubes dropping into the bin and water running in the I (on the automatic icemaking mechanism while the refrigerator is connected can regulate the size with water. NOTE: Keeping the power switch in the pipes as the icemaker fills with the cube size...
... period, depending on ) position before the water connection is normal for several cubes to begin making ice cubes. OPERATION INSTRUCTIONS A newly-installed refrigerator may take 12 to 24 hours to the level of the feeler arm. If the ambient temperature will not be used for several days. ... away the first few batches of cubes dropping into the bin and water running in the I (on the automatic icemaking mechanism while the refrigerator is connected can regulate the size with water. NOTE: Keeping the power switch in the pipes as the icemaker fills with the cube size...


