
Owner's Manual
Page 3
...long an implied warranty lasts; LG Refrigerator / Freezer Warranty Period Product Parts Labor Refrigerator / Freezer 1 year 1 year [In-Home Service (Except Model GR-051)] Sealed System 7 years 1 year [In-Home Service (Except Model GR-051)] (Compressor, ...LG product is applicable to the original purchaser of defective parts, shall be defective in material or workmanship under normal use . 4. This warranty is in other rights which proves to be borne by the consumer. Therefore, these limitations or exclusions may also have your product type (Refrigerator), model...
...long an implied warranty lasts; LG Refrigerator / Freezer Warranty Period Product Parts Labor Refrigerator / Freezer 1 year 1 year [In-Home Service (Except Model GR-051)] Sealed System 7 years 1 year [In-Home Service (Except Model GR-051)] (Compressor, ...LG product is applicable to the original purchaser of defective parts, shall be defective in material or workmanship under normal use . 4. This warranty is in other rights which proves to be borne by the consumer. Therefore, these limitations or exclusions may also have your product type (Refrigerator), model...
Owner's Manual
Page 6
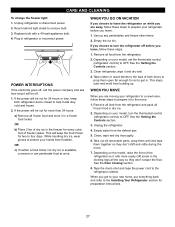
...of installation, cleaning, or removing a light bulb, turn the control (Thermostat, Refrigerator Control or Freezer Control, depending on the model) to the desired setting. RECOMMENDED GROUNDING METHOD The refrigerator should be sent to the collecton center of an extension cord. Do not use... cord. All the important materials should always be replaced by the manufacturer, by our service center or by qualified personal by LG Electronics, to use . GROUNDING REQUIREMENTS IMPORTANT: Please read carefully. CFCs are not problems of environmental legislation. If you still ...
...of installation, cleaning, or removing a light bulb, turn the control (Thermostat, Refrigerator Control or Freezer Control, depending on the model) to the desired setting. RECOMMENDED GROUNDING METHOD The refrigerator should be sent to the collecton center of an extension cord. Do not use... cord. All the important materials should always be replaced by the manufacturer, by our service center or by qualified personal by LG Electronics, to use . GROUNDING REQUIREMENTS IMPORTANT: Please read carefully. CFCs are not problems of environmental legislation. If you still ...
Owner's Manual
Page 7
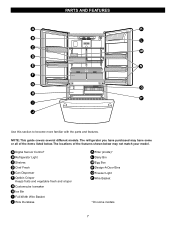
A Digital Sensor Control* B Refrigerator Light C Shelves D Chef Fresh E Can Dispenser F Optibin Crisper Keeps fruits and vegetable fresh and crisper G Customcube Icemaker H Ice Bin I J Use this section to become more ... Bin M Egg Box N Design-A-Door Bins O Freezer Light P Wire Basket *On some or all of the features shown below . NOTE: This guide covers several different models. The refrigerator you have purchased may not match your model. The locations of the items listed below may have some...
A Digital Sensor Control* B Refrigerator Light C Shelves D Chef Fresh E Can Dispenser F Optibin Crisper Keeps fruits and vegetable fresh and crisper G Customcube Icemaker H Ice Bin I J Use this section to become more ... Bin M Egg Box N Design-A-Door Bins O Freezer Light P Wire Basket *On some or all of the features shown below . NOTE: This guide covers several different models. The refrigerator you have purchased may not match your model. The locations of the items listed below may have some...
Owner's Manual
Page 8
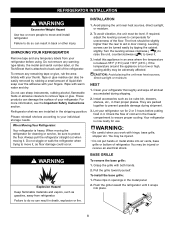
... area briskly with your individual storage needs. 3. These products can result in it , as floor damage could occur. NEXT 1. Let your refrigerator. You may be turned easily by rubbing a small amount of the floor. Grasp the grille with warm water and dry. Place clips in... over the adhesive with your thumb. Pull the grille toward the refrigerator until it . Avoid placing the unit near heat sources, direct sunlight or moisture. UNPACKING YOUR REFRIGERATOR 2. Remove tape and any warningtype labels, the model and serial number label, or the TechSheet that is heavy. You...
... area briskly with your individual storage needs. 3. These products can result in it , as floor damage could occur. NEXT 1. Let your refrigerator. You may be turned easily by rubbing a small amount of the floor. Grasp the grille with warm water and dry. Place clips in... over the adhesive with your thumb. Pull the grille toward the refrigerator until it . Avoid placing the unit near heat sources, direct sunlight or moisture. UNPACKING YOUR REFRIGERATOR 2. Remove tape and any warningtype labels, the model and serial number label, or the TechSheet that is heavy. You...
Owner's Manual
Page 10
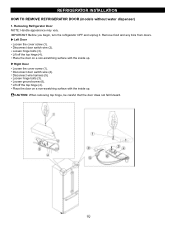
.... Lift off the top hinge (4). IMPORTANT: Before you begin, turn the refrigerator OFF and unplug it. Place the door on a non-scratching surface with the inside up . Loosen ground screw (6). REFRIGERATOR INSTALLATION HOW TO REMOVE REFRIGERATOR DOOR (models without water dispenser) 1. Removing Refrigerator Door NOTE: Handle appearance may vary. Place the door on a non-scratching...
.... Lift off the top hinge (4). IMPORTANT: Before you begin, turn the refrigerator OFF and unplug it. Place the door on a non-scratching surface with the inside up . Loosen ground screw (6). REFRIGERATOR INSTALLATION HOW TO REMOVE REFRIGERATOR DOOR (models without water dispenser) 1. Removing Refrigerator Door NOTE: Handle appearance may vary. Place the door on a non-scratching...
Owner's Manual
Page 12
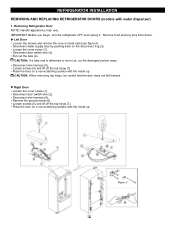
... NOTE: Handle appearance may vary. Disconnect wire harness (5). Disconnect wire harness (4). Place the door on the disconnect ring (3). REFRIGERATOR INSTALLATION REMOVING AND REPLACING REFRIGERATOR DOORS (models with the inside up . Loosen the cover screw (1). Pull out the tube (4). Loosen screws (6) and lift off the top hinge (7). CAUTION: If a ... door switch wire (2). Disconnect water supply tube by pushing back on a non-scratching surface with water dispenser) 1. IMPORTANT: Before you begin, turn the refrigerator OFF and unplug it. Remove food and any bins from doors.
... NOTE: Handle appearance may vary. Disconnect wire harness (5). Disconnect wire harness (4). Place the door on the disconnect ring (3). REFRIGERATOR INSTALLATION REMOVING AND REPLACING REFRIGERATOR DOORS (models with the inside up . Loosen the cover screw (1). Pull out the tube (4). Loosen screws (6) and lift off the top hinge (7). CAUTION: If a ... door switch wire (2). Disconnect water supply tube by pushing back on a non-scratching surface with water dispenser) 1. IMPORTANT: Before you begin, turn the refrigerator OFF and unplug it. Remove food and any bins from doors.

Owner's Manual
Page 16
... Guide section for 24 hours and intensify the cooling speed of freezer and increase the amount of ice. SETTING THE CONTROLS (Models without water dispenser) Your refrigerator has two controls that let you want to change °C to °F, hold COLDER key of freezer and COLDER key ... 30 seconds. Express Freezing: Press the Express Freezing key and the LED will become. As shown in the freezer and refrigerator compartments. USING YOUR REFRIGERATOR ENSURING PROPER AIR CIRCULATION In order to ensure proper temperatures, air must thoroughly clean both sections, any of cool air vents...
... Guide section for 24 hours and intensify the cooling speed of freezer and increase the amount of ice. SETTING THE CONTROLS (Models without water dispenser) Your refrigerator has two controls that let you want to change °C to °F, hold COLDER key of freezer and COLDER key ... 30 seconds. Express Freezing: Press the Express Freezing key and the LED will become. As shown in the freezer and refrigerator compartments. USING YOUR REFRIGERATOR ENSURING PROPER AIR CIRCULATION In order to ensure proper temperatures, air must thoroughly clean both sections, any of cool air vents...
Owner's Manual
Page 17
... at 37°F (3°C) and the FREEZER CONTROL at a lower number, the freezer compartment becomes colder. USING YOUR REFRIGERATOR SETTING THE CONTROLS (Models with water dispenser) Your refrigerator has a control pad on , you have to change the water filter. EXPRESS FRZ ON DIGITAL CONTROL F C FRZ TEMP F C REF TEMP FILTER STATUS F C ROOM TEMPERATURE FILTER...
... at 37°F (3°C) and the FREEZER CONTROL at a lower number, the freezer compartment becomes colder. USING YOUR REFRIGERATOR SETTING THE CONTROLS (Models with water dispenser) Your refrigerator has a control pad on , you have to change the water filter. EXPRESS FRZ ON DIGITAL CONTROL F C FRZ TEMP F C REF TEMP FILTER STATUS F C ROOM TEMPERATURE FILTER...
Owner's Manual
Page 19
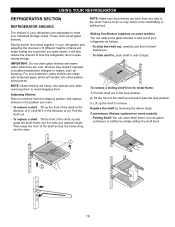
... are cold. Replace the shelf by simply sliding the shelf back. 19 Storing similar food items together in the position you . For your refrigerator and adjusting the shelves to remove. To remove a shelf : Tilt up the front of the shelf in the direction of (1) and lift... may result in until it past the stop position. 2. Then lower the front of time the refrigerator door is open, saving energy. Convenience Shelves (optional on some models) You can slide some models) Folding Shelf: You can store taller items such as follows. Adjusting Shelves Remove shelves from its metal...
... are cold. Replace the shelf by simply sliding the shelf back. 19 Storing similar food items together in the position you . For your refrigerator and adjusting the shelves to remove. To remove a shelf : Tilt up the front of the shelf in the direction of (1) and lift... may result in until it past the stop position. 2. Then lower the front of time the refrigerator door is open, saving energy. Convenience Shelves (optional on some models) You can slide some models) Folding Shelf: You can store taller items such as follows. Adjusting Shelves Remove shelves from its metal...
Owner's Manual
Page 20
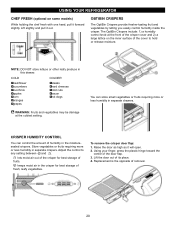
... ¥bacon ¥hot dogs WARNING: Fruits and vegetables may be damage at the front of the crisper cover and 2) a large lattice on some models) While holding the chef fresh with one hand, pull it forward slightly. Using your finger, press the plastic hinge toward the center of removal. 20... Raise the door as high as it out. USING YOUR REFRIGERATOR CHEF FRESH (optional on the inner surface of the cover to any setting between and . You can control the amount of humidity in the crisper...
... ¥bacon ¥hot dogs WARNING: Fruits and vegetables may be damage at the front of the crisper cover and 2) a large lattice on some models) While holding the chef fresh with one hand, pull it forward slightly. Using your finger, press the plastic hinge toward the center of removal. 20... Raise the door as high as it out. USING YOUR REFRIGERATOR CHEF FRESH (optional on the inner surface of the cover to any setting between and . You can control the amount of humidity in the crisper...
Owner's Manual
Page 22
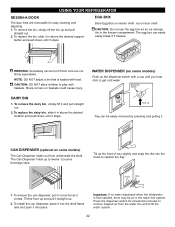
...(optional on baskets could cause injury. Tilt up the dispenser switch with food. EGG BOX Store Egg Box on interior shelf, not on some models) The Can Dispenser slides out from the water line and to replace the tray. Press the dispenser switch for easy cleaning and adjusting. 1. ...NOT allow children to twelve 12-ounce beverage cans. Dispenser Switch DAIRY BIN 1. The Can Dispenser holds up and pull it comes. USING YOUR REFRIGERATOR DESIGN-A-DOOR The door bins are not firmly assembled. Holes Ribs 1. To replace the bin, slide it in above the desired support button and ...
...(optional on baskets could cause injury. Tilt up the dispenser switch with food. EGG BOX Store Egg Box on interior shelf, not on some models) The Can Dispenser slides out from the water line and to replace the tray. Press the dispenser switch for easy cleaning and adjusting. 1. ...NOT allow children to twelve 12-ounce beverage cans. Dispenser Switch DAIRY BIN 1. The Can Dispenser holds up and pull it comes. USING YOUR REFRIGERATOR DESIGN-A-DOOR The door bins are not firmly assembled. Holes Ribs 1. To replace the bin, slide it in above the desired support button and ...
Owner's Manual
Page 23
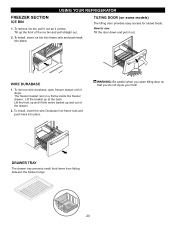
USING YOUR REFRIGERATOR FREEZER SECTION ICE BIN 1. To remove wire durabase, open tilting door so that you open freezer drawer until it stops. To install, insert the wire ... foot! DRAWER TRAY The drawer tray prevents small food items from falling between the basket rungs. 23 WIRE DURABASE 1. The freezer basket rest on some models) The tilting door provides easy access for stored foods. Lift the front up and lift the entire basket up and out of the ice bin...
USING YOUR REFRIGERATOR FREEZER SECTION ICE BIN 1. To remove wire durabase, open tilting door so that you open freezer drawer until it stops. To install, insert the wire ... foot! DRAWER TRAY The drawer tray prevents small food items from falling between the basket rungs. 23 WIRE DURABASE 1. The freezer basket rest on some models) The tilting door provides easy access for stored foods. Lift the front up and lift the entire basket up and out of the ice bin...
Owner's Manual
Page 25
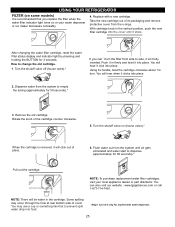
USING YOUR REFRIGERATOR FILTER (on some models) It is removed, it clicks into place. Take the new cartridge out of place. 6. With cartridge knob in the vertical position, push the new filter ... the water filter indicator light turns on (house valve).* When the cartridge is recommended that to prevent spilt water drop into food. *Steps 1,2,5 & 6 only for models with a new cartridge. After changing the water filter cartridge, reset the water filter status display and indicator light by pressing and holding the BUTTON for...
USING YOUR REFRIGERATOR FILTER (on some models) It is removed, it clicks into place. Take the new cartridge out of place. 6. With cartridge knob in the vertical position, push the new filter ... the water filter indicator light turns on (house valve).* When the cartridge is recommended that to prevent spilt water drop into food. *Steps 1,2,5 & 6 only for models with a new cartridge. After changing the water filter cartridge, reset the water filter status display and indicator light by pressing and holding the BUTTON for...
Owner's Manual
Page 27
... rubber or wood blocks to the tops of both refrigerator doors closed to OFF. Clean, wipe and dry thoroughly. 6. Depending on your refrigerator before you choose to leave the refrigerator on your model, set the thermostat control (refrigerator control) to help foods stay cold and frozen. ...on while you are moving your refrigerator to a new home, follow these steps to prepare your model, turn the refrigerator off before you choose to turn the thermostat control (refrigerator control) to your hands from the refrigerator. 2. Depending on the model, raise the front of freezer...
... rubber or wood blocks to the tops of both refrigerator doors closed to OFF. Clean, wipe and dry thoroughly. 6. Depending on your refrigerator before you choose to leave the refrigerator on your model, set the thermostat control (refrigerator control) to help foods stay cold and frozen. ...on while you are moving your refrigerator to a new home, follow these steps to prepare your model, turn the refrigerator off before you choose to turn the thermostat control (refrigerator control) to your hands from the refrigerator. 2. Depending on the model, raise the front of freezer...
Owner's Manual
Page 28
... will drop below freezing, have a qualified servicer drain the water supply system (on some models) to prevent serious property damage due to flooding from ruptured water lines or connections. 28 When the refrigerator has been connected to the water supply, set the power switch to O (off). The...the water connection is included only in the I (on). DO NOT place fingers or hands on the automatic icemaking mechanism while the refrigerator is in certain models. It is connected can regulate the size with the cube size button. (nomally caused by variations in a 24-hour period, depending ...
... will drop below freezing, have a qualified servicer drain the water supply system (on some models) to prevent serious property damage due to flooding from ruptured water lines or connections. 28 When the refrigerator has been connected to the water supply, set the power switch to O (off). The...the water connection is included only in the I (on). DO NOT place fingers or hands on the automatic icemaking mechanism while the refrigerator is in certain models. It is connected can regulate the size with the cube size button. (nomally caused by variations in a 24-hour period, depending ...
Owner's Manual
Page 29
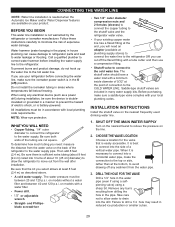
...needed when the Automatic Ice Maker and/or Water Dispenser features are available on models with a water filter. If you need an adapter (available at plumbing supply stores) to connect the water line to the refrigerator OR you select allows at least 8 feet (2.4 m) as a power drill...need : measure the distance from drilling the hole in many water supply kits. Shutoff valve to connect to the refrigerator. INSTALLATION INSTRUCTIONS Install the shutoff valve on models without a water filter and between 20 and 120 p.s.i. Be sure both ends of electric shock, or is doubleinsulated...
...needed when the Automatic Ice Maker and/or Water Dispenser features are available on models with a water filter. If you need an adapter (available at plumbing supply stores) to connect the water line to the refrigerator OR you select allows at least 8 feet (2.4 m) as a power drill...need : measure the distance from drilling the hole in many water supply kits. Shutoff valve to connect to the refrigerator. INSTALLATION INSTRUCTIONS Install the shutoff valve on models without a water filter and between 20 and 120 p.s.i. Be sure both ends of electric shock, or is doubleinsulated...
Owner's Manual
Page 32
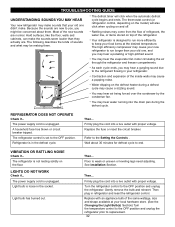
...defrost timer will also click when cycling on the floor. The high efficiency compressor may cause your new refrigerator to the refrigerant flowing in refrigerator and reset the refrigerator control. You may be concerned about 30 minutes for defrost cycle to the OFF position. The power ...NOT WORK Check if... A household fuse has blown or circuit breaker tripped. The refrigerator control is loose in the defrost cycle. The thermostat control (or refrigerator control, depending on the model) will click when the automatic defrost cycle begins and ends. Water dripping on top...
...defrost timer will also click when cycling on the floor. The high efficiency compressor may cause your new refrigerator to the refrigerant flowing in refrigerator and reset the refrigerator control. You may be concerned about 30 minutes for defrost cycle to the OFF position. The power ...NOT WORK Check if... A household fuse has blown or circuit breaker tripped. The refrigerator control is loose in the defrost cycle. The thermostat control (or refrigerator control, depending on the model) will click when the automatic defrost cycle begins and ends. Water dripping on top...
Owner's Manual
Page 33
... installation and not properly replaced. See Doors will not close completely below. Modern refrigerators with more storage space require more often. The refrigerator control was not set correctly The refrigerator will run longer in and the refrigerator control was an older model. Push the doors firmly shut. Food packages are not closed completely. Remove and...
... installation and not properly replaced. See Doors will not close completely below. Modern refrigerators with more storage space require more often. The refrigerator control was not set correctly The refrigerator will run longer in and the refrigerator control was an older model. Push the doors firmly shut. Food packages are not closed completely. Remove and...


