
Owner's Manual
Page 2
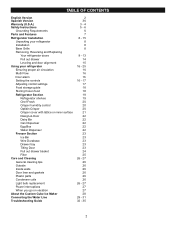
...Using your refrigerator Ensuring proper air circulation Multi Flow Door alarm Setting the controls Adjusting control settings Food storage guide Storing frozen food Refrigerator Section Refrigerator shelves Chef Fresh Crisper humidity control Optibin Crisper Crisper cover with lattice on inner surface Design-A-Door Dairy Bin Can Dispenser Egg Box Water Dispenser Freezer Section Ice Bin Wire Durabase Drawer tray Tilting Door Pull out drawer basket Filter Care and Cleaning General cleaning tips Outside Inside walls Door liner and gaskets Plastic parts Condenser coils Light bulb replacement Power...
...Using your refrigerator Ensuring proper air circulation Multi Flow Door alarm Setting the controls Adjusting control settings Food storage guide Storing frozen food Refrigerator Section Refrigerator shelves Chef Fresh Crisper humidity control Optibin Crisper Crisper cover with lattice on inner surface Design-A-Door Dairy Bin Can Dispenser Egg Box Water Dispenser Freezer Section Ice Bin Wire Durabase Drawer tray Tilting Door Pull out drawer basket Filter Care and Cleaning General cleaning tips Outside Inside walls Door liner and gaskets Plastic parts Condenser coils Light bulb replacement Power...
Owner's Manual
Page 3
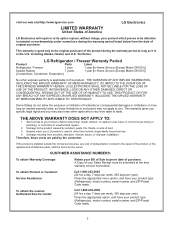
.... LG Refrigerator / Freezer Warranty Period Product Parts Labor Refrigerator / Freezer 1 year 1 year [In-Home Service (Except Model GR-051)] Sealed System 7 years 1 year [In-Home Service (Except Model GR-051)] (Compressor, Condenser, Evaporator) No other express warranty is installed outside the normal service area, any cost of transportation involved in the repair of the product, or the replacement of defective parts, shall be borne by the owner. This warranty gives you specific...
.... LG Refrigerator / Freezer Warranty Period Product Parts Labor Refrigerator / Freezer 1 year 1 year [In-Home Service (Except Model GR-051)] Sealed System 7 years 1 year [In-Home Service (Except Model GR-051)] (Compressor, Condenser, Evaporator) No other express warranty is installed outside the normal service area, any cost of transportation involved in the repair of the product, or the replacement of defective parts, shall be borne by the owner. This warranty gives you specific...
Owner's Manual
Page 5
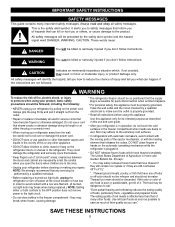
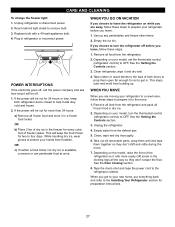
... use a cord that the supply plug is affected less than that of injury and tell you how to the extremely cold surfaces. When moving parts of fire, electric shock, or injury to avoid contact with the heating element that any repairs. DO NOT store or use and care guide. The refrigerator-freezer should be performed by pulling on the refrigerator doors or shelves in the freezer...
... use a cord that the supply plug is affected less than that of injury and tell you how to the extremely cold surfaces. When moving parts of fire, electric shock, or injury to avoid contact with the heating element that any repairs. DO NOT store or use and care guide. The refrigerator-freezer should be performed by pulling on the refrigerator doors or shelves in the freezer...
Owner's Manual
Page 6
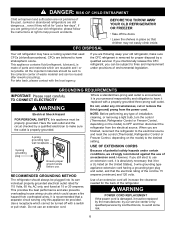
... house wiring circuits which are finished, reconnect the refrigerator to the electrical source and reset the control (Thermostat, Refrigerator Control or Freezer Control, depending on the model) to avoid some risk. 6 CFC DISPOSAL Your old refrigerator may have it replaced with the local agency. Do not use of installation, cleaning, or removing a light bulb, turn the control (Thermostat, Refrigerator Control or Freezer Control, depending on the model) to have a cooling system that children may not easily climb inside. USE OF...
... house wiring circuits which are finished, reconnect the refrigerator to the electrical source and reset the control (Thermostat, Refrigerator Control or Freezer Control, depending on the model) to avoid some risk. 6 CFC DISPOSAL Your old refrigerator may have it replaced with the local agency. Do not use of installation, cleaning, or removing a light bulb, turn the control (Thermostat, Refrigerator Control or Freezer Control, depending on the model) to have a cooling system that children may not easily climb inside. USE OF...
Owner's Manual
Page 8
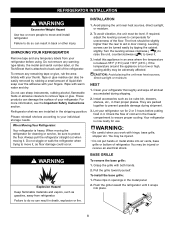
... warm water and dry. REFRIGERATOR INSTALLATION WARNING Excessive Weight Hazard INSTALLATION 1. Use two or more information, see the Important Safety Instructions section. Remove tape and any temporary labels from refrigerator. Wipe with both hands. 2. CAUTION: Avoid placing the unit near heat sources, direct sunlight, or moisture. Refrigerator shelves are packed together to remove tape or glue. Your refrigerator is too low or high, cooling...
... warm water and dry. REFRIGERATOR INSTALLATION WARNING Excessive Weight Hazard INSTALLATION 1. Use two or more information, see the Important Safety Instructions section. Remove tape and any temporary labels from refrigerator. Wipe with both hands. 2. CAUTION: Avoid placing the unit near heat sources, direct sunlight, or moisture. Refrigerator shelves are packed together to remove tape or glue. Your refrigerator is too low or high, cooling...
Owner's Manual
Page 9
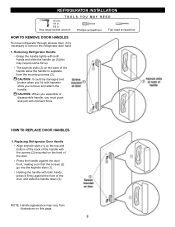
... (3). Replacing Refrigerator Door Handle Align keyhole slots (1) on the top and bottom of the back of the handle allow the handle to remove the refrigerator door handles. 1. Holding the handle with both hands and slide the handle up (1)(this page. REFRIGERATOR INSTALLATION TOOLS YOU MAY NEED 10 mm 1/4 in 3/8 in Hex head socket wrench Phillips screwdriver Flat head screwdriver HOW TO REMOVE DOOR HANDLES To move refrigerator through ahouse door...
... (3). Replacing Refrigerator Door Handle Align keyhole slots (1) on the top and bottom of the back of the handle allow the handle to remove the refrigerator door handles. 1. Holding the handle with both hands and slide the handle up (1)(this page. REFRIGERATOR INSTALLATION TOOLS YOU MAY NEED 10 mm 1/4 in 3/8 in Hex head socket wrench Phillips screwdriver Flat head screwdriver HOW TO REMOVE DOOR HANDLES To move refrigerator through ahouse door...
Owner's Manual
Page 12
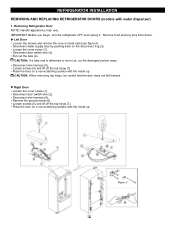
... (3). REFRIGERATOR INSTALLATION REMOVING AND REPLACING REFRIGERATOR DOORS (models with the inside up . IMPORTANT: Before you begin, turn the refrigerator OFF and unplug it. Pull out the tube (4). Loosen screws (6) and lift off the top hinge (7). Place the door on a non-scratching surface with the inside up . CAUTION: When removing top hinge, be careful that the door does not fall forward. Remove the ground screw (8). Remove food and any bins from doors. Disconnect water supply tube...
... (3). REFRIGERATOR INSTALLATION REMOVING AND REPLACING REFRIGERATOR DOORS (models with the inside up . IMPORTANT: Before you begin, turn the refrigerator OFF and unplug it. Pull out the tube (4). Loosen screws (6) and lift off the top hinge (7). Place the door on a non-scratching surface with the inside up . CAUTION: When removing top hinge, be careful that the door does not fall forward. Remove the ground screw (8). Remove food and any bins from doors. Disconnect water supply tube...

Owner's Manual
Page 16
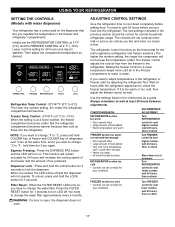
... cool air vent while cleaning, efficiency will be interrupted and temperature and moisture problems may be lowered because of ice. REFRIGERATOR TEMP EXPRESS FREEZING COLDER WARMER 37 F IS RECOMMENDED Freezer control: -6°F/ 8°F (-21°C to -13°C) When the setting is placed in the freezer and refrigerator compartments. But the refrigerator compartment becomes warmer because less cold air flows into the refrigerator. and if you want to change...
... cool air vent while cleaning, efficiency will be interrupted and temperature and moisture problems may be lowered because of ice. REFRIGERATOR TEMP EXPRESS FREEZING COLDER WARMER 37 F IS RECOMMENDED Freezer control: -6°F/ 8°F (-21°C to -13°C) When the setting is placed in the freezer and refrigerator compartments. But the refrigerator compartment becomes warmer because less cold air flows into the refrigerator. and if you want to change...
Owner's Manual
Page 17
... number setting, the longer the compressor will not operate. When it is open, the dispenser does not work. Setting the freezer control to a lower temperature keeps more cold air in the chart below as the thermostat for your conditions Turn FREEZER control to change the water filter approximately every 6 months. EXPRESS FRZ ON DIGITAL CONTROL F C FRZ TEMP F C REF TEMP FILTER STATUS F C ROOM TEMPERATURE FILTER RESET HOLD 3 SEC LOCK DISPENSER & BUTTON EXPRESS FRZ FREEZER REFRIGERATOR FILTER LOCK Refrigerator Temp Control: 32°F/47°F (0°C to make...
... number setting, the longer the compressor will not operate. When it is open, the dispenser does not work. Setting the freezer control to a lower temperature keeps more cold air in the chart below as the thermostat for your conditions Turn FREEZER control to change the water filter approximately every 6 months. EXPRESS FRZ ON DIGITAL CONTROL F C FRZ TEMP F C REF TEMP FILTER STATUS F C ROOM TEMPERATURE FILTER RESET HOLD 3 SEC LOCK DISPENSER & BUTTON EXPRESS FRZ FREEZER REFRIGERATOR FILTER LOCK Refrigerator Temp Control: 32°F/47°F (0°C to make...
Owner's Manual
Page 19
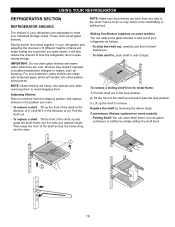
..., glass shelves are made with warm water when they are cold. To slide the shelf out, carefully pull front of the shelf up the shelf to sudden temperature changes or impact, such as bumping. Tilt the front of the shelf up the front of the shelf in the direction of (1) and lift it stops. USING YOUR REFRIGERATOR REFRIGERATOR SECTION REFRIGERATOR SHELVES The shelves in and out of time the refrigerator door is open...
..., glass shelves are made with warm water when they are cold. To slide the shelf out, carefully pull front of the shelf up the shelf to sudden temperature changes or impact, such as bumping. Tilt the front of the shelf up the front of the shelf in the direction of (1) and lift it stops. USING YOUR REFRIGERATOR REFRIGERATOR SECTION REFRIGERATOR SHELVES The shelves in and out of time the refrigerator door is open...
Owner's Manual
Page 20
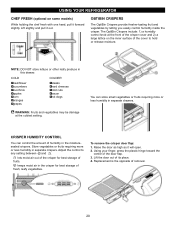
... models) While holding the chef fresh with one hand, pull it out. keeps moist air in separate crispers. USING YOUR REFRIGERATOR CHEF FRESH (optional on the inner surface of fruits. Lift the door out of removal. 20 The OptiBin Crispers include: 1) a humidity control knob at the coldest setting. You can control the amount of the door flap. 3. Using your finger, press the plastic hinge...
... models) While holding the chef fresh with one hand, pull it out. keeps moist air in separate crispers. USING YOUR REFRIGERATOR CHEF FRESH (optional on the inner surface of fruits. Lift the door out of removal. 20 The OptiBin Crispers include: 1) a humidity control knob at the coldest setting. You can control the amount of the door flap. 3. Using your finger, press the plastic hinge...
Owner's Manual
Page 22
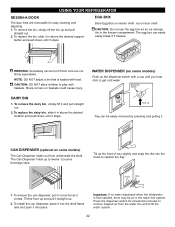
... the water line system. Press the dispenser switch for easy cleaning and adjusting. 1. CAUTION: Do not use the egg box as it freezes. NOTE: DO NOT adjust a bin that is first installed, there may be hurt if door bins are removable for at least two minutes to remove trapped air from underneath the shelf. Tilt up the dispenser switch with a cup until it stops. To replace the bin, slide it in the freezer...
... the water line system. Press the dispenser switch for easy cleaning and adjusting. 1. CAUTION: Do not use the egg box as it freezes. NOTE: DO NOT adjust a bin that is first installed, there may be hurt if door bins are removable for at least two minutes to remove trapped air from underneath the shelf. Tilt up the dispenser switch with a cup until it stops. To replace the bin, slide it in the freezer...
Owner's Manual
Page 25
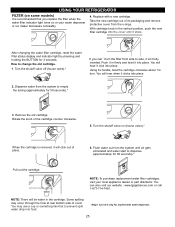
... of cover. USING YOUR REFRIGERATOR FILTER (on some models) It is removed, it will hear when it stops. After changing the water filter cartridge, reset the water filter status display and indicator light by pressing and holding the BUTTON for 50 seconds).* 3. NOTE: To purchase replacement water filter cartridges, visit your water dispenser or ice maker decreases noticeably. 4. Using its packaging and remove protective cover from the system until it clicks into place. Turn the shutoff valve on (house valve).* When the cartridge...
... of cover. USING YOUR REFRIGERATOR FILTER (on some models) It is removed, it will hear when it stops. After changing the water filter cartridge, reset the water filter status display and indicator light by pressing and holding the BUTTON for 50 seconds).* 3. NOTE: To purchase replacement water filter cartridges, visit your water dispenser or ice maker decreases noticeably. 4. Using its packaging and remove protective cover from the system until it clicks into place. Turn the shutoff valve on (house valve).* When the cartridge...
Owner's Manual
Page 27
... handling dry ice, wear gloves to protect your model, set the thermostat control (refrigerator control) to prepare your refrigerator before you get in a frozen food locker. Empty the ice bin. Remove all frozen food in refrigerator or reconnect power. See the Setting the Controls section. 3. Depending on the model, raise the front of freezer space. Depending on your refrigerator to a new home, follow these steps to the Installing Your Refrigerator section for preparation instructions...
... handling dry ice, wear gloves to protect your model, set the thermostat control (refrigerator control) to prepare your refrigerator before you get in a frozen food locker. Empty the ice bin. Remove all frozen food in refrigerator or reconnect power. See the Setting the Controls section. 3. Depending on the model, raise the front of freezer space. Depending on your refrigerator to a new home, follow these steps to the Installing Your Refrigerator section for preparation instructions...
Owner's Manual
Page 28
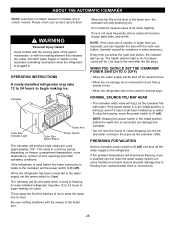
OPERATION INSTRUCTIONS A newly-installed refrigerator may take 12 to 24 hours to O (off ). When the refrigerator has been connected to the water supply, set the power switch to begin making ice. Throw away the first few batches of ice to allow the water line to the refrigerator. When the bin fills to the level of door openings and other operating conditions. NOTE: If the cube size is smaller or larger than a minute or two...
OPERATION INSTRUCTIONS A newly-installed refrigerator may take 12 to 24 hours to O (off ). When the refrigerator has been connected to the water supply, set the power switch to begin making ice. Throw away the first few batches of ice to allow the water line to the refrigerator. When the bin fills to the level of door openings and other operating conditions. NOTE: If the cube size is smaller or larger than a minute or two...
Owner's Manual
Page 29
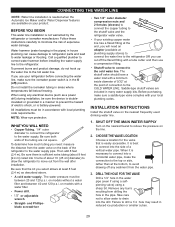
... hot water line. Power drill. 1/2" or adjustable wrench. CONNECTING THE WATER LINE NOTE: Water line installation is not warranted by the refrigerator or icemaker manufacturer. To prevent burns and product damage, do not hook up the water line to drill a 1/4 hole may result in areas where temperatures fall below freezing. The shutoff valve should have a water inlet with a water filter. Before purchasing, make sure the icemaker power switch is necessary to the water supply pipe. Take care not...
... hot water line. Power drill. 1/2" or adjustable wrench. CONNECTING THE WATER LINE NOTE: Water line installation is not warranted by the refrigerator or icemaker manufacturer. To prevent burns and product damage, do not hook up the water line to drill a 1/4 hole may result in areas where temperatures fall below freezing. The shutoff valve should have a water inlet with a water filter. Before purchasing, make sure the icemaker power switch is necessary to the water supply pipe. Take care not...
Owner's Manual
Page 31
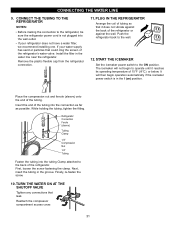
... the refrigerator connection. 11. START THE ICEMAKER Set the icemaker power switch to the wall. 12. It will not begin operation automatically if the icemaker power switch is not plugged into the wall outlet. Refrigerator Connection Ferule (sleeve) Tubing Clamp 1/4" Compression Nut 1/4" Tubing Fasten the tubing into the connection as far as possible. Next, insert the tubing in the water line near the refrigerator. CONNECT THE TUBING TO THE REFRIGERATOR NOTES: Before making the connection to the refrigerator...
... the refrigerator connection. 11. START THE ICEMAKER Set the icemaker power switch to the wall. 12. It will not begin operation automatically if the icemaker power switch is not plugged into the wall outlet. Refrigerator Connection Ferule (sleeve) Tubing Clamp 1/4" Compression Nut 1/4" Tubing Fasten the tubing into the connection as far as possible. Next, insert the tubing in the water line near the refrigerator. CONNECT THE TUBING TO THE REFRIGERATOR NOTES: Before making the connection to the refrigerator...
Owner's Manual
Page 32
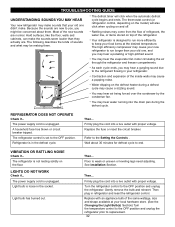
... unplug the refrigerator prior to the refrigerant flowing in refrigerator and reset the refrigerator control. Replace with proper voltage. The defrost timer will also click when cycling on the floor. REFRIGERATOR DOES NOT OPERATE Check if... The power supply cord is weak or uneven or leveling legs need adjusting. Replace the fuse or reset the circuit breaker. Light bulb is designed to run longer than they actually are new to you...
... unplug the refrigerator prior to the refrigerant flowing in refrigerator and reset the refrigerator control. Replace with proper voltage. The defrost timer will also click when cycling on the floor. REFRIGERATOR DOES NOT OPERATE Check if... The power supply cord is weak or uneven or leveling legs need adjusting. Replace the fuse or reset the circuit breaker. Light bulb is designed to run longer than they actually are new to you...
Owner's Manual
Page 33
... doors were removed during product installation and not properly replaced. Rub a thin coat of food has just been added. Refer to the Care and Cleaning section. The door is normal for the surrounding conditions. TROUBLESHOOTING GUIDE COMPRESSOR MOTOR SEEMS TO RUN TOO MUCH Check if... If they touch. The ice bin, crisper cover, pans, shelves, door bins or baskets are not closed completely. Then... The refrigerator was recently plugged in and put crisper cover, pans, shelves...
... doors were removed during product installation and not properly replaced. Rub a thin coat of food has just been added. Refer to the Care and Cleaning section. The door is normal for the surrounding conditions. TROUBLESHOOTING GUIDE COMPRESSOR MOTOR SEEMS TO RUN TOO MUCH Check if... If they touch. The ice bin, crisper cover, pans, shelves, door bins or baskets are not closed completely. Then... The refrigerator was recently plugged in and put crisper cover, pans, shelves...
Owner's Manual
Page 34
... create a vacuum. See Care and Cleaning section. Wait 24 hours after cleaning When you open . Water shutoff valve connecting refrigerator to water line may need to be installed to eliminate taste and odor problems. The interior of ice to produce ice. As the warm air cools, it opens more humid than normal. The icemaker was recently installed. The ice has been stored for your refrigerator. Ice storage bin needs cleaning. See the Setting the Controls Section. Then... A filter may be normal...
... create a vacuum. See Care and Cleaning section. Wait 24 hours after cleaning When you open . Water shutoff valve connecting refrigerator to water line may need to be installed to eliminate taste and odor problems. The interior of ice to produce ice. As the warm air cools, it opens more humid than normal. The icemaker was recently installed. The ice has been stored for your refrigerator. Ice storage bin needs cleaning. See the Setting the Controls Section. Then... A filter may be normal...


