User Guide
Page 1
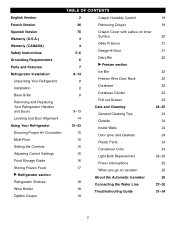
...(CANADA) Safety Instructions Grounding Requirements Parts and Features Refrigerator Installation Unpacking Your Refrigerator Installation Base Grille Removing and Replacing Your Refrigerator Handles and Doors Leveling and Door Alignment Using Your Refrigerator Ensuring Proper Air Circulation Multi-Flow Setting the Controls... Adjusting Control Settings Food Storage Guide Storing Frozen Food u Refrigerator section Refrigerator Shelves Wine Holder Optibin Crisper TABLE OF CONTENTS 2 Crisper Humidity Control 19 36 Removing Crisper 19 70 ...
...(CANADA) Safety Instructions Grounding Requirements Parts and Features Refrigerator Installation Unpacking Your Refrigerator Installation Base Grille Removing and Replacing Your Refrigerator Handles and Doors Leveling and Door Alignment Using Your Refrigerator Ensuring Proper Air Circulation Multi-Flow Setting the Controls... Adjusting Control Settings Food Storage Guide Storing Frozen Food u Refrigerator section Refrigerator Shelves Wine Holder Optibin Crisper TABLE OF CONTENTS 2 Crisper Humidity Control 19 36 Removing Crisper 19 70 ...
User Guide
Page 2
...single-family household use for other rights that result from the date ("Date of Purchase") of original consumer purchase of the product. LG REFRIGERATOR LIMITED WARRANTY - Replacement Units and Repair Parts are answered 24 hours a day, 365 days per year) and select the appropriate ...apply to you may also have other than intended purpose. • Repairs when your LG refrigerator is good only to be defective in the United States, including Alaska, Hawaii, and U.S. USA Your LG Refrigerator will be borne by the consumer. O. SEALED SYSTEM (Compressor, Condenser, and Evaporator) ...
...single-family household use for other rights that result from the date ("Date of Purchase") of original consumer purchase of the product. LG REFRIGERATOR LIMITED WARRANTY - Replacement Units and Repair Parts are answered 24 hours a day, 365 days per year) and select the appropriate ...apply to you may also have other than intended purpose. • Repairs when your LG refrigerator is good only to be defective in the United States, including Alaska, Hawaii, and U.S. USA Your LG Refrigerator will be borne by the consumer. O. SEALED SYSTEM (Compressor, Condenser, and Evaporator) ...
User Guide
Page 3
...installation, or acts of the consumer. Please have product type (refrigerator) and ZIP Code ready. LG ELECTRONICS USA, INC. so these costs are the responsibility of God. 3. Damage to the product caused by Internet: http://www.lg.ca 4 A copy of your Sales Receipt must be defective ... or workmanship under normal use for other rights which proves to be submitted at http://www.lg.ca This warranty provides in-home service. LIMITED WARRANTY (CANADA) LG REFRIGERATOR LG Electronics will repair or at its option replace, without charge, your product which vary from ...
...installation, or acts of the consumer. Please have product type (refrigerator) and ZIP Code ready. LG ELECTRONICS USA, INC. so these costs are the responsibility of God. 3. Damage to the product caused by Internet: http://www.lg.ca 4 A copy of your Sales Receipt must be defective ... or workmanship under normal use for other rights which proves to be submitted at http://www.lg.ca This warranty provides in-home service. LIMITED WARRANTY (CANADA) LG REFRIGERATOR LG Electronics will repair or at its option replace, without charge, your product which vary from ...
User Guide
Page 4
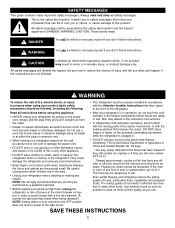
...The food may result in accordance with the Attention Installer Instructions that were taped to the extremely cold surfaces. • In refrigerators with automatic icemakers, avoid contact with the heating element that releases the cubes. Even partial thawing and refreezing reduces the eating quality... safety messages. All safety messages will be dangerous to climb, stand or hang on the power cord. They could damage the refrigerator and seriously injure themselves. • Keep fingers out of foods, particularly fruits, vegetables and prepared foods. Be careful closing doors...
...The food may result in accordance with the Attention Installer Instructions that were taped to the extremely cold surfaces. • In refrigerators with automatic icemakers, avoid contact with the heating element that releases the cubes. Even partial thawing and refreezing reduces the eating quality... safety messages. All safety messages will be dangerous to climb, stand or hang on the power cord. They could damage the refrigerator and seriously injure themselves. • Keep fingers out of foods, particularly fruits, vegetables and prepared foods. Be careful closing doors...
User Guide
Page 5
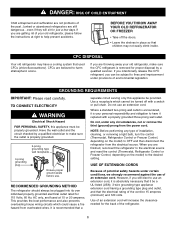
...of an extension cord will sit for proper disposal by a qualified electrician to help prevent accidents. CFCs are getting rid of your old refrigerator, please follow the instructions at 15 or 20 amperes. Have the wall outlet and the circuit checked by a qualified servicer. If ... the model) to harm stratospheric ozone. When you can be 15 amperes (minimum) and 120 volts. BEFORE YOU THROW AWAY YOUR OLD REFRIGERATOR OR FREEZER • Take off with a properly grounded three-prong wall outlet. GROUNDING REQUIREMENTS IMPORTANT: Please read carefully. USE OF EXTENSION CORDS...
...of an extension cord will sit for proper disposal by a qualified electrician to help prevent accidents. CFCs are getting rid of your old refrigerator, please follow the instructions at 15 or 20 amperes. Have the wall outlet and the circuit checked by a qualified servicer. If ... the model) to harm stratospheric ozone. When you can be 15 amperes (minimum) and 120 volts. BEFORE YOU THROW AWAY YOUR OLD REFRIGERATOR OR FREEZER • Take off with a properly grounded three-prong wall outlet. GROUNDING REQUIREMENTS IMPORTANT: Please read carefully. USE OF EXTENSION CORDS...

User Guide
Page 6
PARTS AND FEATURES A M L N B B H C I Durabase (p.22) J Divider (p.23) K Freezer Door Rack (Tilting-LRFC 25750** only) (p.22) L Wine Holder (p.18) M Dairy Bin (p.22) N Egg Box 7 The refrigerator you have purchased may not match your convenience. A Digital Sensor Control (p.15) B Design-A-Door (p.21) C Shelves (p.18) D Optibin Crisper (p.19) (Keeps fruits and vegetable fresh ...
PARTS AND FEATURES A M L N B B H C I Durabase (p.22) J Divider (p.23) K Freezer Door Rack (Tilting-LRFC 25750** only) (p.22) L Wine Holder (p.18) M Dairy Bin (p.22) N Egg Box 7 The refrigerator you have purchased may not match your convenience. A Digital Sensor Control (p.15) B Design-A-Door (p.21) C Shelves (p.18) D Optibin Crisper (p.19) (Keeps fruits and vegetable fresh ...
User Guide
Page 7
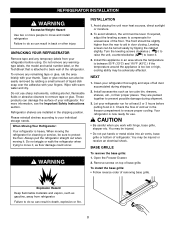
..., cooling ability may be sure to prevent possible damage during shipping. 2. Tape or glue residue can damage the surface of refrigerator. When Moving Your Refrigerator: Your refrigerator is now ready for at least 2 or 3 hours before using. If required, adjust the leveling screws to back wall ...sunlight or moisture. 2. The front should be turned easily by rubbing a small amount of the floor. Clean your thumb. Let your refrigerator run for use sharp instruments, rubbing alcohol, flammable fluids or abrasive cleaners to move it . You may be easily removed by tipping ...
..., cooling ability may be sure to prevent possible damage during shipping. 2. Tape or glue residue can damage the surface of refrigerator. When Moving Your Refrigerator: Your refrigerator is now ready for at least 2 or 3 hours before using. If required, adjust the leveling screws to back wall ...sunlight or moisture. 2. The front should be turned easily by rubbing a small amount of the floor. Clean your thumb. Let your refrigerator run for use sharp instruments, rubbing alcohol, flammable fluids or abrasive cleaners to move it . You may be easily removed by tipping ...
User Guide
Page 8
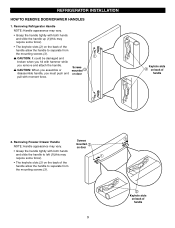
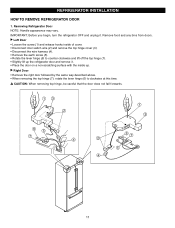
...may require some force). • The keyhole slots (2) on back of the handle allow the handle to left (1)(this may vary. Removing Refrigerator Handle NOTE: Handle appearance may vary. • Grasp the handle tightly with both hands and slide the handle to separate from the mounting screws... (3). 9 1 2 Keyhole slots on back of handle REFRIGERATOR INSTALLATION HOW TO REMOVE DOOR/DRAWER HANDLES 1. w CAUTION: When you assemble or Screws mounted 3 disassemble handle, you remove and attach the handle...
...may require some force). • The keyhole slots (2) on back of the handle allow the handle to left (1)(this may vary. Removing Refrigerator Handle NOTE: Handle appearance may vary. • Grasp the handle tightly with both hands and slide the handle to separate from the mounting screws... (3). 9 1 2 Keyhole slots on back of handle REFRIGERATOR INSTALLATION HOW TO REMOVE DOOR/DRAWER HANDLES 1. w CAUTION: When you assemble or Screws mounted 3 disassemble handle, you remove and attach the handle...

User Guide
Page 9
... sure that the screws (5) go into the keyhole slots (4). • Holding the handle with both hands, press it firmly against the front of handle Replacing Refrigerator Door Handle NOTE: Handle appearance may vary. Replacing Freezer Drawer Handle NOTE: Handle appearance may vary. • Align keyhole slots (1) on the top and bottom... door and slide the handle down (3). 2 Screws mounted on back of the drawer and slide the handle to the left (6). 10 6 4 Keyhole slots on door 1 5 2. REFRIGERATOR INSTALLATION HOW TO REPLACE DOOR/DRAWER HANDLES 1.
... sure that the screws (5) go into the keyhole slots (4). • Holding the handle with both hands, press it firmly against the front of handle Replacing Refrigerator Door Handle NOTE: Handle appearance may vary. Replacing Freezer Drawer Handle NOTE: Handle appearance may vary. • Align keyhole slots (1) on the top and bottom... door and slide the handle down (3). 2 Screws mounted on back of the drawer and slide the handle to the left (6). 10 6 4 Keyhole slots on door 1 5 2. REFRIGERATOR INSTALLATION HOW TO REPLACE DOOR/DRAWER HANDLES 1.
User Guide
Page 10
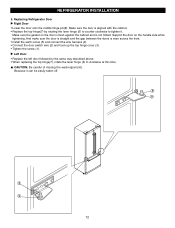
... removing the top hinge (7), rotate the lever hinge (6) to counter clockwise and lift off the top hinge (7). • Slightly lift up the refrigerator door and remove it . u Left Door • Loosen the screw (1) and release hooks inside up. w CAUTION: When removing top hinge,... careful that the door does not fall forwards. 13 2 1 3 6 5 7 4 2 67 5 4 11 Removing Refrigerator Door NOTE: Handle appearance may vary. IMPORTANT: Before you begin, turn the refrigerator OFF and unplug it . • Place the door on a non-scratching surface with the inside of cover. • ...
... removing the top hinge (7), rotate the lever hinge (6) to counter clockwise and lift off the top hinge (7). • Slightly lift up the refrigerator door and remove it . u Left Door • Loosen the screw (1) and release hooks inside up. w CAUTION: When removing top hinge,... careful that the door does not fall forwards. 13 2 1 3 6 5 7 4 2 67 5 4 11 Removing Refrigerator Door NOTE: Handle appearance may vary. IMPORTANT: Before you begin, turn the refrigerator OFF and unplug it . • Place the door on a non-scratching surface with the inside of cover. • ...
User Guide
Page 11
.... 8 9 8 9 12 w CAUTION: Be careful of missing the washer[part (9)]. And make sure the door is straight and the gap between the doors is not folded. REFRIGERATOR INSTALLATION 2. u Left Door • Replace the left door followed by rotating the lever hinge (6) to counter clockwise to clockwise at this time. Replacing...
.... 8 9 8 9 12 w CAUTION: Be careful of missing the washer[part (9)]. And make sure the door is straight and the gap between the doors is not folded. REFRIGERATOR INSTALLATION 2. u Left Door • Replace the left door followed by rotating the lever hinge (6) to counter clockwise to clockwise at this time. Replacing...

User Guide
Page 12
... the rail tabs (3), as illustrated, and lower the door into final position. 2 3 • Remove the lower basket (2) by the sharp edges on Freezer Door. 13 REFRIGERATOR INSTALLATION HOW TO REMOVE AND INSTALL THE PULLOUT DRAWER IMPORTANT: To avoid possible injury, product or property damage, you remove the drawer, do not hold...
... the rail tabs (3), as illustrated, and lower the door into final position. 2 3 • Remove the lower basket (2) by the sharp edges on Freezer Door. 13 REFRIGERATOR INSTALLATION HOW TO REMOVE AND INSTALL THE PULLOUT DRAWER IMPORTANT: To avoid possible injury, product or property damage, you remove the drawer, do not hold...
User Guide
Page 13
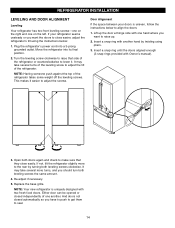
... you should turn both leveling screws the same amount. 4. Open both doors again and check to adjust the tilt of the refrigerator or counterclockwise to the rear by twisting using the instructions below to adjust the screws. It may take several turns of the ...leveling screw to make sure that side of the refrigerator. Move the refrigerator into a 3-prong grounded outlet. Re-adjust if necessary. 5. It may take several more to lower it easier to align the doors:...
... you should turn both leveling screws the same amount. 4. Open both doors again and check to adjust the tilt of the refrigerator or counterclockwise to the rear by twisting using the instructions below to adjust the screws. It may take several turns of the ...leveling screw to make sure that side of the refrigerator. Move the refrigerator into a 3-prong grounded outlet. Re-adjust if necessary. 5. It may take several more to lower it easier to align the doors:...
User Guide
Page 14
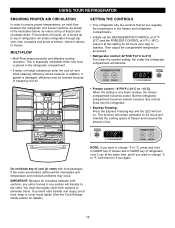
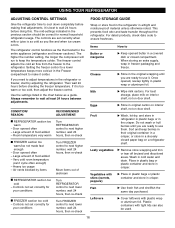
...the setting is damaged, efficiency may be interrupted and temperature and moisture problems may occur. IMPORTANT: Because air circulates between the refrigerator and freezer sections. REFRIGERATOR TEMP EXPRESS FREEZING COLDER WARMER 37 °F IS RECOMMENDED • Freezer control: -6°F/9°F (-21°C to ...176;F (-18°C). In addition, if gasket is at the same time. and if you regulate the temperature in the refrigerator compartment. • If water or foreign substances enter the cool air vent while cleaning, efficiency will remain activated for 24 hours...
...the setting is damaged, efficiency may be interrupted and temperature and moisture problems may occur. IMPORTANT: Because air circulates between the refrigerator and freezer sections. REFRIGERATOR TEMP EXPRESS FREEZING COLDER WARMER 37 °F IS RECOMMENDED • Freezer control: -6°F/9°F (-21°C to ...176;F (-18°C). In addition, if gasket is at the same time. and if you regulate the temperature in the refrigerator compartment. • If water or foreign substances enter the cool air vent while cleaning, efficiency will remain activated for 24 hours...
User Guide
Page 15
...correctly when milk or juice is as cold as you are ready to use them. This prevents food odor and taste transfer throughout the refrigerator. Items How to Butter or margarine u Keep opened , rewrap tightly in crisper. Place in plastic bag or plastic container and store in... keeps more cold air in crisper. Large amount of food added - Always remember to next higher number, wait 24 hours, then re-check I REFRIGERATOR section too cold - Do not wash or hull berries until you need to adjust temperatures in a sloosely closed compartment. Wash in a covered dish ...
...correctly when milk or juice is as cold as you are ready to use them. This prevents food odor and taste transfer throughout the refrigerator. Items How to Butter or margarine u Keep opened , rewrap tightly in crisper. Place in plastic bag or plastic container and store in... keeps more cold air in crisper. Large amount of food added - Always remember to next higher number, wait 24 hours, then re-check I REFRIGERATOR section too cold - Do not wash or hull berries until you need to adjust temperatures in a sloosely closed compartment. Wash in a covered dish ...

User Guide
Page 16
USING YOUR REFRIGERATOR STORING FROZEN FOOD NOTE: For further information about preparing food for proper freezing methods. If it must not allow air or moisture in or out. ...-freeze any large quantity of food. Be careful to circulate around packages. Ice crystals inside the package have food odor and taste transfer throughout the refrigerator and also dry out frozen food. NOTE: Allow hot foods to 3 lbs of food per cubic foot of packaging or wrap used (airtight and moisture...
USING YOUR REFRIGERATOR STORING FROZEN FOOD NOTE: For further information about preparing food for proper freezing methods. If it must not allow air or moisture in or out. ...-freeze any large quantity of food. Be careful to circulate around packages. Ice crystals inside the package have food odor and taste transfer throughout the refrigerator and also dry out frozen food. NOTE: Allow hot foods to 3 lbs of food per cubic foot of packaging or wrap used (airtight and moisture...
User Guide
Page 17
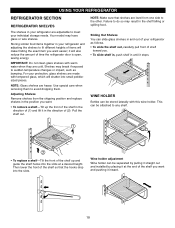
... heavy. WINE HOLDER Bottles can slide glass shelves in and out of your refrigerator as bumping. Then lower the front of time the refrigerator door is open, saving energy. Storing similar food items together in your refrigerator and adjusting the shelves to any shelf. • To replace a shelf... To remove a shelf-Tilt up and guide the shelf hooks into the slots. Failure to meet your individual storage needs. USING YOUR REFRIGERATOR REFRIGERATOR SECTION REFRIGERATOR SHELVES The shelves in your refrigerator are adjustable to do so may result in the shelf falling or spilling food.
... heavy. WINE HOLDER Bottles can slide glass shelves in and out of your refrigerator as bumping. Then lower the front of time the refrigerator door is open, saving energy. Storing similar food items together in your refrigerator and adjusting the shelves to any shelf. • To replace a shelf... To remove a shelf-Tilt up and guide the shelf hooks into the slots. Failure to meet your individual storage needs. USING YOUR REFRIGERATOR REFRIGERATOR SECTION REFRIGERATOR SHELVES The shelves in your refrigerator are adjustable to do so may result in the shelf falling or spilling food.
User Guide
Page 18
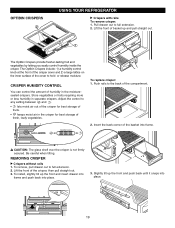
... the front of the crisper cover and 2) a large lattice on the inner surface of fresh, leafy vegetables. Be careful when tilting. OPTIBIN CRISPERS 2 USING YOUR REFRIGERATOR u Crispers with rails To remove crisper: 1. Adjust the control to any setting between and . • lets moist air out of the crisper for best storage...
... the front of the crisper cover and 2) a large lattice on the inner surface of fresh, leafy vegetables. Be careful when tilting. OPTIBIN CRISPERS 2 USING YOUR REFRIGERATOR u Crispers with rails To remove crisper: 1. Adjust the control to any setting between and . • lets moist air out of the crisper for best storage...
User Guide
Page 19
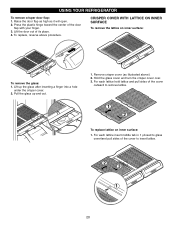
USING YOUR REFRIGERATOR To remove crisper door flap: 1. Lift up and out. 1. Lift the door out of the cover to insert lattice. 2 3 1 20 CRISPER COVER WITH LATTICE ON ...
USING YOUR REFRIGERATOR To remove crisper door flap: 1. Lift up and out. 1. Lift the door out of the cover to insert lattice. 2 3 1 20 CRISPER COVER WITH LATTICE ON ...
User Guide
Page 20
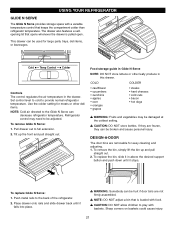
... for meats or other leafy produce in the drawer. Use the colder setting for large party trays, deli items, or beverages. Refrigerator control may be adjusted. Cold Temp Control Colder Controls The control regulates the air temperature in this drawer. To remove the bin,... front and pull straight out. Push metal rails to be damaged at the coldest setting. Sharp corners on baskets could cause injury. 21 USING YOUR REFRIGERATOR GLIDE N SERVE The Glide N Serve provides storage space with baskets. To remove Glide N Serve: 1. COLD COLDER • cauliflower • cucumbers...
... for meats or other leafy produce in the drawer. Use the colder setting for large party trays, deli items, or beverages. Refrigerator control may be adjusted. Cold Temp Control Colder Controls The control regulates the air temperature in this drawer. To remove the bin,... front and pull straight out. Push metal rails to be damaged at the coldest setting. Sharp corners on baskets could cause injury. 21 USING YOUR REFRIGERATOR GLIDE N SERVE The Glide N Serve provides storage space with baskets. To remove Glide N Serve: 1. COLD COLDER • cauliflower • cucumbers...


