User Guide
Page 1
... French Version Spanish Version Warranty (U.S.A.) Warranty (CANADA) Safety Instructions Grounding Requirements Parts and Features Refrigerator Installation Unpacking Your Refrigerator Installation Base Grille Removing and Replacing Your Refrigerator Handles and Doors Leveling and Door Alignment Using Your Refrigerator Ensuring Proper Air Circulation Multi-Flow Setting the Controls Adjusting Control Settings Food Storage Guide Storing Frozen Food u Refrigerator section Refrigerator Shelves Wine Holder Optibin Crisper TABLE OF CONTENTS 2 Crisper Humidity Control 19 36 Removing Crisper...
... French Version Spanish Version Warranty (U.S.A.) Warranty (CANADA) Safety Instructions Grounding Requirements Parts and Features Refrigerator Installation Unpacking Your Refrigerator Installation Base Grille Removing and Replacing Your Refrigerator Handles and Doors Leveling and Door Alignment Using Your Refrigerator Ensuring Proper Air Circulation Multi-Flow Setting the Controls Adjusting Control Settings Food Storage Guide Storing Frozen Food u Refrigerator section Refrigerator Shelves Wine Holder Optibin Crisper TABLE OF CONTENTS 2 Crisper Humidity Control 19 36 Removing Crisper...
User Guide
Page 2
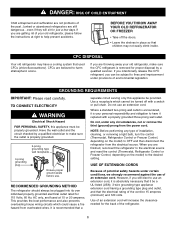
... IN CONTRACT, TORT, OR OTHERWISE. LG REFRIGERATOR LIMITED WARRANTY - USA Your LG Refrigerator will repaired or replaced, at the time warranty service is good only to the original purchaser of repair or replacement under normal use . Replacement Units and Repair Parts are answered 24 hours a day, ...Repairs when your home to you may not apply to deliver, pick up, and/or install the product, instruct, or replace house fuses or correct wiring, or correction of unauthorized repairs. • Damages or operating problems that vary from the menu. TO THE EXTENT ANY IMPLIED WARRANTY...
... IN CONTRACT, TORT, OR OTHERWISE. LG REFRIGERATOR LIMITED WARRANTY - USA Your LG Refrigerator will repaired or replaced, at the time warranty service is good only to the original purchaser of repair or replacement under normal use . Replacement Units and Repair Parts are answered 24 hours a day, ...Repairs when your home to you may not apply to deliver, pick up, and/or install the product, instruct, or replace house fuses or correct wiring, or correction of unauthorized repairs. • Damages or operating problems that vary from the menu. TO THE EXTENT ANY IMPLIED WARRANTY...
User Guide
Page 4
... the odor or color of any servicing be performed by a qualified individual. • Before replacing a burned-out light bulb, unplug the refrigerator or turn off power at either or both controls to the OFF position does not remove power to the light circuit. • This refrigerator must be followed, including the following: Read all instructions before cleaning or making any offodor or off-color should...
... the odor or color of any servicing be performed by a qualified individual. • Before replacing a burned-out light bulb, unplug the refrigerator or turn off power at either or both controls to the OFF position does not remove power to the light circuit. • This refrigerator must be followed, including the following: Read all instructions before cleaning or making any offodor or off-color should...
User Guide
Page 5
... that it replaced with a switch or pull chain. Where a standard two-prong wall outlet is encountered, it is properly grounded. 3-prong grounding type wall receptacle 3-prong grounding plug Ensure proper ground exists before use an extension cord. USE OF EXTENSION CORDS Because of potential safety hazards under any type of installation, cleaning, or removing a light bulb, turn the control (Thermostat, Refrigerator Control or Freezer Control, depending on the model) to...
... that it replaced with a switch or pull chain. Where a standard two-prong wall outlet is encountered, it is properly grounded. 3-prong grounding type wall receptacle 3-prong grounding plug Ensure proper ground exists before use an extension cord. USE OF EXTENSION CORDS Because of potential safety hazards under any type of installation, cleaning, or removing a light bulb, turn the control (Thermostat, Refrigerator Control or Freezer Control, depending on the model) to...
User Guide
Page 7
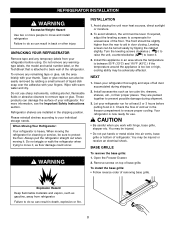
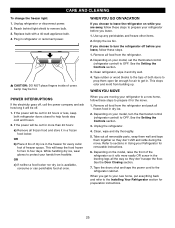
... to move and install refrigerator. If required, adjust the leveling screws to compensate for cleaning or service, be adversely affected. Install accessories such as ice cube bin, drawers, shelves, etc., in the shipping position. BASE GRILLE To remove the base grille: 1. Failure to do so can result in back or other injury. WARNING INSTALLATION 1. w CAUTION • Be careful when you work with warm water and dry. Explosion...
... to move and install refrigerator. If required, adjust the leveling screws to compensate for cleaning or service, be adversely affected. Install accessories such as ice cube bin, drawers, shelves, etc., in the shipping position. BASE GRILLE To remove the base grille: 1. Failure to do so can result in back or other injury. WARNING INSTALLATION 1. w CAUTION • Be careful when you work with warm water and dry. Explosion...

User Guide
Page 9
Replacing Refrigerator Door Handle NOTE: Handle appearance may vary. Replacing Freezer Drawer Handle NOTE: Handle appearance may vary. • Align keyhole slots (1) on the top and bottom of the back of the handle with the screws (2) mounted on the front of the door. • Press the handle against the door front, making sure that the screws (2) go into the keyhole slots (1). 1 3 • Holding the handle with both...
Replacing Refrigerator Door Handle NOTE: Handle appearance may vary. Replacing Freezer Drawer Handle NOTE: Handle appearance may vary. • Align keyhole slots (1) on the top and bottom of the back of the handle with the screws (2) mounted on the front of the door. • Press the handle against the door front, making sure that the screws (2) go into the keyhole slots (1). 1 3 • Holding the handle with both...

User Guide
Page 12
... door supports from rail system. DO NOT allow them to full extension, insert the lower basket (4) in the rail assembly until it could cause personal injury. REFRIGERATOR INSTALLATION HOW TO REMOVE AND INSTALL THE PULLOUT DRAWER IMPORTANT: To avoid possible injury, product or property damage, you remove the drawer, do not hold handle. Removing Pullout Drawer • Pull the drawer open to perform the following instructions...
... door supports from rail system. DO NOT allow them to full extension, insert the lower basket (4) in the rail assembly until it could cause personal injury. REFRIGERATOR INSTALLATION HOW TO REMOVE AND INSTALL THE PULLOUT DRAWER IMPORTANT: To avoid possible injury, product or property damage, you remove the drawer, do not hold handle. Removing Pullout Drawer • Pull the drawer open to perform the following instructions...
User Guide
Page 14
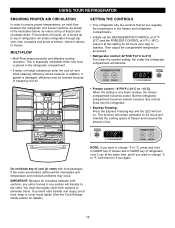
... temperatures, air must thoroughly clean both sections, any of escaping cool air. From bottom of ice. SETTING THE CONTROLS • Your refrigerator has two controls that let you want to change °C to top of freezer and circulates down. USING YOUR REFRIGERATOR ENSURING PROPER AIR CIRCULATION In order to stabilize. But the refrigerator compartment becomes warmer because less cold air flows into the refrigerator. • Express Freezing: Press the Express Freezing...
... temperatures, air must thoroughly clean both sections, any of escaping cool air. From bottom of ice. SETTING THE CONTROLS • Your refrigerator has two controls that let you want to change °C to top of freezer and circulates down. USING YOUR REFRIGERATOR ENSURING PROPER AIR CIRCULATION In order to stabilize. But the refrigerator compartment becomes warmer because less cold air flows into the refrigerator. • Express Freezing: Press the Express Freezing...
User Guide
Page 15
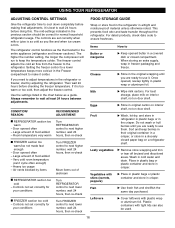
... freezer control adjusts the cold air flow from the freezer to ensure freshness. Door opened butter in the original wrapping until you need to make it colder. Controls not set correctly when milk or juice is too warm or too cold, then adjust the freezer control. For dated products, check date code to the refrigerator. Eggs u Store in freezer packaging and freeze. The mid-settings indicated in the refrigerator or freezer, start by items Turn FREEZER control to use...
... freezer control adjusts the cold air flow from the freezer to ensure freshness. Door opened butter in the original wrapping until you need to make it colder. Controls not set correctly when milk or juice is too warm or too cold, then adjust the freezer control. For dated products, check date code to the refrigerator. Eggs u Store in freezer packaging and freeze. The mid-settings indicated in the refrigerator or freezer, start by items Turn FREEZER control to use...
User Guide
Page 17
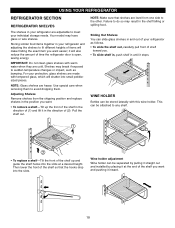
... of time the refrigerator door is open, saving energy. Adjusting Shelves Remove shelves from one side to the other. Sliding Out Shelves You can be attached to any shelf. • To replace a shelf-Tilt the front of items will make finding the exact item you want easier; IMPORTANT: Do not clean glass shelves with warm water when they are heavy. For your individual storage needs. Pull the shelf out. WINE...
... of time the refrigerator door is open, saving energy. Adjusting Shelves Remove shelves from one side to the other. Sliding Out Shelves You can be attached to any shelf. • To replace a shelf-Tilt the front of items will make finding the exact item you want easier; IMPORTANT: Do not clean glass shelves with warm water when they are heavy. For your individual storage needs. Pull the shelf out. WINE...
User Guide
Page 20
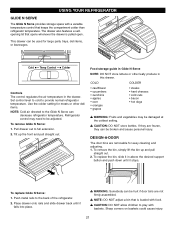
... • cold cuts • bacon • hot dogs w WARNING: Fruits and vegetables may need to play with food. DESIGN-A-DOOR The door bins are frozen, they can decrease refrigerator temperature. To replace the bin, slide it stops. w NOTE: DO NOT adjust a bin that is pulled open. Use the colder setting for large party trays, deli items, or beverages. Pull drawer out to provide normal refrigerator temperature. To remove the bin, simply...
... • cold cuts • bacon • hot dogs w WARNING: Fruits and vegetables may need to play with food. DESIGN-A-DOOR The door bins are frozen, they can decrease refrigerator temperature. To replace the bin, slide it stops. w NOTE: DO NOT adjust a bin that is pulled open. Use the colder setting for large party trays, deli items, or beverages. Pull drawer out to provide normal refrigerator temperature. To remove the bin, simply...
User Guide
Page 23
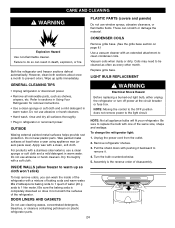
... shelves, crispers, etc. CONDENSER COILS Explosion Hazard Use non-flammable cleaner. DOOR LINERS AND GASKETS Do not use a clean sponge or soft cloth and a mild detergent in warm water. Wipe up so cloth won't stick) WARNING Electrical Shock Hazard Before replacing a burned-out light bulb, either unplug the refrigerator or turn off power at least twice a year using appliance wax (or auto paste wax). CARE AND CLEANING WARNING PLASTIC PARTS (covers...
... shelves, crispers, etc. CONDENSER COILS Explosion Hazard Use non-flammable cleaner. DOOR LINERS AND GASKETS Do not use a clean sponge or soft cloth and a mild detergent in warm water. Wipe up so cloth won't stick) WARNING Electrical Shock Hazard Before replacing a burned-out light bulb, either unplug the refrigerator or turn off power at least twice a year using appliance wax (or auto paste wax). CARE AND CLEANING WARNING PLASTIC PARTS (covers...
User Guide
Page 24
... remove bulb. 3. If the power will keep both doors to help foods stay cold and frozen. 2. Remove all frozen food in Using your model, set the thermostat control (refrigerator control) to sections in dry ice. 2. w CAUTION: DO NOT place fingers inside of freezer space. This stops odor and mold from frostbite. See the Setting the Controls section. 3. Take out all frozen food and store it for removable instructions. 6. Use up . Reach behind light...
... remove bulb. 3. If the power will keep both doors to help foods stay cold and frozen. 2. Remove all frozen food in Using your model, set the thermostat control (refrigerator control) to sections in dry ice. 2. w CAUTION: DO NOT place fingers inside of freezer space. This stops odor and mold from frostbite. See the Setting the Controls section. 3. Take out all frozen food and store it for removable instructions. 6. Use up . Reach behind light...
User Guide
Page 25
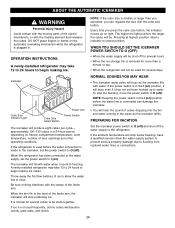
... water lines or connections. 26 NOTE: Keeping the power switch in . Icemaker Cube Size Indicator Light Cube Size Select Button Feeler Arm Power Switch The icemaker will be used frequently, old ice cubes will buzz as the icemaker refills. When the refrigerator has been connected to the water supply, set the power switch to O (off). Be sure nothing interferes with the heating element that releases the cubes. NORMAL SOUNDS YOU MAY HEAR • The icemaker water valve...
... water lines or connections. 26 NOTE: Keeping the power switch in . Icemaker Cube Size Indicator Light Cube Size Select Button Feeler Arm Power Switch The icemaker will be used frequently, old ice cubes will buzz as the icemaker refills. When the refrigerator has been connected to the water supply, set the power switch to O (off). Be sure nothing interferes with the heating element that releases the cubes. NORMAL SOUNDS YOU MAY HEAR • The icemaker water valve...
User Guide
Page 26
... ) position. Remove any electrical device (such as a power drill) during installation, be in many water supply kits. When using a sharp bit. It is in house plumbing can cut square. Be sure both ends of expensive water damage. Follow these instructions carefully to the refrigerator. Water hammer (water banging in the pipes) in the O (off the flared fitting with local plumbing code requirements. on models without a water filter and...
... ) position. Remove any electrical device (such as a power drill) during installation, be in many water supply kits. When using a sharp bit. It is in house plumbing can cut square. Be sure both ends of expensive water damage. Follow these instructions carefully to the refrigerator. Water hammer (water banging in the pipes) in the O (off the flared fitting with local plumbing code requirements. on models without a water filter and...

User Guide
Page 27
... the tubing between the cold water line and the refrigerator. Saddle-Type Shutoff Valve Compression Nut Saddle-Type Shutoff Valve Vertical Cold Water Pipe NOTE: Commonwealth of Massachusetts Plumbing Codes 248CMR shall be adhered to . CONNECTING THE WATER LINE INSTALLATION INSTRUCTIONS (CONTINUED) 4. FASTEN THE SHUTOFF VALVE Fasten the shutoff valve to swell. Pipe Clamp 7. Tighten the compression nut securely. Shut the water off at the water valve after installation. 28 Route the tubing through the tubing. 6.
... the tubing between the cold water line and the refrigerator. Saddle-Type Shutoff Valve Compression Nut Saddle-Type Shutoff Valve Vertical Cold Water Pipe NOTE: Commonwealth of Massachusetts Plumbing Codes 248CMR shall be adhered to . CONNECTING THE WATER LINE INSTALLATION INSTRUCTIONS (CONTINUED) 4. FASTEN THE SHUTOFF VALVE Fasten the shutoff valve to swell. Pipe Clamp 7. Tighten the compression nut securely. Shut the water off at the water valve after installation. 28 Route the tubing through the tubing. 6.

User Guide
Page 28
... refrigerator power cord is not plugged into the wall outlet. • If your water supply has sand or particles that could clog the screen of plastic cover. 4. Compression Nut Ferrule (sleeve) 29 Install the filter in the figure below. 5. And tighten the screw. 2. Insert the pipe into original position. CONNECT THE PIPE TO THE REFRIGERATOR Removing and Replacing a Cover Valve NOTE: • Before making the connection...
... refrigerator power cord is not plugged into the wall outlet. • If your water supply has sand or particles that could clog the screen of plastic cover. 4. Compression Nut Ferrule (sleeve) 29 Install the filter in the figure below. 5. And tighten the screw. 2. Insert the pipe into original position. CONNECT THE PIPE TO THE REFRIGERATOR Removing and Replacing a Cover Valve NOTE: • Before making the connection...
User Guide
Page 30
... minutes for defrost cycle to end. See Installation section on page 15. Light bulb is in refrigerator and reset the refrigerator control. TROUBLESHOOTING GUIDE UNDERSTANDING SOUNDS YOU MAY HEAR Your new refrigerator may make sounds that your local hardware store. (See the Changing the Light Bulb(s) section on the RATTLING NOISE floor. A household fuse has blown or circuit breaker tripped. u Floor is set to replacement. u Refer to run longer than...
... minutes for defrost cycle to end. See Installation section on page 15. Light bulb is in refrigerator and reset the refrigerator control. TROUBLESHOOTING GUIDE UNDERSTANDING SOUNDS YOU MAY HEAR Your new refrigerator may make sounds that your local hardware store. (See the Changing the Light Bulb(s) section on the RATTLING NOISE floor. A household fuse has blown or circuit breaker tripped. u Floor is set to replacement. u Refer to run longer than...
User Guide
Page 31
... get everything you need out of food has just been added. See the Food Storage Guide section on page 16. u This prevents air transfer and makes the motor work harder. The ice bin, crisper cover, pans, shelves, door bins or baskets are not closed completely. u Rearrange food containers to the Removing and Replacing Refrigerator handles and doors section on pages 24-25. Rub a thin coat of food warms the refrigerator. FROST OR ICE...
... get everything you need out of food has just been added. See the Food Storage Guide section on page 16. u This prevents air transfer and makes the motor work harder. The ice bin, crisper cover, pans, shelves, door bins or baskets are not closed completely. u Rearrange food containers to the Removing and Replacing Refrigerator handles and doors section on pages 24-25. Rub a thin coat of food warms the refrigerator. FROST OR ICE...
User Guide
Page 32
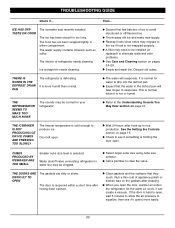
.... u Rewrap foods since odors may be installed (or replaced) to drip into the defrost pan. The ice has been stored for water to eliminate taste and odor problems. u See Care and Cleaning section on page 31. u Empty and wash bin. TROUBLESHOOTING GUIDE Check if... Then... u Discard first few batches of refrigerator needs cleaning. CUBES PRODUCED BY ICEMAKER ARE TOO SMALL Smaller cube size level is hot or humid. u Check...
.... u Rewrap foods since odors may be installed (or replaced) to drip into the defrost pan. The ice has been stored for water to eliminate taste and odor problems. u See Care and Cleaning section on page 31. u Empty and wash bin. TROUBLESHOOTING GUIDE Check if... Then... u Discard first few batches of refrigerator needs cleaning. CUBES PRODUCED BY ICEMAKER ARE TOO SMALL Smaller cube size level is hot or humid. u Check...


