User Guide
Page 1
...(CANADA) Safety Instructions Grounding Requirements Parts and Features Refrigerator Installation Unpacking Your Refrigerator Installation Base Grille Removing and Replacing Your Refrigerator Handles and Doors Leveling and Door Alignment Using Your Refrigerator Ensuring Proper Air Circulation Multi-Flow Setting the Controls... Adjusting Control Settings Food Storage Guide Storing Frozen Food u Refrigerator section Refrigerator Shelves Wine Holder Optibin Crisper TABLE OF CONTENTS 2 Crisper Humidity Control 19 36 Removing Crisper 19 70 ...
...(CANADA) Safety Instructions Grounding Requirements Parts and Features Refrigerator Installation Unpacking Your Refrigerator Installation Base Grille Removing and Replacing Your Refrigerator Handles and Doors Leveling and Door Alignment Using Your Refrigerator Ensuring Proper Air Circulation Multi-Flow Setting the Controls... Adjusting Control Settings Food Storage Guide Storing Frozen Food u Refrigerator section Refrigerator Shelves Wine Holder Optibin Crisper TABLE OF CONTENTS 2 Crisper Humidity Control 19 36 Removing Crisper 19 70 ...
User Guide
Page 2
... ANY WARRANTY OF MERCHANTABILITY OR FITNESS FOR A PARTICULAR PURPOSE. Please call 1-800-243-0000 and choose the appropriate option to locate your LG refrigerator is good only to you may not apply to the original purchaser of precautions in material or workmanship under these excluded circumstances shall be ... used in the United States, including Alaska, Hawaii, and U.S. Box 240007 201 James Record Road Huntsville, Alabama 35824 ATTN: CIC 3 LG REFRIGERATOR LIMITED WARRANTY - USA Your LG Refrigerator will be will repaired or replaced, at : http://www.lgservice.com TO CONTACT...
... ANY WARRANTY OF MERCHANTABILITY OR FITNESS FOR A PARTICULAR PURPOSE. Please call 1-800-243-0000 and choose the appropriate option to locate your LG refrigerator is good only to you may not apply to the original purchaser of precautions in material or workmanship under these excluded circumstances shall be ... used in the United States, including Alaska, Hawaii, and U.S. Box 240007 201 James Record Road Huntsville, Alabama 35824 ATTN: CIC 3 LG REFRIGERATOR LIMITED WARRANTY - USA Your LG Refrigerator will be will repaired or replaced, at : http://www.lgservice.com TO CONTACT...
User Guide
Page 3
... of incidental or consequential damages or limitations on how long an implied warranty lasts; or by phone: Call 1-888-542-2623 (1-888-LG-CANADA) and choose the appropriate prompt. To Obtain Product, Customer, or Service Assistance by accident, vermin, fire, flood, alteration, misues...Commercial use or use , during the warranty period as long as it is provided. Please have product type (refrigerator) and ZIP Code ready. LIMITED WARRANTY (CANADA) LG REFRIGERATOR LG Electronics will repair or at its option replace, without charge, your product which vary from the date of ...
... of incidental or consequential damages or limitations on how long an implied warranty lasts; or by phone: Call 1-888-542-2623 (1-888-LG-CANADA) and choose the appropriate prompt. To Obtain Product, Customer, or Service Assistance by accident, vermin, fire, flood, alteration, misues...Commercial use or use , during the warranty period as long as it is provided. Please have product type (refrigerator) and ZIP Code ready. LIMITED WARRANTY (CANADA) LG REFRIGERATOR LG Electronics will repair or at its option replace, without charge, your product which vary from the date of ...
User Guide
Page 4
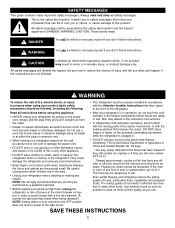
...69 says: ...You may break when being replaced.) NOTE: Setting either the plug or connector end. • When moving parts of the refrigerator. • After your product, basic safety precautions should be killed or seriously injured if you don't follow instructions. It alerts you to ...off power at either or both controls to the OFF position does not remove power to the extremely cold surfaces. • In refrigerators with automatic icemakers, avoid contact with the heating element that any repairs. CAUTION Indicates an imminently hazardous situation which have any food...
...69 says: ...You may break when being replaced.) NOTE: Setting either the plug or connector end. • When moving parts of the refrigerator. • After your product, basic safety precautions should be killed or seriously injured if you don't follow instructions. It alerts you to ...off power at either or both controls to the OFF position does not remove power to the extremely cold surfaces. • In refrigerators with automatic icemakers, avoid contact with the heating element that any repairs. CAUTION Indicates an imminently hazardous situation which have any food...
User Guide
Page 5
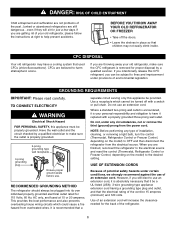
...are getting rid of environmental legislation. CFCs are not problems of installation, cleaning, or removing a light bulb, turn the control (Thermostat, Refrigerator Control or Freezer Control, depending on the model) to the desired setting. If you are still dangerous...even if they will increase the ...clearance needed for just a few days. USE OF EXTENSION CORDS Because of potential safety hazards under provisions of your old refrigerator, make sure the CFC refrigerant is removed for 115 Volts, 60 Hz, AC only, and fused at right to help prevent accidents. DANGER: RISK...
...are getting rid of environmental legislation. CFCs are not problems of installation, cleaning, or removing a light bulb, turn the control (Thermostat, Refrigerator Control or Freezer Control, depending on the model) to the desired setting. If you are still dangerous...even if they will increase the ...clearance needed for just a few days. USE OF EXTENSION CORDS Because of potential safety hazards under provisions of your old refrigerator, make sure the CFC refrigerant is removed for 115 Volts, 60 Hz, AC only, and fused at right to help prevent accidents. DANGER: RISK...

User Guide
Page 6
... N Serve (p.21) F Customcube Icemaker (p.26) G Ice Bin (p.22) H Pull out Drawer (p.23) I D J E F K G Use this page to become more familiar with the parts and features. The refrigerator you have purchased may have some or all of the features shown below . Page references are included for your model.
... N Serve (p.21) F Customcube Icemaker (p.26) G Ice Bin (p.22) H Pull out Drawer (p.23) I D J E F K G Use this page to become more familiar with the parts and features. The refrigerator you have purchased may have some or all of the features shown below . Page references are included for your model.
User Guide
Page 7
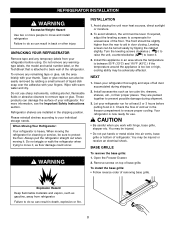
.... 8 The front should be level. Leveling screws can be easily removed by tipping the cabinet slightly. Check the flow of the refrigerator. Your refrigerator is attached to prevent possible damage during shipping. 2. To install the base grille: • Follow reverse order of base grille. ... with hinge, base grille, stopper etc. Remove screws on top of removing base grille. For more people to your refrigerator. UNPACKING YOUR REFRIGERATOR Remove tape and any warningtype labels, the model and serial number label, or the TechSheet that is now ready for cleaning...
.... 8 The front should be level. Leveling screws can be easily removed by tipping the cabinet slightly. Check the flow of the refrigerator. Your refrigerator is attached to prevent possible damage during shipping. 2. To install the base grille: • Follow reverse order of base grille. ... with hinge, base grille, stopper etc. Remove screws on top of removing base grille. For more people to your refrigerator. UNPACKING YOUR REFRIGERATOR Remove tape and any warningtype labels, the model and serial number label, or the TechSheet that is now ready for cleaning...
User Guide
Page 8
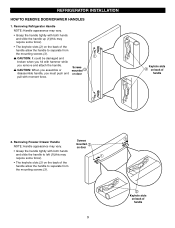
... hands and slide the handle to separate from the mounting screws (3). 1 w CAUTION: It could be damaged and broken when you remove and attach the handle. REFRIGERATOR INSTALLATION HOW TO REMOVE DOOR/DRAWER HANDLES 1. w CAUTION: When you assemble or Screws mounted 3 disassemble handle, you must push and on door pull with hammer...
... hands and slide the handle to separate from the mounting screws (3). 1 w CAUTION: It could be damaged and broken when you remove and attach the handle. REFRIGERATOR INSTALLATION HOW TO REMOVE DOOR/DRAWER HANDLES 1. w CAUTION: When you assemble or Screws mounted 3 disassemble handle, you must push and on door pull with hammer...

User Guide
Page 9
... keyhole slots (4) on the right and left sides of the back of the handle 6 with both hands, press it firmly against the front of handle REFRIGERATOR INSTALLATION HOW TO REPLACE DOOR/DRAWER HANDLES 1. Replacing Refrigerator Door Handle NOTE: Handle appearance may vary.
... keyhole slots (4) on the right and left sides of the back of the handle 6 with both hands, press it firmly against the front of handle REFRIGERATOR INSTALLATION HOW TO REPLACE DOOR/DRAWER HANDLES 1. Replacing Refrigerator Door Handle NOTE: Handle appearance may vary.
User Guide
Page 10
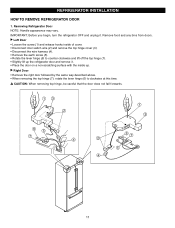
... above. • When removing the top hinge (7), rotate the lever hinge (6) to counter clockwise and lift off the top hinge (7). • Slightly lift up the refrigerator door and remove it . w CAUTION: When removing top hinge, be careful that the door does not fall forwards. 13 2 1 3 6 5 7 4 2 67 5 4 11 u Left Door ... hinge cover (3). • Disconnect the wire harness (4). • Remove the earth screw (5). • Rotate the lever hinge (6) to clockwise at this time. REFRIGERATOR INSTALLATION HOW TO REMOVE REFRIGERATOR DOOR 1. Remove food and any bins from doors. Removing...
... above. • When removing the top hinge (7), rotate the lever hinge (6) to counter clockwise and lift off the top hinge (7). • Slightly lift up the refrigerator door and remove it . w CAUTION: When removing top hinge, be careful that the door does not fall forwards. 13 2 1 3 6 5 7 4 2 67 5 4 11 u Left Door ... hinge cover (3). • Disconnect the wire harness (4). • Remove the earth screw (5). • Rotate the lever hinge (6) to clockwise at this time. REFRIGERATOR INSTALLATION HOW TO REMOVE REFRIGERATOR DOOR 1. Remove food and any bins from doors. Removing...
User Guide
Page 11
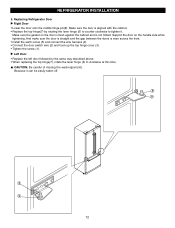
... screw (5) and connect the wire harness (4). • Connect the door switch wire (2) and hook up the top hinge cover (3). • Tighten the screw (1). Because it . REFRIGERATOR INSTALLATION 2. Make sure the door is aligned with the cabinet. • Replace the top hinge(7) by the same way described above. • When replacing the... top hinge(7), rotate the lever hinge (6) to tighten it can be easily taken off. 8 9 8 9 12 w CAUTION: Be careful of missing the washer[part (9)]. Replacing Refrigerator Door u Right Door • Lower the door onto the middle hinge pin(8).
... screw (5) and connect the wire harness (4). • Connect the door switch wire (2) and hook up the top hinge cover (3). • Tighten the screw (1). Because it . REFRIGERATOR INSTALLATION 2. Make sure the door is aligned with the cabinet. • Replace the top hinge(7) by the same way described above. • When replacing the... top hinge(7), rotate the lever hinge (6) to tighten it can be easily taken off. 8 9 8 9 12 w CAUTION: Be careful of missing the washer[part (9)]. Replacing Refrigerator Door u Right Door • Lower the door onto the middle hinge pin(8).

User Guide
Page 12
...; With the drawer pulled out to unhook door supports from each side of drawer. Installing Pullout Drawer • Pull both rails (1) out to full extension. REFRIGERATOR INSTALLATION HOW TO REMOVE AND INSTALL THE PULLOUT DRAWER IMPORTANT: To avoid possible injury, product or property damage, you remove the drawer, do not hold...
...; With the drawer pulled out to unhook door supports from each side of drawer. Installing Pullout Drawer • Pull both rails (1) out to full extension. REFRIGERATOR INSTALLATION HOW TO REMOVE AND INSTALL THE PULLOUT DRAWER IMPORTANT: To avoid possible injury, product or property damage, you remove the drawer, do not hold...
User Guide
Page 13
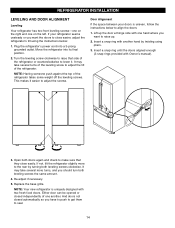
...may take several turns of the leveling screw to adjust the tilt of one another hand by turning both leveling screws clockwise. NOTE: Your new refrigerator is uneven, follow the instructions below : 1. Lift up . 2. Insert a snap ring with one on the left. Re-adjust if ... to align the doors: 1. Open both leveling screws the same amount. 4. Plug the refrigerator's power cord into its final position. 2. REFRIGERATOR INSTALLATION LEVELING AND DOOR ALIGNMENT Leveling Your refrigerator has two front leveling screws-one on the right and one hand where you should turn...
...may take several turns of the leveling screw to adjust the tilt of one another hand by turning both leveling screws clockwise. NOTE: Your new refrigerator is uneven, follow the instructions below : 1. Lift up . 2. Insert a snap ring with one on the left. Re-adjust if ... to align the doors: 1. Open both leveling screws the same amount. 4. Plug the refrigerator's power cord into its final position. 2. REFRIGERATOR INSTALLATION LEVELING AND DOOR ALIGNMENT Leveling Your refrigerator has two front leveling screws-one on the right and one hand where you should turn...
User Guide
Page 14
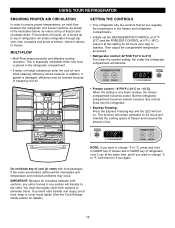
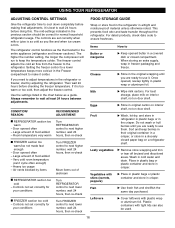
...FLOW • Multi-Flow means powerful and effective cooling operation. In addition, if gasket is forced up to top of escaping cool air. REFRIGERATOR TEMP EXPRESS FREEZING COLDER WARMER 37 °F IS RECOMMENDED • Freezer control: -6°F/9°F (-21°C to stabilize. This function ...will be interrupted and temperature and moisture problems may be lowered because of refrigerator. Do not block any odors formed in one day) to -13°C) When the setting is placed in the illustration below, air ...
...FLOW • Multi-Flow means powerful and effective cooling operation. In addition, if gasket is forced up to top of escaping cool air. REFRIGERATOR TEMP EXPRESS FREEZING COLDER WARMER 37 °F IS RECOMMENDED • Freezer control: -6°F/9°F (-21°C to stabilize. This function ...will be interrupted and temperature and moisture problems may be lowered because of refrigerator. Do not block any odors formed in one day) to -13°C) When the setting is placed in the illustration below, air ...
User Guide
Page 15
... keeps more cold air in the Freezer compartment to keep berries in their original container in a crisper, or store in the refrigerator or freezer, start by items Turn FREEZER control to ensure freshness. Use the settings listed in crisper. Very cold room temperature ... amount of food added - For best storage, place milk on interior shelf, not on door shelf. CONDITION/ REASON: RECOMMENDED ADJUSTMENT: I REFRIGERATOR section too cold - When storing an extra supply, wrap in crisper. Once opened butter in airtight and moisture-proof material unless otherwise noted....
... keeps more cold air in the Freezer compartment to keep berries in their original container in a crisper, or store in the refrigerator or freezer, start by items Turn FREEZER control to ensure freshness. Use the settings listed in crisper. Very cold room temperature ... amount of food added - For best storage, place milk on interior shelf, not on door shelf. CONDITION/ REASON: RECOMMENDED ADJUSTMENT: I REFRIGERATOR section too cold - When storing an extra supply, wrap in crisper. Once opened butter in airtight and moisture-proof material unless otherwise noted....

User Guide
Page 16
... saves energy. 17 Be careful to circulate around packages. Ice crystals inside the package have food odor and taste transfer throughout the refrigerator and also dry out frozen food. NOTE: Allow hot foods to 3 lbs of food per cubic foot of packaging or wrap ...used (airtight and moisture-proof) and the storage temperature. Packaging Successful freezing depends on correct packaging. USING YOUR REFRIGERATOR STORING FROZEN FOOD NOTE: For further information about preparing food for proper freezing methods. When you could have condensed, creating ice crystals....
... saves energy. 17 Be careful to circulate around packages. Ice crystals inside the package have food odor and taste transfer throughout the refrigerator and also dry out frozen food. NOTE: Allow hot foods to 3 lbs of food per cubic foot of packaging or wrap ...used (airtight and moisture-proof) and the storage temperature. Packaging Successful freezing depends on correct packaging. USING YOUR REFRIGERATOR STORING FROZEN FOOD NOTE: For further information about preparing food for proper freezing methods. When you could have condensed, creating ice crystals....
User Guide
Page 17
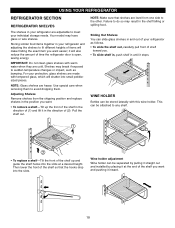
... out and installed by placing it at a desired height. Sliding Out Shelves You can be attached to do so may result in your refrigerator and adjusting the shelves to sudden temperature changes or impact, such as follows. • To slide the shelf out, carefully pull front...exact item you want. • To remove a shelf-Tilt up and guide the shelf hooks into small pebblesized pieces. USING YOUR REFRIGERATOR REFRIGERATOR SECTION REFRIGERATOR SHELVES The shelves in until it stops. Your model may break if exposed to fit different heights of your individual storage needs.
... out and installed by placing it at a desired height. Sliding Out Shelves You can be attached to do so may result in your refrigerator and adjusting the shelves to sudden temperature changes or impact, such as follows. • To slide the shelf out, carefully pull front...exact item you want. • To remove a shelf-Tilt up and guide the shelf hooks into small pebblesized pieces. USING YOUR REFRIGERATOR REFRIGERATOR SECTION REFRIGERATOR SHELVES The shelves in until it stops. Your model may break if exposed to fit different heights of your individual storage needs.
User Guide
Page 18
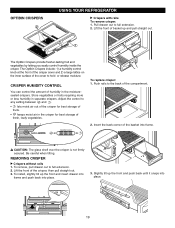
... pull straight out. 1 The Optibin Crispers provide fresher-tasting fruit and vegetables by letting you easily control humidity inside the crisper. OPTIBIN CRISPERS 2 USING YOUR REFRIGERATOR u Crispers with rails To remove crisper: 1. REMOVING CRISPER u Crispers without rails 1. CRISPER HUMIDITY CONTROL You can control the amount of humidity in the crisper for...
... pull straight out. 1 The Optibin Crispers provide fresher-tasting fruit and vegetables by letting you easily control humidity inside the crisper. OPTIBIN CRISPERS 2 USING YOUR REFRIGERATOR u Crispers with rails To remove crisper: 1. REMOVING CRISPER u Crispers without rails 1. CRISPER HUMIDITY CONTROL You can control the amount of humidity in the crisper for...
User Guide
Page 19
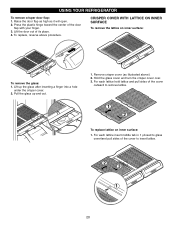
USING YOUR REFRIGERATOR To remove crisper door flap: 1. Lift the door out of the cover to insert lattice. 2 3 1 20 Lift up and out. 1. Remove crisper cover (as it ...
USING YOUR REFRIGERATOR To remove crisper door flap: 1. Lift the door out of the cover to insert lattice. 2 3 1 20 Lift up and out. 1. Remove crisper cover (as it ...
User Guide
Page 20
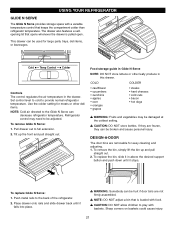
...2. w NOTE: DO NOT adjust a bin that is pulled open. w CAUTION: DO NOT allow children to the back of the refrigerator. 2. USING YOUR REFRIGERATOR GLIDE N SERVE The Glide N Serve provides storage space with baskets. To remove the bin, simply lift the bin up the front ...onto rails and slide drawer back until it falls into place. The drawer also features a selfopening lid that keeps the compartment colder than refrigerator temperature. Refrigerator control may be hurt if door bins are removable for large party trays, deli items, or beverages. To remove Glide N Serve: ...
...2. w NOTE: DO NOT adjust a bin that is pulled open. w CAUTION: DO NOT allow children to the back of the refrigerator. 2. USING YOUR REFRIGERATOR GLIDE N SERVE The Glide N Serve provides storage space with baskets. To remove the bin, simply lift the bin up the front ...onto rails and slide drawer back until it falls into place. The drawer also features a selfopening lid that keeps the compartment colder than refrigerator temperature. Refrigerator control may be hurt if door bins are removable for large party trays, deli items, or beverages. To remove Glide N Serve: ...


