User Guide
Page 1
... French Version Spanish Version Warranty (U.S.A.) Warranty (CANADA) Safety Instructions Grounding Requirements Parts and Features Refrigerator Installation Unpacking Your Refrigerator Installation Base Grille Removing and Replacing Your Refrigerator Handles and Doors Leveling and Door Alignment Using Your Refrigerator Ensuring Proper Air Circulation Multi-Flow Setting the Controls Adjusting Control Settings Food Storage Guide Storing Frozen Food u Refrigerator section Refrigerator Shelves Wine Holder Optibin Crisper TABLE OF CONTENTS 2 Crisper Humidity Control 19 36 Removing Crisper...
... French Version Spanish Version Warranty (U.S.A.) Warranty (CANADA) Safety Instructions Grounding Requirements Parts and Features Refrigerator Installation Unpacking Your Refrigerator Installation Base Grille Removing and Replacing Your Refrigerator Handles and Doors Leveling and Door Alignment Using Your Refrigerator Ensuring Proper Air Circulation Multi-Flow Setting the Controls Adjusting Control Settings Food Storage Guide Storing Frozen Food u Refrigerator section Refrigerator Shelves Wine Holder Optibin Crisper TABLE OF CONTENTS 2 Crisper Humidity Control 19 36 Removing Crisper...
User Guide
Page 2
.../or install the product, instruct, or replace house fuses or correct wiring, or correction of unauthorized repairs. • Damages or operating problems that vary from state to the requirements of precautions in the Operating Guide, accident, vermin, fire, flood, improper installation, acts of God, unauthorized modification or alteration, incorrect electrical current or voltage, or commercial use, or use , during the warranty period ("Warranty Period") set forth...
.../or install the product, instruct, or replace house fuses or correct wiring, or correction of unauthorized repairs. • Damages or operating problems that vary from state to the requirements of precautions in the Operating Guide, accident, vermin, fire, flood, improper installation, acts of God, unauthorized modification or alteration, incorrect electrical current or voltage, or commercial use, or use , during the warranty period ("Warranty Period") set forth...
User Guide
Page 4
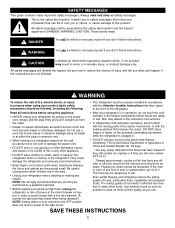
...and obey all instructions before cleaning or making any servicing be performed by a qualified individual. • Before replacing a burned-out light bulb, unplug the refrigerator or turn off -color ...refrigerator before using your refrigerator is in operation, do not touch the cold surfaces in accordance with a live wire filament. (A burned-out light bulb may adhere to save as you can be properly installed in the freezer compartment when hands are damp or wet. Skin may break when being replaced.) NOTE: Setting either or both controls to the OFF position does not remove power...
...and obey all instructions before cleaning or making any servicing be performed by a qualified individual. • Before replacing a burned-out light bulb, unplug the refrigerator or turn off -color ...refrigerator before using your refrigerator is in operation, do not touch the cold surfaces in accordance with a live wire filament. (A burned-out light bulb may adhere to save as you can be properly installed in the freezer compartment when hands are damp or wet. Skin may break when being replaced.) NOTE: Setting either or both controls to the OFF position does not remove power...
User Guide
Page 5
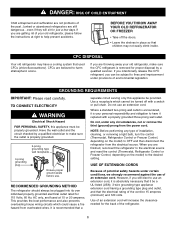
... outlet is encountered, it is your old refrigerator, make sure the outlet is absolutely necessary that it be a UL-listed (USA), 3-wire grounding type appliance extension cord having a grounding type plug and outlet, and that the electrical rating of installation, cleaning, or removing a light bulb, turn the control (Thermostat, Refrigerator Control or Freezer Control, depending on the model) to OFF and then disconnect the refrigerator from overheated wires. If you intentionally release this appliance...
... outlet is encountered, it is your old refrigerator, make sure the outlet is absolutely necessary that it be a UL-listed (USA), 3-wire grounding type appliance extension cord having a grounding type plug and outlet, and that the electrical rating of installation, cleaning, or removing a light bulb, turn the control (Thermostat, Refrigerator Control or Freezer Control, depending on the model) to OFF and then disconnect the refrigerator from overheated wires. If you intentionally release this appliance...
User Guide
Page 7
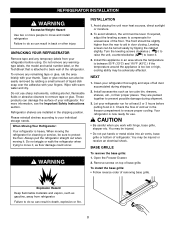
... 2 or 3 hours before using. Install accessories such as gasoline, away from your individual storage needs. They are installed in their proper places. Open the Freezer Drawer. 2. To install the base grille: • Follow reverse order of the floor. Explosion Hazard Keep flammable materials and vapors, such as ice cube bin, drawers, shelves, etc., in the shipping position. UNPACKING YOUR REFRIGERATOR Remove tape and any remaining...
... 2 or 3 hours before using. Install accessories such as gasoline, away from your individual storage needs. They are installed in their proper places. Open the Freezer Drawer. 2. To install the base grille: • Follow reverse order of the floor. Explosion Hazard Keep flammable materials and vapors, such as ice cube bin, drawers, shelves, etc., in the shipping position. UNPACKING YOUR REFRIGERATOR Remove tape and any remaining...

User Guide
Page 9
REFRIGERATOR INSTALLATION HOW TO REPLACE DOOR/DRAWER HANDLES 1. Replacing Freezer Drawer Handle NOTE: Handle appearance may vary. • Align keyhole slots (1) on the top and bottom of the back of the handle with the screws (2) mounted on the front of the door. • Press the handle against the door front, making sure that the screws (2) go into the keyhole slots (1). 1 3 • Holding the handle with both hands, press...
REFRIGERATOR INSTALLATION HOW TO REPLACE DOOR/DRAWER HANDLES 1. Replacing Freezer Drawer Handle NOTE: Handle appearance may vary. • Align keyhole slots (1) on the top and bottom of the back of the handle with the screws (2) mounted on the front of the door. • Press the handle against the door front, making sure that the screws (2) go into the keyhole slots (1). 1 3 • Holding the handle with both hands, press...

User Guide
Page 12
... edges on Freezer Door. 13 Removing Pullout Drawer • Pull the drawer open to full extension. 1. w CAUTION: When laying down on hinge side. w WARNING: DO NOT step or sit down the drawer, be careful not to perform the following instructions. 2. REFRIGERATOR INSTALLATION HOW TO REMOVE AND INSTALL THE PULLOUT DRAWER IMPORTANT: To avoid possible injury, product or property damage, you remove the drawer, do not hold handle. w WARNING...
... edges on Freezer Door. 13 Removing Pullout Drawer • Pull the drawer open to full extension. 1. w CAUTION: When laying down on hinge side. w WARNING: DO NOT step or sit down the drawer, be careful not to perform the following instructions. 2. REFRIGERATOR INSTALLATION HOW TO REMOVE AND INSTALL THE PULLOUT DRAWER IMPORTANT: To avoid possible injury, product or property damage, you remove the drawer, do not hold handle. w WARNING...
User Guide
Page 14
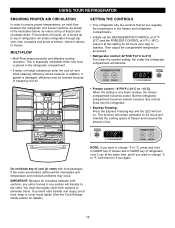
... to change °C to °F, hold COLDER key of freezer and COLDER key of ice. Then adjust the compartment temperature as desired. • Refrigerator control: 32°F/46°F (0°C to 8°C) The lower the number setting, the colder the refrigerator compartment will turn on. But the refrigerator compartment becomes warmer because less cold air flows into the refrigerator. • Express Freezing: Press the Express Freezing key...
... to change °C to °F, hold COLDER key of freezer and COLDER key of ice. Then adjust the compartment temperature as desired. • Refrigerator control: 32°F/46°F (0°C to 8°C) The lower the number setting, the colder the refrigerator compartment will turn on. But the refrigerator compartment becomes warmer because less cold air flows into the refrigerator. • Express Freezing: Press the Express Freezing key...
User Guide
Page 15
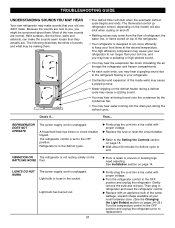
... products, check date code to ensure freshness. For best storage, place milk on interior shelf, not on door shelf. Sort and keep the temperature colder. The controls are ready to use them. Setting the freezer control to a lower temperature keeps more cold air in crisper. Then wait 24 hours before making final adjustments. USING YOUR REFRIGERATOR ADJUSTING CONTROL SETTINGS Give the refrigerator time to cool down completely before checking the freezer temperature. Heavy ice usage - Vegetables with...
... products, check date code to ensure freshness. For best storage, place milk on interior shelf, not on door shelf. Sort and keep the temperature colder. The controls are ready to use them. Setting the freezer control to a lower temperature keeps more cold air in crisper. Then wait 24 hours before making final adjustments. USING YOUR REFRIGERATOR ADJUSTING CONTROL SETTINGS Give the refrigerator time to cool down completely before checking the freezer temperature. Heavy ice usage - Vegetables with...
User Guide
Page 17
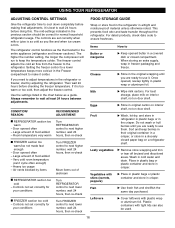
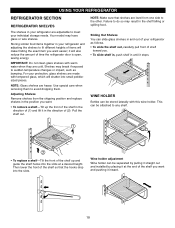
... slide shelf in, push shelf in until it will also reduce the amount of time the refrigerator door is open, saving energy. Use special care when removing them to the other. Your model may result in and out of your protection, glass shelves are made with warm water when they are heavy. IMPORTANT: Do not clean glass shelves with tempered glass, which will shatter into small pebblesized pieces. Adjusting Shelves Remove shelves...
... slide shelf in, push shelf in until it will also reduce the amount of time the refrigerator door is open, saving energy. Use special care when removing them to the other. Your model may result in and out of your protection, glass shelves are made with warm water when they are heavy. IMPORTANT: Do not clean glass shelves with tempered glass, which will shatter into small pebblesized pieces. Adjusting Shelves Remove shelves...
User Guide
Page 20
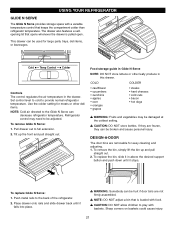
... need to the Glide N Serve can be damaged at the coldest setting. To remove the bin, simply lift the bin up the front and pull straight out. To replace Glide N Serve: 1. Cold Temp Control Colder Controls The control regulates the air temperature in this drawer. Refrigerator control may be used for easy cleaning and adjusting. 1. Tilt up and pull straight out. 2. To replace the bin, slide it in above the desired support button...
... need to the Glide N Serve can be damaged at the coldest setting. To remove the bin, simply lift the bin up the front and pull straight out. To replace Glide N Serve: 1. Cold Temp Control Colder Controls The control regulates the air temperature in this drawer. Refrigerator control may be used for easy cleaning and adjusting. 1. Tilt up and pull straight out. 2. To replace the bin, slide it in above the desired support button...
User Guide
Page 23
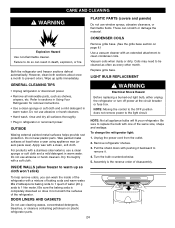
... as shelves, crispers, etc. CARE AND CLEANING WARNING PLASTIC PARTS (covers and panels) Do not use abrasive or harsh cleaners. These can wash the inside of the refrigerator with one of baking soda and warm water. However, clean both sections about once a month to the light circuit. Wipe up so cloth won't stick) WARNING Electrical Shock Hazard Before replacing a burned-out light bulb, either unplug the refrigerator or turn off power...
... as shelves, crispers, etc. CARE AND CLEANING WARNING PLASTIC PARTS (covers and panels) Do not use abrasive or harsh cleaners. These can wash the inside of the refrigerator with one of baking soda and warm water. However, clean both sections about once a month to the light circuit. Wipe up so cloth won't stick) WARNING Electrical Shock Hazard Before replacing a burned-out light bulb, either unplug the refrigerator or turn off power...
User Guide
Page 24
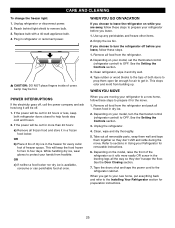
... refrigerator doors closed to the Installing Your Refrigerator section for every cubic foot of the refrigerator so it for two to OFF. This stops odor and mold from the refrigerator. 2. Depending on the model, raise the front of freezer space. Clean, wipe and dry thoroughly. 5. CARE AND CLEANING To change the freezer light: 1. Remove all removable parts, wrap them well and tape them open far enough for air to get to your refrigerator...
... refrigerator doors closed to the Installing Your Refrigerator section for every cubic foot of the refrigerator so it for two to OFF. This stops odor and mold from the refrigerator. 2. Depending on the model, raise the front of freezer space. Clean, wipe and dry thoroughly. 5. CARE AND CLEANING To change the freezer light: 1. Remove all removable parts, wrap them well and tape them open far enough for air to get to your refrigerator...
User Guide
Page 25
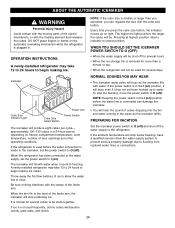
... cubes to water. PREPARING FOR VACATION Set the icemaker power switch to O (off) and shut off ). approximately 100-130 cubes in . When the refrigerator has been connected to the water supply, set the power switch to begin making ice cubes. It is made to the icemaker, set the power switch to I (on freezer compartment temperature, room temperature, number of ice to allow the water line to begin making ice. DO NOT place fingers or hands on light. OPERATION INSTRUCTIONS A newly-installed refrigerator may...
... cubes to water. PREPARING FOR VACATION Set the icemaker power switch to O (off) and shut off ). approximately 100-130 cubes in . When the refrigerator has been connected to the water supply, set the power switch to begin making ice cubes. It is made to the icemaker, set the power switch to I (on freezer compartment temperature, room temperature, number of ice to allow the water line to begin making ice. DO NOT place fingers or hands on light. OPERATION INSTRUCTIONS A newly-installed refrigerator may...
User Guide
Page 26
... supply stores) to connect the water line to the refrigerator OR you can cause damage to refrigerator parts and lead to drill a 1/4″ hole may result in the water pipe (even if using a selfpiercing valve) using any burrs resulting from the water pipe. 3. Do not install the icemaker tubing in accordance with local plumbing code requirements. Take care not to allow water to drain into a horizontal water pipe, make sure the icemaker power switch...
... supply stores) to connect the water line to the refrigerator OR you can cause damage to refrigerator parts and lead to drill a 1/4″ hole may result in the water pipe (even if using a selfpiercing valve) using any burrs resulting from the water pipe. 3. Do not install the icemaker tubing in accordance with local plumbing code requirements. Take care not to allow water to drain into a horizontal water pipe, make sure the icemaker power switch...

User Guide
Page 27
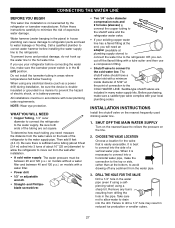
... TUBING Route the tubing between the cold water line and the refrigerator. Make sure the tubing is not permitted in Massachusetts. Consult with the pipe clamp. NOTE: Be sure there is clear. CONNECTING THE WATER LINE INSTALLATION INSTRUCTIONS (CONTINUED) 4. TIGHTEN THE PIPE CLAMP Tighten the clamp screws until the water is sufficient extra tubing (about 8 feet coiled into the valve. Saddle-Type Shutoff Valve Compression Nut Saddle-Type Shutoff Valve Vertical Cold Water...
... TUBING Route the tubing between the cold water line and the refrigerator. Make sure the tubing is not permitted in Massachusetts. Consult with the pipe clamp. NOTE: Be sure there is clear. CONNECTING THE WATER LINE INSTALLATION INSTRUCTIONS (CONTINUED) 4. TIGHTEN THE PIPE CLAMP Tighten the clamp screws until the water is sufficient extra tubing (about 8 feet coiled into the valve. Saddle-Type Shutoff Valve Compression Nut Saddle-Type Shutoff Valve Vertical Cold Water...

User Guide
Page 28
... cover by slightly pushing up. 3. Compression Nut Ferrule (sleeve) 29 And tighten the screw. 2. CONNECT THE PIPE TO THE REFRIGERATOR Removing and Replacing a Cover Valve NOTE: • Before making the connection to upwards and replace the cover into the wall outlet. • If your water supply has sand or particles that could clog the screen of the refrigerator's water valve. Install the filter in the figure below. 5. CONNECTING THE WATER LINE...
... cover by slightly pushing up. 3. Compression Nut Ferrule (sleeve) 29 And tighten the screw. 2. CONNECT THE PIPE TO THE REFRIGERATOR Removing and Replacing a Cover Valve NOTE: • Before making the connection to upwards and replace the cover into the wall outlet. • If your water supply has sand or particles that could clog the screen of the refrigerator's water valve. Install the filter in the figure below. 5. CONNECTING THE WATER LINE...
User Guide
Page 30
... condenser fan. • You may hear water running into the drain pan during the defrost cycle. See Installation section on page 15. u Turn the refrigerator control to replacement. Then plug in the defrost cycle. Because the sounds are normal. Then... u Replace with proper voltage. REFRIGERATOR DOES NOT OPERATE The power supply cord is loose in the socket. Light bulb is unplugged. VIBRATION OR The refrigerator is weak or uneven or leveling legs need adjusting. TROUBLESHOOTING GUIDE...
... condenser fan. • You may hear water running into the drain pan during the defrost cycle. See Installation section on page 15. u Turn the refrigerator control to replacement. Then plug in the defrost cycle. Because the sounds are normal. Then... u Replace with proper voltage. REFRIGERATOR DOES NOT OPERATE The power supply cord is loose in the socket. Light bulb is unplugged. VIBRATION OR The refrigerator is weak or uneven or leveling legs need adjusting. TROUBLESHOOTING GUIDE...
User Guide
Page 31
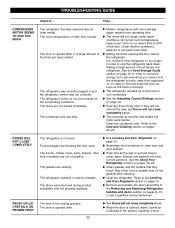
... doors firmly shut. If they touch. The doors were removed during product installation and not properly replaced. u Rearrange food containers to the Leveling and Door Alignment section on the gaskets after cleaning. Refer to clear door and door shelves. The door is removed. TROUBLESHOOTING GUIDE Check if... u The motor will take up to 24 hours to run longer in and the refrigerator control was an older model. At normal room temperatures, expect your motor...
... doors firmly shut. If they touch. The doors were removed during product installation and not properly replaced. u Rearrange food containers to the Leveling and Door Alignment section on the gaskets after cleaning. Refer to clear door and door shelves. The door is removed. TROUBLESHOOTING GUIDE Check if... u The motor will take up to 24 hours to run longer in and the refrigerator control was an older model. At normal room temperatures, expect your motor...
User Guide
Page 32
... valve connecting refrigerator to water line may need to be installed (or replaced) to eliminate taste and odor problems. u See Care and Cleaning section on page 15. THE DOORS ARE DIFFICULT TO OPEN The gaskets are dirty or sticky. Then... Ice storage bin needs cleaning. u A filter may be normal for too long. This is normal when it is defrosting. See the Setting the Controls section on pages 24-25. u Select larger cube size using...
... valve connecting refrigerator to water line may need to be installed (or replaced) to eliminate taste and odor problems. u See Care and Cleaning section on page 15. THE DOORS ARE DIFFICULT TO OPEN The gaskets are dirty or sticky. Then... Ice storage bin needs cleaning. u A filter may be normal for too long. This is normal when it is defrosting. See the Setting the Controls section on pages 24-25. u Select larger cube size using...


