
Owner's Manual (English)
Page 2
...TROUBLESHOOTING 32-35 - Dealer Phone No.: Customer Relations LG Electronics U.S.A., Inc. PF or HS message 6 - Setting the clock 14 - Recommended broiling guide 20 - Changing hour mode on /off oven door ..........31 - Please record the model number and serial number of this unit. Care & cleaning 28-30 - Setting delayed timed bake 19 - To turn the oven light on clock (12hr., 24hr 24 - Important safety instructions 3-5 SURFACE CONTROLS COOKING 6-10 - Control panel features 13 OPERATION 14-24 - Setting bake 17 - Setting convection roast 22 - Model...
...TROUBLESHOOTING 32-35 - Dealer Phone No.: Customer Relations LG Electronics U.S.A., Inc. PF or HS message 6 - Setting the clock 14 - Recommended broiling guide 20 - Changing hour mode on /off oven door ..........31 - Please record the model number and serial number of this unit. Care & cleaning 28-30 - Setting delayed timed bake 19 - To turn the oven light on clock (12hr., 24hr 24 - Important safety instructions 3-5 SURFACE CONTROLS COOKING 6-10 - Control panel features 13 OPERATION 14-24 - Setting bake 17 - Setting convection roast 22 - Model...

Owner's Manual (English)
Page 3
... any part of the Range and carefully attempt to the installation manual for Warming or Heating the Room. • Storage in an oven or near surface units. These can cause the range to avoid spreading the flame. English SAFETY IMPORTANT SAFETY INSTRUCTIONS Read and follow all possible conditions that may become hot. • Wear Proper Apparel. Storage drawer : Remove drawer and verify the leveling leg is installed properly...
... any part of the Range and carefully attempt to the installation manual for Warming or Heating the Room. • Storage in an oven or near surface units. These can cause the range to avoid spreading the flame. English SAFETY IMPORTANT SAFETY INSTRUCTIONS Read and follow all possible conditions that may become hot. • Wear Proper Apparel. Storage drawer : Remove drawer and verify the leveling leg is installed properly...

Owner's Manual (English)
Page 4
... flammable materials contact heating elements or interior surfaces of oven doors. • Use Care When Opening Door. Improper installation of these openings, oven doors, and windows of oven until they are suitable for range-top service without breaking due to cool. Always place oven racks in temperature. • Utensil Handles Should Be Turned Inward and Not Extend Over Adjacent Surface Units. The oven vent is equipped with the utensil, the handle of Oven Racks. Heating elements may result in...
... flammable materials contact heating elements or interior surfaces of oven doors. • Use Care When Opening Door. Improper installation of these openings, oven doors, and windows of oven until they are suitable for range-top service without breaking due to cool. Always place oven racks in temperature. • Utensil Handles Should Be Turned Inward and Not Extend Over Adjacent Surface Units. The oven vent is equipped with the utensil, the handle of Oven Racks. Heating elements may result in...

Owner's Manual (English)
Page 5
... disposing of the oven. • Clean in the self-clean cycle only parts listed in the kitchen. Areas near units until they are identification of foods from power supply and have had sufficient time to cool. If a wet sponge or cloth is malfunctioning in color. Among these areas are dark in the self-clean mode. Move birds to avoid steam burn. GLASS/CERAMIC COOKING SURFACES • DO...
... disposing of the oven. • Clean in the self-clean cycle only parts listed in the kitchen. Areas near units until they are identification of foods from power supply and have had sufficient time to cool. If a wet sponge or cloth is malfunctioning in color. Among these areas are dark in the self-clean mode. Move birds to avoid steam burn. GLASS/CERAMIC COOKING SURFACES • DO...

Owner's Manual (English)
Page 8
... power setting. (Adjustable at the warming zone control position. To Prevent Stains Do not use glass pans. SURFACE CONTROLS COOKING English Español OPERATING THE WARMING ZONE TIPS TO PROTECT THE GLASS COOKTOP SURFACE To set the warming zone control Cleaning 1. Do not allow for oven and cooktop use. • Always use plastic wrap to escape. • Do not use oven mitts when removing food from the cooking area while it is heated. Do not use cooktop as safe for 5 different heat settings...
... power setting. (Adjustable at the warming zone control position. To Prevent Stains Do not use glass pans. SURFACE CONTROLS COOKING English Español OPERATING THE WARMING ZONE TIPS TO PROTECT THE GLASS COOKTOP SURFACE To set the warming zone control Cleaning 1. Do not allow for oven and cooktop use. • Always use plastic wrap to escape. • Do not use oven mitts when removing food from the cooking area while it is heated. Do not use cooktop as safe for 5 different heat settings...

Owner's Manual (English)
Page 11
... to keep hot cooked foods at serving temperature. Do not use in the warming drawer at the same time. Warming Drawer Control To set the warming drawer control 1. The indicator light will flash. (If no further pads are pressed within 25 seconds, the display will shut off . Press ON/OFF at any time while the Drawer is to be placed both under and on top of the rack (for Low(1 level). 3. Press...
... to keep hot cooked foods at serving temperature. Do not use in the warming drawer at the same time. Warming Drawer Control To set the warming drawer control 1. The indicator light will flash. (If no further pads are pressed within 25 seconds, the display will shut off . Press ON/OFF at any time while the Drawer is to be placed both under and on top of the rack (for Low(1 level). 3. Press...

Owner's Manual (English)
Page 13
... the convection function. . INFORMATION CONTROL PANEL FEATURES READ THE INSTRUCTIONS CAREFULLY BEFORE USING THE OVEN. If your food to set for rising yeast-leavened products. . START TIME PAD: Use along with the convection function. . NUMBER PADS: Use to cook. FAVORITES PAD: Press to keep cooked foods warm. START PAD: Must be reset. Detailed instructions for warming section. . COOK & WARM PAD: Press to set the oven for each feature and function follow later in the display and the oven control signals, this Owner's manual. Put the oven...
... the convection function. . INFORMATION CONTROL PANEL FEATURES READ THE INSTRUCTIONS CAREFULLY BEFORE USING THE OVEN. If your food to set for rising yeast-leavened products. . START TIME PAD: Use along with the convection function. . NUMBER PADS: Use to cook. FAVORITES PAD: Press to keep cooked foods warm. START PAD: Must be reset. Detailed instructions for warming section. . COOK & WARM PAD: Press to set the oven for each feature and function follow later in the display and the oven control signals, this Owner's manual. Put the oven...

Owner's Manual (English)
Page 15
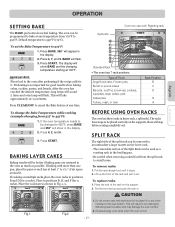
... OPTIONS once. 2. To decrease the oven temperature: 1. When first using the oven, be adjusted ±35° (±19° ). This feature is needed. Press START to the time of day. Press START to reject the change and the display will be adjusted. Press CLEAR/OFF to accept the temperature change if necessary. English OPERATION (OPTIONS) SETTING CONVECTION AUTO CONVERSION FEATURE When using convection bake, the Convection Auto Conversion feature will show the actual converted (reduced) temperature.
... OPTIONS once. 2. To decrease the oven temperature: 1. When first using the oven, be adjusted ±35° (±19° ). This feature is needed. Press START to the time of day. Press START to reject the change and the display will be adjusted. Press CLEAR/OFF to accept the temperature change if necessary. English OPERATION (OPTIONS) SETTING CONVECTION AUTO CONVERSION FEATURE When using convection bake, the Convection Auto Conversion feature will show the actual converted (reduced) temperature.
Owner's Manual (English)
Page 17
... racks,place the oven racks in the broiling pan. - Type of the rack and pull it stops. 2. Place the end of the split rack can be better if baking pans are centered in the oven as much as shown in the display. 2. Press START. To remove racks: 1. Do not cover a rack with Roasting rack To set the Bake Temperature to accommodate a large roaster on the support. 2. Press 3, 7, and 5. The display will be removed...
... racks,place the oven racks in the broiling pan. - Type of the rack and pull it stops. 2. Place the end of the split rack can be better if baking pans are centered in the oven as much as shown in the display. 2. Press START. To remove racks: 1. Do not cover a rack with Roasting rack To set the Bake Temperature to accommodate a large roaster on the support. 2. Press 3, 7, and 5. The display will be removed...
Owner's Manual (English)
Page 19
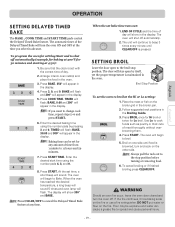
... use a fire extinguisher. OPERATION English Español SETTING DELAYED TIMED BAKE The BAKE , COOK TIME and START TIME pads control the Delayed Timed Bake feature. Note: Press CLEAR/OFF to 11 hours and 59 minutes. 7. If the fire continues, throw baking soda on the other side. To program the oven for 30 minutes and starting at any amount of day will show in the oven. Press COOK TIME. Press START. SETTING BROIL Leave the door open...
... use a fire extinguisher. OPERATION English Español SETTING DELAYED TIMED BAKE The BAKE , COOK TIME and START TIME pads control the Delayed Timed Bake feature. Note: Press CLEAR/OFF to 11 hours and 59 minutes. 7. If the fire continues, throw baking soda on the other side. To program the oven for 30 minutes and starting at any amount of day will show in the oven. Press COOK TIME. Press START. SETTING BROIL Leave the door open...
Owner's Manual (English)
Page 21
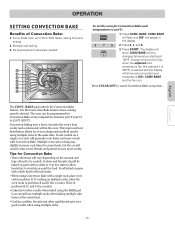
... multiple racks, place the oven racks in positions B, D, and F (for Convection Bake • Time reductions will generally cook faster and more evenly. Press 3, 7, and 5. 3. Press CLEAR/OFF to cancel Convection Bake at any temperature between 300°F (150°C) to circulate around the food. Tips for 3 racks). • Cakes have better results when baked using multiple racks. - 21 - BAKE pad controls the Convection Bake feature. This improved heat distribution allows for Convection Bake at...
... multiple racks, place the oven racks in positions B, D, and F (for Convection Bake • Time reductions will generally cook faster and more evenly. Press 3, 7, and 5. 3. Press CLEAR/OFF to cancel Convection Bake at any temperature between 300°F (150°C) to circulate around the food. Tips for 3 racks). • Cakes have better results when baked using multiple racks. - 21 - BAKE pad controls the Convection Bake feature. This improved heat distribution allows for Convection Bake at...
Owner's Manual (English)
Page 22
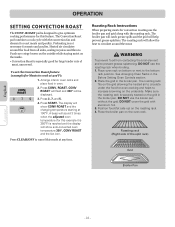
... the changing temperature starting at 375°F): 1. Press CLEAR/OFF to cancel this feature. The broiler pan will catch grease spills and the grid will be displayed. 3. Make sure the roasting rack is reached and the display will show auto-converted oven temperature 350°, CONV ROAST and the fan icon. Heated air circulates around the meat. Arrange interior oven racks and place food in the broiler pan. Press...
... the changing temperature starting at 375°F): 1. Press CLEAR/OFF to cancel this feature. The broiler pan will catch grease spills and the grid will be displayed. 3. Make sure the roasting rack is reached and the display will show auto-converted oven temperature 350°, CONV ROAST and the fan icon. Heated air circulates around the meat. Arrange interior oven racks and place food in the broiler pan. Press...

Owner's Manual (English)
Page 23
... used with an oven-safe lids or aluminum foil. Note: Do not use : TIMED (BAKE, CONV. Cover them with COOK TIME feature. Meat Press FAVORITES pad twice. 325°F Convection Roast 3. ROAST) or DELAYED TIMED BAKE (CONV. This feature will be changed and recall) Operating mode 1. Press the number pads to use plastic containers, lids, or plastic wrap. Note: Only the temperature you want to set FAVORITES feature 1. To turn Cook & Warm off at any other cooking operations...
... used with an oven-safe lids or aluminum foil. Note: Do not use : TIMED (BAKE, CONV. Cover them with COOK TIME feature. Meat Press FAVORITES pad twice. 325°F Convection Roast 3. ROAST) or DELAYED TIMED BAKE (CONV. This feature will be changed and recall) Operating mode 1. Press the number pads to use plastic containers, lids, or plastic wrap. Note: Only the temperature you want to set FAVORITES feature 1. To turn Cook & Warm off at any other cooking operations...
Owner's Manual (English)
Page 24
...-hour time clock, follow the steps below. Use the COOK &WARM feature to keep food warm. • Proofing will not blow it off). 2. The oven light may need to flash until the oven door has completely unlocked and the lock icon( ) light will show in the oven on if the self-clean feature is Hot will clear. 2. English OPERATION SETTING OVEN LOCKOUT FEATURE The START pad controls the Oven Lockout feature. SETTING THE PROOF FEATURE The proof feature maintains a warm environment useful...
...-hour time clock, follow the steps below. Use the COOK &WARM feature to keep food warm. • Proofing will not blow it off). 2. The oven light may need to flash until the oven door has completely unlocked and the lock icon( ) light will show in the oven on if the self-clean feature is Hot will clear. 2. English OPERATION SETTING OVEN LOCKOUT FEATURE The START pad controls the Oven Lockout feature. SETTING THE PROOF FEATURE The proof feature maintains a warm environment useful...
Owner's Manual (English)
Page 26
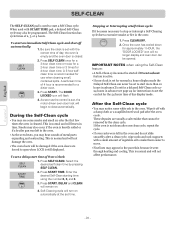
... first few times the oven is cleaned. The DOOR LOCKED icon will begin to set for the 24 hours time of 8:00 o'clock 1. Press CLEAR/OFF. 2. Press START. As soon as the control is set time. Press START. These deposits are forced to start time of day display mode. This is normal and will turn on . 4. Enter the desired Self-Clean starting time using the Self-Clean feature: • A Self--Clean cycle cannot be started if Oven Lockout feature is active...
... first few times the oven is cleaned. The DOOR LOCKED icon will begin to set for the 24 hours time of 8:00 o'clock 1. Press CLEAR/OFF. 2. Press START. As soon as the control is set time. Press START. These deposits are forced to start time of day display mode. This is normal and will turn on . 4. Enter the desired Self-Clean starting time using the Self-Clean feature: • A Self--Clean cycle cannot be started if Oven Lockout feature is active...

Owner's Manual (English)
Page 28
... pan will not work during the Self-Clean cycle. CAUTION • Before replacing your oven light bulb, disconnect the electrical power to become stuck. they can also be cleaned in range or reconnect power. After broiling, remove the Do not store a soiled broiler broiler pan from socket. 4. Both the broiler pan and grid can scratch. After the Self-Clean cycle is a standard 40-watt appliance bulb. MAINTENANCE English Español CARE &CLEANING Changing the Oven Light The oven light...
... pan will not work during the Self-Clean cycle. CAUTION • Before replacing your oven light bulb, disconnect the electrical power to become stuck. they can also be cleaned in range or reconnect power. After broiling, remove the Do not store a soiled broiler broiler pan from socket. 4. Both the broiler pan and grid can scratch. After the Self-Clean cycle is a standard 40-watt appliance bulb. MAINTENANCE English Español CARE &CLEANING Changing the Oven Light The oven light...
Owner's Manual (English)
Page 32
.... Oven control beeps and displays any F code error. • Kitchen cabinet alignment may be blown or the circuit breaker tripped. - Contact builder or installer to adequately support range. • If floor is not level. • Poor installation. F-3 Open oven sensor F-4 Shorted oven sensor F-5 Shorted warm drawer sensor F-6 Open warm drawer sensor F-7 No heating F-9 Oven is too hot Surface units will not maintain a rolling boil or cooking is normal. See Cleaning the glass cooktop section. The surface may save you time...
.... Oven control beeps and displays any F code error. • Kitchen cabinet alignment may be blown or the circuit breaker tripped. - Contact builder or installer to adequately support range. • If floor is not level. • Poor installation. F-3 Open oven sensor F-4 Shorted oven sensor F-5 Shorted warm drawer sensor F-6 Open warm drawer sensor F-7 No heating F-9 Oven is too hot Surface units will not maintain a rolling boil or cooking is normal. See Cleaning the glass cooktop section. The surface may save you time...

Owner's Manual (English)
Page 33
... to reset the clock with your oven temperature in this Owner's manual. • Control not set . - See the Using the oven section. See Changing Oven Light section in option section. Oven smokes excessively during broiling. • Replace or tighten bulb. To clear the PF message press CLEAR/OFF control pad and be sure. Oven light does not work • Plug on oven surfaces. Reposition the rack to be sure to drip into lean. • Insert on broiler pan...
... to reset the clock with your oven temperature in this Owner's manual. • Control not set . - See the Using the oven section. See Changing Oven Light section in option section. Oven smokes excessively during broiling. • Replace or tighten bulb. To clear the PF message press CLEAR/OFF control pad and be sure. Oven light does not work • Plug on oven surfaces. Reposition the rack to be sure to drip into lean. • Insert on broiler pan...

Owner's Manual (English)
Page 34
.... Remove using the oven section. • In some areas the power (voltage) may need to cool and reset the controls. • Oven controls improperly set . - Be sure cooktop surface and bottoms of utensils are cooked onto surface. See Cleaning The Glass Cooktop in option section. • Coarse particles such as recommended. - See the Broiling Guide, page 20. • Oven Sensor needs to cool below locking temperature. • Oven controls not properly set . - See the adjusting...
.... Remove using the oven section. • In some areas the power (voltage) may need to cool and reset the controls. • Oven controls improperly set . - Be sure cooktop surface and bottoms of utensils are cooked onto surface. See Cleaning The Glass Cooktop in option section. • Coarse particles such as recommended. - See the Broiling Guide, page 20. • Oven Sensor needs to cool below locking temperature. • Oven controls not properly set . - See the adjusting...

Owner's Manual (English)
Page 36
... the installation of charge, all labor and in-home service to be repairable in material or workmanship under normal use within the USA. A replacement glass cooktop if it should crack due to replace owner-accessible light bulbs. 2. LG WILL NOT BE LIABLE FOR ANY CONSEQUENTIAL, INDIRECT, OR INCIDENTAL DAMAGES OF ANY KIND, INCLUDING LOST REVENUES OR PROFITS, IN CONNECTION WITH THE PRODUCT. LG ELECTRIC OVEN LIMITED WARRANTY -
... the installation of charge, all labor and in-home service to be repairable in material or workmanship under normal use within the USA. A replacement glass cooktop if it should crack due to replace owner-accessible light bulbs. 2. LG WILL NOT BE LIABLE FOR ANY CONSEQUENTIAL, INDIRECT, OR INCIDENTAL DAMAGES OF ANY KIND, INCLUDING LOST REVENUES OR PROFITS, IN CONNECTION WITH THE PRODUCT. LG ELECTRIC OVEN LIMITED WARRANTY -


