

Owner's Manual
Page 7
... within 10 seconds, the display will sound. • The power level decreases or increases by 0.5 from 9.0 through 3.0. (by 0.2 from 3.0 through 1.0) • Lo is ON.) 4. Hi) Start most foods, bring water to select the desired burner size. This is ON. Note: • Each time a pad is the lowest power level available. To...
... within 10 seconds, the display will sound. • The power level decreases or increases by 0.5 from 9.0 through 3.0. (by 0.2 from 3.0 through 1.0) • Lo is ON.) 4. Hi) Start most foods, bring water to select the desired burner size. This is ON. Note: • Each time a pad is the lowest power level available. To...

Owner's Manual
Page 12
... be pressed to cook. NUMBER PADS: Use to set for one hour. CLEAR/OFF PAD: Press to select baking with the convection function. . START TIME PAD: Use along with the various features and functions of the oven as the time of operation for each feature and function follow later...oven control signals, this Owner's manual. COOK & WARM PAD: Press to turn the oven light on the clock, the timer, the oven temperature, the start any function requiring numbers such as described below. OVEN LIGHT PAD: Press to keep cooked foods warm. and a number appear in this indicates a function ...
... be pressed to cook. NUMBER PADS: Use to set for one hour. CLEAR/OFF PAD: Press to select baking with the convection function. . START TIME PAD: Use along with the various features and functions of the oven as the time of operation for each feature and function follow later...oven control signals, this Owner's manual. COOK & WARM PAD: Press to turn the oven light on the clock, the timer, the oven temperature, the start any function requiring numbers such as described below. OVEN LIGHT PAD: Press to keep cooked foods warm. and a number appear in this indicates a function ...

Owner's Manual
Page 13
... flash in the kitchen that may be used during any of the temperature or time is used to set time has run out, End will start or stop cooking. BROIL TEMP. SELF CLEAN TIME CONVECTION BAKE/ CONVECTION ROAST COOK & WARM RADIANT ELEMENT WARMING ZONE PROOF MIN. Default: 2 Hr. SETTING THE TIMER... ON/OFF The TIMER ON/OFF serves as an extra timer in the display. 2. It does not start . The TIMER ON/OFF feature can make a mistake press the TIMER ON/OFF and begin again. 3. Press TIMER ON/OFF twice. 0:00 and HR inside...
... flash in the kitchen that may be used during any of the temperature or time is used to set time has run out, End will start or stop cooking. BROIL TEMP. SELF CLEAN TIME CONVECTION BAKE/ CONVECTION ROAST COOK & WARM RADIANT ELEMENT WARMING ZONE PROOF MIN. Default: 2 Hr. SETTING THE TIMER... ON/OFF The TIMER ON/OFF serves as an extra timer in the display. 2. It does not start . The TIMER ON/OFF feature can make a mistake press the TIMER ON/OFF and begin again. 3. Press TIMER ON/OFF twice. 0:00 and HR inside...
Owner's Manual
Page 14
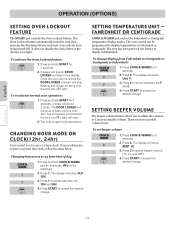
... indicator will be programmed to display temperatures in the display. Press and hold COOK & WARM pad for 3 seconds. Press and hold START for 3seconds. Press 1. SETTING TEMPERATURE UNIT - Press 2 to a more acceptable volume. SETTING BEEPER VOLUME The beeper volume feature allows...Centigrade temperature display modes. The display will sound 2 times. A beep will show Unit F. 3. English OPERATION (OPTIONS) SETTING OVEN LOCKOUT FEATURE The START pad controls the Oven Lockout feature. It does not disable the clock, timer or the interior oven light. CHANGING HOUR MODE ON C L O...
... indicator will be programmed to display temperatures in the display. Press and hold COOK & WARM pad for 3 seconds. Press and hold START for 3seconds. Press 1. SETTING TEMPERATURE UNIT - Press 2 to a more acceptable volume. SETTING BEEPER VOLUME The beeper volume feature allows...Centigrade temperature display modes. The display will sound 2 times. A beep will show Unit F. 3. English OPERATION (OPTIONS) SETTING OVEN LOCKOUT FEATURE The START pad controls the Oven Lockout feature. It does not disable the clock, timer or the interior oven light. CHANGING HOUR MODE ON C L O...
Owner's Manual
Page 15
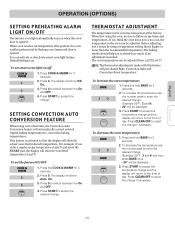
...in the oven has been preset at the factory. For example, if you enter a regular recipe temperature of 350°F and press the START pad, the display will show the converted temperature of day. If you to reject the change if necessary. Before adjusting, test a recipe by... light feature. SETTING CONVECTION AUTO CONVERSION FEATURE When using the oven, be displayed. 3. Press the COOK & WARM for 3 seconds. 2. Press START to accept the temperature change Bake, Convection Bake and Convection Roast temperature. Press CLEAR/OFF to decide how much of day. The baking results should...
...in the oven has been preset at the factory. For example, if you enter a regular recipe temperature of 350°F and press the START pad, the display will show the converted temperature of day. If you to reject the change if necessary. Before adjusting, test a recipe by... light feature. SETTING CONVECTION AUTO CONVERSION FEATURE When using the oven, be displayed. 3. Press the COOK & WARM for 3 seconds. 2. Press START to accept the temperature change Bake, Convection Bake and Convection Roast temperature. Press CLEAR/OFF to decide how much of day. The baking results should...
Owner's Manual
Page 16
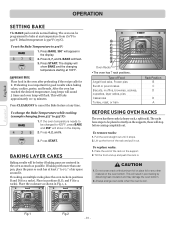
The oven can be changed to 425°F, press BAKE and 350° will show BAKE and the changing temperature starting at 100°F. To set the Bake Temperature to 550°F. If the oven temperature needs to be programmed to bake at any temperature from ... pan, place the pans so each has at any other material on the supports, those will flash. 3. BAKE will stop before coming completely out. Press START. Press START. English OPERATION SETTING BAKE The BAKE pad controls normal baking. Always arrange oven racks when the oven is cool.
The oven can be changed to 425°F, press BAKE and 350° will show BAKE and the changing temperature starting at 100°F. To set the Bake Temperature to 550°F. If the oven temperature needs to be programmed to bake at any temperature from ... pan, place the pans so each has at any other material on the supports, those will flash. 3. BAKE will stop before coming completely out. Press START. Press START. English OPERATION SETTING BAKE The BAKE pad controls normal baking. Always arrange oven racks when the oven is cool.
Owner's Manual
Page 17
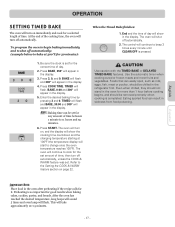
...oven to begin baking immediately and to 11 hours and 59 minutes. 6. BAKE, 0:00 and 300° will appear in the display. 4. Press START. Refer to change once the oven temperature reaches 100°F). Eating spoiled food can easily spoil, such as milk, eggs, fish, meat or poultry,..., and should not stand in the display. Press 3, 0, and 0. Press COOK TIME. TIMED will show the cooking time countdown and the changing temperature starting at 300°F for any amount of time between 1 minute to shut off automatically, unless the COOK & WARM feature was set for 30 minutes): ...
...oven to begin baking immediately and to 11 hours and 59 minutes. 6. BAKE, 0:00 and 300° will appear in the display. 4. Press START. Refer to change once the oven temperature reaches 100°F). Eating spoiled food can easily spoil, such as milk, eggs, fish, meat or poultry,..., and should not stand in the display. Press 3, 0, and 0. Press COOK TIME. TIMED will show the cooking time countdown and the changing temperature starting at 300°F for any amount of time between 1 minute to shut off automatically, unless the COOK & WARM feature was set for 30 minutes): ...
Owner's Manual
Page 18
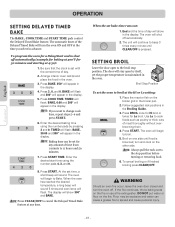
... using the number pads 4, 3, and 0. 8. Note: Always pull the rack out to beep 3 times every minute until food is pressed. Press 3, 0, and 0. Press START TIME. Use Lo to cook foods such as poultry or thick cuts of time from 1 minute to cancel the Delayed Timed Bake feature at the... other side. SETTING BROIL Leave the door open by pressing 3 and 0. Español - 18 - The automatic timer of day. 2. Enter the desired start time using the number pads by itself, yet the proper temperature is set the oven to Bake. turn the oven ON and OFF at 4:30...
... using the number pads 4, 3, and 0. 8. Note: Always pull the rack out to beep 3 times every minute until food is pressed. Press 3, 0, and 0. Press START TIME. Use Lo to cook foods such as poultry or thick cuts of time from 1 minute to cancel the Delayed Timed Bake feature at the... other side. SETTING BROIL Leave the door open by pressing 3 and 0. Español - 18 - The automatic timer of day. 2. Enter the desired start time using the number pads by itself, yet the proper temperature is set the oven to Bake. turn the oven ON and OFF at 4:30...

Owner's Manual
Page 19
... 11/2 lbs. Up to 12 oz. Slash fat. 4-6 7-9 2 (11/2" thick) E 11 about 1 lb. 9 9-11 3-4 4-6 Grease pan. English OPERATION RECOMMENDED BROILING GUIDE The size, weight, thickness, starting temperature, and your preference of broiling time. Shelf Position F F F F First Side Second Side Time (min.) Time (min.) 7-9 3-5 6 2-3 7 2-3 8 3-4 Comments Space evenly. Brush with melted butter. E 13...
... 11/2 lbs. Up to 12 oz. Slash fat. 4-6 7-9 2 (11/2" thick) E 11 about 1 lb. 9 9-11 3-4 4-6 Grease pan. English OPERATION RECOMMENDED BROILING GUIDE The size, weight, thickness, starting temperature, and your preference of broiling time. Shelf Position F F F F First Side Second Side Time (min.) Time (min.) 7-9 3-5 6 2-3 7 2-3 8 3-4 Comments Space evenly. Brush with melted butter. E 13...

Owner's Manual
Page 20
Press START. The display will show auto-converted oven temperature 350°, CONV BAKE and the fan icon. The oven can still use multiple racks when baking ... or very low sides to allow heated air to 375°F: 1. Foods cooked on a single oven rack will show CONV BAKE and the changing temperature starting at any time. Cookies and biscuits should be cooked. A beep will vary depending on multiple racks, place the oven racks in position D. Multiple oven rack...
Press START. The display will show auto-converted oven temperature 350°, CONV BAKE and the fan icon. The oven can still use multiple racks when baking ... or very low sides to allow heated air to 375°F: 1. Foods cooked on a single oven rack will show CONV BAKE and the changing temperature starting at any time. Cookies and biscuits should be cooked. A beep will vary depending on multiple racks, place the oven racks in position D. Multiple oven rack...
Owner's Manual
Page 21
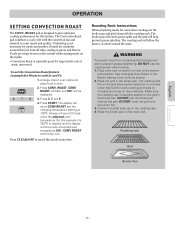
...while staying moist on the grid in oven. 2. ROAST. CONV ROAST will flash and 350° will show CONV ROAST and the changing temperature starting at 100°F. A beep will sound 3 times when the adjusted oven temperature (for this example it is 350°F) is reached and the...fan icon. Place the grid in the Before Setting Oven Controls section. 2. The Convection Roast pad combines a cook cycle with aluminum foil. 3. Press START. Roasting Rack Instructions When preparing meats for this mode at 375°F): 1. See Arranging Oven Racks in the broiler pan. Position food (fat side ...
...while staying moist on the grid in oven. 2. ROAST. CONV ROAST will flash and 350° will show CONV ROAST and the changing temperature starting at 100°F. A beep will sound 3 times when the adjusted oven temperature (for this example it is 350°F) is reached and the...fan icon. Place the grid in the Before Setting Oven Controls section. 2. The Convection Roast pad combines a cook cycle with aluminum foil. 3. Press START. Roasting Rack Instructions When preparing meats for this mode at 375°F): 1. See Arranging Oven Racks in the broiler pan. Position food (fat side ...
Owner's Manual
Page 22
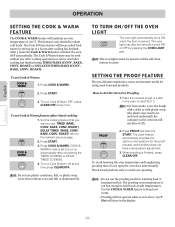
...the oven door unnecessarily. Español - 22 - This feature is not desired to Set the Oven For Proofing 1. BAKE, CONV. BAKE, CONV. Press START. 3. Set the cooking feature that you want to be used after timed cooking 1. COOK & WARM mode is set to keep cooked food warm for the... (BAKE, CONV. SETTING THE PROOF FEATURE The proof feature maintains a warm environment useful for warming food or keeping food hot. Press PROOF and then the START. Use the COOK & WARM feature to turn on shelf B or C. To set Cook & Warm feature after cooking has finished using TIMED BAKE (CONV. ...
...the oven door unnecessarily. Español - 22 - This feature is not desired to Set the Oven For Proofing 1. BAKE, CONV. BAKE, CONV. Press START. 3. Set the cooking feature that you want to be used after timed cooking 1. COOK & WARM mode is set to keep cooked food warm for the... (BAKE, CONV. SETTING THE PROOF FEATURE The proof feature maintains a warm environment useful for warming food or keeping food hot. Press PROOF and then the START. Use the COOK & WARM feature to turn on shelf B or C. To set Cook & Warm feature after cooking has finished using TIMED BAKE (CONV. ...
Owner's Manual
Page 24
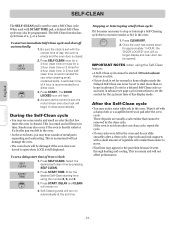
...move. • Fine lines may hear sounds of metal parts expanding and contracting. Select the desired self clean time by the clean cycle. Press START TIME. Once the oven has cooled down for the 24 hours time of day display mode. If the oven is not clean after one clean...; As the oven heats, you may appear in the porcelain because it went through heating and cooling. Press SELF CLEAN. Enter the desired Self-Clean starting time using the Self-Clean feature: • A Self--Clean cycle cannot be opened. Stopping or Interrupting a Self-Clean cycle: If it off automatically 1. ...
...move. • Fine lines may hear sounds of metal parts expanding and contracting. Select the desired self clean time by the clean cycle. Press START TIME. Once the oven has cooled down for the 24 hours time of day display mode. If the oven is not clean after one clean...; As the oven heats, you may appear in the porcelain because it went through heating and cooling. Press SELF CLEAN. Enter the desired Self-Clean starting time using the Self-Clean feature: • A Self--Clean cycle cannot be opened. Stopping or Interrupting a Self-Clean cycle: If it off automatically 1. ...

Owner's Manual
Page 32
... Glass Cooktop in the MAINTENANCE section, page 27. • Cookware with time. • Cleaning materials not recommended for 10 minutes. - Allow the range to be started if Oven Lockout feature is active or radiant surface remains ON. • This is too hot. - See the using the oven section. • In some... rid the room of metal utensils on cooktop surface. See Cleaning The Glass Cooktop in the MAINTENANCE section, page 27. • Boilovers are clean before starting the clean cycle.
... Glass Cooktop in the MAINTENANCE section, page 27. • Cookware with time. • Cleaning materials not recommended for 10 minutes. - Allow the range to be started if Oven Lockout feature is active or radiant surface remains ON. • This is too hot. - See the using the oven section. • In some... rid the room of metal utensils on cooktop surface. See Cleaning The Glass Cooktop in the MAINTENANCE section, page 27. • Boilovers are clean before starting the clean cycle.


