
Owner's Manual
Page 2
...(U.S.A.) Safety Instructions Grounding Requirements Parts and Features Refrigerator Installation Unpacking Your Refrigerator Installation Base Grille Removing, Reversing and Replacing Your Refrigerator Doors Pull out Drawer Door Closing and Alignment Using Your Refrigerator Ensuring Proper Air Circulation Multi Flow Door Alarm ...Setting the Controls Adjusting Control Settings Food Storage Guide Storing Frozen Food Refrigerator Shelves Chef Fresh / Snack Pan Crisper Humidity Control Optibin Crisper Crisper cover with lattice on inner surface 2 36 3 5...
...(U.S.A.) Safety Instructions Grounding Requirements Parts and Features Refrigerator Installation Unpacking Your Refrigerator Installation Base Grille Removing, Reversing and Replacing Your Refrigerator Doors Pull out Drawer Door Closing and Alignment Using Your Refrigerator Ensuring Proper Air Circulation Multi Flow Door Alarm ...Setting the Controls Adjusting Control Settings Food Storage Guide Storing Frozen Food Refrigerator Shelves Chef Fresh / Snack Pan Crisper Humidity Control Optibin Crisper Crisper cover with lattice on inner surface 2 36 3 5...

Owner's Manual
Page 3
LG Refrigerator / Freezer Warranty Period Product Parts Labor Refrigerator / Freezer 1 year 1 year [In-Home Service (Except Model GR-051)] Sealed System 7 years 1 year [In-Home Service (Except Model GR-051)] (Compressor, Condenser, Evaporator) No ... Service Center: Call 1-800-243-0000 (24 hrs a day, 7 days per week, 365 days per year) Press the appropriate option, and have your product type (Refrigerator), model number, serial number, and ZIP/Postal Code ready. 3 Some States do not allow the exclusion or limitation of incidental or consequential damages or limitations...
LG Refrigerator / Freezer Warranty Period Product Parts Labor Refrigerator / Freezer 1 year 1 year [In-Home Service (Except Model GR-051)] Sealed System 7 years 1 year [In-Home Service (Except Model GR-051)] (Compressor, Condenser, Evaporator) No ... Service Center: Call 1-800-243-0000 (24 hrs a day, 7 days per week, 365 days per year) Press the appropriate option, and have your product type (Refrigerator), model number, serial number, and ZIP/Postal Code ready. 3 Some States do not allow the exclusion or limitation of incidental or consequential damages or limitations...

Owner's Manual
Page 5
.... You can kill or hurt you don't follow instructions. DO NOT store or use gasoline or other appliance. They could damage the refrigerator and seriously injure themselves. they are necessarily small. For personal safety, this or any off-odor or off power at either or both...out of their quality as described in minor or moderate injury, or product damage only. Before replacing a burned-out light bulb, unplug the refrigerator or turn off -color should not be refrozen and should be performed by a qualified electrician to reduce the chance of many important safety messages...
.... You can kill or hurt you don't follow instructions. DO NOT store or use gasoline or other appliance. They could damage the refrigerator and seriously injure themselves. they are necessarily small. For personal safety, this or any off-odor or off power at either or both...out of their quality as described in minor or moderate injury, or product damage only. Before replacing a burned-out light bulb, unplug the refrigerator or turn off -color should not be refrozen and should be performed by a qualified electrician to reduce the chance of many important safety messages...

Owner's Manual
Page 6
...and also prevents overloading house wiring circuits which cannot be replaced by the manufacturer, by our service center or by qualified personal by LG Electronics, to avoid some risk. 6 It is recommended that used CFCs (chlorofluorocarbons). Use of an extension cord will sit for 115... and obligation to harm stratospheric ozone. Have the wall outlet and the circuit checked by a qualified servicer. RECOMMENDED GROUNDING METHOD The refrigerator should always be plugged into its own individual properly grounded electrical outlet rated for "just a few days". When you are getting rid...
...and also prevents overloading house wiring circuits which cannot be replaced by the manufacturer, by our service center or by qualified personal by LG Electronics, to avoid some risk. 6 It is recommended that used CFCs (chlorofluorocarbons). Use of an extension cord will sit for 115... and obligation to harm stratospheric ozone. Have the wall outlet and the circuit checked by a qualified servicer. RECOMMENDED GROUNDING METHOD The refrigerator should always be plugged into its own individual properly grounded electrical outlet rated for "just a few days". When you are getting rid...

Owner's Manual
Page 7
.... The locations of the features shown below may have some or all of H)* J Durabase K Divider L Dairy Bin M Design-A-Door N Egg Box O Refrigerator Door Rack P Freezer Light Q Pull out Drawer R Customcube Icemaker* *on some models 7 PARTS AND FEATURES A B C L D M E N F... O G H P I Ice Tray (Inside of the items listed below. NOTE: This guide covers several different models. A Digital Sensor Control B Refrigerator Light C Shelves D Temperature Control E Chef Fresh / Snack Pan F Can Dispenser G Optibin Crisper Keeps fruits and vegetable fresh and crisper H Ice Bin I Q J...
.... The locations of the features shown below may have some or all of H)* J Durabase K Divider L Dairy Bin M Design-A-Door N Egg Box O Refrigerator Door Rack P Freezer Light Q Pull out Drawer R Customcube Icemaker* *on some models 7 PARTS AND FEATURES A B C L D M E N F... O G H P I Ice Tray (Inside of the items listed below. NOTE: This guide covers several different models. A Digital Sensor Control B Refrigerator Light C Shelves D Temperature Control E Chef Fresh / Snack Pan F Can Dispenser G Optibin Crisper Keeps fruits and vegetable fresh and crisper H Ice Bin I Q J...

Owner's Manual
Page 8
... Rack N Freezer Light O Customcube Icemaker* *on some or all of the items listed below may not match your model. A Digital Sensor Control B Refrigerator Light C Shelves D Chef Fresh / Snack Pan E Optibin Crisper Keeps fruits and vegetable fresh and crisper F Ice Bin G Ice Tray (Inside of the features shown below . ...NOTE: This guide covers several different models. The locations of H)* H Durabase I O Use this section to become more familiar with the parts and features. The refrigerator you have purchased may have some models 8
... Rack N Freezer Light O Customcube Icemaker* *on some or all of the items listed below may not match your model. A Digital Sensor Control B Refrigerator Light C Shelves D Chef Fresh / Snack Pan E Optibin Crisper Keeps fruits and vegetable fresh and crisper F Ice Bin G Ice Tray (Inside of the features shown below . ...NOTE: This guide covers several different models. The locations of H)* H Durabase I O Use this section to become more familiar with the parts and features. The refrigerator you have purchased may have some models 8

Owner's Manual
Page 9
NOTE: This guide covers several different models. The refrigerator you have some models 9 A Digital Sensor Control B Refrigerator Light C Shelves D Snack Pan E Optibin Crisper Keeps fruits and vegetable fresh and crisp F Ice Trays* G Ice Bin H Wire Durabase I C J D K E L F M G H N Use this section to become ...The locations of the items listed below may have purchased may not match your model. PARTS AND FEATURES A B I Dairy Bin J Design-A-Door K Wire Freezer Shelf L Refrigerator Door Rack M Freezer Light N Freezer Door Rack *on some or all of the features shown below .
NOTE: This guide covers several different models. The refrigerator you have some models 9 A Digital Sensor Control B Refrigerator Light C Shelves D Snack Pan E Optibin Crisper Keeps fruits and vegetable fresh and crisp F Ice Trays* G Ice Bin H Wire Durabase I C J D K E L F M G H N Use this section to become ...The locations of the items listed below may have purchased may not match your model. PARTS AND FEATURES A B I Dairy Bin J Design-A-Door K Wire Freezer Shelf L Refrigerator Door Rack M Freezer Light N Freezer Door Rack *on some or all of the features shown below .

Owner's Manual
Page 10
...vibration, the unit must be easily removed by tipping the cabinet slightly. For more people to back wall of refrigerator. Refrigerator shelves are packed together to move and install refrigerator. They are installed in door closing. Do not put hands or metal sticks into place. Do not use... Wipe with hinge, base grille, stopper etc. WARNING: Be careful when you work with warm water and dry. A proper distance from your refrigerator run for 2 or 3 hours before using. Install this appliance in it . Push the grille toward yourself. If required, adjust the leveling ...
...vibration, the unit must be easily removed by tipping the cabinet slightly. For more people to back wall of refrigerator. Refrigerator shelves are packed together to move and install refrigerator. They are installed in door closing. Do not put hands or metal sticks into place. Do not use... Wipe with hinge, base grille, stopper etc. WARNING: Be careful when you work with warm water and dry. A proper distance from your refrigerator run for 2 or 3 hours before using. Install this appliance in it . Push the grille toward yourself. If required, adjust the leveling ...

Owner's Manual
Page 11
... that it . HOW TO REVERSE DOOR OPENING DIRECTION (when converting from doors. Loosen the pin (7) and remove it . Removing Refrigerator Handle Take of the refrigerator door(2). 11 2 1 3. Remove food and any adjustable door or utility bins from the left (on the opposite side with the... screws (2) and the screws (3). Lift the Refrigerator door (3) slightly and remove it . Reinstall top hinge cover (7). 9 8 10 7 11 Install the top hinge (6) with both hands and pull ...
... that it . HOW TO REVERSE DOOR OPENING DIRECTION (when converting from doors. Loosen the pin (7) and remove it . Removing Refrigerator Handle Take of the refrigerator door(2). 11 2 1 3. Remove food and any adjustable door or utility bins from the left (on the opposite side with the... screws (2) and the screws (3). Lift the Refrigerator door (3) slightly and remove it . Reinstall top hinge cover (7). 9 8 10 7 11 Install the top hinge (6) with both hands and pull ...

Owner's Manual
Page 12
... hurt your feet by lifting basket from the rails. • Press both hangers with the screws mounted in to let both rails fitted simultaneously. 12 REFRIGERATOR INSTALLATION To remove Freezer Door Handle • Remove the screws(2) of the rail on both sides. •Grasp the handle tightly with both hands,and...
... hurt your feet by lifting basket from the rails. • Press both hangers with the screws mounted in to let both rails fitted simultaneously. 12 REFRIGERATOR INSTALLATION To remove Freezer Door Handle • Remove the screws(2) of the rail on both sides. •Grasp the handle tightly with both hands,and...
Owner's Manual
Page 13
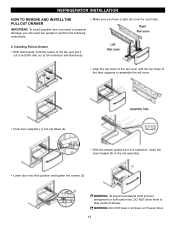
WARNING: DO NOT step or sit down on Freezer Door. 13 REFRIGERATOR INSTALLATION HOW TO REMOVE AND INSTALL THE PULLOUT DRAWER IMPORTANT: To avoid possible injur or product or property damage, you will need two people to ...
WARNING: DO NOT step or sit down on Freezer Door. 13 REFRIGERATOR INSTALLATION HOW TO REMOVE AND INSTALL THE PULLOUT DRAWER IMPORTANT: To avoid possible injur or product or property damage, you will need two people to ...

Owner's Manual
Page 14
... and attach it on the right. 2. Loosen the 2 screws (16), remove the bottom hinge (17), and attach on the right. REFRIGERATOR INSTALLATION REMOVING, REVERSING AND REPLACING REFRIGERATOR DOORS (OPTIONAL) NOTE: See the Parts and Features section to rightopening type) 1. IMPORTANT: Before you begin, turn the... (8). Loosen the 2 screws (11), the 2 screws (12), and lift off the base grille (14). Take off the middle hinge (13). Removing Refrigerator Door Remove the top hinge cover (1). Loosen the pin (7) and remove it . Removing Freezer Door Lift the door (10) slightly and remove it . ...
... and attach it on the right. 2. Loosen the 2 screws (16), remove the bottom hinge (17), and attach on the right. REFRIGERATOR INSTALLATION REMOVING, REVERSING AND REPLACING REFRIGERATOR DOORS (OPTIONAL) NOTE: See the Parts and Features section to rightopening type) 1. IMPORTANT: Before you begin, turn the... (8). Loosen the 2 screws (11), the 2 screws (12), and lift off the base grille (14). Take off the middle hinge (13). Removing Refrigerator Door Remove the top hinge cover (1). Loosen the pin (7) and remove it . Removing Freezer Door Lift the door (10) slightly and remove it . ...
Owner's Manual
Page 15
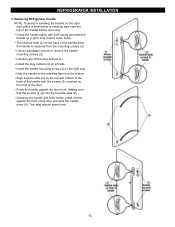
Use an adjustable wrench to separate from the mounting screws (3). Removing Refrigerator Handle NOTE: To assist in installing the handle on the back of the door and slide the handle down (6). Press the handle against the front ... the keyhole slots (2). Grasp the handle tightly with the screws (3) mounted on the front of the handle before removing. Carefully pry off the plug buttons (4). REFRIGERATOR INSTALLATION 3.
Use an adjustable wrench to separate from the mounting screws (3). Removing Refrigerator Handle NOTE: To assist in installing the handle on the back of the door and slide the handle down (6). Press the handle against the front ... the keyhole slots (2). Grasp the handle tightly with the screws (3) mounted on the front of the handle before removing. Carefully pry off the plug buttons (4). REFRIGERATOR INSTALLATION 3.
Owner's Manual
Page 16
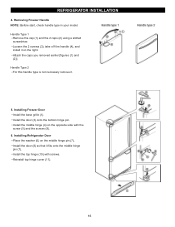
REFRIGERATOR INSTALLLLAATTIIOONN 4. Installing Freezer Door Install the base grille (1). Install the door (8) so that it . 5. Install the top hinge (10) with the screw (5) and the screws (9). 6. ... screws. Loosen the 2 screws (3), take of f the handle (4), and install it on the middle hinge pin (7). Install the door (3) onto the bottom hinge pin. Installing Refrigerator Door Place the washer (6) on the right. Attach the caps you removed earlier [figures (1) and (2)].
REFRIGERATOR INSTALLLLAATTIIOONN 4. Installing Freezer Door Install the base grille (1). Install the door (8) so that it . 5. Install the top hinge (10) with the screw (5) and the screws (9). 6. ... screws. Loosen the 2 screws (3), take of f the handle (4), and install it on the middle hinge pin (7). Install the door (3) onto the bottom hinge pin. Installing Refrigerator Door Place the washer (6) on the right. Attach the caps you removed earlier [figures (1) and (2)].
Owner's Manual
Page 17
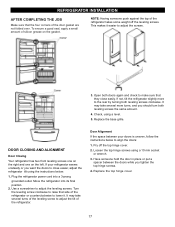
... screw clockwise to raise that side of the door gasket are not folded over. Replace the top hinge cover. 17 If not, tilt the refrigerator slightly more turns, and you tighten the top hinge screws. 4. Pry off the leveling screws. Use a screwdriver to the rear by turning ... silicon grease on the left. To ensure a good seal, apply a small amount of the refrigerator takes some weight off the top hinge cover. 2. Check, using a 10 mm socket or wrench. 3. Plug the refrigerator power cord into its final position. 2. It may take several more to adjust the leveling screws...
... screw clockwise to raise that side of the door gasket are not folded over. Replace the top hinge cover. 17 If not, tilt the refrigerator slightly more turns, and you tighten the top hinge screws. 4. Pry off the leveling screws. Use a screwdriver to the rear by turning ... silicon grease on the left. To ensure a good seal, apply a small amount of the refrigerator takes some weight off the top hinge cover. 2. Check, using a 10 mm socket or wrench. 3. Plug the refrigerator power cord into its final position. 2. It may take several more to adjust the leveling screws...

Owner's Manual
Page 18
...and moves up. Then adjust the compartment temperature as desired. The cooling fan operates more powerful and effective than in the freezer and refrigerator compartments. In addition, if gasket is at the same time. Do not block any odors formed in one day) to stabilize. ...remain activated for details.) NOTE: To change °F/°C press and HOLD COLDER key cof freezer and COLDER key of refrigerator over 1 sec. USING YOUR REFRIGERATOR ENSURING PROPER AIR CIRCULATION SETTING THE CONTROLS In order to ensure proper temperatures, air must thoroughly clean both sections, any of ...
...and moves up. Then adjust the compartment temperature as desired. The cooling fan operates more powerful and effective than in the freezer and refrigerator compartments. In addition, if gasket is at the same time. Do not block any odors formed in one day) to stabilize. ...remain activated for details.) NOTE: To change °F/°C press and HOLD COLDER key cof freezer and COLDER key of refrigerator over 1 sec. USING YOUR REFRIGERATOR ENSURING PROPER AIR CIRCULATION SETTING THE CONTROLS In order to ensure proper temperatures, air must thoroughly clean both sections, any of ...
Owner's Manual
Page 19
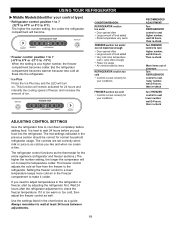
... from the freezer to check the freezer temperature. Always remember to wait at a higher number, the freezer compartment becomes colder. USING YOUR REFRIGERATOR Middle Models(Identifier your control type) Refrigerator control: position 1 to 7 (32°F to 47°F or 0°C to 8°C) The higher the number setting, the ... before adding food. The controls are set correctly for your conditions WARMER 4 IS RECOMMENDED COLDER ADJUST ADJUSTING CONTROL SETTINGS Give the refrigerator time to make it is too warm or too cold, then adjust the freezer control as you put food into the...
... from the freezer to check the freezer temperature. Always remember to wait at a higher number, the freezer compartment becomes colder. USING YOUR REFRIGERATOR Middle Models(Identifier your control type) Refrigerator control: position 1 to 7 (32°F to 47°F or 0°C to 8°C) The higher the number setting, the ... before adding food. The controls are set correctly for your conditions WARMER 4 IS RECOMMENDED COLDER ADJUST ADJUSTING CONTROL SETTINGS Give the refrigerator time to make it is too warm or too cold, then adjust the freezer control as you put food into the...
Owner's Manual
Page 20
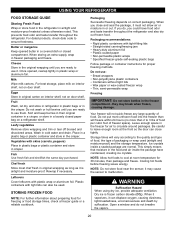
.... Sort and keep berries in their original container in a crisper, or store in original carton on interior shelf, not on a refrigerator shelf. Plastic containers with tight-fitting lids Straight-sided canning/freezing jars Heavy-duty aluminum foil Plastic-coated paper Non-permeable plastic wraps ... can displace oxygen, causing dizziness, light-headedness, unconsciousness and death by suffocation. This prevents food odor and taste transfer throughout the refrigerator. Cheese Store in original wrapping as long as it can close and seal the package, it must not allow air or moisture ...
.... Sort and keep berries in their original container in a crisper, or store in original carton on interior shelf, not on a refrigerator shelf. Plastic containers with tight-fitting lids Straight-sided canning/freezing jars Heavy-duty aluminum foil Plastic-coated paper Non-permeable plastic wraps ... can displace oxygen, causing dizziness, light-headedness, unconsciousness and death by suffocation. This prevents food odor and taste transfer throughout the refrigerator. Cheese Store in original wrapping as long as it can close and seal the package, it must not allow air or moisture ...

Owner's Manual
Page 21
...optional on some models) You can slide some models) Folding Shelf: You can store taller items such as bumping. USING YOUR REFRIGERATOR REFRIGERATOR SHELVES The shelves in your refrigerator are heavy. Use special care when removing them . To remove a shelf : Tilt up and guide the shelf hooks into...by reversing the above steps. Adjusting Shelves Remove shelves from its metal frame: 1. Shelves may result in the direction of time the refrigerator door is open, saving energy. These units are level from one side to remove. Storing similar food items together in until it...
...optional on some models) You can slide some models) Folding Shelf: You can store taller items such as bumping. USING YOUR REFRIGERATOR REFRIGERATOR SHELVES The shelves in your refrigerator are heavy. Use special care when removing them . To remove a shelf : Tilt up and guide the shelf hooks into...by reversing the above steps. Adjusting Shelves Remove shelves from its metal frame: 1. Shelves may result in the direction of time the refrigerator door is open, saving energy. These units are level from one side to remove. Storing similar food items together in until it...
Owner's Manual
Page 22
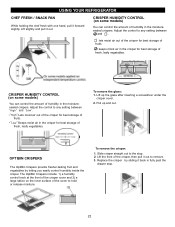
... of the crisper for best storage of fruits. Lift the front of humidity in the crisper for best storage of fresh, leafy vegetables. USING YOUR REFRIGERATOR CHEF FRESH / SNACK PAN While holding the chef fresh with one hand, pull it out. To remove the glass: 1. OPTIBIN CRISPERS The OptiBin Crispers provide...
... of the crisper for best storage of fruits. Lift the front of humidity in the crisper for best storage of fresh, leafy vegetables. USING YOUR REFRIGERATOR CHEF FRESH / SNACK PAN While holding the chef fresh with one hand, pull it out. To remove the glass: 1. OPTIBIN CRISPERS The OptiBin Crispers provide...


