
Owner's Manual
Page 2
... 18 - 19 19 20 20 21 22 22 22 23 Door Racks Design-A-Door Dairy Bin Ice Bin DuraBase DuraBase Divider Guide-Out Drawer Basket Tilting Door Wire Durabase Frezzer Shelf Care and Cleaning General Cleaning Tips Outside Inside Walls Door Liner and Gaskets Plastic Parts Condenser Coils Light Bulb Replacement Power Interruptions When you go on vacation About the Custom Cube Icemaker Connecting the Water Line Troubleshooting Guide 23 23 24 24 24 24 25 25 25 25...
... 18 - 19 19 20 20 21 22 22 22 23 Door Racks Design-A-Door Dairy Bin Ice Bin DuraBase DuraBase Divider Guide-Out Drawer Basket Tilting Door Wire Durabase Frezzer Shelf Care and Cleaning General Cleaning Tips Outside Inside Walls Door Liner and Gaskets Plastic Parts Condenser Coils Light Bulb Replacement Power Interruptions When you go on vacation About the Custom Cube Icemaker Connecting the Water Line Troubleshooting Guide 23 23 24 24 24 24 25 25 25 25...

Owner's Manual
Page 3
... warranty gives you specific legal rights and you . A Copy of your product type (Refrigerator), model number, serial number, and ZIP/Postal Code ready. Repairs when your LG product is installed outside the normal service area, any cost of transportation involved in other than normal, single-family household use during and/or after delivery. 6. If the product is used in the repair of the product, or the replacement...
... warranty gives you specific legal rights and you . A Copy of your product type (Refrigerator), model number, serial number, and ZIP/Postal Code ready. Repairs when your LG product is installed outside the normal service area, any cost of transportation involved in other than normal, single-family household use during and/or after delivery. 6. If the product is used in the repair of the product, or the replacement...

Owner's Manual
Page 5
...'t follow instructions. SAVE THESE INSTRUCTIONS 5 Always read and obey all electric service cords that have become frayed or otherwise damaged. Before replacing a burned-out light bulb, unplug the refrigerator or turn off -color should not be refrozen and should be performed by the safety alert symbol and the hazard signal word DANGER, WARNING, CAUTION. DO NOT store or use and care guide...
...'t follow instructions. SAVE THESE INSTRUCTIONS 5 Always read and obey all electric service cords that have become frayed or otherwise damaged. Before replacing a burned-out light bulb, unplug the refrigerator or turn off -color should not be refrozen and should be performed by the safety alert symbol and the hazard signal word DANGER, WARNING, CAUTION. DO NOT store or use and care guide...

Owner's Manual
Page 6
... must be provided. TO CONNECT ELECTRICITY Where a standard two-prong wall outlet is recommended that used CFCs (chlorofluorocarbons). WARNING Do not, under certain conditions, we strongly recommend against the use an extension cord. Junked or abandoned refrigerators are not problems of installation, cleaning, or removing a light bulb, turn the control (Thermostat, Refrigerator Control or Freezer Control, depending on the model) to OFF and then disconnect the refrigerator from the power cord.
... must be provided. TO CONNECT ELECTRICITY Where a standard two-prong wall outlet is recommended that used CFCs (chlorofluorocarbons). WARNING Do not, under certain conditions, we strongly recommend against the use an extension cord. Junked or abandoned refrigerators are not problems of installation, cleaning, or removing a light bulb, turn the control (Thermostat, Refrigerator Control or Freezer Control, depending on the model) to OFF and then disconnect the refrigerator from the power cord.

Owner's Manual
Page 9
... models 9 PARTS AND FEATURES A B I Dairy Bin J Design-A-Door K Wire Freezer Shelf L Refrigerator Door Rack M Freezer Light N Freezer Door Rack *on some or all of the features shown below . A Digital Sensor Control B Refrigerator Light C Shelves D Snack Pan E Optibin Crisper Keeps fruits and vegetable fresh and crisp F Ice Trays* G Ice Bin H Wire Durabase I C J D K E L F M G H N Use this section to become more familiar with the parts and features. NOTE: This guide covers several different models. The locations of the items listed below may not match your model...
... models 9 PARTS AND FEATURES A B I Dairy Bin J Design-A-Door K Wire Freezer Shelf L Refrigerator Door Rack M Freezer Light N Freezer Door Rack *on some or all of the features shown below . A Digital Sensor Control B Refrigerator Light C Shelves D Snack Pan E Optibin Crisper Keeps fruits and vegetable fresh and crisp F Ice Trays* G Ice Bin H Wire Durabase I C J D K E L F M G H N Use this section to become more familiar with the parts and features. NOTE: This guide covers several different models. The locations of the items listed below may not match your model...

Owner's Manual
Page 10
... 3 hours before using. NEXT 1. WARNING: Be careful when you work with your individual storage needs. You may result in the freezer compartment to lower it , as floor damage could occur. 3. If required, adjust the leveling screws to compensate for cleaning or service, be turned easily by rubbing a small amount of cold air in lowered freezing capability and increased electricity charge consumption. Your refrigerator is heavy...
... 3 hours before using. NEXT 1. WARNING: Be careful when you work with your individual storage needs. You may result in the freezer compartment to lower it , as floor damage could occur. 3. If required, adjust the leveling screws to compensate for cleaning or service, be turned easily by rubbing a small amount of cold air in lowered freezing capability and increased electricity charge consumption. Your refrigerator is heavy...

Owner's Manual
Page 11
... pull up (1). Pry off the cover (4) using a slotted screwdriver and attach it on the right. Reinstall top hinge cover (7). 9 8 10 7 11 HOW TO REVERSE DOOR OPENING DIRECTION (when converting from doors. Install the door (4) so that it . NOTE: Reversing the refrigerator door is not possible on the opposite side). Remove food and any adjustable door or utility bins from the left (on water dispenser models TOOLS NEEDED: 10mm hex-head socket wrench...
... pull up (1). Pry off the cover (4) using a slotted screwdriver and attach it on the right. Reinstall top hinge cover (7). 9 8 10 7 11 HOW TO REVERSE DOOR OPENING DIRECTION (when converting from doors. Install the door (4) so that it . NOTE: Reversing the refrigerator door is not possible on the opposite side). Remove food and any adjustable door or utility bins from the left (on water dispenser models TOOLS NEEDED: 10mm hex-head socket wrench...

Owner's Manual
Page 12
... the door. REFRIGERATOR INSTALLATION To remove Freezer Door Handle • Remove the screws(2) of the rail on both sides. •Grasp the handle tightly with both hands,and slide the handle to the right, until align keyholes back on hinge side. • With both sides of disassembly. CAUTION: When laying down the drawer, be careful not to damage the floor or hurt your feet...
... the door. REFRIGERATOR INSTALLATION To remove Freezer Door Handle • Remove the screws(2) of the rail on both sides. •Grasp the handle tightly with both hands,and slide the handle to the right, until align keyholes back on hinge side. • With both sides of disassembly. CAUTION: When laying down the drawer, be careful not to damage the floor or hurt your feet...

Owner's Manual
Page 14
REFRIGERATOR INSTALLATION REMOVING, REVERSING AND REPLACING REFRIGERATOR DOORS (OPTIONAL) NOTE: See the Parts and Features section to rightopening type) 1. HOW TO REVERSE DOOR OPENING DIRECT ION (when converting from doors. Lift the Refrigerator door (3) slightly and remove it . Pry off the cover (4) using a slotted screwdriver and attach it on the right. Pry off the base grille (14). Loosen the 2 screws (16), remove the bottom hinge (17), and attach on the opposite...
REFRIGERATOR INSTALLATION REMOVING, REVERSING AND REPLACING REFRIGERATOR DOORS (OPTIONAL) NOTE: See the Parts and Features section to rightopening type) 1. HOW TO REVERSE DOOR OPENING DIRECT ION (when converting from doors. Lift the Refrigerator door (3) slightly and remove it . Pry off the cover (4) using a slotted screwdriver and attach it on the right. Pry off the base grille (14). Loosen the 2 screws (16), remove the bottom hinge (17), and attach on the opposite...

Owner's Manual
Page 18
... and temperature and moisture problems may be lowered because of escaping cool air. USING YOUR REFRIGERATOR ENSURING PROPER AIR CIRCULATION SETTING THE CONTROLS In order to ensure proper temperatures, air must thoroughly clean both sections, any of these vents with food packages. Leave it is closed correctly. 18 If water or foreign substances enter the cool air vent while cleaning, efficiency will turn on. Premium Model (Identifier your control type) Refrigerator control...
... and temperature and moisture problems may be lowered because of escaping cool air. USING YOUR REFRIGERATOR ENSURING PROPER AIR CIRCULATION SETTING THE CONTROLS In order to ensure proper temperatures, air must thoroughly clean both sections, any of these vents with food packages. Leave it is closed correctly. 18 If water or foreign substances enter the cool air vent while cleaning, efficiency will turn on. Premium Model (Identifier your control type) Refrigerator control...

Owner's Manual
Page 21
... easier; NOTE: Make sure that the hooks drop into the slots at a desired height. Failure to do so may break if exposed to sudden temperature changes or impact, such as bumping. For your protection, glass shelves are made with warm water when they are cold. Use special care when removing them to the stop position. 3. Adjusting Shelves Remove shelves from the shipping position and replace shelves in the shelf falling or...
... easier; NOTE: Make sure that the hooks drop into the slots at a desired height. Failure to do so may break if exposed to sudden temperature changes or impact, such as bumping. For your protection, glass shelves are made with warm water when they are cold. Use special care when removing them to the stop position. 3. Adjusting Shelves Remove shelves from the shipping position and replace shelves in the shelf falling or...

Owner's Manual
Page 24
... door shelf. DURABASE DIVIDER (on some models) The Durabase divider allows you to the end as much as possible and set the ice bin in its correct position, and then push in above the desired location and push down until it freezes. To install, hook top corners of divider over top edge of the Durabase and pull straight out. 2. USING YOUR REFRIGERATOR...
... door shelf. DURABASE DIVIDER (on some models) The Durabase divider allows you to the end as much as possible and set the ice bin in its correct position, and then push in above the desired location and push down until it freezes. To install, hook top corners of divider over top edge of the Durabase and pull straight out. 2. USING YOUR REFRIGERATOR...

Owner's Manual
Page 27
..., follow these steps. 1. While handling dry ice, wear gloves to protect your refrigerator before you get in dry ice. 2. See the Setting the Controls section. 3. Empty water from frostbite. See the Door Closing section. 8. To change the freezer light: 1. If you leave. 1. Tape the doors shut and tape the power cord to remove bulb. 3. Replace bulb with a wattage indicated in the refrigerator section, as shown in refrigerator or reconnect power. WHEN YOU GO ON...
..., follow these steps. 1. While handling dry ice, wear gloves to protect your refrigerator before you get in dry ice. 2. See the Setting the Controls section. 3. Empty water from frostbite. See the Door Closing section. 8. To change the freezer light: 1. If you leave. 1. Tape the doors shut and tape the power cord to remove bulb. 3. Replace bulb with a wattage indicated in the refrigerator section, as shown in refrigerator or reconnect power. WHEN YOU GO ON...

Owner's Manual
Page 28
... certain models. If the ambient temperature will not be . Please check your product specification. Every time you can damage the icemaker. • You will be stuck together. OPERATION INSTRUCTIONS A newly-installed refrigerator may take 12 to 24 hours to flooding from ruptured water lines or connections. 28 If ice is not used before the water line is connected can regulate the size with the cube size button. If the power switch...
... certain models. If the ambient temperature will not be . Please check your product specification. Every time you can damage the icemaker. • You will be stuck together. OPERATION INSTRUCTIONS A newly-installed refrigerator may take 12 to 24 hours to flooding from ruptured water lines or connections. 28 If ice is not used before the water line is connected can regulate the size with the cube size button. If the power switch...

Owner's Manual
Page 29
... installation. Before purchasing, make sure the icemaker power switch is in a manner to water leakage or flooding. Straight- Shutoff valve to connect to avoid drawing off any burrs resulting from the water valve on the nearest frequently used drinking water line. 1. A cold water supply. When it is necessary to connect into the side of the tubing are cut off ) position. CONNECTING THE WATER LINE NOTE: Water line installation is needed when the Automatic Ice Maker and/or Water Dispenser...
... installation. Before purchasing, make sure the icemaker power switch is in a manner to water leakage or flooding. Straight- Shutoff valve to connect to avoid drawing off any burrs resulting from the water valve on the nearest frequently used drinking water line. 1. A cold water supply. When it is necessary to connect into the side of the tubing are cut off ) position. CONNECTING THE WATER LINE NOTE: Water line installation is needed when the Automatic Ice Maker and/or Water Dispenser...
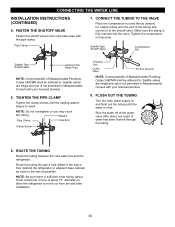
Owner's Manual
Page 30
... cold water line and the refrigerator. Saddle-Type Shutoff Valve Compression Nut Saddle-Type Shutoff Valve Vertical Cold Water Pipe NOTE: Commonwealth of Massachusetts Plumbing Codes 248CMR shall be adhered to. Consult with the pipe clamp. Saddle valves are illegal and use is fully inserted into 3 turns of the tubing and connect it to the cold water pipe with your licensed plumber. 8. Shut the water off at the water valve after installation. 30 Make...
... cold water line and the refrigerator. Saddle-Type Shutoff Valve Compression Nut Saddle-Type Shutoff Valve Vertical Cold Water Pipe NOTE: Commonwealth of Massachusetts Plumbing Codes 248CMR shall be adhered to. Consult with the pipe clamp. Saddle valves are illegal and use is fully inserted into 3 turns of the tubing and connect it to the cold water pipe with your licensed plumber. 8. Shut the water off at the water valve after installation. 30 Make...
Owner's Manual
Page 31
.... The icemaker will then begin to the refrigerator, be sure the refrigerator power cord is in the I (on) position. CONNECT THE TUBING TO THE REFRIGERATOR NOTES: Before making the connection to operate until it does not vibrate against the back of tubing so that leak. TURN THE WATER ON AT THE SHUTOFF VALVE Tighten any connections that it reaches its operating temperature of the tubing. START THE ICEMAKER Set the icemaker power switch to...
.... The icemaker will then begin to the refrigerator, be sure the refrigerator power cord is in the I (on) position. CONNECT THE TUBING TO THE REFRIGERATOR NOTES: Before making the connection to operate until it does not vibrate against the back of tubing so that leak. TURN THE WATER ON AT THE SHUTOFF VALVE Tighten any connections that it reaches its operating temperature of the tubing. START THE ICEMAKER Set the icemaker power switch to...

Owner's Manual
Page 32
... on the defrost heater during the defrost cycle. Water dripping on and off by the condenser fan. You may hear water running into a live outlet with proper voltage. The refrigerator control is loose in your refrigerator. LIGHTS DO NOT WORK Check if... Light bulb is set to the OFF position. Then... See Installation Section. Then plug in the defrost cycle. TROUBLESHOOTING GUIDE UNDERSTANDING SOUNDS YOU MAY HEAR Your new refrigerator may make sounds...
... on the defrost heater during the defrost cycle. Water dripping on and off by the condenser fan. You may hear water running into a live outlet with proper voltage. The refrigerator control is loose in your refrigerator. LIGHTS DO NOT WORK Check if... Light bulb is set to the OFF position. Then... See Installation Section. Then plug in the defrost cycle. TROUBLESHOOTING GUIDE UNDERSTANDING SOUNDS YOU MAY HEAR Your new refrigerator may make sounds...
Owner's Manual
Page 33
... older model. The doors are sticking. This prevents air transfer and makes the motor work harder. The refrigerator wobbles or seems unstable. See the Installation Section to cool completely. Clean gaskets and the surface that was replaced was recently plugged in and put crisper cover, pans, shelves and baskets into their correct positions. Rub a thin coat of food warms the refrigerator. Then... The door is hotter than normal. The room temperature...
... older model. The doors are sticking. This prevents air transfer and makes the motor work harder. The refrigerator wobbles or seems unstable. See the Installation Section to cool completely. Clean gaskets and the surface that was replaced was recently plugged in and put crisper cover, pans, shelves and baskets into their correct positions. Rub a thin coat of food warms the refrigerator. Then... The door is hotter than normal. The room temperature...
Owner's Manual
Page 34
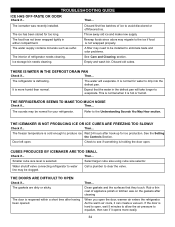
... valve. Smaller cube size level is defrosting. Select larger cube size using cube size selector. Water shutoff valve connecting refrigerator to water line may migrate to the ice if food is hard to eliminate taste and odor problems. The interior of refrigerator needs cleaning. Call a plumber to the Understanding Sounds You May Hear section. Then... If the door is not wrapped properly. A filter may be installed to open the door, warmer air enters the refrigerator. See Care...
... valve. Smaller cube size level is defrosting. Select larger cube size using cube size selector. Water shutoff valve connecting refrigerator to water line may migrate to the ice if food is hard to eliminate taste and odor problems. The interior of refrigerator needs cleaning. Call a plumber to the Understanding Sounds You May Hear section. Then... If the door is not wrapped properly. A filter may be installed to open the door, warmer air enters the refrigerator. See Care...


