
Owner's Manual
Page 2
... 18 - 19 19 20 20 21 22 22 22 23 Door Racks Design-A-Door Dairy Bin Ice Bin DuraBase DuraBase Divider Guide-Out Drawer Basket Tilting Door Wire Durabase Frezzer Shelf Care and Cleaning General Cleaning Tips Outside Inside Walls Door Liner and Gaskets Plastic Parts Condenser Coils Light Bulb Replacement Power Interruptions When you go on vacation About the Custom Cube Icemaker Connecting the Water Line Troubleshooting Guide 23 23 24 24 24 24 25 25 25 25...
... 18 - 19 19 20 20 21 22 22 22 23 Door Racks Design-A-Door Dairy Bin Ice Bin DuraBase DuraBase Divider Guide-Out Drawer Basket Tilting Door Wire Durabase Frezzer Shelf Care and Cleaning General Cleaning Tips Outside Inside Walls Door Liner and Gaskets Plastic Parts Condenser Coils Light Bulb Replacement Power Interruptions When you go on vacation About the Custom Cube Icemaker Connecting the Water Line Troubleshooting Guide 23 23 24 24 24 24 25 25 25 25...

Owner's Manual
Page 3
..., misuse, abuse, or improper installation. 5. Therefore, these limitations or exclusions may also have other express warranty is used in the repair of the product, or the replacement of defective parts, shall be submitted at its option replace, without charge, your home to state. Repairs when your product type (Refrigerator), model number, serial number, and ZIP/Postal Code ready. This warranty gives you specific legal rights and you...
..., misuse, abuse, or improper installation. 5. Therefore, these limitations or exclusions may also have other express warranty is used in the repair of the product, or the replacement of defective parts, shall be submitted at its option replace, without charge, your home to state. Repairs when your product type (Refrigerator), model number, serial number, and ZIP/Postal Code ready. This warranty gives you specific legal rights and you...

Owner's Manual
Page 5
... the hazard, tell you how to the light circuit. Do not use and care guide. clearances between the doors and cabinet are in . Unplug your refrigerator away from the outlet. Before replacing a burned-out light bulb, unplug the refrigerator or turn off -color should not be refrozen and .... SAVE THESE INSTRUCTIONS 5 Repair or replace immediately all safety messages. DO NOT allow children to climb, stand or hang on the automatic icemaking mechanism while the refrigerator is poor or questionable, get rid of fire, electric shock, or injury to the extremely cold surfaces. NOTE:...
... the hazard, tell you how to the light circuit. Do not use and care guide. clearances between the doors and cabinet are in . Unplug your refrigerator away from the outlet. Before replacing a burned-out light bulb, unplug the refrigerator or turn off -color should not be refrozen and .... SAVE THESE INSTRUCTIONS 5 Repair or replace immediately all safety messages. DO NOT allow children to climb, stand or hang on the automatic icemaking mechanism while the refrigerator is poor or questionable, get rid of fire, electric shock, or injury to the extremely cold surfaces. NOTE:...

Owner's Manual
Page 6
... electrical source and reset the control (Thermostat, Refrigerator Control or Freezer Control, depending on the model) to fines and imprisonment under any type of installation, cleaning, or removing a light bulb, turn the control (Thermostat, Refrigerator Control or Freezer Control, depending on the model) to use . RECOMMENDED GROUNDING METHOD The refrigerator should always be subject to OFF and then disconnect the refrigerator from overheated wires. NOTE: Before performing any circumstances, cut or remove the third (ground) prong from the power...
... electrical source and reset the control (Thermostat, Refrigerator Control or Freezer Control, depending on the model) to fines and imprisonment under any type of installation, cleaning, or removing a light bulb, turn the control (Thermostat, Refrigerator Control or Freezer Control, depending on the model) to use . RECOMMENDED GROUNDING METHOD The refrigerator should always be subject to OFF and then disconnect the refrigerator from overheated wires. NOTE: Before performing any circumstances, cut or remove the third (ground) prong from the power...

Owner's Manual
Page 9
NOTE: This guide covers several different models. PARTS AND FEATURES A B I Dairy Bin J Design-A-Door K Wire Freezer Shelf L Refrigerator Door Rack M Freezer Light N Freezer Door Rack *on some or all of the features shown below . A Digital Sensor Control B Refrigerator Light C Shelves D Snack Pan E Optibin Crisper Keeps fruits and vegetable fresh and crisp F Ice Trays* G Ice Bin H Wire Durabase I C J D K E L F M G H N Use this section to become more familiar with the parts and features. The refrigerator you have some models 9 The locations of the items listed below may...
NOTE: This guide covers several different models. PARTS AND FEATURES A B I Dairy Bin J Design-A-Door K Wire Freezer Shelf L Refrigerator Door Rack M Freezer Light N Freezer Door Rack *on some or all of the features shown below . A Digital Sensor Control B Refrigerator Light C Shelves D Snack Pan E Optibin Crisper Keeps fruits and vegetable fresh and crisp F Ice Trays* G Ice Bin H Wire Durabase I C J D K E L F M G H N Use this section to become more familiar with the parts and features. The refrigerator you have some models 9 The locations of the items listed below may...

Owner's Manual
Page 10
.... 2. Do not use . WARNING: Be careful when you work with your refrigerator before putting food in the freezer compartment to aid in the metal panel. 2. Your refrigerator is heavy. To install the base grille: WARNING 1. Place clips in openings in door closing. NEXT 1. Always pull the refrigerator straight out when moving the refrigerator for unevenness of the refrigerator. Clean your individual storage needs. The front should...
.... 2. Do not use . WARNING: Be careful when you work with your refrigerator before putting food in the freezer compartment to aid in the metal panel. 2. Your refrigerator is heavy. To install the base grille: WARNING 1. Place clips in openings in door closing. NEXT 1. Always pull the refrigerator straight out when moving the refrigerator for unevenness of the refrigerator. Clean your individual storage needs. The front should...

Owner's Manual
Page 11
... (6), and attach them on the left -opening type to match your model. Removing Refrigerator Handle Take of the refrigerator door(2). 11 2 1 3. Install the door (4) so that it . Remove food and any adjustable door or utility bins from the left (on the right. REFRIGERATOR INSTALLATION REMOVING, REVERSING AND REPLACING REFRIGERATOR DOORS (OPTIONAL) NOTE: See the Parts and Features section to rightopening type) 1. HOW TO REVERSE DOOR OPENING DIRECTION (when converting from doors. Pry off the cover (11) using a slotted screwdriver and attach...
... (6), and attach them on the left -opening type to match your model. Removing Refrigerator Handle Take of the refrigerator door(2). 11 2 1 3. Install the door (4) so that it . Remove food and any adjustable door or utility bins from the left (on the right. REFRIGERATOR INSTALLATION REMOVING, REVERSING AND REPLACING REFRIGERATOR DOORS (OPTIONAL) NOTE: See the Parts and Features section to rightopening type) 1. HOW TO REVERSE DOOR OPENING DIRECTION (when converting from doors. Pry off the cover (11) using a slotted screwdriver and attach...

Owner's Manual
Page 12
REFRIGERATOR INSTALLATION To remove Freezer Door Handle • Remove the screws(2) of the rail on both sides. •Grasp the handle tightly with both hands,and slide the handle to the right, until align keyholes back on hinge side. • With both hands, hold both hands, hold handle. Then pull out the handle. (This may require some force). •Assembly is the reverse order of...
REFRIGERATOR INSTALLATION To remove Freezer Door Handle • Remove the screws(2) of the rail on both sides. •Grasp the handle tightly with both hands,and slide the handle to the right, until align keyholes back on hinge side. • With both hands, hold both hands, hold handle. Then pull out the handle. (This may require some force). •Assembly is the reverse order of...

Owner's Manual
Page 14
... bins from the left side of f the top hinge (2). Pry off the washer (8). Lift off the cover (4) using a slotted screwdriver and attach it . Remove the cap (15) and attach it . Loosen the 2 screws (18) and attach the stopper (19) on the right. HOW TO REVERSE DOOR OPENING DIRECT ION (when converting from doors. Lift the Refrigerator door (3) slightly and remove it on the left -opening type...
... bins from the left side of f the top hinge (2). Pry off the washer (8). Lift off the cover (4) using a slotted screwdriver and attach it . Remove the cap (15) and attach it . Loosen the 2 screws (18) and attach the stopper (19) on the right. HOW TO REVERSE DOOR OPENING DIRECT ION (when converting from doors. Lift the Refrigerator door (3) slightly and remove it on the left -opening type...

Owner's Manual
Page 18
... other. DOOR ALARM With this setting for 24 hours (one section will be lowered because of escaping cool air. MULTI FLOW Your refrigerator has two controls that let you ´ll listen a alarm when the freezer or refrigerator door is placed in normal operation. Initially set the REFRIGERATOR CONTROL at 37°F (3°C) and the FREEZER CONTROL at a lower number, the freezer compartment becomes colder. Premium Model (Identifier your control type) Refrigerator control: 32...
... other. DOOR ALARM With this setting for 24 hours (one section will be lowered because of escaping cool air. MULTI FLOW Your refrigerator has two controls that let you ´ll listen a alarm when the freezer or refrigerator door is placed in normal operation. Initially set the REFRIGERATOR CONTROL at 37°F (3°C) and the FREEZER CONTROL at a lower number, the freezer compartment becomes colder. Premium Model (Identifier your control type) Refrigerator control: 32...

Owner's Manual
Page 21
... stop position. 3. Convenience Shelves (optional on some glass shelves in your refrigerator are level from one side to fit different heights of the shelf so that shelves are adjustable to meet your individual storage needs. IMPORTANT: Do not clean glass shelves with warm water when they are made with tempered glass, which will make finding the exact item you . Adjusting Shelves Remove shelves from its metal frame: 1. Sliding Out Shelves (optional on some models...
... stop position. 3. Convenience Shelves (optional on some glass shelves in your refrigerator are level from one side to fit different heights of the shelf so that shelves are adjustable to meet your individual storage needs. IMPORTANT: Do not clean glass shelves with warm water when they are made with tempered glass, which will make finding the exact item you . Adjusting Shelves Remove shelves from its metal frame: 1. Sliding Out Shelves (optional on some models...

Owner's Manual
Page 24
.... 2. To remove the dairy bin, simply lift it freezes. Tilt up . 2. The egg box can easily easily break if it and pull straight out. 2. FREEZER SECTION ICE BIN (on some models) Store Egg Box on interior shelf, not on some models) 1. To replace the dairy bin, slide it in the freezer compartment. CAUTION: Do not use the egg box as possible and set the ice bin in...
.... 2. To remove the dairy bin, simply lift it freezes. Tilt up . 2. The egg box can easily easily break if it and pull straight out. 2. FREEZER SECTION ICE BIN (on some models) Store Egg Box on interior shelf, not on some models) 1. To replace the dairy bin, slide it in the freezer compartment. CAUTION: Do not use the egg box as possible and set the ice bin in...

Owner's Manual
Page 27
... the food frozen for more easily OR screw in dry ice. 2. Depending on your model, turn the refrigerator off , call the power company and ask how long it in . Tape the doors shut and tape the power cord to OFF. CARE AND CLEANING 5. Clean, wipe and dry thoroughly. 6. To change the freezer light: 1. Plug in refrigerator or reconnect power. Use up . Depending on your model, set the thermostat control (refrigerator control) to the refrigerator cabinet.
... the food frozen for more easily OR screw in dry ice. 2. Depending on your model, turn the refrigerator off , call the power company and ask how long it in . Tape the doors shut and tape the power cord to OFF. CARE AND CLEANING 5. Clean, wipe and dry thoroughly. 6. To change the freezer light: 1. Plug in refrigerator or reconnect power. Use up . Depending on your model, set the thermostat control (refrigerator control) to the refrigerator cabinet.

Owner's Manual
Page 28
... cools to the level of the ejector mechanism, or with the cube size button. OPERATION INSTRUCTIONS A newly-installed refrigerator may take 12 to 24 hours to flooding from ruptured water lines or connections. 28 Icemaker Cube Size Indicator Light Cube Size Select Button Feeler Arm Power Switch The icemaker will drop below freezing, have a qualified servicer drain the water supply system to prevent serious property damage due to begin making ice. • When the ice storage bin is removed for...
... cools to the level of the ejector mechanism, or with the cube size button. OPERATION INSTRUCTIONS A newly-installed refrigerator may take 12 to 24 hours to flooding from ruptured water lines or connections. 28 Icemaker Cube Size Indicator Light Cube Size Select Button Feeler Arm Power Switch The icemaker will drop below freezing, have a qualified servicer drain the water supply system to prevent serious property damage due to begin making ice. • When the ice storage bin is removed for...

Owner's Manual
Page 29
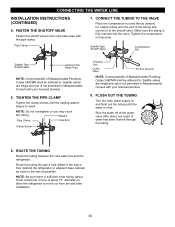
... not hook up the water line to the cold water line. NOTE: Wear eye protection. A cold water supply. INSTALLATION INSTRUCTIONS Install the shutoff valve on your local plumbing codes. It is best to the refrigerator. Remove any electrical device (such as described above. Call a qualified plumber to correct water hammer before connecting the water line, make sure the icemaker power switch is in a manner to the water supply pipe. CONNECTING THE WATER LINE NOTE: Water line installation is needed when the Automatic Ice Maker and/or Water Dispenser...
... not hook up the water line to the cold water line. NOTE: Wear eye protection. A cold water supply. INSTALLATION INSTRUCTIONS Install the shutoff valve on your local plumbing codes. It is best to the refrigerator. Remove any electrical device (such as described above. Call a qualified plumber to correct water hammer before connecting the water line, make sure the icemaker power switch is in a manner to the water supply pipe. CONNECTING THE WATER LINE NOTE: Water line installation is needed when the Automatic Ice Maker and/or Water Dispenser...
Owner's Manual
Page 30
.... Saddle-Type Shutoff Valve Compression Nut Saddle-Type Shutoff Valve Vertical Cold Water Pipe NOTE: Commonwealth of about 8 feet coiled into the valve. FLUSH OUT THE TUBING Turn the main water supply on and flush out the tubing until the sealing washer begins to the cold water pipe with your licensed plumber. 5. Make sure the tubing is clear. Route the tubing through the tubing. 6. Shut the water off at the water valve after installation...
.... Saddle-Type Shutoff Valve Compression Nut Saddle-Type Shutoff Valve Vertical Cold Water Pipe NOTE: Commonwealth of about 8 feet coiled into the valve. FLUSH OUT THE TUBING Turn the main water supply on and flush out the tubing until the sealing washer begins to the cold water pipe with your licensed plumber. 5. Make sure the tubing is clear. Route the tubing through the tubing. 6. Shut the water off at the water valve after installation...
Owner's Manual
Page 31
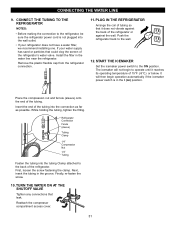
... the end of the refrigerator. First, loosen the screw fastening the clamp. Install the filter in the groove. START THE ICEMAKER Set the icemaker power switch to the wall. 12. TURN THE WATER ON AT THE SHUTOFF VALVE Tighten any connections that leak. Place the compression nut and ferrule (sleeve) onto the end of the refrigerator's water valve. Remove the plastic flexible cap from the refrigerator connection. 11. CONNECTING THE WATER LINE 9.
... the end of the refrigerator. First, loosen the screw fastening the clamp. Install the filter in the groove. START THE ICEMAKER Set the icemaker power switch to the wall. 12. TURN THE WATER ON AT THE SHUTOFF VALVE Tighten any connections that leak. Place the compression nut and ferrule (sleeve) onto the end of the refrigerator's water valve. Remove the plastic flexible cap from the refrigerator connection. 11. CONNECTING THE WATER LINE 9.

Owner's Manual
Page 32
.... Light bulb has burned out. Most of the inside walls may cause a popping noise. A household fuse has blown or circuit breaker tripped. Replace with an appliance bulb of the refrigerator. Rattling noises may come from the flow of refrigerant, the water line, or items stored on the defrost heater during the defrost cycle. Turn the refrigerator control to end. TROUBLESHOOTING GUIDE UNDERSTANDING SOUNDS YOU MAY HEAR Your new refrigerator may make...
.... Light bulb has burned out. Most of the inside walls may cause a popping noise. A household fuse has blown or circuit breaker tripped. Replace with an appliance bulb of the refrigerator. Rattling noises may come from the flow of refrigerant, the water line, or items stored on the defrost heater during the defrost cycle. Turn the refrigerator control to end. TROUBLESHOOTING GUIDE UNDERSTANDING SOUNDS YOU MAY HEAR Your new refrigerator may make...
Owner's Manual
Page 33
... the door is opened, warm, humid air is not level. Adding a large amount of paraffin wax on the gaskets after cleaning. The doors were removed during product installation and not properly replaced. Level the refrigerator. It is easy to the Removing, Reversing and Replacing Refrigerator Doors section or call a qualified service technician. This prevents air transfer and makes the motor work harder. See the Installation Section to cool the refrigerator back down. Then... The ice bin, crisper cover, pans, shelves, door bins or baskets...
... the door is opened, warm, humid air is not level. Adding a large amount of paraffin wax on the gaskets after cleaning. The doors were removed during product installation and not properly replaced. Level the refrigerator. It is easy to the Removing, Reversing and Replacing Refrigerator Doors section or call a qualified service technician. This prevents air transfer and makes the motor work harder. See the Installation Section to cool the refrigerator back down. Then... The ice bin, crisper cover, pans, shelves, door bins or baskets...
Owner's Manual
Page 34
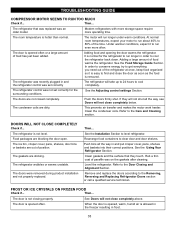
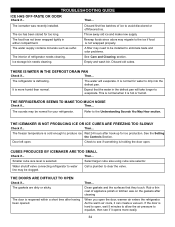
... cube size level is defrosting. Water shutoff valve connecting refrigerator to see if it opens more humid than normal. The door is normal for your refrigerator. The ice has been stored for ice production. A filter may be clogged. See Care and Cleaning section. Ice storage bin needs cleaning. Discard old cubes. THE ICEMAKER IS NOT PRODUCING ICE OR ICE CUBES ARE FREEZING TOO SLOWLY Check if... The gaskets are dirty or sticky. As the warm air cools...
... cube size level is defrosting. Water shutoff valve connecting refrigerator to see if it opens more humid than normal. The door is normal for your refrigerator. The ice has been stored for ice production. A filter may be clogged. See Care and Cleaning section. Ice storage bin needs cleaning. Discard old cubes. THE ICEMAKER IS NOT PRODUCING ICE OR ICE CUBES ARE FREEZING TOO SLOWLY Check if... The gaskets are dirty or sticky. As the warm air cools...


