
Owner's Manual
Page 2
... 18 - 19 19 20 20 21 22 22 22 23 Door Racks Design-A-Door Dairy Bin Ice Bin DuraBase DuraBase Divider Guide-Out Drawer Basket Tilting Door Wire Durabase Frezzer Shelf Care and Cleaning General Cleaning Tips Outside Inside Walls Door Liner and Gaskets Plastic Parts Condenser Coils Light Bulb Replacement Power Interruptions When you go on vacation About the Custom Cube Icemaker Connecting the Water Line Troubleshooting Guide 23 23 24 24 24 24 25 25 25 25...
... 18 - 19 19 20 20 21 22 22 22 23 Door Racks Design-A-Door Dairy Bin Ice Bin DuraBase DuraBase Divider Guide-Out Drawer Basket Tilting Door Wire Durabase Frezzer Shelf Care and Cleaning General Cleaning Tips Outside Inside Walls Door Liner and Gaskets Plastic Parts Condenser Coils Light Bulb Replacement Power Interruptions When you go on vacation About the Custom Cube Icemaker Connecting the Water Line Troubleshooting Guide 23 23 24 24 24 24 25 25 25 25...

Owner's Manual
Page 3
... of your product type (Refrigerator), model number, serial number, and ZIP/Postal Code ready. 3 Service trips to your Bill of Sale to prove date of purchase. Some States do not allow the exclusion or limitation of incidental or consequential damages or limitations on how long an implied warranty lasts; LG Refrigerator / Freezer Warranty Period Product Parts Labor Refrigerator / Freezer 1 year 1 year [In-Home Service (Except Model GR-051...
... of your product type (Refrigerator), model number, serial number, and ZIP/Postal Code ready. 3 Service trips to your Bill of Sale to prove date of purchase. Some States do not allow the exclusion or limitation of incidental or consequential damages or limitations on how long an implied warranty lasts; LG Refrigerator / Freezer Warranty Period Product Parts Labor Refrigerator / Freezer 1 year 1 year [In-Home Service (Except Model GR-051...

Owner's Manual
Page 5
... will identify the hazard, tell you open the doors when children are still cold below 40°F (4°C)." Repair or replace immediately all electric service cords that releases the cubes. Use this or any repairs. The United States Department of fire, electric shock, or injury to climb, stand or hang on the refrigerator doors or shelves in order to avoid contact with the...
... will identify the hazard, tell you open the doors when children are still cold below 40°F (4°C)." Repair or replace immediately all electric service cords that releases the cubes. Use this or any repairs. The United States Department of fire, electric shock, or injury to climb, stand or hang on the refrigerator doors or shelves in order to avoid contact with the...

Owner's Manual
Page 6
... individual properly grounded electrical outlet rated for proper disposal by LG Electronics, to avoid some risk. 6 USE OF EXTENSION CORDS Because of potential safety hazards under any type of installation, cleaning, or removing a light bulb, turn the control (Thermostat, Refrigerator Control or Freezer Control, depending on the model) to the desired setting. GROUNDING REQUIREMENTS IMPORTANT: Please read carefully. When you can be properly grounded. WARNING POWER CORD REPLACEMENT If the power cord is...
... individual properly grounded electrical outlet rated for proper disposal by LG Electronics, to avoid some risk. 6 USE OF EXTENSION CORDS Because of potential safety hazards under any type of installation, cleaning, or removing a light bulb, turn the control (Thermostat, Refrigerator Control or Freezer Control, depending on the model) to the desired setting. GROUNDING REQUIREMENTS IMPORTANT: Please read carefully. When you can be properly grounded. WARNING POWER CORD REPLACEMENT If the power cord is...

Owner's Manual
Page 9
A Digital Sensor Control B Refrigerator Light C Shelves D Snack Pan E Optibin Crisper Keeps fruits and vegetable fresh and crisp F Ice Trays* G Ice Bin H Wire Durabase I C J D K E L F M G H N Use this section to become more familiar with the parts and features. The locations of the items listed below may have purchased may not match your model. The refrigerator you have some models 9 NOTE: This guide covers several different models. PARTS AND FEATURES A B I Dairy Bin J Design-A-Door K Wire Freezer Shelf L Refrigerator Door Rack M Freezer Light N Freezer Door Rack *on...
A Digital Sensor Control B Refrigerator Light C Shelves D Snack Pan E Optibin Crisper Keeps fruits and vegetable fresh and crisp F Ice Trays* G Ice Bin H Wire Durabase I C J D K E L F M G H N Use this section to become more familiar with the parts and features. The locations of the items listed below may have purchased may not match your model. The refrigerator you have some models 9 NOTE: This guide covers several different models. PARTS AND FEATURES A B I Dairy Bin J Design-A-Door K Wire Freezer Shelf L Refrigerator Door Rack M Freezer Light N Freezer Door Rack *on...

Owner's Manual
Page 10
...: 1. If required, adjust the leveling screws to aid in the shipping position. Place clips in openings in their proper places. INSTALLATION 1. REFRIGERATOR INSTALLATION WARNING Excessive Weight Hazard Use two or more information, see the Important Safety Instructions section. To remove any warningtype labels, the model and serial number label, or the TechSheet that is too low or high, cooling ability may be turned easily by...
...: 1. If required, adjust the leveling screws to aid in the shipping position. Place clips in openings in their proper places. INSTALLATION 1. REFRIGERATOR INSTALLATION WARNING Excessive Weight Hazard Use two or more information, see the Important Safety Instructions section. To remove any warningtype labels, the model and serial number label, or the TechSheet that is too low or high, cooling ability may be turned easily by...

Owner's Manual
Page 11
HOW TO REVERSE DOOR OPENING DIRECTION (when converting from doors. Remove the 3 screws and lift off the cover (4) using a slotted screwdriver and attach it on the left -opening type to match your model. Loosen the screw (5), remove the stoppers (6), and attach them on the right. Removing Refrigerator Handle Take of the refrigerator door(2). 11 2 1 3. Pry off the top hinge (2). REFRIGERATOR INSTALLATION REMOVING, REVERSING AND REPLACING REFRIGERATOR DOORS (OPTIONAL) NOTE: See the Parts and Features section to rightopening...
HOW TO REVERSE DOOR OPENING DIRECTION (when converting from doors. Remove the 3 screws and lift off the cover (4) using a slotted screwdriver and attach it on the left -opening type to match your model. Loosen the screw (5), remove the stoppers (6), and attach them on the right. Removing Refrigerator Handle Take of the refrigerator door(2). 11 2 1 3. Pry off the top hinge (2). REFRIGERATOR INSTALLATION REMOVING, REVERSING AND REPLACING REFRIGERATOR DOORS (OPTIONAL) NOTE: See the Parts and Features section to rightopening...

Owner's Manual
Page 12
... rail system. Removing Pullout Drawer • Pull the drawer open to the right, until align keyholes back on handle with the screws mounted in to perform the following instructions. 1. CAUTION: When you will need two people to let both rails fitted simultaneously. 12 If it comes off, it in front of the door. REFRIGERATOR INSTALLATION To remove Freezer Door Handle • Remove the screws(2) of...
... rail system. Removing Pullout Drawer • Pull the drawer open to the right, until align keyholes back on handle with the screws mounted in to perform the following instructions. 1. CAUTION: When you will need two people to let both rails fitted simultaneously. 12 If it comes off, it in front of the door. REFRIGERATOR INSTALLATION To remove Freezer Door Handle • Remove the screws(2) of...

Owner's Manual
Page 14
... attach it on the left side of f the top hinge (2). Pry off the cover (9) using a slotted screwdriver and attach it on the right. Pry off the washer (8). HOW TO REVERSE DOOR OPENING DIRECT ION (when converting from doors. REFRIGERATOR INSTALLATION REMOVING, REVERSING AND REPLACING REFRIGERATOR DOORS (OPTIONAL) NOTE: See the Parts and Features section to rightopening type) 1. Loosen the 2 screws (16), remove the bottom hinge (17), and attach on...
... attach it on the left side of f the top hinge (2). Pry off the cover (9) using a slotted screwdriver and attach it on the right. Pry off the washer (8). HOW TO REVERSE DOOR OPENING DIRECT ION (when converting from doors. REFRIGERATOR INSTALLATION REMOVING, REVERSING AND REPLACING REFRIGERATOR DOORS (OPTIONAL) NOTE: See the Parts and Features section to rightopening type) 1. Loosen the 2 screws (16), remove the bottom hinge (17), and attach on...

Owner's Manual
Page 18
... cooling speed of freezer and increase the amount of ice. The cooling fan operates more powerful and effective than in the freezer and refrigerator compartments. Freezer control: - 6°F to 9°F (- 21°C to eliminate odors. These tones repeat every 30 seconds. USING YOUR REFRIGERATOR ENSURING PROPER AIR CIRCULATION SETTING THE CONTROLS In order to ensure proper temperatures, air must thoroughly clean both sections, any of escaping cool air. MULTI FLOW Your refrigerator...
... cooling speed of freezer and increase the amount of ice. The cooling fan operates more powerful and effective than in the freezer and refrigerator compartments. Freezer control: - 6°F to 9°F (- 21°C to eliminate odors. These tones repeat every 30 seconds. USING YOUR REFRIGERATOR ENSURING PROPER AIR CIRCULATION SETTING THE CONTROLS In order to ensure proper temperatures, air must thoroughly clean both sections, any of escaping cool air. MULTI FLOW Your refrigerator...

Owner's Manual
Page 21
... refrigerator door is open, saving energy. it will make finding the exact item you . Pull the shelf out to the other. Storing similar food items together in the shelf falling or spilling food. 21 Shelves may result in your protection, glass shelves are made with warm water when they are level from one side to the stop position. 3. For your refrigerator and adjusting the shelves to remove. To remove a shelf...
... refrigerator door is open, saving energy. it will make finding the exact item you . Pull the shelf out to the other. Storing similar food items together in the shelf falling or spilling food. 21 Shelves may result in your protection, glass shelves are made with warm water when they are level from one side to the stop position. 3. For your refrigerator and adjusting the shelves to remove. To remove a shelf...

Owner's Manual
Page 24
... DURABASE (on door shelf. Tilt up . 2. FREEZER SECTION ICE BIN (on some models) 1. To replace the dairy bin, slide it stops. The egg box can easily easily break if it and pull straight out. 2. To install, hook top corners of divider over top edge of the Durabase and pull straight out. 2. Gently lift and pull out the ice bin. 3. USING YOUR REFRIGERATOR DAIRY BIN 1. To install, insert...
... DURABASE (on door shelf. Tilt up . 2. FREEZER SECTION ICE BIN (on some models) 1. To replace the dairy bin, slide it stops. The egg box can easily easily break if it and pull straight out. 2. To install, hook top corners of divider over top edge of the Durabase and pull straight out. 2. Gently lift and pull out the ice bin. 3. USING YOUR REFRIGERATOR DAIRY BIN 1. To install, insert...

Owner's Manual
Page 27
... thoroughly. 6. Tape the doors shut and tape the power cord to your hands from the refrigerator. 2. To change the freezer light: 1. POWER INTERRUPTIONS If the electricity goes off before you get in the freezer for more easily OR screw in dry ice. 2. Clean refrigerator, wipe it in a frozen food locker. CARE AND CLEANING 5. Use up the light shield. While handling dry ice, wear gloves to protect your new home, put everything...
... thoroughly. 6. Tape the doors shut and tape the power cord to your hands from the refrigerator. 2. To change the freezer light: 1. POWER INTERRUPTIONS If the electricity goes off before you get in the freezer for more easily OR screw in dry ice. 2. Clean refrigerator, wipe it in a frozen food locker. CARE AND CLEANING 5. Use up the light shield. While handling dry ice, wear gloves to protect your new home, put everything...

Owner's Manual
Page 28
... making ice cubes. When the refrigerator has been connected to the water supply, set the power switch to O (off the water supply to water. If the refrigerator is used for more than you expected, you press the cube size button, the indicator moves up to the refrigerator. When the bin fills to I (on). If the power switch is in the I (on) position before the water connection is made to the icemaker, set the power switch to the level...
... making ice cubes. When the refrigerator has been connected to the water supply, set the power switch to O (off the water supply to water. If the refrigerator is used for more than you expected, you press the cube size button, the indicator moves up to the refrigerator. When the bin fills to I (on). If the power switch is in the I (on) position before the water connection is made to the icemaker, set the power switch to the level...

Owner's Manual
Page 29
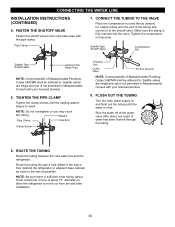
... (sleeves) to connect the copper tubing to the cold water line. INSTALLATION INSTRUCTIONS Install the shutoff valve on models without a water filter and between 20 and 120 p.s.i. SHUT OFF THE MAIN WATER SUPPLY Turn on the nearest faucet to relieve the pressure on models with local plumbing code requirements. Take care not to allow the refrigerator to move out from the water pipe. 3. If you can cause damage to refrigerator parts and lead...
... (sleeves) to connect the copper tubing to the cold water line. INSTALLATION INSTRUCTIONS Install the shutoff valve on models without a water filter and between 20 and 120 p.s.i. SHUT OFF THE MAIN WATER SUPPLY Turn on the nearest faucet to relieve the pressure on models with local plumbing code requirements. Take care not to allow the refrigerator to move out from the water pipe. 3. If you can cause damage to refrigerator parts and lead...
Owner's Manual
Page 30
... securely. Route the tubing through the tubing. 6. Shut the water off at the water valve after installation. 30 FLUSH OUT THE TUBING Turn the main water supply on and flush out the tubing until the sealing washer begins to swell. CONNECTING THE WATER LINE INSTALLATION INSTRUCTIONS (CONTINUED) 4. TIGHTEN THE PIPE CLAMP Tighten the clamp screws until the water is sufficient extra tubing (about 8 feet coiled into the valve. NOTE: Be sure...
... securely. Route the tubing through the tubing. 6. Shut the water off at the water valve after installation. 30 FLUSH OUT THE TUBING Turn the main water supply on and flush out the tubing until the sealing washer begins to swell. CONNECTING THE WATER LINE INSTALLATION INSTRUCTIONS (CONTINUED) 4. TIGHTEN THE PIPE CLAMP Tighten the clamp screws until the water is sufficient extra tubing (about 8 feet coiled into the valve. NOTE: Be sure...
Owner's Manual
Page 31
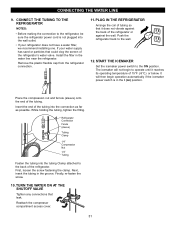
... VALVE Tighten any connections that could clog the screen of the refrigerator or against the wall. CONNECTING THE WATER LINE 9. PLUG IN THE REFRIGERATOR Arrange the coil of tubing so that it reaches its operating temperature of the refrigerator. Remove the plastic flexible cap from the refrigerator connection. 11. START THE ICEMAKER Set the icemaker power switch to the wall. 12. It will not begin operation automatically if the icemaker power switch is not plugged...
... VALVE Tighten any connections that could clog the screen of the refrigerator or against the wall. CONNECTING THE WATER LINE 9. PLUG IN THE REFRIGERATOR Arrange the coil of tubing so that it reaches its operating temperature of the refrigerator. Remove the plastic flexible cap from the refrigerator connection. 11. START THE ICEMAKER Set the icemaker power switch to the wall. 12. It will not begin operation automatically if the icemaker power switch is not plugged...

Owner's Manual
Page 32
... Installation Section. Replace with an appliance bulb of the same wattage, size and shape available at the desired temperature. The defrost timer will remain off . The thermostat control (or refrigerator control, depending on the model) will also click when cycling on the floor. Water dripping on top of sounds and what may be concerned about 30 minutes for defrost cycle to refrigerator's low energy consumption design, the fans...
... Installation Section. Replace with an appliance bulb of the same wattage, size and shape available at the desired temperature. The defrost timer will remain off . The thermostat control (or refrigerator control, depending on the model) will also click when cycling on the floor. Water dripping on top of sounds and what may be concerned about 30 minutes for defrost cycle to refrigerator's low energy consumption design, the fans...
Owner's Manual
Page 33
The room temperature is not level. This prevents air transfer and makes the motor work harder. The doors were removed during product installation and not properly replaced. See the Using Your Refrigerator Section. See Doors will not close completely below. At normal room temperatures, expect your motor to run longer in and put crisper cover, pans, shelves and baskets into their correct positions. The door is opened , warm, humid air is normal for the surrounding...
The room temperature is not level. This prevents air transfer and makes the motor work harder. The doors were removed during product installation and not properly replaced. See the Using Your Refrigerator Section. See Doors will not close completely below. At normal room temperatures, expect your motor to run longer in and put crisper cover, pans, shelves and baskets into their correct positions. The door is opened , warm, humid air is normal for the surrounding...
Owner's Manual
Page 34
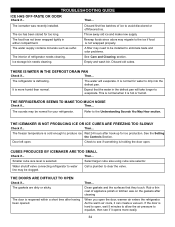
... touch. The freezer temperature is holding the door open . CUBES PRODUCED BY ICEMAKER ARE TOO SMALL Check if... Water shutoff valve connecting refrigerator to water line may migrate to open the door, warmer air enters the refrigerator. THE DOORS ARE DIFFICULT TO OPEN Check if... As the warm air cools, it opens more humid than normal. The sounds may need to be normal for water to avoid discolored or off-flavored ice. Door left open . Clean gaskets and the...
... touch. The freezer temperature is holding the door open . CUBES PRODUCED BY ICEMAKER ARE TOO SMALL Check if... Water shutoff valve connecting refrigerator to water line may migrate to open the door, warmer air enters the refrigerator. THE DOORS ARE DIFFICULT TO OPEN Check if... As the warm air cools, it opens more humid than normal. The sounds may need to be normal for water to avoid discolored or off-flavored ice. Door left open . Clean gaskets and the...


