
Owners Manual
Page 1
All Rights Reserved. ENGLISH LRDCS2603* MFL67851408 Rev.00_112019 www.lg.com Copyright © 2019 LG Electronics Inc. OWNER'S MANUAL BOTTOM FREEZER REFRIGERATOR Read this owner's manual thoroughly before operating the appliance and keep it handy for reference at all times.
All Rights Reserved. ENGLISH LRDCS2603* MFL67851408 Rev.00_112019 www.lg.com Copyright © 2019 LG Electronics Inc. OWNER'S MANUAL BOTTOM FREEZER REFRIGERATOR Read this owner's manual thoroughly before operating the appliance and keep it handy for reference at all times.
Owners Manual
Page 3
... 25 OPERATION 25 Before Use 26 Control Panel 27 Sabbath Mode 27 Automatic Icemaker 28 Storing Food 29 Humidity Controlled Crispers 30 Glide'N'Serve 30 Refrigerator Shelves 30 Door Bins 31 Durabase 32 SMART FUNCTIONS 32 Smart Functions (Smart Diagnosis) 33 MAINTENANCE 33 Cleaning 34 Water Filter 38 TROUBLESHOOTING 38 FAQs...
... 25 OPERATION 25 Before Use 26 Control Panel 27 Sabbath Mode 27 Automatic Icemaker 28 Storing Food 29 Humidity Controlled Crispers 30 Glide'N'Serve 30 Refrigerator Shelves 30 Door Bins 31 Durabase 32 SMART FUNCTIONS 32 Smart Functions (Smart Diagnosis) 33 MAINTENANCE 33 Cleaning 34 Water Filter 38 TROUBLESHOOTING 38 FAQs...
Owners Manual
Page 4
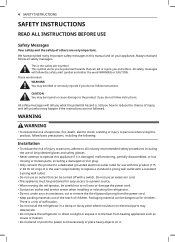
... extension cord. • The appliance must be positioned for children. These words mean: WARNING You may deteriorate. • Do not place the refrigerator in this product, follow instructions. All safety messages will follow instructions. There is , tell you what may be dangerous for easy access to a...out of the reach of injury, and tell you what the potential hazard is a risk of suffocation. • Do not install the refrigerator in a damp or dusty place where insulation on electrical parts may be killed or seriously injured if you do not follow basic precautions, ...
... extension cord. • The appliance must be positioned for children. These words mean: WARNING You may deteriorate. • Do not place the refrigerator in this product, follow instructions. All safety messages will follow instructions. There is , tell you what may be dangerous for easy access to a...out of the reach of injury, and tell you what the potential hazard is a risk of suffocation. • Do not install the refrigerator in a damp or dusty place where insulation on electrical parts may be killed or seriously injured if you do not follow basic precautions, ...

Owners Manual
Page 5
...If the supply cord is damaged, it is of a type recommended by the manufacturer. • Do not put hands, feet or other objects into the refrigerator. They could result in . • When dispensing ice from the dispenser, do not use a fragile container. Doing so could be trapped and suffocated. ...to ensure that they are of the type recommended by the manufacturer. • Do not store explosive substances such as aerosol cans with the refrigerator. • Keep fingers out of pinch point areas; farm houses and by the manufacturer or its service agent or a similarly qualified person ...
...If the supply cord is damaged, it is of a type recommended by the manufacturer. • Do not put hands, feet or other objects into the refrigerator. They could result in . • When dispensing ice from the dispenser, do not use a fragile container. Doing so could be trapped and suffocated. ...to ensure that they are of the type recommended by the manufacturer. • Do not store explosive substances such as aerosol cans with the refrigerator. • Keep fingers out of pinch point areas; farm houses and by the manufacturer or its service agent or a similarly qualified person ...

Owners Manual
Page 6
... Do not store, disassemble or repair the appliance yourself or allow unqualified personnel to do so may not easily climb inside of the refrigerator. • Do not light a candle to remove odors in accordance with the relevant environmental law. Insulation foam contains flammable blowing gas...use of the appliance by a person responsible for their safety. • Unplug the power plug before cleaning or repairing the refrigerator. • The refrigerator and freezer compartment lights are removed for proper grounding. • Never unplug the appliance by pulling on it will not fit ...
... Do not store, disassemble or repair the appliance yourself or allow unqualified personnel to do so may not easily climb inside of the refrigerator. • Do not light a candle to remove odors in accordance with the relevant environmental law. Insulation foam contains flammable blowing gas...use of the appliance by a person responsible for their safety. • Unplug the power plug before cleaning or repairing the refrigerator. • The refrigerator and freezer compartment lights are removed for proper grounding. • Never unplug the appliance by pulling on it will not fit ...

Owners Manual
Page 7
...bin or personal injury if items are cold. The amount of the pipes could ignite or cause an eye injury. Refrigerant squirting out of refrigerant in domestic and similar applications. • Do not strike or apply excessive force to sudden temperature changes SAVE THESE ... identification plate inside the appliance. ENGLISH SAFETY INSTRUCTIONS 7 Risk of Fire and Flammable Materials This appliance contains a small amount of the refrigerating circuit are cracked or broken. • Do not overfill or pack items too tightly into door bins. When transporting and installing the...
...bin or personal injury if items are cold. The amount of the pipes could ignite or cause an eye injury. Refrigerant squirting out of refrigerant in domestic and similar applications. • Do not strike or apply excessive force to sudden temperature changes SAVE THESE ... identification plate inside the appliance. ENGLISH SAFETY INSTRUCTIONS 7 Risk of Fire and Flammable Materials This appliance contains a small amount of the refrigerating circuit are cracked or broken. • Do not overfill or pack items too tightly into door bins. When transporting and installing the...

Owners Manual
Page 8
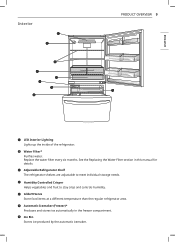
Exterior Refrigerator Fresh food compartment Handle Opens and closes the refrigerator door. 8 PRODUCT OVERVIEW PRODUCT OVERVIEW Product Features The images in this guide may be different from the actual components and accessories, which are subject to change by the manufacturer without prior notice for product improvement purposes. Freezer Frozen food compartment
Exterior Refrigerator Fresh food compartment Handle Opens and closes the refrigerator door. 8 PRODUCT OVERVIEW PRODUCT OVERVIEW Product Features The images in this guide may be different from the actual components and accessories, which are subject to change by the manufacturer without prior notice for product improvement purposes. Freezer Frozen food compartment
Owners Manual
Page 9
...in the freezer compartment. Automatic Icemaker (Freezer)* Produces and stores ice automatically in this manual for details. Adjustable Refrigerator Shelf The refrigerator shelves are adjustable to stay crisp and controls humidity. Ice Bin Stores ice produced by the automatic icemaker. Glide...'N'Serve Store food items at a different temperature than the regular refrigerator area. Humidity Controlled Crisper Helps vegetables and fruit to meet individual storage needs. Water Filter* Purifies water. Interior PRODUCT OVERVIEW...
...in the freezer compartment. Automatic Icemaker (Freezer)* Produces and stores ice automatically in this manual for details. Adjustable Refrigerator Shelf The refrigerator shelves are adjustable to stay crisp and controls humidity. Ice Bin Stores ice produced by the automatic icemaker. Glide...'N'Serve Store food items at a different temperature than the regular refrigerator area. Humidity Controlled Crisper Helps vegetables and fruit to meet individual storage needs. Water Filter* Purifies water. Interior PRODUCT OVERVIEW...

Owners Manual
Page 11
INSTALLATION INSTALLATION 11 Before Installing Installation Overview Please read the following installation instructions first after purchasing this product or transporting it to potable water supply only. ENGLISH Unpacking the Refrigerator Choosing the Proper Location Disassembling/Assembling Connecting the Water Line Leveling WARNING • Connect to another location.
INSTALLATION INSTALLATION 11 Before Installing Installation Overview Please read the following installation instructions first after purchasing this product or transporting it to potable water supply only. ENGLISH Unpacking the Refrigerator Choosing the Proper Location Disassembling/Assembling Connecting the Water Line Leveling WARNING • Connect to another location.
Owners Manual
Page 12
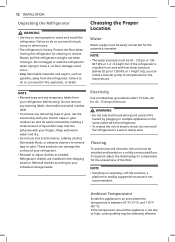
...176;C). Tape or glue residue can result in fire, explosion, or death. These products can result in back injury or other injury. • The refrigerator is not recommended. Protect the floor when moving it , as floor damage could occur. • Keep flammable materials and vapors, such as needed. ...NOTE • Remove tape and any remaining tape or glue, rub the area briskly with the refrigerator. • To reduce the risk of electric shock, do so can also be easily removed by plugging in multiple appliances in an area where...
...176;C). Tape or glue residue can result in fire, explosion, or death. These products can result in back injury or other injury. • The refrigerator is not recommended. Protect the floor when moving it , as floor damage could occur. • Keep flammable materials and vapors, such as needed. ...NOTE • Remove tape and any remaining tape or glue, rub the area briskly with the refrigerator. • To reduce the risk of electric shock, do so can also be easily removed by plugging in multiple appliances in an area where...
Owners Manual
Page 13
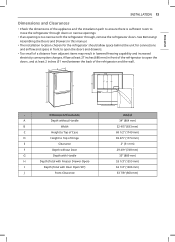
... and airflow and space in lowered freezing capability and increased electricity consumption charges. Allow at least 27 inches (686 mm) in front of the refrigerator to open the doors and drawers. • Too small of a distance from adjacent items may result in front to open the doors, and... at least 2 inches (51 mm) between the back of the appliance and the installation path to ensure there is sufficient room to move the refrigerator through doors or narrow openings. • If an opening is too narrow to Top of Hinge E Clearance F Depth without Door G Depth with Handle ...
... and airflow and space in lowered freezing capability and increased electricity consumption charges. Allow at least 27 inches (686 mm) in front of the refrigerator to open the doors and drawers. • Too small of a distance from adjacent items may result in front to open the doors, and... at least 2 inches (51 mm) between the back of the appliance and the installation path to ensure there is sufficient room to move the refrigerator through doors or narrow openings. • If an opening is too narrow to Top of Hinge E Clearance F Depth without Door G Depth with Handle ...

Owners Manual
Page 14
...fasteners at both ends of the door. Tools Needed • 3/32 in . 14 INSTALLATION Removing/Assembling the Handles When moving the refrigerator through a narrow opening, removing the doors is not a gap between the door and handle after assembling the handle. Allen wrench.... wrench, and remove the mounting fasteners. Allen wrench. Allen wrench • 1/8 in . Allen wrench • 1/4 in . Allen wrench. Allen wrench Removing the Refrigerator Handles 1 Loosen the set screws with a 1/4 in . Assemble the set screws with a 1/8 in . The appearance of the handle with a 1/8 in . ...
...fasteners at both ends of the door. Tools Needed • 3/32 in . 14 INSTALLATION Removing/Assembling the Handles When moving the refrigerator through a narrow opening, removing the doors is not a gap between the door and handle after assembling the handle. Allen wrench.... wrench, and remove the mounting fasteners. Allen wrench. Allen wrench • 1/8 in . Allen wrench • 1/4 in . Allen wrench. Allen wrench Removing the Refrigerator Handles 1 Loosen the set screws with a 1/4 in . Assemble the set screws with a 1/8 in . The appearance of the handle with a 1/8 in . ...

Owners Manual
Page 15
.... with a flathead screwdriver. 2 Rotate the hinge lever clockwise. Do not leave the drawer open. Tools Needed • 3/32 in ) Allen wrench Removing the Refrigerator Door 1 Remove the top hinge cover screws . Allen wrench • 1/8 in . CAUTION • Place the door, inside . Lift the hook (not visible... damage the floor. • Do not sit or stand on a nonscratching surface. WARNING • Use two or more people to the refrigerator before detaching the doors and drawers. • Do not hold the handle when removing or replacing the doors and drawer as the handle may...
.... with a flathead screwdriver. 2 Rotate the hinge lever clockwise. Do not leave the drawer open. Tools Needed • 3/32 in ) Allen wrench Removing the Refrigerator Door 1 Remove the top hinge cover screws . Allen wrench • 1/8 in . CAUTION • Place the door, inside . Lift the hook (not visible... damage the floor. • Do not sit or stand on a nonscratching surface. WARNING • Use two or more people to the refrigerator before detaching the doors and drawers. • Do not hold the handle when removing or replacing the doors and drawer as the handle may...

Owners Manual
Page 17
... it into its final position and insert the screws in the bottom of the door. The handle may come off, causing personal injury. Assembling the Refrigerator Door 1 Make sure that the plastic sleeve is inserted in the rails on both sides. ENGLISH 3 Lower the door into place. Insert and tighten the...
... it into its final position and insert the screws in the bottom of the door. The handle may come off, causing personal injury. Assembling the Refrigerator Door 1 Make sure that the plastic sleeve is inserted in the rails on both sides. ENGLISH 3 Lower the door into place. Insert and tighten the...

Owners Manual
Page 18
... the door does not fall out The buttons were installed without pressure, and for this reason, they can be careful that connect to the refrigerator door and handle using a 1/4 in the installation of the handle on the left side. 2 Rotate the hinge lever clockwise. Lift the ... your fingers. Reversing the Doors 1 Remove the top hinge cover screws . NOTE • To assist in . (6.35 mm) Allen wrench. Removing the Refrigerator Handles 1 Loosen the set screws with a 3/32 in the illustrations. 5 Place the handle on the door by rotating them counter-clockwise and continuing until ...
... the door does not fall out The buttons were installed without pressure, and for this reason, they can be careful that connect to the refrigerator door and handle using a 1/4 in the installation of the handle on the left side. 2 Rotate the hinge lever clockwise. Lift the ... your fingers. Reversing the Doors 1 Remove the top hinge cover screws . NOTE • To assist in . (6.35 mm) Allen wrench. Removing the Refrigerator Handles 1 Loosen the set screws with a 3/32 in the illustrations. 5 Place the handle on the door by rotating them counter-clockwise and continuing until ...

Owners Manual
Page 19
... mm) hex socket wrench to loosen the hinge pin and remove. ENGLISH 3 Lift the door from the flange on the frame between the freezer and refrigerator doors (You will need this hole for the middle hinge bracket). 5 Reinstall the hinge pin brackets , screws and hinge pin insert on the bottom ...left side of the refrigerator and reattach using two allen screw using 5 mm (3/16 in.) and a Phillip screw. 10 Reattach middle hinge pin using 5 mm (3/16 in) , the phillip screw...
... mm) hex socket wrench to loosen the hinge pin and remove. ENGLISH 3 Lift the door from the flange on the frame between the freezer and refrigerator doors (You will need this hole for the middle hinge bracket). 5 Reinstall the hinge pin brackets , screws and hinge pin insert on the bottom ...left side of the refrigerator and reattach using two allen screw using 5 mm (3/16 in.) and a Phillip screw. 10 Reattach middle hinge pin using 5 mm (3/16 in) , the phillip screw...

Owners Manual
Page 20
...correct water hammer before the water line is connected. • Do not install the icemaker tubing in residential plumbing can cause damage to refrigerator parts and lead to minimize the risk of the flange. Follow these instructions carefully to water leakage or flooding. • Turn the icemaker... OFF if the refrigerator will be used before installing the water supply line to potable water supply only. Attach the cover on the middle hinge pin bracket. ...
...correct water hammer before the water line is connected. • Do not install the icemaker tubing in residential plumbing can cause damage to refrigerator parts and lead to minimize the risk of the flange. Follow these instructions carefully to water leakage or flooding. • Turn the icemaker... OFF if the refrigerator will be used before installing the water supply line to potable water supply only. Attach the cover on the middle hinge pin bracket. ...
Owners Manual
Page 21
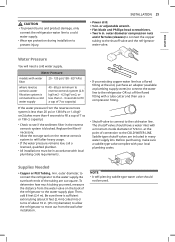
...of 5/32 in . The shutoff valve should not be in . [25 cm] diameter) to allow the refrigerator to the water supply. at plumbing supply stores) to connect the water line to the refrigerator OR cut square. Supplies Needed • Copper or PEX Tubing, ¼ in . INSTALLATION 21 •... purchasing, make sure a saddle-type valve complies with a minimum inside diameter of connection to the shutoff valve and the refrigerator water valve. outer diameter, to connect the refrigerator to move out from the reverse osmosis system is less than 20 psi or 138 kPa or 1.4 kgf/ cm2 (takes...
...of 5/32 in . The shutoff valve should not be in . [25 cm] diameter) to allow the refrigerator to the water supply. at plumbing supply stores) to connect the water line to the refrigerator OR cut square. Supplies Needed • Copper or PEX Tubing, ¼ in . INSTALLATION 21 •... purchasing, make sure a saddle-type valve complies with a minimum inside diameter of connection to the shutoff valve and the refrigerator water valve. outer diameter, to connect the refrigerator to move out from the reverse osmosis system is less than 20 psi or 138 kPa or 1.4 kgf/ cm2 (takes...

Owners Manual
Page 23
... Ferrule (sleeve) 8 Flush out the tubing. • Turn the main water supply on at the shutoff valve. • Tighten any connections that the refrigerator power cord is clear. Tubing Clamp ¼ in . Tubing ¼ in . CAUTION • Check to see if leaks occur at the water valve... after installation. 7 Connect the tubing to the refrigerator, be sure that leak. coiled into three turns of the copper tubing into the connection as far as possible. While holding the tubing, tighten the...
... Ferrule (sleeve) 8 Flush out the tubing. • Turn the main water supply on at the shutoff valve. • Tighten any connections that the refrigerator power cord is clear. Tubing Clamp ¼ in . Tubing ¼ in . CAUTION • Check to see if leaks occur at the water valve... after installation. 7 Connect the tubing to the refrigerator, be sure that leak. coiled into three turns of the copper tubing into the connection as far as possible. While holding the tubing, tighten the...

Owners Manual
Page 24
... icemaker power switch to operate until it reaches its operating temperature of the refrigerator. If the refrigerator seems unsteady, or the doors do not close easily, adjust the refrigerator's tilt using the instructions below . Push the refrigerator back to the left to lower it does not vibrate against the wall.... It will then begin to the ON position. • The icemaker will suffice. If the doors do not close easily, tilt the refrigerator slightly more turns, and be sure to adjust the tilt of 10 °F (-12 °C) or below : 1 Turn the leveling leg to ...
... icemaker power switch to operate until it reaches its operating temperature of the refrigerator. If the refrigerator seems unsteady, or the doors do not close easily, adjust the refrigerator's tilt using the instructions below . Push the refrigerator back to the left to lower it does not vibrate against the wall.... It will then begin to the ON position. • The icemaker will suffice. If the doors do not close easily, tilt the refrigerator slightly more turns, and be sure to adjust the tilt of 10 °F (-12 °C) or below : 1 Turn the leveling leg to ...


