Owners Manual
Page 3
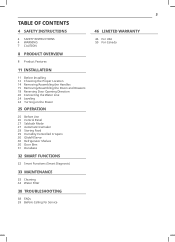
... Installing 12 Choosing the Proper Location 14 Removing/Assembling the Handles 15 Removing/Assembling the Doors and Drawers 18 Reversing Door Opening Direction 20 Connecting the Water Line 24 Leveling 24 Turning on the Power 25 OPERATION 25 Before Use 26 Control Panel 27 Sabbath Mode 27 Automatic Icemaker 28 Storing Food 29 Humidity Controlled Crispers 30 Glide'N'Serve 30 Refrigerator Shelves 30 Door Bins 31 Durabase 32 SMART FUNCTIONS 32 Smart Functions (Smart Diagnosis) 33 MAINTENANCE 33 Cleaning 34 Water Filter 38 TROUBLESHOOTING...
... Installing 12 Choosing the Proper Location 14 Removing/Assembling the Handles 15 Removing/Assembling the Doors and Drawers 18 Reversing Door Opening Direction 20 Connecting the Water Line 24 Leveling 24 Turning on the Power 25 OPERATION 25 Before Use 26 Control Panel 27 Sabbath Mode 27 Automatic Icemaker 28 Storing Food 29 Humidity Controlled Crispers 30 Glide'N'Serve 30 Refrigerator Shelves 30 Door Bins 31 Durabase 32 SMART FUNCTIONS 32 Smart Functions (Smart Diagnosis) 33 MAINTENANCE 33 Cleaning 34 Water Filter 38 TROUBLESHOOTING...
Owners Manual
Page 4
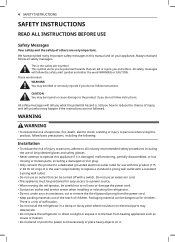
... to a power source. • When moving the refrigerator, be turned off with a switch. All safety messages will follow instructions. 4 SAFETY INSTRUCTIONS SAFETY INSTRUCTIONS READ ALL INSTRUCTIONS BEFORE USE Safety Messages Your safety and the safety of suffocation. • Do not install the refrigerator in a damp or dusty place where insulation on electrical parts may deteriorate. • Do not place the refrigerator in this manual and...
... to a power source. • When moving the refrigerator, be turned off with a switch. All safety messages will follow instructions. 4 SAFETY INSTRUCTIONS SAFETY INSTRUCTIONS READ ALL INSTRUCTIONS BEFORE USE Safety Messages Your safety and the safety of suffocation. • Do not install the refrigerator in a damp or dusty place where insulation on electrical parts may deteriorate. • Do not place the refrigerator in this manual and...

Owners Manual
Page 6
... discarding the appliance, remove the door gasket while leaving the shelves and baskets in the freezer compartment. Do not modify the plug provided with reduced physical, sensory or mental capabilities, or lack of experience and knowledge, unless they are sitting for their safety. • Unplug the power plug before cleaning or repairing the refrigerator. • The refrigerator and freezer compartment lights are dangerous, even...
... discarding the appliance, remove the door gasket while leaving the shelves and baskets in the freezer compartment. Do not modify the plug provided with reduced physical, sensory or mental capabilities, or lack of experience and knowledge, unless they are sitting for their safety. • Unplug the power plug before cleaning or repairing the refrigerator. • The refrigerator and freezer compartment lights are dangerous, even...
Owners Manual
Page 12
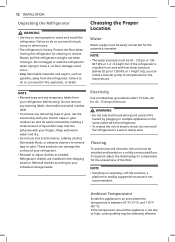
.... NOTE • The water pressure must be easily removed by plugging in multiple appliances in the same outlet with the refrigerator. • To reduce the risk of electric shock, do not install the refrigerator in an area with your fingers. Tape or glue residue can also be easily connected for cleaning or service. Reinstall shelves according to your refrigerator before using. WARNING •...
.... NOTE • The water pressure must be easily removed by plugging in multiple appliances in the same outlet with the refrigerator. • To reduce the risk of electric shock, do not install the refrigerator in an area with your fingers. Tape or glue residue can also be easily connected for cleaning or service. Reinstall shelves according to your refrigerator before using. WARNING •...

Owners Manual
Page 14
... that connect to fix the handle into place. • Make sure that the bracket hole of the handle with a 1/8 in. Removing the Refrigerator Handles 1 Assemble the mounting fasteners at both ends of the handle with a 1/4 in . Allen wrench. 2 Place the handle on the door by fitting the handle footprints over the mounting fasteners and tightening the set screws to the refrigerator door and handle using a ¼ in . Assemble the set...
... that connect to fix the handle into place. • Make sure that the bracket hole of the handle with a 1/8 in. Removing the Refrigerator Handles 1 Assemble the mounting fasteners at both ends of the handle with a 1/4 in . Allen wrench. 2 Place the handle on the door by fitting the handle footprints over the mounting fasteners and tightening the set screws to the refrigerator door and handle using a ¼ in . Assemble the set...

Owners Manual
Page 15
... wrench Removing the Refrigerator Door 1 Remove the top hinge cover screws . Lift the top hinge free of the drawer. • When you lay the drawer down, be careful that the door does not fall forward. CAUTION • Place the door, inside . with a flathead screwdriver. 2 Rotate the hinge lever clockwise. Removing the Freezer Drawers WARNING • Use two or more people to remove and install the refrigerator doors and freezer drawer. • Disconnect the electrical supply to the refrigerator...
... wrench Removing the Refrigerator Door 1 Remove the top hinge cover screws . Lift the top hinge free of the drawer. • When you lay the drawer down, be careful that the door does not fall forward. CAUTION • Place the door, inside . with a flathead screwdriver. 2 Rotate the hinge lever clockwise. Removing the Freezer Drawers WARNING • Use two or more people to remove and install the refrigerator doors and freezer drawer. • Disconnect the electrical supply to the refrigerator...
Owners Manual
Page 21
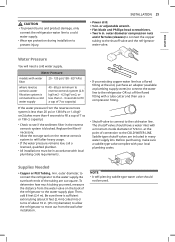
... used. Supplies Needed • Copper or PEX Tubing, ¼ in . Be sure both ends of the tubing are included in many water supply kits. To determine how much tubing you need a cold water supply. INSTALLATION 21 • Power drill. • ½ in . at plumbing supply stores) to connect the water line to the COLD WATER LINE. Then, add 8 feet (2.4 m). Water Pressure models with water filter 20 - 120 psi (138 - 827 kPa) where reverse osmosis water filtration system is connected to a cold water supply...
... used. Supplies Needed • Copper or PEX Tubing, ¼ in . Be sure both ends of the tubing are included in many water supply kits. To determine how much tubing you need a cold water supply. INSTALLATION 21 • Power drill. • ½ in . at plumbing supply stores) to connect the water line to the COLD WATER LINE. Then, add 8 feet (2.4 m). Water Pressure models with water filter 20 - 120 psi (138 - 827 kPa) where reverse osmosis water filtration system is connected to a cold water supply...
Owners Manual
Page 26
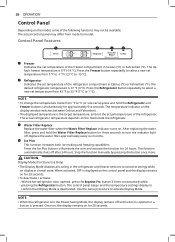
... OPERATION Control Panel Depending on display in a retail store. Control Panel Features Freezer Indicates the set temperature from °F to °C (or vice versa) press and hold the Water Filter Replace button for three seconds to activate Display Mode. After replacing the water filter, press and hold the Refrigerator and Freezer buttons simultaneously for 20 seconds. The function automatically shuts off after 24 hours. CAUTION Display Mode (For Store Use Only) • The Display Mode disables all cooling in...
... OPERATION Control Panel Depending on display in a retail store. Control Panel Features Freezer Indicates the set temperature from °F to °C (or vice versa) press and hold the Water Filter Replace button for three seconds to activate Display Mode. After replacing the water filter, press and hold the Refrigerator and Freezer buttons simultaneously for 20 seconds. The function automatically shuts off after 24 hours. CAUTION Display Mode (For Store Use Only) • The Display Mode disables all cooling in...
Owners Manual
Page 27
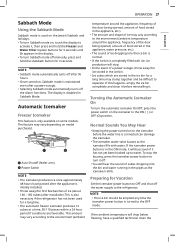
... the ice bin completely and clean it , then press and hold the shabbath button for 3 seconds. Normal Sounds You May Hear • Keeping the power turned on , touch the display to activate it before the water line is connected can damage the icemaker. • The icemaker water valve buzzes as the icemaker refills. OPERATION 27 ENGLISH Sabbath Mode Using the Sabbath Mode Sabbath mode is used for a longtime. • The automatic freezer icemaker...
... the ice bin completely and clean it , then press and hold the shabbath button for 3 seconds. Normal Sounds You May Hear • Keeping the power turned on , touch the display to activate it before the water line is connected can damage the icemaker. • The icemaker water valve buzzes as the icemaker refills. OPERATION 27 ENGLISH Sabbath Mode Using the Sabbath Mode Sabbath mode is used for a longtime. • The automatic freezer icemaker...
Owners Manual
Page 34
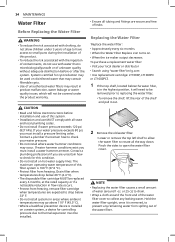
... used on lg.com • Use replacement cartridge: LT1000P, LT1000PC or LT1000PCS 1 If the top shelf, located below 40 °F (4.4 °C). • The disposable filter cartridge MUST be replaced every 6 months, at the rated capacity or if a noticeable reduction in the highest position, it will not be covered under the product warranty. Drain filter when temperatures drop below the water filter, is in flow rate occurs. • Protect from freezing...
... used on lg.com • Use replacement cartridge: LT1000P, LT1000PC or LT1000PCS 1 If the top shelf, located below 40 °F (4.4 °C). • The disposable filter cartridge MUST be replaced every 6 months, at the rated capacity or if a noticeable reduction in the highest position, it will not be covered under the product warranty. Drain filter when temperatures drop below the water filter, is in flow rate occurs. • Protect from freezing...

Owners Manual
Page 35
... to rotate the filter down completely before pulling it stops. 5 Close the water filter cover. MAINTENANCE 35 For further assistance, call: • 1-800-243-0000 (USA) • 1-888-542-2623 (Canada) 4 Replace with a new water filter. • Take the new water filter out of 30 seconds ON and 60 seconds OFF. 7 After changing the filter, press and hold the Water Filter Replace button for approximately 5 minutes) to reset the indicator light.
... to rotate the filter down completely before pulling it stops. 5 Close the water filter cover. MAINTENANCE 35 For further assistance, call: • 1-800-243-0000 (USA) • 1-888-542-2623 (Canada) 4 Replace with a new water filter. • Take the new water filter out of 30 seconds ON and 60 seconds OFF. 7 After changing the filter, press and hold the Water Filter Replace button for approximately 5 minutes) to reset the indicator light.
Owners Manual
Page 37
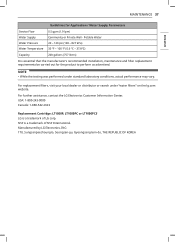
...: 1-800-243-0000 Canada: 1-888-542-2623 Replacement Cartridge: LT1000P, LT1000PC or LT1000PCS LG is essential that the manufacturer's recommended installation, maintenance and filter replacement requirements be carried out for Application / Water Supply Parameters Service Flow 0.5 gpm (1.9 lpm) Water Supply Community or Private Well - For further assistance, contact the LG Electronics Customer Information Center. For replacement filters, visit your local dealer or distributor or search...
...: 1-800-243-0000 Canada: 1-888-542-2623 Replacement Cartridge: LT1000P, LT1000PC or LT1000PCS LG is essential that the manufacturer's recommended installation, maintenance and filter replacement requirements be carried out for Application / Water Supply Parameters Service Flow 0.5 gpm (1.9 lpm) Water Supply Community or Private Well - For further assistance, contact the LG Electronics Customer Information Center. For replacement filters, visit your local dealer or distributor or search...

Owners Manual
Page 38
... firm and ice cubes should be cold when stored on for the refrigerator is deactivated. Q: My refrigerator is wrong? The control panel beeps and the temperature settings display to activate Display Mode. If you do not have a water source attached to your refrigerator and the icemaker is turned on display in a retail store. Q: Why do I hear a buzzing noise from my refrigerator periodically? A: Continually press the Refrigerator or Freezer button on and...
... firm and ice cubes should be cold when stored on for the refrigerator is deactivated. Q: My refrigerator is wrong? The control panel beeps and the temperature settings display to activate Display Mode. If you do not have a water source attached to your refrigerator and the icemaker is turned on display in a retail store. Q: Why do I hear a buzzing noise from my refrigerator periodically? A: Continually press the Refrigerator or Freezer button on and...
Owners Manual
Page 39
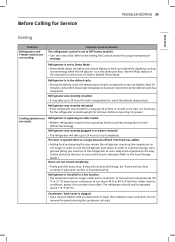
...; Demo Mode allows the lights and control display to work normally while disabling cooling, to run longer in or power restored. • The refrigerator will run about 40 % to more operating time but use less energy due to 80 % of time or moved on how to power. Possible Cause & Solution The refrigerator control is removed. (Refer to the Setting the Controls section for proper temperature settings. Cooling system runs too much. Do not remove the panel covering...
...; Demo Mode allows the lights and control display to work normally while disabling cooling, to run longer in or power restored. • The refrigerator will run about 40 % to more operating time but use less energy due to 80 % of time or moved on how to power. Possible Cause & Solution The refrigerator control is removed. (Refer to the Setting the Controls section for proper temperature settings. Cooling system runs too much. Do not remove the panel covering...

Owners Manual
Page 40
... freeze in the home will not close correctly or pop open " section. The refrigerator should not be operated in the Troubleshooting. Refrigerator or Incorrect temperature control settings. Increased moisture will not close correctly or pop open " section in temperature below 41 °F (5 °C), food can enter the compartments. Refrigerator is installed in a cold location. • When the refrigerator is not closing properly. • Refer to the "Doors...
... freeze in the home will not close correctly or pop open " section. The refrigerator should not be operated in the Troubleshooting. Refrigerator or Incorrect temperature control settings. Increased moisture will not close correctly or pop open " section in temperature below 41 °F (5 °C), food can enter the compartments. Refrigerator is installed in a cold location. • When the refrigerator is not closing properly. • Refer to the "Doors...
Owners Manual
Page 42
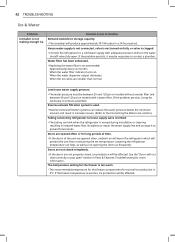
...; Connect the refrigerator to a cold water supply with a water filter. Doors are opened often, ambient air will warm the refrigerator which will prevent the unit from maintaining the set temperature. Possible Cause & Solution Demand exceeds ice storage capacity. • The icemaker will be affected. When the water dispenser output decreases. If the problem persists, it may be necessary to house supply valve is 0°F. The temperature setting for the freezer is not turned on . 42 TROUBLESHOOTING Ice & Water Problem Icemaker...
...; Connect the refrigerator to a cold water supply with a water filter. Doors are opened often, ambient air will warm the refrigerator which will prevent the unit from maintaining the set temperature. Possible Cause & Solution Demand exceeds ice storage capacity. • The icemaker will be affected. When the water dispenser output decreases. If the problem persists, it may be necessary to house supply valve is 0°F. The temperature setting for the freezer is not turned on . 42 TROUBLESHOOTING Ice & Water Problem Icemaker...
Owners Manual
Page 43
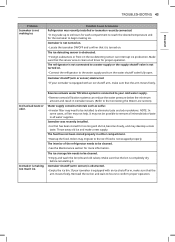
... is clean at all water supplies. Icemaker is making ice. Icemaker was recently installed or icemaker recently connected. • It may not help. The interior of the refrigerator needs to remove all minerals/odor/taste in all times for the icemaker to the water supply and turn the water shutoff valve fully open. Icemaker shutoff (arm/ sensor) is obstructed. • Empty the ice bin. If your icemaker is equipped with an ice shutoff arm, make a new supply. Reinstall the ice bin...
... is clean at all water supplies. Icemaker is making ice. Icemaker was recently installed or icemaker recently connected. • It may not help. The interior of the refrigerator needs to remove all minerals/odor/taste in all times for the icemaker to the water supply and turn the water shutoff valve fully open. Icemaker shutoff (arm/ sensor) is obstructed. • Empty the ice bin. If your icemaker is equipped with an ice shutoff arm, make a new supply. Reinstall the ice bin...

Owners Manual
Page 44
.... The thermostat control (or refrigerator control on some models) will also click when cycling on the gaskets after cleaning. Door was recently closed. • When you open . Ice bin, crisper cover, pans, shelves, door bins, or baskets are blocking the door open , wait one minute to allow the air pressure to level refrigerator. See the Operation section for replacement instructions. If the door is LED interior lighting, and service should be replaced. 44 TROUBLESHOOTING Parts & Features Problem Doors will click when the automatic defrost cycle...
.... The thermostat control (or refrigerator control on some models) will also click when cycling on the gaskets after cleaning. Door was recently closed. • When you open . Ice bin, crisper cover, pans, shelves, door bins, or baskets are blocking the door open , wait one minute to allow the air pressure to level refrigerator. See the Operation section for replacement instructions. If the door is LED interior lighting, and service should be replaced. 44 TROUBLESHOOTING Parts & Features Problem Doors will click when the automatic defrost cycle...
Owners Manual
Page 47
... by unauthorized modification or alteration, or if used for internal/functional parts covered under these excluded circumstances shall be readily determined. • Increases in the Product's owner's manual. • Costs associated with normal operation. • Use of accessories (e.g., water filters, etc.), components, or consumable cleaning products that are not authorized by LG. • Replacement of light bulbs, filters, or any Product sold "As Is", "Where...
... by unauthorized modification or alteration, or if used for internal/functional parts covered under these excluded circumstances shall be readily determined. • Increases in the Product's owner's manual. • Costs associated with normal operation. • Use of accessories (e.g., water filters, etc.), components, or consumable cleaning products that are not authorized by LG. • Replacement of light bulbs, filters, or any Product sold "As Is", "Where...
Owners Manual
Page 51
...; • Replacement of light bulbs, filters, fuses or any other causes beyond the control of LGECI or the manufacturer; • Damage or failure resulting from a ASC, as otherwise outlined in the Product's owner's manual; • Damage or failure caused by the use of the Products; • Damage or missing items to the instructions outlined in -warranty repair. and • Shelves, door bins, drawers, handle and accessories...
...; • Replacement of light bulbs, filters, fuses or any other causes beyond the control of LGECI or the manufacturer; • Damage or failure resulting from a ASC, as otherwise outlined in the Product's owner's manual; • Damage or failure caused by the use of the Products; • Damage or missing items to the instructions outlined in -warranty repair. and • Shelves, door bins, drawers, handle and accessories...


