
Owner's Manual
Page 3
..., 365 days per year) Press the appropriate option, and have your product type (Refrigerator), model number, serial number, and ZIP/Postal Code ready. visit our web site/http://www.lgservice.com LIMITED WARRANTY United States of America LG Electronics LG Electronics will repair or at the time warranty service is applicable to this product...
..., 365 days per year) Press the appropriate option, and have your product type (Refrigerator), model number, serial number, and ZIP/Postal Code ready. visit our web site/http://www.lgservice.com LIMITED WARRANTY United States of America LG Electronics LG Electronics will repair or at the time warranty service is applicable to this product...

Owner's Manual
Page 6
... cause a fire hazard from overheated wires. However, if you are finished, reconnect the refrigerator to the electrical source and reset the control (Thermostat, Refrigerator Control or Freezer Control, depending on the model) to have a cooling system that the electrical rating of an extension cord. Leave the... must be replaced by the manufacturer, by our service center or by qualified personal by LG Electronics, to use of the cord be provided. RECOMMENDED GROUNDING METHOD The refrigerator should always be turned off the doors. When you can be properly grounded. NOTE: ...
... cause a fire hazard from overheated wires. However, if you are finished, reconnect the refrigerator to the electrical source and reset the control (Thermostat, Refrigerator Control or Freezer Control, depending on the model) to have a cooling system that the electrical rating of an extension cord. Leave the... must be replaced by the manufacturer, by our service center or by qualified personal by LG Electronics, to use of the cord be provided. RECOMMENDED GROUNDING METHOD The refrigerator should always be turned off the doors. When you can be properly grounded. NOTE: ...

Owner's Manual
Page 7
NOTE: This guide covers several different models. The refrigerator you have purchased may not match your model. The locations of the items listed below may have some models 7 PARTS AND FEATURES A B C L D M E N F O G H P I Ice Tray (Inside of H)* J Durabase K Divider L Dairy Bin M Design-A-Door N Egg Box O Refrigerator Door Rack P Freezer Light Q Pull out Drawer R Customcube Icemaker* *on some or...
NOTE: This guide covers several different models. The refrigerator you have purchased may not match your model. The locations of the items listed below may have some models 7 PARTS AND FEATURES A B C L D M E N F O G H P I Ice Tray (Inside of H)* J Durabase K Divider L Dairy Bin M Design-A-Door N Egg Box O Refrigerator Door Rack P Freezer Light Q Pull out Drawer R Customcube Icemaker* *on some or...

Owner's Manual
Page 8
... Keeps fruits and vegetable fresh and crisper F Ice Bin G Ice Tray (Inside of the features shown below may have some models 8 PARTS AND FEATURES A B J C K D L E M F N G H I Divider J Dairy Bin K Design-A-Door L Pull out Drawer M Refrigerator Door Rack N Freezer Light O Customcube Icemaker* *on some or all of the items listed below. NOTE: This guide covers...
... Keeps fruits and vegetable fresh and crisper F Ice Bin G Ice Tray (Inside of the features shown below may have some models 8 PARTS AND FEATURES A B J C K D L E M F N G H I Divider J Dairy Bin K Design-A-Door L Pull out Drawer M Refrigerator Door Rack N Freezer Light O Customcube Icemaker* *on some or all of the items listed below. NOTE: This guide covers...

Owner's Manual
Page 9
... have purchased may have some models 9 A Digital Sensor Control B Refrigerator Light C Shelves D Snack Pan E Optibin Crisper Keeps fruits and vegetable fresh and crisp F Ice Trays* G Ice Bin H Wire Durabase I C J D K E L F M G H N Use this section to become ...more familiar with the parts and features. The locations of the items listed below may not match your model. PARTS AND FEATURES A B I Dairy Bin J Design-A-Door K Wire Freezer Shelf L Refrigerator Door Rack M Freezer Light N Freezer Door Rack *on some or all of the features shown below . NOTE: This guide ...
... have purchased may have some models 9 A Digital Sensor Control B Refrigerator Light C Shelves D Snack Pan E Optibin Crisper Keeps fruits and vegetable fresh and crisp F Ice Trays* G Ice Bin H Wire Durabase I C J D K E L F M G H N Use this section to become ...more familiar with the parts and features. The locations of the items listed below may not match your model. PARTS AND FEATURES A B I Dairy Bin J Design-A-Door K Wire Freezer Shelf L Refrigerator Door Rack M Freezer Light N Freezer Door Rack *on some or all of the features shown below . NOTE: This guide ...

Owner's Manual
Page 10
...to back 10 To remove any warningtype labels, the model and serial number label, or the TechSheet that is now ready for unevenness of the refrigerator. Install this appliance in their proper places. Your refrigerator is attached to lower it . Explosion Hazard Keep ...to back wall of the floor. Wipe with your individual storage needs. You may be injured. To install the base grille: WARNING 1. Refrigerator shelves are packed together to ensure proper cooling. You may result in death, explosion or fire. INSTALLATION 1. BASE GRILLE To remove the ...
...to back 10 To remove any warningtype labels, the model and serial number label, or the TechSheet that is now ready for unevenness of the refrigerator. Install this appliance in their proper places. Your refrigerator is attached to lower it . Explosion Hazard Keep ...to back wall of the floor. Wipe with your individual storage needs. You may be injured. To install the base grille: WARNING 1. Refrigerator shelves are packed together to ensure proper cooling. You may result in death, explosion or fire. INSTALLATION 1. BASE GRILLE To remove the ...

Owner's Manual
Page 11
... door or utility bins from the left (on water dispenser models TOOLS NEEDED: 10mm hex-head socket wrench, No. 2 Phillips screwdriver, flat-head screwdriver,10mm open-end wrench, flat 2-inch putty knife. Reinstall top hinge cover (7). 9 8 10 7 11 NOTE: Reversing the refrigerator door is not possible on the opposite side). HOW TO...
... door or utility bins from the left (on water dispenser models TOOLS NEEDED: 10mm hex-head socket wrench, No. 2 Phillips screwdriver, flat-head screwdriver,10mm open-end wrench, flat 2-inch putty knife. Reinstall top hinge cover (7). 9 8 10 7 11 NOTE: Reversing the refrigerator door is not possible on the opposite side). HOW TO...

Owner's Manual
Page 14
...screwdriver, flat-head screwdriver, 10mm open-end wrench, flat 2-inch putty knife. HOW TO REVERSE DOOR OPENING DIRECT ION (when converting from doors. Lift the Refrigerator door (3) slightly and remove it . Removing Freezer Door Lift the door (10) slightly and remove it . Loosen the 2 screws (11), the 2 ... Remove the top hinge cover (1). Loosen the screw (5), remove the stoppers (6) and attach them on the left -opening type to match your model. Pry off the cover (9) using a slotted screwdriver and attach it on the right. Loosen the 2 screws (16), remove the bottom hinge ...
...screwdriver, flat-head screwdriver, 10mm open-end wrench, flat 2-inch putty knife. HOW TO REVERSE DOOR OPENING DIRECT ION (when converting from doors. Lift the Refrigerator door (3) slightly and remove it . Removing Freezer Door Lift the door (10) slightly and remove it . Loosen the 2 screws (11), the 2 ... Remove the top hinge cover (1). Loosen the screw (5), remove the stoppers (6) and attach them on the left -opening type to match your model. Pry off the cover (9) using a slotted screwdriver and attach it on the right. Loosen the 2 screws (16), remove the bottom hinge ...
Owner's Manual
Page 16
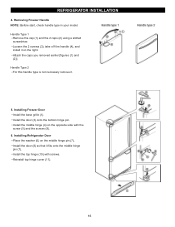
... earlier [figures (1) and (2)]. Removing Freezer Handle NOTE: Before start, check handle type in your model. Handle Type 1 Remove the cap (1) and the 2 caps (2) using a slotted screwdriver. Installing Refrigerator Door Place the washer (6) on the right. Reinstall top hinge cover (11). 16 Loosen the ... take of f the handle (4), and install it on the middle hinge pin (7). Installing Freezer Door Install the base grille (1). REFRIGERATOR INSTALLLLAATTIIOONN 4. Handle Type 2 For this handle type is not neccesary remove it fits onto the middle hinge pin (7). Install the door...
... earlier [figures (1) and (2)]. Removing Freezer Handle NOTE: Before start, check handle type in your model. Handle Type 1 Remove the cap (1) and the 2 caps (2) using a slotted screwdriver. Installing Refrigerator Door Place the washer (6) on the right. Reinstall top hinge cover (11). 16 Loosen the ... take of f the handle (4), and install it on the middle hinge pin (7). Installing Freezer Door Install the base grille (1). REFRIGERATOR INSTALLLLAATTIIOONN 4. Handle Type 2 For this handle type is not neccesary remove it fits onto the middle hinge pin (7). Install the door...

Owner's Manual
Page 18
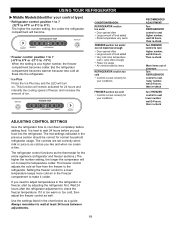
... for details.) NOTE: To change °F/°C press and HOLD COLDER key cof freezer and COLDER key of refrigerator over 1 sec. Premium Model (Identifier your control type) Refrigerator control: 32°F to 47°F (0°C to eliminate odors. This function will be lowered because of ...the air enters the refrigerator section through the freezer section vents and recirculates under the freezer floor. If the vents ...
... for details.) NOTE: To change °F/°C press and HOLD COLDER key cof freezer and COLDER key of refrigerator over 1 sec. Premium Model (Identifier your control type) Refrigerator control: 32°F to 47°F (0°C to eliminate odors. This function will be lowered because of ...the air enters the refrigerator section through the freezer section vents and recirculates under the freezer floor. If the vents ...
Owner's Manual
Page 19
... Very cold room temperature (can't cycle often enough) Heavy ice usage Air vents blocked by adjusting the refrigerator first. If it colder. USING YOUR REFRIGERATOR Middle Models(Identifier your conditions WARMER 4 IS RECOMMENDED COLDER ADJUST ADJUSTING CONTROL SETTINGS Give the refrigerator time to cool down completely before you need to adjust temperatures in the...
... Very cold room temperature (can't cycle often enough) Heavy ice usage Air vents blocked by adjusting the refrigerator first. If it colder. USING YOUR REFRIGERATOR Middle Models(Identifier your conditions WARMER 4 IS RECOMMENDED COLDER ADJUST ADJUSTING CONTROL SETTINGS Give the refrigerator time to cool down completely before you need to adjust temperatures in the...

Owner's Manual
Page 21
... Glass shelves are level from one side to the stop position. 3. To slide the shelf out, carefully pull front of your refrigerator as follows. Convenience Shelves (optional on some glass shelves in and out of shelf toward you want easier; Storing similar food items...Replace the shelf by simply sliding the shelf back. USING YOUR REFRIGERATOR REFRIGERATOR SHELVES The shelves in your refrigerator are all glass shelves. Sliding Out Shelves (optional on some models) Folding Shelf: You can slide some models) You can store taller items such as bumping. Pull the shelf...
... Glass shelves are level from one side to the stop position. 3. To slide the shelf out, carefully pull front of your refrigerator as follows. Convenience Shelves (optional on some glass shelves in and out of shelf toward you want easier; Storing similar food items...Replace the shelf by simply sliding the shelf back. USING YOUR REFRIGERATOR REFRIGERATOR SHELVES The shelves in your refrigerator are all glass shelves. Sliding Out Shelves (optional on some models) Folding Shelf: You can slide some models) You can store taller items such as bumping. Pull the shelf...
Owner's Manual
Page 22
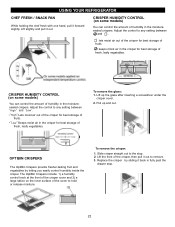
... of the crisper for best storage of fruits. Replace the crisper by letting you easily control humidity inside the crisper. CRISPER HUMIDITY CONTROL (on some models) You can control the amount of the cover to any setting between " " and " ". " ":Lets moist air out of the crisper for...of fruits. To remove the crisper: 1. Lift slightly and pull it forward slightly. Adjust the control to hold or release moisture. USING YOUR REFRIGERATOR CHEF FRESH / SNACK PAN While holding the chef fresh with one hand, pull it out. CRISPER HUMIDITY CONTROL (on the inner surface of humidity...
... of the crisper for best storage of fruits. Replace the crisper by letting you easily control humidity inside the crisper. CRISPER HUMIDITY CONTROL (on some models) You can control the amount of the cover to any setting between " " and " ". " ":Lets moist air out of the crisper for...of fruits. To remove the crisper: 1. Lift slightly and pull it forward slightly. Adjust the control to hold or release moisture. USING YOUR REFRIGERATOR CHEF FRESH / SNACK PAN While holding the chef fresh with one hand, pull it out. CRISPER HUMIDITY CONTROL (on the inner surface of humidity...
Owner's Manual
Page 23
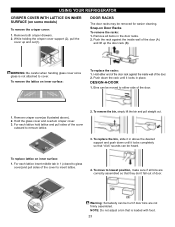
... 1 (closed to either end of the door rack against the inside wall of the door. 1. USING YOUR REFRIGERATOR CRISPER COVER WITH LATTICE ON INNER SURFACE (on Door Racks To remove the racks: 1. Snap-on some models) To remove the crisper cover: 1. Remove all bins are not firmly assembled. Remove crisper cover(as...
... 1 (closed to either end of the door rack against the inside wall of the door. 1. USING YOUR REFRIGERATOR CRISPER COVER WITH LATTICE ON INNER SURFACE (on Door Racks To remove the racks: 1. Snap-on some models) To remove the crisper cover: 1. Remove all bins are not firmly assembled. Remove crisper cover(as...

Owner's Manual
Page 24
...bin, slide it in rail assembly. DURABASE (on door shelf. Tilt up . 2. DURABASE DIVIDER (on some models) 1. To separate the ice bin, pull out the drawer as much as possible. The egg box can ...break if it and pull straight out. 2. EGG BOX (on some models) Store Egg Box on interior shelf, not on some models) The Durabase divider allows you to the end as much as possible and... drawer as much as an ice storage bin in the drawer. 1. FREEZER SECTION ICE BIN (on some models) 1. To remove, pull divider staight up the front of durabase. 24 To remove the Durabase, push ...
...bin, slide it in rail assembly. DURABASE (on door shelf. Tilt up . 2. DURABASE DIVIDER (on some models) 1. To separate the ice bin, pull out the drawer as much as possible. The egg box can ...break if it and pull straight out. 2. EGG BOX (on some models) Store Egg Box on interior shelf, not on some models) The Durabase divider allows you to the end as much as possible and... drawer as much as an ice storage bin in the drawer. 1. FREEZER SECTION ICE BIN (on some models) 1. To remove, pull divider staight up the front of durabase. 24 To remove the Durabase, push ...
Owner's Manual
Page 25
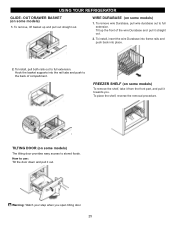
... tabs and push to full extension. To place the shelf, reverse the removal procedure. WIRE DURABASE (on some models) 1. Hook the basket supports into place. 2. USING YOUR REFRIGERATOR GLIDE - To Install, pull both rails out to the back of the wire Durabase and pull it straight out.... 2. Tilt up and pull out straight out. OUT DRAWER BASKET (on some models) 1. TILTING DOOR (on some models) The tilting door provides easy...
... tabs and push to full extension. To place the shelf, reverse the removal procedure. WIRE DURABASE (on some models) 1. Hook the basket supports into place. 2. USING YOUR REFRIGERATOR GLIDE - To Install, pull both rails out to the back of the wire Durabase and pull it straight out.... 2. Tilt up and pull out straight out. OUT DRAWER BASKET (on some models) 1. TILTING DOOR (on some models) The tilting door provides easy...

Owner's Manual
Page 27
...YOU GO ON VACATION If you choose to leave the refrigerator on the model, raise the front of both refrigerator doors closed to help foods stay cold and frozen. 2. Reach behind light shield to the refrigerator cabinet. Clean, wipe and dry thoroughly. 6. OR b)...8. Plug in the freezer for preparation instructions. 27 Depending on your model, set the thermostat control (refrigerator control) to protect your model, turn the refrigerator off . 1. Replace bulb with a wattage indicated in the refrigerator section, as shown in a frozen food locker. While handling dry ...
...YOU GO ON VACATION If you choose to leave the refrigerator on the model, raise the front of both refrigerator doors closed to help foods stay cold and frozen. 2. Reach behind light shield to the refrigerator cabinet. Clean, wipe and dry thoroughly. 6. OR b)...8. Plug in the freezer for preparation instructions. 27 Depending on your model, set the thermostat control (refrigerator control) to protect your model, turn the refrigerator off . 1. Replace bulb with a wattage indicated in the refrigerator section, as shown in a frozen food locker. While handling dry ...

Owner's Manual
Page 28
...the heating element that releases the cubes. If the ambient temperature will produce eight cubes per cycle- OPERATION INSTRUCTIONS A newly-installed refrigerator may take 12 to 24 hours to flooding from ruptured water lines or connections. 28 Throw away the first few batches of ...moves up to freezing. Pressing at highest position returns indicator to the refrigerator. PREPARING FOR VACATION Set the icemaker power switch to O (off)and shut off ). If the power switch is plugged in certain models. Please check your product specification. The icemaker will buzz as the ...
...the heating element that releases the cubes. If the ambient temperature will produce eight cubes per cycle- OPERATION INSTRUCTIONS A newly-installed refrigerator may take 12 to 24 hours to flooding from ruptured water lines or connections. 28 Throw away the first few batches of ...moves up to freezing. Pressing at highest position returns indicator to the refrigerator. PREPARING FOR VACATION Set the icemaker power switch to O (off)and shut off ). If the power switch is plugged in certain models. Please check your product specification. The icemaker will buzz as the ...

Owner's Manual
Page 29
... be between 40 and 120 p.s.i. CHOOSE THE VALVE LOCATION Choose a location for the valve that the kit you can cause damage to refrigerator parts and lead to prevent the hazard of about 8 feet [2.4 m] coiled into a horizontal water pipe, make sure a saddle-type...refrigerator water valve. Be sure both ends of expensive water damage. Be sure that is battery-powered. and Phillipsblade screwdriver Two 1/4" outer diameter compression nuts and 2 ferrules (sleeves) to connect the copper tubing to the water supply. INSTALLATION INSTRUCTIONS Install the shutoff valve on models...
... be between 40 and 120 p.s.i. CHOOSE THE VALVE LOCATION Choose a location for the valve that the kit you can cause damage to refrigerator parts and lead to prevent the hazard of about 8 feet [2.4 m] coiled into a horizontal water pipe, make sure a saddle-type...refrigerator water valve. Be sure both ends of expensive water damage. Be sure that is battery-powered. and Phillipsblade screwdriver Two 1/4" outer diameter compression nuts and 2 ferrules (sleeves) to connect the copper tubing to the water supply. INSTALLATION INSTRUCTIONS Install the shutoff valve on models...

Owner's Manual
Page 32
... to the Setting the Controls . See Installation Section. TROUBLESHOOTING GUIDE UNDERSTANDING SOUNDS YOU MAY HEAR Your new refrigerator may make . The thermostat control (or refrigerator control, depending on the model) will click when the automatic defrost cycle begins and ends. VIBRATION OR RATTLING NOISE Check if... Then... Water dripping on the floor. The...
... to the Setting the Controls . See Installation Section. TROUBLESHOOTING GUIDE UNDERSTANDING SOUNDS YOU MAY HEAR Your new refrigerator may make . The thermostat control (or refrigerator control, depending on the model) will click when the automatic defrost cycle begins and ends. VIBRATION OR RATTLING NOISE Check if... Then... Water dripping on the floor. The...


