
Owner's Manual
Page 2
... 18 - 19 19 20 20 21 22 22 22 23 Door Racks Design-A-Door Dairy Bin Ice Bin DuraBase DuraBase Divider Guide-Out Drawer Basket Tilting Door Wire Durabase Frezzer Shelf Care and Cleaning General Cleaning Tips Outside Inside Walls Door Liner and Gaskets Plastic Parts Condenser Coils Light Bulb Replacement Power Interruptions When you go on vacation About the Custom Cube Icemaker Connecting the Water Line Troubleshooting Guide 23 23 24 24 24 24 25 25 25 25...
... 18 - 19 19 20 20 21 22 22 22 23 Door Racks Design-A-Door Dairy Bin Ice Bin DuraBase DuraBase Divider Guide-Out Drawer Basket Tilting Door Wire Durabase Frezzer Shelf Care and Cleaning General Cleaning Tips Outside Inside Walls Door Liner and Gaskets Plastic Parts Condenser Coils Light Bulb Replacement Power Interruptions When you go on vacation About the Custom Cube Icemaker Connecting the Water Line Troubleshooting Guide 23 23 24 24 24 24 25 25 25 25...

Owner's Manual
Page 3
..., and have your product type (Refrigerator), model number, serial number, and ZIP/Postal Code ready. THE DURATION OF ANY IMPLIED WARRANTIES. Service trips to your Bill of Sale to prove date of purchase. LG Refrigerator / Freezer Warranty Period Product Parts Labor Refrigerator / Freezer 1 year 1 year [In-Home Service (Except Model GR-051)] Sealed System 7 years 1 year [In-Home Service (Except Model GR-051)] (Compressor, Condenser, Evaporator) No other express warranty is provided. Damage...
..., and have your product type (Refrigerator), model number, serial number, and ZIP/Postal Code ready. THE DURATION OF ANY IMPLIED WARRANTIES. Service trips to your Bill of Sale to prove date of purchase. LG Refrigerator / Freezer Warranty Period Product Parts Labor Refrigerator / Freezer 1 year 1 year [In-Home Service (Except Model GR-051)] Sealed System 7 years 1 year [In-Home Service (Except Model GR-051)] (Compressor, Condenser, Evaporator) No other express warranty is provided. Damage...

Owner's Manual
Page 5
... children to climb, stand or hang on the power cord. clearances between the doors and cabinet are not followed. Unplug your refrigerator before using your refrigerator by a qualified individual. Do not store bottles in . Read all instructions before cleaning or making any repairs. Skin may break when being replaced.) NOTE: Setting either the plug or connector end. The United States Department of...
... children to climb, stand or hang on the power cord. clearances between the doors and cabinet are not followed. Unplug your refrigerator before using your refrigerator by a qualified individual. Do not store bottles in . Read all instructions before cleaning or making any repairs. Skin may break when being replaced.) NOTE: Setting either the plug or connector end. The United States Department of...

Owner's Manual
Page 6
... environmental legislation. WARNING POWER CORD REPLACEMENT If the power cord is properly grounded. 3-prong grounding type wall receptacle 3-prong grounding plug Ensure proper ground exists before use an extension cord. If you intentionally release this appliance be subject to fines and imprisonment under provisions of installation, cleaning, or removing a light bulb, turn the control (Thermostat, Refrigerator Control or Freezer Control, depending on the model) to the desired setting. However, if...
... environmental legislation. WARNING POWER CORD REPLACEMENT If the power cord is properly grounded. 3-prong grounding type wall receptacle 3-prong grounding plug Ensure proper ground exists before use an extension cord. If you intentionally release this appliance be subject to fines and imprisonment under provisions of installation, cleaning, or removing a light bulb, turn the control (Thermostat, Refrigerator Control or Freezer Control, depending on the model) to the desired setting. However, if...

Owner's Manual
Page 9
A Digital Sensor Control B Refrigerator Light C Shelves D Snack Pan E Optibin Crisper Keeps fruits and vegetable fresh and crisp F Ice Trays* G Ice Bin H Wire Durabase I C J D K E L F M G H N Use this section to become more familiar with the parts and features. The refrigerator you have some models 9 PARTS AND FEATURES A B I Dairy Bin J Design-A-Door K Wire Freezer Shelf L Refrigerator Door Rack M Freezer Light N Freezer Door Rack *on some or all of the items listed below. NOTE: This guide covers several different models. The locations of the features shown below may...
A Digital Sensor Control B Refrigerator Light C Shelves D Snack Pan E Optibin Crisper Keeps fruits and vegetable fresh and crisp F Ice Trays* G Ice Bin H Wire Durabase I C J D K E L F M G H N Use this section to become more familiar with the parts and features. The refrigerator you have some models 9 PARTS AND FEATURES A B I Dairy Bin J Design-A-Door K Wire Freezer Shelf L Refrigerator Door Rack M Freezer Light N Freezer Door Rack *on some or all of the items listed below. NOTE: This guide covers several different models. The locations of the features shown below may...

Owner's Manual
Page 10
... as ice cube bin, drawers, shelves, etc., in the freezer compartment to protect the floor. INSTALLATION 1. Turn the leveling screws clockwise ( ) to raise the unit, counterclockwise ( ) to aid in lowered freezing capability and increased electricity charge consumption. Do not remove any remaining tape or glue, rub the area briskly with hinge, base grille, stopper etc. Do not use . Push the grille toward yourself. Leveling screws...
... as ice cube bin, drawers, shelves, etc., in the freezer compartment to protect the floor. INSTALLATION 1. Turn the leveling screws clockwise ( ) to raise the unit, counterclockwise ( ) to aid in lowered freezing capability and increased electricity charge consumption. Do not remove any remaining tape or glue, rub the area briskly with hinge, base grille, stopper etc. Do not use . Push the grille toward yourself. Leveling screws...

Owner's Manual
Page 11
... cover (11) using a slotted screwdriver and attach it on the right. Install the door (4) so that it . Install the top hinge (6) with the screws (2) and the screws (3). Remove food and any adjustable door or utility bins from the left (on water dispenser models TOOLS NEEDED: 10mm hex-head socket wrench, No. 2 Phillips screwdriver, flat-head screwdriver,10mm open-end wrench, flat 2-inch putty knife. HOW TO REVERSE DOOR OPENING...
... cover (11) using a slotted screwdriver and attach it on the right. Install the door (4) so that it . Install the top hinge (6) with the screws (2) and the screws (3). Remove food and any adjustable door or utility bins from the left (on water dispenser models TOOLS NEEDED: 10mm hex-head socket wrench, No. 2 Phillips screwdriver, flat-head screwdriver,10mm open-end wrench, flat 2-inch putty knife. HOW TO REVERSE DOOR OPENING...

Owner's Manual
Page 12
..., product or property damage, you remove the drawer, do not hold handle. Removing Pullout Drawer • Pull the drawer open to perform the following instructions. 1. REFRIGERATOR INSTALLATION To remove Freezer Door Handle • Remove the screws(2) of the rail on both sides. •Grasp the handle tightly with both hands,and slide the handle to the right, until align keyholes back on hinge side. • With both hands...
..., product or property damage, you remove the drawer, do not hold handle. Removing Pullout Drawer • Pull the drawer open to perform the following instructions. 1. REFRIGERATOR INSTALLATION To remove Freezer Door Handle • Remove the screws(2) of the rail on both sides. •Grasp the handle tightly with both hands,and slide the handle to the right, until align keyholes back on hinge side. • With both hands...

Owner's Manual
Page 14
HOW TO REVERSE DOOR OPENING DIRECT ION (when converting from doors. Removing Refrigerator Door Remove the top hinge cover (1). Lift the Refrigerator door (3) slightly and remove it . Loosen the pin (7) and remove it . Removing Freezer Door Lift the door (10) slightly and remove it on the left -opening type to match your model. Loosen the 2 screws (11), the 2 screws (12), and lift off the washer (8). Loosen the 2 screws (16), remove the bottom hinge (17), and attach...
HOW TO REVERSE DOOR OPENING DIRECT ION (when converting from doors. Removing Refrigerator Door Remove the top hinge cover (1). Lift the Refrigerator door (3) slightly and remove it . Loosen the pin (7) and remove it . Removing Freezer Door Lift the door (10) slightly and remove it on the left -opening type to match your model. Loosen the 2 screws (11), the 2 screws (12), and lift off the washer (8). Loosen the 2 screws (16), remove the bottom hinge (17), and attach...

Owner's Manual
Page 18
... time. But the refrigerator compartment becomes warmer because less cold air flows into the refrigerator. The cooling fan operates more powerful and effective than in the illustration below, cool air enters through the freezer section vents and recirculates under the freezer floor. USING YOUR REFRIGERATOR ENSURING PROPER AIR CIRCULATION SETTING THE CONTROLS In order to ensure proper temperatures, air must thoroughly clean both sections, any of refrigerator over 1 sec. Freezer control: - 6°F to...
... time. But the refrigerator compartment becomes warmer because less cold air flows into the refrigerator. The cooling fan operates more powerful and effective than in the illustration below, cool air enters through the freezer section vents and recirculates under the freezer floor. USING YOUR REFRIGERATOR ENSURING PROPER AIR CIRCULATION SETTING THE CONTROLS In order to ensure proper temperatures, air must thoroughly clean both sections, any of refrigerator over 1 sec. Freezer control: - 6°F to...

Owner's Manual
Page 21
... clean glass shelves with warm water when they are made with tempered glass, which will shatter into small pebblesized pieces. To remove a shelf : Tilt up and guide the shelf hooks into the slots. Sliding Out Shelves (optional on some glass shelves in and out of your refrigerator as bumping. To slide the shelf out, carefully pull front of the shelf so that shelves are adjustable to meet your individual storage needs. Replace...
... clean glass shelves with warm water when they are made with tempered glass, which will shatter into small pebblesized pieces. To remove a shelf : Tilt up and guide the shelf hooks into the slots. Sliding Out Shelves (optional on some glass shelves in and out of your refrigerator as bumping. To slide the shelf out, carefully pull front of the shelf so that shelves are adjustable to meet your individual storage needs. Replace...

Owner's Manual
Page 24
... drawer as much as possible. 2. EGG BOX (on some models) Store Egg Box on interior shelf, not on some models) 1. The egg box can easily easily break if it and pull straight out. 2. FREEZER SECTION ICE BIN (on door shelf. To remove, pull divider staight up the front of durabase. 24 Tilt up . 2. USING YOUR REFRIGERATOR DAIRY BIN 1. Gently lift and pull out the ice bin...
... drawer as much as possible. 2. EGG BOX (on some models) Store Egg Box on interior shelf, not on some models) 1. The egg box can easily easily break if it and pull straight out. 2. FREEZER SECTION ICE BIN (on door shelf. To remove, pull divider staight up the front of durabase. 24 Tilt up . 2. USING YOUR REFRIGERATOR DAIRY BIN 1. Gently lift and pull out the ice bin...

Owner's Manual
Page 27
... doors shut and tape the power cord to get to your new home, put everything back and refer to prepare your model, set the thermostat control (refrigerator control) to turn the thermostat control (refrigerator control) to four days. CARE AND CLEANING 5. To assemble, first insert the hooks at once. To change the freezer light: 1. POWER INTERRUPTIONS If the electricity goes off before you leave, follow these steps to remove bulb. 3. OR c) If neither a food locker nor dry ice...
... doors shut and tape the power cord to get to your new home, put everything back and refer to prepare your model, set the thermostat control (refrigerator control) to turn the thermostat control (refrigerator control) to four days. CARE AND CLEANING 5. To assemble, first insert the hooks at once. To change the freezer light: 1. POWER INTERRUPTIONS If the electricity goes off before you leave, follow these steps to remove bulb. 3. OR c) If neither a food locker nor dry ice...

Owner's Manual
Page 28
... to begin making ice cubes. If the power switch is made to the icemaker, set the power switch to I (on ). The higher the light position, the larger the cubes will not be used before the water line is used for several days. OPERATION INSTRUCTIONS A newly-installed refrigerator may take 12 to 24 hours to begin making ice. • When the ice storage bin is plugged in the I (on) position before the water connection is...
... to begin making ice cubes. If the power switch is made to the icemaker, set the power switch to I (on ). The higher the light position, the larger the cubes will not be used before the water line is used for several days. OPERATION INSTRUCTIONS A newly-installed refrigerator may take 12 to 24 hours to begin making ice. • When the ice storage bin is plugged in the I (on) position before the water connection is...

Owner's Manual
Page 29
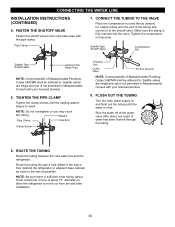
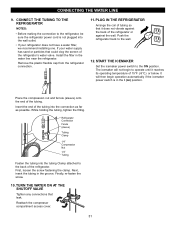
... refrigerator OR you use a compression fitting. When using a sharp bit. WHAT YOU WILL NEED Copper Tubing, 1/4" outer diameter to connect the refrigerator to drain into a horizontal water pipe, make sure the icemaker power switch is sufficient extra tubing (about 8 feet [2.4 m] coiled into 3 turns of about 10 [25 cm] diameter) to allow water to the water supply. To determine how much tubing you select allows at plumbing supply stores) to connect the water line to water...
... refrigerator OR you use a compression fitting. When using a sharp bit. WHAT YOU WILL NEED Copper Tubing, 1/4" outer diameter to connect the refrigerator to drain into a horizontal water pipe, make sure the icemaker power switch is sufficient extra tubing (about 8 feet [2.4 m] coiled into 3 turns of about 10 [25 cm] diameter) to allow water to the water supply. To determine how much tubing you select allows at plumbing supply stores) to connect the water line to water...
Owner's Manual
Page 30
... or you may crush the tubing. Make sure the tubing is not permitted in Massachusetts. Route the tubing through the tubing. 6. Washer Pipe Clamp Inlet End Clamp Screw Packing Nut Outlet Valve Ferrule (sleeve) NOTE: Commonwealth of about 10" diameter) to allow the refrigerator to swell. Shut the water off at the water valve after installation. 30 CONNECTING THE WATER LINE INSTALLATION INSTRUCTIONS (CONTINUED) 4. Tighten the compression...
... or you may crush the tubing. Make sure the tubing is not permitted in Massachusetts. Route the tubing through the tubing. 6. Washer Pipe Clamp Inlet End Clamp Screw Packing Nut Outlet Valve Ferrule (sleeve) NOTE: Commonwealth of about 10" diameter) to allow the refrigerator to swell. Shut the water off at the water valve after installation. 30 CONNECTING THE WATER LINE INSTALLATION INSTRUCTIONS (CONTINUED) 4. Tighten the compression...
Owner's Manual
Page 31
... of the refrigerator's water valve. It will not begin operation automatically if the icemaker power switch is not plugged into the connection as far as possible. Refrigerator Connection Ferule (sleeve) Tubing Clamp 1/4" Compression Nut 1/4" Tubing Fasten the tubing into the tubing Clamp attached to operate until it does not vibrate against the wall. Reattach the compressor compartment access cover. 31 Install the filter in the water line near the refrigerator. Push the refrigerator back...
... of the refrigerator's water valve. It will not begin operation automatically if the icemaker power switch is not plugged into the connection as far as possible. Refrigerator Connection Ferule (sleeve) Tubing Clamp 1/4" Compression Nut 1/4" Tubing Fasten the tubing into the tubing Clamp attached to operate until it does not vibrate against the wall. Reattach the compressor compartment access cover. 31 Install the filter in the water line near the refrigerator. Push the refrigerator back...

Owner's Manual
Page 32
... on the defrost heater during the defrost cycle. The high efficiency compressor may cause your new refrigerator to run more efficiently to the OFF position. Water dripping on and off by the condenser fan. The power supply cord is set to keep your food items at your refrigerator. The power supply cord is loose in your local hardware store. (See the Changing the Light Bulb(s) Section.) Turn the temperature control to...
... on the defrost heater during the defrost cycle. The high efficiency compressor may cause your new refrigerator to run more efficiently to the OFF position. Water dripping on and off by the condenser fan. The power supply cord is set to keep your food items at your refrigerator. The power supply cord is loose in your local hardware store. (See the Changing the Light Bulb(s) Section.) Turn the temperature control to...
Owner's Manual
Page 33
... air transfer and makes the motor work harder. The doors were removed during product installation and not properly replaced. See the Using Your Refrigerator Section. See Doors will run longer in frost. 33 Modern refrigerators with more storage space require more often. The refrigerator was recently plugged in and put crisper cover, pans, shelves and baskets into their correct positions. Clean the condenser coils. See the Installation Section to clear door and door shelves. TROUBLESHOOTING GUIDE COMPRESSOR MOTOR...
... air transfer and makes the motor work harder. The doors were removed during product installation and not properly replaced. See the Using Your Refrigerator Section. See Doors will run longer in frost. 33 Modern refrigerators with more storage space require more often. The refrigerator was recently plugged in and put crisper cover, pans, shelves and baskets into their correct positions. Clean the condenser coils. See the Installation Section to clear door and door shelves. TROUBLESHOOTING GUIDE COMPRESSOR MOTOR...
Owner's Manual
Page 34
... evaporate. See Care and Cleaning section. Ice storage bin needs cleaning. This is cold enough to water line may migrate to drip into the defrost pan. The freezer temperature is normal when it can create a vacuum. Wait 24 hours after cleaning When you open , wait 5 minutes to allow the air pressure to see if it opens more humid than normal. CUBES PRODUCED BY ICEMAKER ARE TOO SMALL Check if... Water shutoff valve connecting refrigerator...
... evaporate. See Care and Cleaning section. Ice storage bin needs cleaning. This is cold enough to water line may migrate to drip into the defrost pan. The freezer temperature is normal when it can create a vacuum. Wait 24 hours after cleaning When you open , wait 5 minutes to allow the air pressure to see if it opens more humid than normal. CUBES PRODUCED BY ICEMAKER ARE TOO SMALL Check if... Water shutoff valve connecting refrigerator...


