Owner's Manual
Page 2
...your Bill of Sale to your product type (Refrigerator), model number, serial number, and ZIP/Postal Code ready. WARRANTY Visit our web site http://www.lg.com LG Electronics LIMITED WARRANTY United States of America LG Electronics will repair or at the time warranty ...option, and have your home to state. LG Refrigerator / Freezer Warranty Period Product Parts Labor Refrigerator / Freezer 1 year 1 year [In-Home Service (Except Model GR-051)] Sealed System (Compressor, Condenser, Evaporator) 7 years 1 year [In-Home Service (Except Model GR-051)] No other express warranty is...
...your Bill of Sale to your product type (Refrigerator), model number, serial number, and ZIP/Postal Code ready. WARRANTY Visit our web site http://www.lg.com LG Electronics LIMITED WARRANTY United States of America LG Electronics will repair or at the time warranty ...option, and have your home to state. LG Refrigerator / Freezer Warranty Period Product Parts Labor Refrigerator / Freezer 1 year 1 year [In-Home Service (Except Model GR-051)] Sealed System (Compressor, Condenser, Evaporator) 7 years 1 year [In-Home Service (Except Model GR-051)] No other express warranty is...

Owner's Manual
Page 4
...Instructions 4-5 Requirements for Ground Connection 5 Parts and Features 6-7 Refrigerator Installation Unpacking Installation Installation of Base Grille Refrigerator Doors: How to remove and reverse For Models with Pull-out Drawer For Models with Swinging Door How to remove and Install Pull-Out Drawer...Glide Out Drawer Tilting Door Wired Durabase (Swing Models) Freezer Shelf Refrigerator Care and Cleaning Refrigerator Cleaning Outside Inside Walls Door Lining & Gaskets Plastic Parts (Covers and Panel) Back Cover Replacing Refrigerator Lights Power Interruptions When Going on Vacation When...
...Instructions 4-5 Requirements for Ground Connection 5 Parts and Features 6-7 Refrigerator Installation Unpacking Installation Installation of Base Grille Refrigerator Doors: How to remove and reverse For Models with Pull-out Drawer For Models with Swinging Door How to remove and Install Pull-Out Drawer...Glide Out Drawer Tilting Door Wired Durabase (Swing Models) Freezer Shelf Refrigerator Care and Cleaning Refrigerator Cleaning Outside Inside Walls Door Lining & Gaskets Plastic Parts (Covers and Panel) Back Cover Replacing Refrigerator Lights Power Interruptions When Going on Vacation When...

Owner's Manual
Page 7
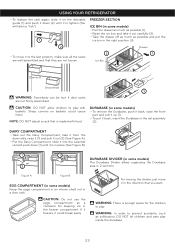
... and parts listed below. NOTE: This guide covers different models. PARTS AND FEATURES Drawer Model A A J BB C K D E L F M G N H O I Divider J Dairy Compartment K Door Racks L Fixed Refrigerator Rack M Freezer Light N Pull Out Drawer O Ice maker * * On some models 6 The location of some or all of your model. A Digital Sensor Control B Refrigerator Light C Shelves D Frozen Meat Compartment (Chef Fresh/Snack Pan...
... and parts listed below. NOTE: This guide covers different models. PARTS AND FEATURES Drawer Model A A J BB C K D E L F M G N H O I Divider J Dairy Compartment K Door Racks L Fixed Refrigerator Rack M Freezer Light N Pull Out Drawer O Ice maker * * On some models 6 The location of some or all of your model. A Digital Sensor Control B Refrigerator Light C Shelves D Frozen Meat Compartment (Chef Fresh/Snack Pan...

Owner's Manual
Page 8
... and features of your model. NOTE: This guide covers different models. Swing Model PARTS AND FEATURES A I Dairy Compartment J Door Racks K Freezer Light L Fixed Refrigerator Rack M Wire Freezer Shelf N Freezer Door Rack * On some models 7 Your refrigerator could have some or ...all of the features and parts listed below. A Digital Sensor Control B Refrigerator Light C Shelves D Frozen Meat Compartment (Chef Fresh...
... and features of your model. NOTE: This guide covers different models. Swing Model PARTS AND FEATURES A I Dairy Compartment J Door Racks K Freezer Light L Fixed Refrigerator Rack M Wire Freezer Shelf N Freezer Door Rack * On some models 7 Your refrigerator could have some or ...all of the features and parts listed below. A Digital Sensor Control B Refrigerator Light C Shelves D Frozen Meat Compartment (Chef Fresh...

Owner's Manual
Page 9
... it . Make sure you protect the floor when moving it as gasoline) away from side to side or "walk" the refrigerator when attempting to prevent any stickers that feature warnings, the model serial number or the technical label of the product located on "Important Safety Instructions". Verify that the doors close properly...
... it . Make sure you protect the floor when moving it as gasoline) away from side to side or "walk" the refrigerator when attempting to prevent any stickers that feature warnings, the model serial number or the technical label of the product located on "Important Safety Instructions". Verify that the doors close properly...

Owner's Manual
Page 10
...and remove it (1). • Using 10 mm socket wrench, remove the three bolts and lift off the top hinge. REFRIGERATOR INSTALLATION REFRIGERATOR DOORS: HOW TO REMOVE AND REVERSE (Optional) For models with a flat head screwdriver and remove it . 5 • Remove the four screws (15 & 16) and .... • Adjustable Wrench. • 10 mm open-end wrench • Flat 2 inch putty knife IMPORTANT: Before you begin, unplug the refrigerator or disconnect the power source. HOW TO REVERSE DOOR SWING (when converting from left -opening type (factory installed) to right-opening type. Directions ...
...and remove it (1). • Using 10 mm socket wrench, remove the three bolts and lift off the top hinge. REFRIGERATOR INSTALLATION REFRIGERATOR DOORS: HOW TO REMOVE AND REVERSE (Optional) For models with a flat head screwdriver and remove it . 5 • Remove the four screws (15 & 16) and .... • Adjustable Wrench. • 10 mm open-end wrench • Flat 2 inch putty knife IMPORTANT: Before you begin, unplug the refrigerator or disconnect the power source. HOW TO REVERSE DOOR SWING (when converting from left -opening type (factory installed) to right-opening type. Directions ...

Owner's Manual
Page 14
...Screwdriver Flat Head Screwdriver 1/4 in 3/32 in the back of unscrewed using your right when facing the unit. REFRIGERATOR INSTALLATION REFRIGERATOR DOORS: HOW TO REMOVE AND REVERSE (Optional) For Swing models You may require some force). • The keyhole slots (2) on the back of the handle allow the... handle to separate from the refrigerator doors. IMPORTANT: Before you prefer the door to open -end wrench. • Flat 2 inch ...
...Screwdriver Flat Head Screwdriver 1/4 in 3/32 in the back of unscrewed using your right when facing the unit. REFRIGERATOR INSTALLATION REFRIGERATOR DOORS: HOW TO REMOVE AND REVERSE (Optional) For Swing models You may require some force). • The keyhole slots (2) on the back of the handle allow the... handle to separate from the refrigerator doors. IMPORTANT: Before you prefer the door to open -end wrench. • Flat 2 inch ...

Owner's Manual
Page 15
...8226; Attach the cap and the two screws (that were previously removed) on the left side). • Slightly raise the refrigerator door (5) and remove it. • Once the door has been taken off the washer (14). • Using the ... 5 Handle Type 2 It is not necessary to remove this and remove the hinge (9). • Install the hinge (10) on the left side (5). REFRIGERATOR INSTALLATION 2. Handle Type 1 • Remove the cap (1) and two screws (2) with a flat head screwdriver (1). • Using the 10 mm open...in the right side and the pivot on the opposite side of your model.
...8226; Attach the cap and the two screws (that were previously removed) on the left side). • Slightly raise the refrigerator door (5) and remove it. • Once the door has been taken off the washer (14). • Using the ... 5 Handle Type 2 It is not necessary to remove this and remove the hinge (9). • Install the hinge (10) on the left side (5). REFRIGERATOR INSTALLATION 2. Handle Type 1 • Remove the cap (1) and two screws (2) with a flat head screwdriver (1). • Using the 10 mm open...in the right side and the pivot on the opposite side of your model.
Owner's Manual
Page 21
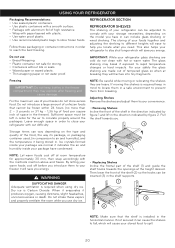
...when using dry ice. If not secured it indicates the air and humidity inside your package are made out of your storage necessities; REFRIGERATOR SECTION REFRIGERATOR SHELVES The shelving of the shelf in the direction indicated by figure 1 and lift in the direction indicated by figure 2. Freezing IMPORTANT:... spill. 20 By letting your warm foods cool off at breaking they will save you . 1 Storage times can vary depending on the model you need. depending on the type and quality of high resistance. • Wrap with paper layered with your foods together and adjusting the...
...when using dry ice. If not secured it indicates the air and humidity inside your package are made out of your storage necessities; REFRIGERATOR SECTION REFRIGERATOR SHELVES The shelving of the shelf in the direction indicated by figure 1 and lift in the direction indicated by figure 2. Freezing IMPORTANT:... spill. 20 By letting your warm foods cool off at breaking they will save you . 1 Storage times can vary depending on the model you need. depending on the type and quality of high resistance. • Wrap with paper layered with your foods together and adjusting the...
Owner's Manual
Page 22
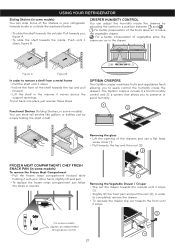
... then out (2). 2 FROZEN MEAT COMPARTMENT/ CHEF FRESH SNACK PAN (in some models) To remove the Frozen Meat Compartment • Pull the frozen meat compartment forward while holding it with your refrigerator towards inside the drawers by simply folding the shelf in half. For better preservation...or avoid humidity. 1 2 Removing the glass • Lift the opening of the shelf towards the inside the drawers. USING YOUR REFRIGERATOR Sliding Shelves (in some models) You can store tall articles like explained below. • To slide the shelf towards the outside until it stops (1). •...
... then out (2). 2 FROZEN MEAT COMPARTMENT/ CHEF FRESH SNACK PAN (in some models) To remove the Frozen Meat Compartment • Pull the frozen meat compartment forward while holding it with your refrigerator towards inside the drawers by simply folding the shelf in half. For better preservation...or avoid humidity. 1 2 Removing the glass • Lift the opening of the shelf towards the inside the drawers. USING YOUR REFRIGERATOR Sliding Shelves (in some models) You can store tall articles like explained below. • To slide the shelf towards the outside until it stops (1). •...
Owner's Manual
Page 23
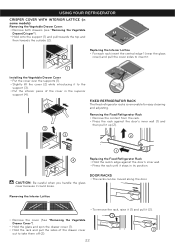
... the content from the rack. • Press the rack against the door's inner wall (1) and then pull it up (2). 2 1 4 Replacing the Fixed Refrigerator Rack • Hold the rack's edge against the door's inner wall. • Press the rack until it could loose. CAUTION: Be careful when you handle... Drawer Cover"). • Hold the glass and spin the drawer cover (1). • Hold the rack and pull the sides of the cover in some models) Removing the Vegetable Drawer Cover: • Remove both drawers (see "Removing the Vegetable Drawer/Crisper"). • Hold onto the support (1) and pull ...
... the content from the rack. • Press the rack against the door's inner wall (1) and then pull it up (2). 2 1 4 Replacing the Fixed Refrigerator Rack • Hold the rack's edge against the door's inner wall. • Press the rack until it could loose. CAUTION: Be careful when you handle... Drawer Cover"). • Hold the glass and spin the drawer cover (1). • Hold the rack and pull the sides of the cover in some models) Removing the Vegetable Drawer Cover: • Remove both drawers (see "Removing the Vegetable Drawer/Crisper"). • Hold onto the support (1) and pull ...
Owner's Manual
Page 24
USING YOUR REFRIGERATOR • To replace the rack again, slide it on baskets could break easily. NOTE: DO NOT adjust a rack that is in place (See Figure B). 2 1 1 DURABASE DIVIDER (in some models) • To remove the Durabase, push it back, raise the front part and pull it up (1). • To ... in the direction that they are not loosen. For moving the divider, just move it could cause injury. Figure A Figure B EGG COMPARTMENT (in some models) • Pull the drawer as much as possible (1). • Raise the ice box and take it from the down side, raise it (1) and ...
USING YOUR REFRIGERATOR • To replace the rack again, slide it on baskets could break easily. NOTE: DO NOT adjust a rack that is in place (See Figure B). 2 1 1 DURABASE DIVIDER (in some models) • To remove the Durabase, push it back, raise the front part and pull it up (1). • To ... in the direction that they are not loosen. For moving the divider, just move it could cause injury. Figure A Figure B EGG COMPARTMENT (in some models) • Pull the drawer as much as possible (1). • Raise the ice box and take it from the down side, raise it (1) and ...
Owner's Manual
Page 25
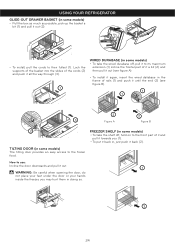
... insert the wired database in the frame of rails (1) and push it until the end (2) (see figure B). 1 1 2 2 3 Figure A Figure B 2 FREEZER SHELF (in some models) • To take the shelf off, hold on to the front part of it and pull it towards you may hurt them in , just push...it out (2). 1 2 • To install, pull the cords to their fullest (1). USING YOUR REFRIGERATOR GLIDE-OUT DRAWER BASKET (in some models) The tilting door provides an easy access to the frozen food. TILTING DOOR (in some models) • Pull the box as much as possible, pick up the basket a bit (1) and ...
... insert the wired database in the frame of rails (1) and push it until the end (2) (see figure B). 1 1 2 2 3 Figure A Figure B 2 FREEZER SHELF (in some models) • To take the shelf off, hold on to the front part of it and pull it towards you may hurt them in , just push...it out (2). 1 2 • To install, pull the cords to their fullest (1). USING YOUR REFRIGERATOR GLIDE-OUT DRAWER BASKET (in some models) The tilting door provides an easy access to the frozen food. TILTING DOOR (in some models) • Pull the box as much as possible, pick up the basket a bit (1) and ...

Owner's Manual
Page 27
... • Take the cover (2), lock the hooks of it (3) and push it upwards (4). • Plug the refrigerator back in order to leave your refrigerator on the model of the refrigerator, lift the top part of the refrigerator so it can roll with ease, or screw the levelers so it will not scratch the floor... If you see that food contains ice crystals, it will preserve the food fro 2 to the section "Closing and Aligning Doors". 7. In case your refrigerator has a factory ice maker, remember you do one . In case of a black out, call your electric company and ask how long it may be...
... • Take the cover (2), lock the hooks of it (3) and push it upwards (4). • Plug the refrigerator back in order to leave your refrigerator on the model of the refrigerator, lift the top part of the refrigerator so it can roll with ease, or screw the levelers so it will not scratch the floor... If you see that food contains ice crystals, it will preserve the food fro 2 to the section "Closing and Aligning Doors". 7. In case your refrigerator has a factory ice maker, remember you do one . In case of a black out, call your electric company and ask how long it may be...
Owner's Manual
Page 28
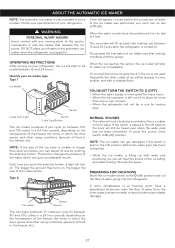
... the sensor. WARNING PERSONAL INJURY HAZARD Avoid contact with any moving parts of water from the inner pipes (certain models) to make ice immediately. Type 1 Ice Maker Sensor If the refrigerator is filling up (and start to O (off). The ice maker will fill up with a strange flavor.... cubes. If the ice is smaller or bigger than one or two minutes. • When the refrigerator will not be in use for various days. The bigger the amount that some models. OPERATING INSTRUCTIONS After turning on ). Check your specifications of ice. To avoid this sound, move switch...
... the sensor. WARNING PERSONAL INJURY HAZARD Avoid contact with any moving parts of water from the inner pipes (certain models) to make ice immediately. Type 1 Ice Maker Sensor If the refrigerator is filling up (and start to O (off). The ice maker will fill up with a strange flavor.... cubes. If the ice is smaller or bigger than one or two minutes. • When the refrigerator will not be in use for various days. The bigger the amount that some models. OPERATING INSTRUCTIONS After turning on ). Check your specifications of ice. To avoid this sound, move switch...

Owner's Manual
Page 29
... to the cold-water flow, the water pressure for models containing water filter. • A drill. c) Call a qualified plumber if the inverted osmosis water pressure problem continues. Follow instructions carefully in diameter copper pipe to connect refrigerator to the water pipe. Make sure there is best ... cold water source. BEFORE START The water source is not guaranteed by the refrigerator or automated ice maker manufacturer. Water pressure should be between 0,138 and 0,82 MPa or 20 and 120 PSI for models not containing water filter and between 0,276 and 0,82 MPa or 40 and...
... to the cold-water flow, the water pressure for models containing water filter. • A drill. c) Call a qualified plumber if the inverted osmosis water pressure problem continues. Follow instructions carefully in diameter copper pipe to connect refrigerator to the water pipe. Make sure there is best ... cold water source. BEFORE START The water source is not guaranteed by the refrigerator or automated ice maker manufacturer. Water pressure should be between 0,138 and 0,82 MPa or 20 and 120 PSI for models not containing water filter and between 0,276 and 0,82 MPa or 40 and...
Owner's Manual
Page 33
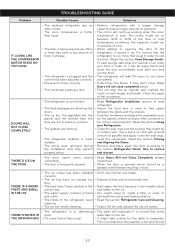
... in contact with. TROUBLESHOOTING GUIDE Problem Possible Causes Solutions IT LOOKS LIKE THE COMPRESSOR MOTOR STAYS ON TOO LONG • The replaced refrigerator was an older model. • The room temperature is hotter than usual. • The water will evaporate. To save energy, take what you took ...out the food. • The refrigerator will take a while for the water to cool down completely. • Push firmly the Doors. mentioned. • ...
... in contact with. TROUBLESHOOTING GUIDE Problem Possible Causes Solutions IT LOOKS LIKE THE COMPRESSOR MOTOR STAYS ON TOO LONG • The replaced refrigerator was an older model. • The room temperature is hotter than usual. • The water will evaporate. To save energy, take what you took ...out the food. • The refrigerator will take a while for the water to cool down completely. • Push firmly the Doors. mentioned. • ...

Owner's Manual
Page 2
... Receipt must be submitted at its option replace, without charge, your product type (Refrigerator), model number, serial number, and ZIP/Postal Code ready. 1 Territories. WARRANTY Visit our web site http://www.lg.com LG Electronics LIMITED WARRANTY United States of America LG Electronics will repair or at the time warranty service is provided. This warranty...
... Receipt must be submitted at its option replace, without charge, your product type (Refrigerator), model number, serial number, and ZIP/Postal Code ready. 1 Territories. WARRANTY Visit our web site http://www.lg.com LG Electronics LIMITED WARRANTY United States of America LG Electronics will repair or at the time warranty service is provided. This warranty...


