Owner's Manual
Page 2
... Parts Labor Refrigerator / Freezer 1 year 1 year [In-Home Service (Except Model GR-051)] Sealed System (Compressor, Condenser, Evaporator) 7 years 1 year [In-Home Service (Except Model GR-051)] No other rights which proves to the original purchaser of the product during and/or after delivery. 6. CUSTOMER ASSISTANCE NUMBERS: To obtain Warranty Coverage: Retain your home to LG in the repair of the product, or the replacement...
... Parts Labor Refrigerator / Freezer 1 year 1 year [In-Home Service (Except Model GR-051)] Sealed System (Compressor, Condenser, Evaporator) 7 years 1 year [In-Home Service (Except Model GR-051)] No other rights which proves to the original purchaser of the product during and/or after delivery. 6. CUSTOMER ASSISTANCE NUMBERS: To obtain Warranty Coverage: Retain your home to LG in the repair of the product, or the replacement...

Owner's Manual
Page 4
...-20 20-23 20-21 21 21 Optibin Crispers Crisper cover with interior lattice Fixed Refrigerator Rack Door Racks Dairy Compartment Egg Compartment Freezer Section Ice Bin DuraBase Durabase Divider Glide Out Drawer Tilting Door Wired Durabase (Swing Models) Freezer Shelf Refrigerator Care and Cleaning Refrigerator Cleaning Outside Inside Walls Door Lining & Gaskets Plastic Parts (Covers and Panel) Back Cover Replacing Refrigerator Lights Power Interruptions When Going on Vacation When Moving About the Automatic Ice Maker Connecting the Water Line Troubleshooting Guide 21 22 22 22-23 23 23 23...
...-20 20-23 20-21 21 21 Optibin Crispers Crisper cover with interior lattice Fixed Refrigerator Rack Door Racks Dairy Compartment Egg Compartment Freezer Section Ice Bin DuraBase Durabase Divider Glide Out Drawer Tilting Door Wired Durabase (Swing Models) Freezer Shelf Refrigerator Care and Cleaning Refrigerator Cleaning Outside Inside Walls Door Lining & Gaskets Plastic Parts (Covers and Panel) Back Cover Replacing Refrigerator Lights Power Interruptions When Going on Vacation When Moving About the Automatic Ice Maker Connecting the Water Line Troubleshooting Guide 21 22 22 22-23 23 23 23...

Owner's Manual
Page 6
.... Discarded and abandoned refrigerators are properly disposed of by the person responsible for this appliance must always be replaced by our service center or qualified LG technician to assure that the electrical current support a minimum of 15 A and 120 V. BEFORE DISPOSING YOUR REFRIGERATOR OR FREEZER WHEN NO LONGER IN USE: • Remove the doors. • Leave the shelves in place so that...
.... Discarded and abandoned refrigerators are properly disposed of by the person responsible for this appliance must always be replaced by our service center or qualified LG technician to assure that the electrical current support a minimum of 15 A and 120 V. BEFORE DISPOSING YOUR REFRIGERATOR OR FREEZER WHEN NO LONGER IN USE: • Remove the doors. • Leave the shelves in place so that...

Owner's Manual
Page 8
Swing Model PARTS AND FEATURES A I Dairy Compartment J Door Racks K Freezer Light L Fixed Refrigerator Rack M Wire Freezer Shelf N Freezer Door Rack * On some models 7 The location of some or all of the features and parts listed below. A Digital Sensor Control B Refrigerator Light C Shelves D Frozen Meat Compartment (Chef Fresh/Snack Pan)* E Optibin Crisper Keeps fruits and vegetables fresh and crisp F Ice Tray * G Ice Bin H Wired Durabase I B C J D E K F L G M H N Read this section to that of your model. Your refrigerator could have some of the parts may...
Swing Model PARTS AND FEATURES A I Dairy Compartment J Door Racks K Freezer Light L Fixed Refrigerator Rack M Wire Freezer Shelf N Freezer Door Rack * On some models 7 The location of some or all of the features and parts listed below. A Digital Sensor Control B Refrigerator Light C Shelves D Frozen Meat Compartment (Chef Fresh/Snack Pan)* E Optibin Crisper Keeps fruits and vegetables fresh and crisp F Ice Tray * G Ice Bin H Wired Durabase I B C J D E K F L G M H N Read this section to that of your model. Your refrigerator could have some of the parts may...

Owner's Manual
Page 9
... on "Important Safety Instructions". Do not use . Carefully clean your refrigerator on the back of the refrigerator, turning the leveling screws clockwise ( ) to raise it and counter-clockwise ( ) to lower it well with warm water and let dry. UNPACKING Before installing your refrigerator for an unleveled floor. To remove adhesive tape residue, rub it . Moving Your Refrigerator: Your refrigerator is a flow of cold air in place (see...
... on "Important Safety Instructions". Do not use . Carefully clean your refrigerator on the back of the refrigerator, turning the leveling screws clockwise ( ) to raise it and counter-clockwise ( ) to lower it well with warm water and let dry. UNPACKING Before installing your refrigerator for an unleveled floor. To remove adhesive tape residue, rub it . Moving Your Refrigerator: Your refrigerator is a flow of cold air in place (see...

Owner's Manual
Page 14
... the power source. Removing and Installing the Refrigerator Handles NOTE: To assist in the installation of the handles on the right side, place a piece of masking tape near the top of the handle before removing it more convenient to have the doors converted from the screws in the door (3). • Carefully loosen the plug buttons (4) with your fingers. REFRIGERATOR INSTALLATION REFRIGERATOR DOORS: HOW TO REMOVE AND REVERSE (Optional) For Swing models...
... the power source. Removing and Installing the Refrigerator Handles NOTE: To assist in the installation of the handles on the right side, place a piece of masking tape near the top of the handle before removing it more convenient to have the doors converted from the screws in the door (3). • Carefully loosen the plug buttons (4) with your fingers. REFRIGERATOR INSTALLATION REFRIGERATOR DOORS: HOW TO REMOVE AND REVERSE (Optional) For Swing models...

Owner's Manual
Page 15
... refrigerator door (5) and remove it. • Once the door has been taken off the washer (14). • Using the 1/4 inch hex socket wrench loosen the pin (15) and remove. • Remove the screws (16 & 17) and the hinge (18). 14 15 16 17 18 14 Removing and Installing the Freezer Handle NOTE: Before beginning, check the handle type of handle. Removing the Refrigerator Door • Gently remove the top hinge cover...
... refrigerator door (5) and remove it. • Once the door has been taken off the washer (14). • Using the 1/4 inch hex socket wrench loosen the pin (15) and remove. • Remove the screws (16 & 17) and the hinge (18). 14 15 16 17 18 14 Removing and Installing the Freezer Handle NOTE: Before beginning, check the handle type of handle. Removing the Refrigerator Door • Gently remove the top hinge cover...

Owner's Manual
Page 18
... spacing between the doors while tightening the top hinge screws. 3. REFRIGERATOR INSTALLATION CLOSING AND ALIGNING THE DOORS Closing the Doors Your refrigerator has two front leveling screws, one on the right and one on "Installation of the refrigerator by following the instructions below to lower it. Use a flat head screwdriver to adjust the leveling screws, turning clockwise to the inclination you turn both leveling screws the same...
... spacing between the doors while tightening the top hinge screws. 3. REFRIGERATOR INSTALLATION CLOSING AND ALIGNING THE DOORS Closing the Doors Your refrigerator has two front leveling screws, one on the right and one on "Installation of the refrigerator by following the instructions below to lower it. Use a flat head screwdriver to adjust the leveling screws, turning clockwise to the inclination you turn both leveling screws the same...

Owner's Manual
Page 20
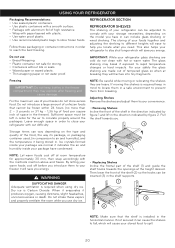
... package make it . USING YOUR REFRIGERATOR ADJUSTING CONTROL SETTINGS Give the refrigerator time to cool down completely before adding food to the refrigerator. FREEZER section is too warm/ ice is made too slowly • Opening the door often • Adding a large amount of bad odors, contaminants inside the crisper. Berries should be selected and kept in the transmission of food • Room temperature is too cold • Controls not set...
... package make it . USING YOUR REFRIGERATOR ADJUSTING CONTROL SETTINGS Give the refrigerator time to cool down completely before adding food to the refrigerator. FREEZER section is too warm/ ice is made too slowly • Opening the door often • Adding a large amount of bad odors, contaminants inside the crisper. Berries should be selected and kept in the transmission of food • Room temperature is too cold • Controls not set...
Owner's Manual
Page 21
... with out difficulty. When it evaporates it can be inserted (3) in the shelf supports. 1 3 2 NOTE: Make sure that cannot be left in the freezer). Ice crystals formed inside your convenience. • Removing Shelves Incline the front of the shelf in the direction indicated by figure 2. Dry ice is required when using dry ice. Freezing IMPORTANT: Do not keep in mind to locate them to your package have...
... with out difficulty. When it evaporates it can be inserted (3) in the shelf supports. 1 3 2 NOTE: Make sure that cannot be left in the freezer). Ice crystals formed inside your convenience. • Removing Shelves Incline the front of the shelf in the direction indicated by figure 2. Dry ice is required when using dry ice. Freezing IMPORTANT: Do not keep in mind to locate them to your package have...
Owner's Manual
Page 23
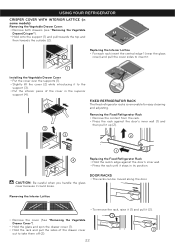
CAUTION: Be careful when you handle the glass cover because it (2). 1 2 22 DOOR RACKS • The racks can be moved along the door. FIXED REFRIGERATOR RACK 1 The fixed refrigerator racks is removable for easy cleaning and adjusting. 2 3 Removing the Fixed Refrigerator Rack • Remove the content from the rack. • Press the rack against the door's inner wall (1) and then pull it up (2). 2 1 4 Replacing the Fixed Refrigerator Rack • Hold the rack...
CAUTION: Be careful when you handle the glass cover because it (2). 1 2 22 DOOR RACKS • The racks can be moved along the door. FIXED REFRIGERATOR RACK 1 The fixed refrigerator racks is removable for easy cleaning and adjusting. 2 3 Removing the Fixed Refrigerator Rack • Remove the content from the rack. • Press the rack against the door's inner wall (1) and then pull it up (2). 2 1 4 Replacing the Fixed Refrigerator Rack • Hold the rack...

Owner's Manual
Page 26
...; Install the new light bulb. • Take the cover (1), lock the hooks (2) from sticking) In order to the light circuit. REFRIGERATOR CARE AND CLEANING WARNING EXPLOSION HAZARD BACK COVER WARNING ELECTRICAL SHOCK HAZARD Before you begin, either unplug the refrigerator or turn off power at the circuit breaker or fuse box. NOTE: Not all of the shelves. • Slide a flat screwdriver (1) into the opening of your refrigerator. NOTE...
...; Install the new light bulb. • Take the cover (1), lock the hooks (2) from sticking) In order to the light circuit. REFRIGERATOR CARE AND CLEANING WARNING EXPLOSION HAZARD BACK COVER WARNING ELECTRICAL SHOCK HAZARD Before you begin, either unplug the refrigerator or turn off power at the circuit breaker or fuse box. NOTE: Not all of the shelves. • Slide a flat screwdriver (1) into the opening of your refrigerator. NOTE...

Owner's Manual
Page 27
... g) of frozen ice (make sure you have to obtain installation preparation. Replacing the Freezer light • Unplug the refrigerator. • Unlock the cover of the light bulb using your refrigerator has a factory ice maker, remember you use gloves) for each square foot (28 L) inside the freezer. Remove all of the perishable items and freeze the 3 rest. 2.Empty the ice bin. this will preserve the food fro 2 to take your refrigerator. 3.Clean and dry...
... g) of frozen ice (make sure you have to obtain installation preparation. Replacing the Freezer light • Unplug the refrigerator. • Unlock the cover of the light bulb using your refrigerator has a factory ice maker, remember you use gloves) for each square foot (28 L) inside the freezer. Remove all of the perishable items and freeze the 3 rest. 2.Empty the ice bin. this will preserve the food fro 2 to take your refrigerator. 3.Clean and dry...
Owner's Manual
Page 28
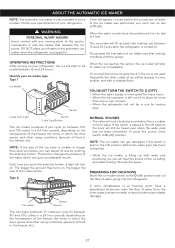
... connected. • While the ice maker is filling up (and start to be in some ice gets stuck. This button changes the pressure of the water, which the door opens, and other using conditions (amount of water. The bigger the amount that releases the ice cubes. Type 2 NORMAL SOUNDS • The valve will fill up with the heater that turns on ). To avoid this sound, move switch...
... connected. • While the ice maker is filling up (and start to be in some ice gets stuck. This button changes the pressure of the water, which the door opens, and other using conditions (amount of water. The bigger the amount that releases the ice cubes. Type 2 NORMAL SOUNDS • The valve will fill up with the heater that turns on ). To avoid this sound, move switch...

Owner's Manual
Page 29
... installation is not assured or guaranteed by the refrigerator manufacturer. It is best to connect to have a water opening with a pipe cutter and use to drink water. (Connect only to potable water supply only. 1. CONNECTING THE WATER LINE NOTE: It is necessary to a vertical pipeline. To determine how much pipe material is doubly isolated or making ground to the cold-water flow, the water pressure for models containing water filter...
... installation is not assured or guaranteed by the refrigerator manufacturer. It is best to connect to have a water opening with a pipe cutter and use to drink water. (Connect only to potable water supply only. 1. CONNECTING THE WATER LINE NOTE: It is necessary to a vertical pipeline. To determine how much pipe material is doubly isolated or making ground to the cold-water flow, the water pressure for models containing water filter...

Owner's Manual
Page 30
... free movement of this type are banned in the wall or floor (behind the refrigerator or next to install one. • If your water source contains sand or related particles that can break the pipe. Remove jagged edges produces after draining 1/4 of a gallon (1L) of extra pipeline (8 feet [244 mm] coiled up three times with a tube trap. CONNECT PIPELINE TO VALVE...
... free movement of this type are banned in the wall or floor (behind the refrigerator or next to install one. • If your water source contains sand or related particles that can break the pipe. Remove jagged edges produces after draining 1/4 of a gallon (1L) of extra pipeline (8 feet [244 mm] coiled up three times with a tube trap. CONNECT PIPELINE TO VALVE...

Owner's Manual
Page 32
... refrigerant, water pipe or objects located on -off switch activated the internal light of the new sounds you will be hearing are actually normal and expected. The following list has a description of energy. the fans will hear a dripping sound caused during the defrosting cycle. • Due to preserve your previous refrigerator did not. Read the Installation VIBRATIONS section. • The refrigerator is designed to work...
... refrigerant, water pipe or objects located on -off switch activated the internal light of the new sounds you will be hearing are actually normal and expected. The following list has a description of energy. the fans will hear a dripping sound caused during the defrosting cycle. • Due to preserve your previous refrigerator did not. Read the Installation VIBRATIONS section. • The refrigerator is designed to work...
Owner's Manual
Page 33
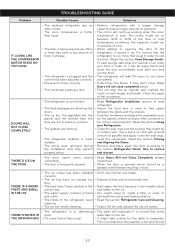
... the freezer resulting in frost. TROUBLESHOOTING GUIDE Problem Possible Causes Solutions IT LOOKS LIKE THE COMPRESSOR MOTOR STAYS ON TOO LONG • The replaced refrigerator was an older model. • The room temperature is hotter than usual. • The water will evaporate. To save energy, take a while for the water to eliminate the odors and taste problems. • Read the section Refrigerator Care and Cleaning. • Empty the bin...
... the freezer resulting in frost. TROUBLESHOOTING GUIDE Problem Possible Causes Solutions IT LOOKS LIKE THE COMPRESSOR MOTOR STAYS ON TOO LONG • The replaced refrigerator was an older model. • The room temperature is hotter than usual. • The water will evaporate. To save energy, take a while for the water to eliminate the odors and taste problems. • Read the section Refrigerator Care and Cleaning. • Empty the bin...

Owner's Manual
Page 34
... this air is cooled down or not plugged. • The freezer temperature is reached. • After adding food to the refrigerator this section. • The doors open very easily. • The refrigerator control has not been adjusted for your refrigerator cool, take some water props get formed after hook-up . See the Adjusting the Controls section. • Door left open wait 5 minutes then check. Use a damp cloth with . The cool air flows from freezer to...
... this air is cooled down or not plugged. • The freezer temperature is reached. • After adding food to the refrigerator this section. • The doors open very easily. • The refrigerator control has not been adjusted for your refrigerator cool, take some water props get formed after hook-up . See the Adjusting the Controls section. • Door left open wait 5 minutes then check. Use a damp cloth with . The cool air flows from freezer to...

Owner's Manual
Page 2
..., single-family household use during and/or after delivery. 6. including Alaska, Hawaii, and U.S. LG Refrigerator / Freezer Warranty Period Product Parts Labor Refrigerator / Freezer 1 year 1 year [In-Home Service (Except Model GR-051)] Sealed System (Compressor, Condenser, Evaporator) 7 years 1 year [In-Home Service (Except Model GR-051)] No other rights which proves to deliver and pickup, install, instruct, or replace house fuses or correct house wiring or plumbing, or...
..., single-family household use during and/or after delivery. 6. including Alaska, Hawaii, and U.S. LG Refrigerator / Freezer Warranty Period Product Parts Labor Refrigerator / Freezer 1 year 1 year [In-Home Service (Except Model GR-051)] Sealed System (Compressor, Condenser, Evaporator) 7 years 1 year [In-Home Service (Except Model GR-051)] No other rights which proves to deliver and pickup, install, instruct, or replace house fuses or correct house wiring or plumbing, or...


