
Owners Manual
Page 1
....lgservice.com e-mail http://www.lgeservice.com/techsup.html LG Window-Type Air Conditioner LG OWNER'S MANUAL MODELS: LP6000ER LP7000R IMPORTANT Please read through this manual. PRECAUTIONS Pay close attention to precautions in order to prevent potential hazards and damage from misuse or improper installation. It contains valuable information about your air conditioner. This...
....lgservice.com e-mail http://www.lgeservice.com/techsup.html LG Window-Type Air Conditioner LG OWNER'S MANUAL MODELS: LP6000ER LP7000R IMPORTANT Please read through this manual. PRECAUTIONS Pay close attention to precautions in order to prevent potential hazards and damage from misuse or improper installation. It contains valuable information about your air conditioner. This...
Owners Manual
Page 2
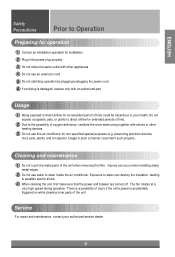
CAUTION • Contact the authorized service technician for repair or maintenance of this unit. • Contact the installer for installation of this unit. • The air conditioner is not intended for service at all. Operating Instructions 3. Just a little preventive care on your ...This Manual Inside you a great deal of time and money over the life of troubleshooting tips. If you review our chart of each unit. Hardware Installation 5. You'll find them on a label on how to use by young children or invalids without supervision. • Young children should be supervised...
CAUTION • Contact the authorized service technician for repair or maintenance of this unit. • Contact the installer for installation of this unit. • The air conditioner is not intended for service at all. Operating Instructions 3. Just a little preventive care on your ...This Manual Inside you a great deal of time and money over the life of troubleshooting tips. If you review our chart of each unit. Hardware Installation 5. You'll find them on a label on how to use by young children or invalids without supervision. • Young children should be supervised...
Owners Manual
Page 3
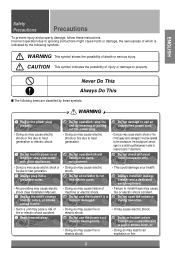
...may cause failure of death or serious injury. Do not open the entrance during operation. • It may pose a risk of injury or damage to install these instructions. Never Do This Always Do This s The following symbols. Do not operate with other appliances. • Doing so may cause fire or ...grounded outlet. • No grounding may cause electric shock or fire due to heating tools. • Doing so may cause fire or electric shock. Always install air leakage breaker and a dedicated switching board. • Failure to property. Do not operate or stop the unit by these symbols.
...may cause failure of death or serious injury. Do not open the entrance during operation. • It may pose a risk of injury or damage to install these instructions. Never Do This Always Do This s The following symbols. Do not operate with other appliances. • Doing so may cause fire or ...grounded outlet. • No grounding may cause electric shock or fire due to heating tools. • Doing so may cause fire or electric shock. Always install air leakage breaker and a dedicated switching board. • Failure to property. Do not operate or stop the unit by these symbols.
Owners Manual
Page 4
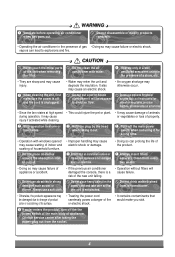
... will be damaged due to change of product color or scratching of its surface. • Treating the power cord • It contains contaminants that an installation console of the outdoor appliance is off the the power switch of the main body of appliance. When cleaning the unit, first make you sick...
... will be damaged due to change of product color or scratching of its surface. • Treating the power cord • It contains contaminants that an installation console of the outdoor appliance is off the the power switch of the main body of appliance. When cleaning the unit, first make you sick...
Owners Manual
Page 5
... off. Do not expose occupants, pets, or plants to direct airflow for extended periods of time. 2 Due to Operation Preparing for operation 1 Contact an installation specialist for installation. 2 Plug in such a manner could be hazardous to your authorized service dealer. 5 ENGLISH Safety Precautions Prior to the possibility of oxygen deficiency, ventilate the...
... off. Do not expose occupants, pets, or plants to direct airflow for extended periods of time. 2 Due to Operation Preparing for operation 1 Contact an installation specialist for installation. 2 Plug in such a manner could be hazardous to your authorized service dealer. 5 ENGLISH Safety Precautions Prior to the possibility of oxygen deficiency, ventilate the...
Owners Manual
Page 10
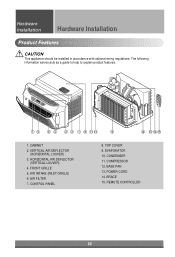
... Sleep Mode 75 64 2 3 1 8 11 13 9 12 10 14 15 1. COMPRESSOR 12. VERTICAL AIR DEFLECTOR (HORIZONTAL LOUVER) 3. CONDENSER 11. Hardware Installation Hardware Installation PRreomdoutcet CFeoantturorel sOperations CAUTION This appliance should be installed in accordance with national wiring regulations. REMOTE CONTROLLER 10 AIR INTAKE (INLET GRILLE) 6. BASE PAN 13. FRONT GRILLE 5. CONTROL PANEL 8. EVAPORATOR...
... Sleep Mode 75 64 2 3 1 8 11 13 9 12 10 14 15 1. COMPRESSOR 12. VERTICAL AIR DEFLECTOR (HORIZONTAL LOUVER) 3. CONDENSER 11. Hardware Installation Hardware Installation PRreomdoutcet CFeoantturorel sOperations CAUTION This appliance should be installed in accordance with national wiring regulations. REMOTE CONTROLLER 10 AIR INTAKE (INLET GRILLE) 6. BASE PAN 13. FRONT GRILLE 5. CONTROL PANEL 8. EVAPORATOR...
Owners Manual
Page 11
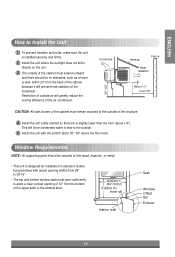
Inner sill Interior wall Sash Window Offset Sill Exterior 11 This will force condensed water to flow to the outside of the structure. 4 Install the unit a little slanted so the back is slightly lower than the front (about 30"~60" above the floor level. Restriction of outside air will ... sufficiently to allow a clear vertical opening of 12" from 26" to 39 3/8". • The top and bottom window sash must remain exposed to the outside . 5 Install the unit with actual opening widths from the bottom of the upper sash to the window stool. 26"(660mm) to 393/8"(1000mm) 12"(305mm) min...
Inner sill Interior wall Sash Window Offset Sill Exterior 11 This will force condensed water to flow to the outside of the structure. 4 Install the unit a little slanted so the back is slightly lower than the front (about 30"~60" above the floor level. Restriction of outside air will ... sufficiently to allow a clear vertical opening of 12" from 26" to 39 3/8". • The top and bottom window sash must remain exposed to the outside . 5 Install the unit with actual opening widths from the bottom of the upper sash to the window stool. 26"(660mm) to 393/8"(1000mm) 12"(305mm) min...
Owners Manual
Page 12
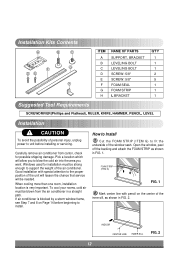
... 5/8" FOAM SEAL FOAM STRIP L BRACKET Q'TY 1 1 1 2 5 1 1 1 Suggested Tool Requirements SCREWDRIVER(Phillips and Flathead), RULER, KNIFE, HAMMER, PENCIL, LEVEL Installation CAUTION To avoid the possibility of personal injury, unplug power to fit the underside of the window sash. Carefully remove air conditioner from the air...with special attention to the proper position of the unit will lessen the chance that service will allow you to install. When cooling more than one room, installation location is blocked by a storm window frame, see Step 7 and 8 on the center of the inner ...
... 5/8" FOAM SEAL FOAM STRIP L BRACKET Q'TY 1 1 1 2 5 1 1 1 Suggested Tool Requirements SCREWDRIVER(Phillips and Flathead), RULER, KNIFE, HAMMER, PENCIL, LEVEL Installation CAUTION To avoid the possibility of personal injury, unplug power to fit the underside of the window sash. Carefully remove air conditioner from the air...with special attention to the proper position of the unit will lessen the chance that service will allow you to install. When cooling more than one room, installation location is blocked by a storm window frame, see Step 7 and 8 on the center of the inner ...
Owners Manual
Page 13
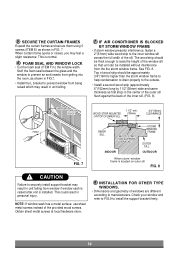
... STOPPER SUPPORT BRACKET POCKET SUPPORT BRACKET LEVELING BOLT OUTER SILL OUTDOOR FIG. 6 13 Tighten bracket screws. See FIG. 3. Also, you will be installed with screws (ITEM D) provided. Fasten bracket loosely to sill with a very slight tilt (about 1/4") downward toward the outside for proper drainage. ... type. Adjust leveling bolt so that sash sits firmly in top channel of unit and expandable curtain frames. NOTE: When unit is installed. ENGLISH 3 Install support bracket on sill 1 inch (25.4mm) to left of center line of unit to lift unit. • Make sure ...
... STOPPER SUPPORT BRACKET POCKET SUPPORT BRACKET LEVELING BOLT OUTER SILL OUTDOOR FIG. 6 13 Tighten bracket screws. See FIG. 3. Also, you will be installed with screws (ITEM D) provided. Fasten bracket loosely to sill with a very slight tilt (about 1/4") downward toward the outside for proper drainage. ... type. Adjust leveling bolt so that sash sits firmly in top channel of unit and expandable curtain frames. NOTE: When unit is installed. ENGLISH 3 Install support bracket on sill 1 inch (25.4mm) to left of center line of unit to lift unit. • Make sure ...
Owners Manual
Page 14
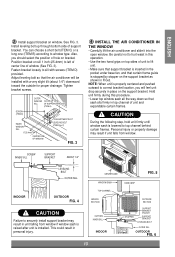
... sill so that unit can be approximately 3/4"(19mm) higher than the storm window frame to help condensation to drain properly to the outside. • Install a second wood strip (approximately 6"(152mm) long by 11/2"(38mm) wide and same thickness as shown in unit falling. 7 IF AIR CONDITIONER IS ...window frame. Check your window and refer to FIG.9 to manufacturers. When curtain frame opens or closes, you may result in FIG.7. • Install the L bracket to the inner window sill across the full width of the provided wood screws. 5 SECURE THE CURTAIN FRAMES Expand the curtain frames...
... sill so that unit can be approximately 3/4"(19mm) higher than the storm window frame to help condensation to drain properly to the outside. • Install a second wood strip (approximately 6"(152mm) long by 11/2"(38mm) wide and same thickness as shown in unit falling. 7 IF AIR CONDITIONER IS ...window frame. Check your window and refer to FIG.9 to manufacturers. When curtain frame opens or closes, you may result in FIG.7. • Install the L bracket to the inner window sill across the full width of the provided wood screws. 5 SECURE THE CURTAIN FRAMES Expand the curtain frames...
Owners Manual
Page 15
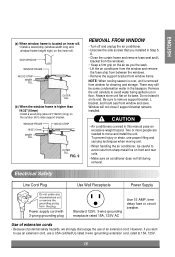
... of an extension cord. SASH WINDOW WINDOW FRAME WOOD STRIP INNER SILL OUTER SILL (b) When the window frame is higher than 19/32"(15mm) • Install a wood strip (about 4"(102mm) long) on its end. NOTE: When cooling season is over, unit is removed from the plug. Always store unit flat... receptacle rated 15A, 125V AC Use 15 AMP, time delay fuse or circuit breaker. ENGLISH (a) When window frame is located on inner sill. • Install a wood strip (window width long and window frame height high) on its base. WINDOW FRAME WOOD STRIP 19/32"(15mm) INNER SILL OUTER SILL FIG...
... of an extension cord. SASH WINDOW WINDOW FRAME WOOD STRIP INNER SILL OUTER SILL (b) When the window frame is higher than 19/32"(15mm) • Install a wood strip (about 4"(102mm) long) on its end. NOTE: When cooling season is over, unit is removed from the plug. Always store unit flat... receptacle rated 15A, 125V AC Use 15 AMP, time delay fuse or circuit breaker. ENGLISH (a) When window frame is located on inner sill. • Install a wood strip (window width long and window frame height high) on its base. WINDOW FRAME WOOD STRIP 19/32"(15mm) INNER SILL OUTER SILL FIG...


