
Owner's Manual
Page 2
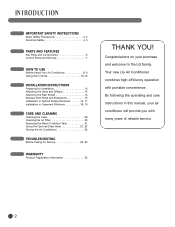
... Diffuser 14 Attaching the Rain Shield 14 Window Vent Panel and Extensions 15 Installation in Vertical Sliding Windows 16, 17 Installation in this manual, your purchase and welcome to the LG family. Congratulations on your air conditioner will provide you with portable convenience. ... Remote 7 HOW TO USE Before Using Your Air Conditioner 8, 9 Using the Controls 10-12 INSTALLATION INSTRUCTIONS Preparing for Service 23, 24 WARRANTY Product Registration Information 25 THANK YOU! Your new LG Air Conditioner combines high-efficiency operation with many years of reliable service. 2
... Diffuser 14 Attaching the Rain Shield 14 Window Vent Panel and Extensions 15 Installation in Vertical Sliding Windows 16, 17 Installation in this manual, your purchase and welcome to the LG family. Congratulations on your air conditioner will provide you with portable convenience. ... Remote 7 HOW TO USE Before Using Your Air Conditioner 8, 9 Using the Controls 10-12 INSTALLATION INSTRUCTIONS Preparing for Service 23, 24 WARRANTY Product Registration Information 25 THANK YOU! Your new LG Air Conditioner combines high-efficiency operation with many years of reliable service. 2
Owner's Manual
Page 3
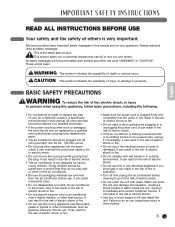
CAUTION This symbol indicates the possibility of injury or damage to lift and install the unit. it is specifically recommended in the risk of fire or explosion. • Turn off and unplug the air conditioner before use this ...
CAUTION This symbol indicates the possibility of injury or damage to lift and install the unit. it is specifically recommended in the risk of fire or explosion. • Turn off and unplug the air conditioner before use this ...
Owner's Manual
Page 4
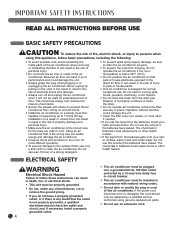
...;follow basicprecautions,includingthefollowing: • To avoid possible cuts, avoid contacting the metal parts of time. Installation on a weak or unlevel floor can result in result in the risk of supporting up to cool. Do not use the remote if the batteries...power cord becomes worn or damaged, the cord should checktheoutletand circuit,and,ifnecessary,installaproperly groundedoutlet. 4 • Thisairconditionermustbeplugged intoagrounded...
...;follow basicprecautions,includingthefollowing: • To avoid possible cuts, avoid contacting the metal parts of time. Installation on a weak or unlevel floor can result in result in the risk of supporting up to cool. Do not use the remote if the batteries...power cord becomes worn or damaged, the cord should checktheoutletand circuit,and,ifnecessary,installaproperly groundedoutlet. 4 • Thisairconditionermustbeplugged intoagrounded...
Owner's Manual
Page 6
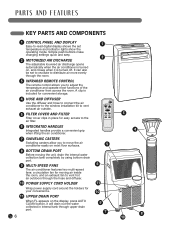
... AUTO CLEAN button, it is included for convenient storage. 4 HOSE AND DIFFUSER Use the diffuser and hose to connect the air conditioner to the window installation kit to vent exhaust air outside. 5 FILTER COVER AND FILTER Filter cover clips in internal tank through the room. 3 INFRARED REMOTE CONTROL The remote control...
... AUTO CLEAN button, it is included for convenient storage. 4 HOSE AND DIFFUSER Use the diffuser and hose to connect the air conditioner to the window installation kit to vent exhaust air outside. 5 FILTER COVER AND FILTER Filter cover clips in internal tank through the room. 3 INFRARED REMOTE CONTROL The remote control...
Owner's Manual
Page 8
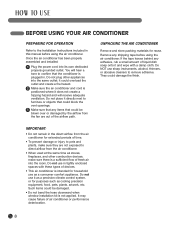
...conditioner is plugged in this manual before using the air conditioner. Do not use sharp instruments, alcohol, thinners, or abrasive cleaners to the Installation Instructions included in . Such items could overload the outlet and create a fire hazard. 2 Make sure the air conditioner and cord is ...intended for purposes such as stoves, fireplaces, and other appliances into the same outlet; Once the air conditioner has been properly assembled and installed: 1 Plug the power cord into the room. IMPORTANT: • Do not remain in tightly enclosed spaces with a damp cloth. If ...
...conditioner is plugged in this manual before using the air conditioner. Do not use sharp instruments, alcohol, thinners, or abrasive cleaners to the Installation Instructions included in . Such items could overload the outlet and create a fire hazard. 2 Make sure the air conditioner and cord is ...intended for purposes such as stoves, fireplaces, and other appliances into the same outlet; Once the air conditioner has been properly assembled and installed: 1 Plug the power cord into the room. IMPORTANT: • Do not remain in tightly enclosed spaces with a damp cloth. If ...
Owner's Manual
Page 9
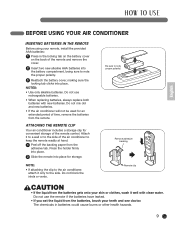
...liquidfrom the adhesive tab. HOW TO USE English BEFORE USING YOUR AIR CONDITIONER INSERTING BATTERIES IN THE REMOTE Before using your remote, install the provided AAA batteries: 1 Press in batteries could cause burns or other health hazards. 9 Do not use rechargeable batteries. • When replacing batteries, always replace...
...liquidfrom the adhesive tab. HOW TO USE English BEFORE USING YOUR AIR CONDITIONER INSERTING BATTERIES IN THE REMOTE Before using your remote, install the provided AAA batteries: 1 Press in batteries could cause burns or other health hazards. 9 Do not use rechargeable batteries. • When replacing batteries, always replace...
Owner's Manual
Page 13
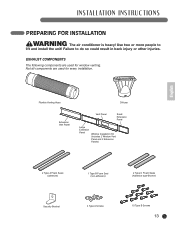
... 2 Type A Foam Seals (adhesive) 1 Type B Foam Seal (non-adhesive) 2 Type C Foam Seals (Adhesive type-Shorter) Security Bracket 4 Type A Screws 10 Type B Screws 13 INSTALLATION INSTRUCTIONS PREPARING FOR INSTALLATION WARNING Theairconditionerisheavy!Usetwoormorepeopleto lift...;andinstalltheunit!Failuretodosocouldresultinbackinjuryor&#...
... 2 Type A Foam Seals (adhesive) 1 Type B Foam Seal (non-adhesive) 2 Type C Foam Seals (Adhesive type-Shorter) Security Bracket 4 Type A Screws 10 Type B Screws 13 INSTALLATION INSTRUCTIONS PREPARING FOR INSTALLATION WARNING Theairconditionerisheavy!Usetwoormorepeopleto lift...;andinstalltheunit!Failuretodosocouldresultinbackinjuryor&#...

Owner's Manual
Page 14
.... Simply reverse the steps below to lock into the hole on the back of the hose. Align the slots on the diffuser with the hose installed. INSTALLATION INSTRUCTIONS ATTACHING THE HOSE AND DIFFUSER NOTE: The air conditioner is shipped with the pins on the hose. Align the pins on the connector with...
.... Simply reverse the steps below to lock into the hole on the back of the hose. Align the slots on the diffuser with the hose installed. INSTALLATION INSTRUCTIONS ATTACHING THE HOSE AND DIFFUSER NOTE: The air conditioner is shipped with the pins on the hose. Align the pins on the connector with...
Owner's Manual
Page 15
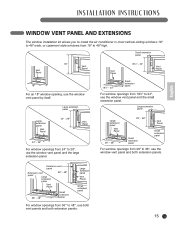
... extension panel For window openings from 29" to 36", use the window vent panel and both extension panels. 15 INSTALLATION INSTRUCTIONS English WINDOW VENT PANEL AND EXTENSIONS The window installation kit allows you to install the air conditioner in most vertical-sliding windows 18" to 48" wide, or casement-style windows from...
... extension panel For window openings from 29" to 36", use the window vent panel and both extension panels. 15 INSTALLATION INSTRUCTIONS English WINDOW VENT PANEL AND EXTENSIONS The window installation kit allows you to install the air conditioner in most vertical-sliding windows 18" to 48" wide, or casement-style windows from...

Owner's Manual
Page 16
... VERTICAL SLIDING WINDOWS NOTE: The window installation kit can be used . Sellado con esp (tipo no adhesiv Stuff the foam seal B between 18" and 48" wide. Type B screws Sellante de espuma A (Tipo ...
... VERTICAL SLIDING WINDOWS NOTE: The window installation kit can be used . Sellado con esp (tipo no adhesiv Stuff the foam seal B between 18" and 48" wide. Type B screws Sellante de espuma A (Tipo ...

Owner's Manual
Page 17
Type A screws 6 Insert the oval end of the diffuser into the window installation kit until the locking tabs engage. English 17 Secure in place with a type B screw, as shown. INSTALLATION INSTRUCTIONS INSTALLATION IN VERTICAL SLIDING WINDOWS Security Bracket Type B screw 5 Install the security bracket with four Type A screws.
Type A screws 6 Insert the oval end of the diffuser into the window installation kit until the locking tabs engage. English 17 Secure in place with a type B screw, as shown. INSTALLATION INSTRUCTIONS INSTALLATION IN VERTICAL SLIDING WINDOWS Security Bracket Type B screw 5 Install the security bracket with four Type A screws.

Owner's Manual
Page 18
... CASEMENT STYLE WINDOWS NOTE: The window installation kit can be used . Sellado con esp (tipo adhesivo) Joints en Mousse A (Type adhésif) Extend the extension panels, if used with 4 type B screws, ...
... CASEMENT STYLE WINDOWS NOTE: The window installation kit can be used . Sellado con esp (tipo adhesivo) Joints en Mousse A (Type adhésif) Extend the extension panels, if used with 4 type B screws, ...

Owner's Manual
Page 19
Secure in place with a type B screw, as shown. 6 Insert the oval end of the included screws. English 19 INSTALLATION INSTRUCTIONS INSTALLATION IN CASEMENT STYLE WINDOWS Security bracket Type A screws Type B screw 5 Install the window security bracket with four of the diffuser into the window installation kit until the locking tabs engage.
Secure in place with a type B screw, as shown. 6 Insert the oval end of the included screws. English 19 INSTALLATION INSTRUCTIONS INSTALLATION IN CASEMENT STYLE WINDOWS Security bracket Type A screws Type B screw 5 Install the window security bracket with four of the diffuser into the window installation kit until the locking tabs engage.
Owner's Manual
Page 22
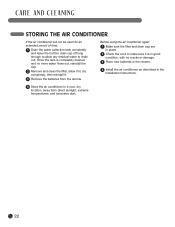
.... 2 Check the cord to make sure it is completely drained and no cracks or damage. 3 Place new batteries in the remote. 4 Install the air conditioner as described in the Installation Instructions. 4 Store the air conditioner in good condition, with no more water flows out, reinstall the cap. 2 Remove and clean the filter...
.... 2 Check the cord to make sure it is completely drained and no cracks or damage. 3 Place new batteries in the remote. 4 Install the air conditioner as described in the Installation Instructions. 4 Store the air conditioner in good condition, with no more water flows out, reinstall the cap. 2 Remove and clean the filter...
Owner's Manual
Page 25
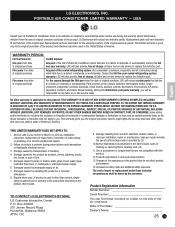
... use or contrary to territory. Date of air. 7. Replacement parts are warranted for delivery or pick-up, installation, instruction, replacement of house fuses, connection of the air conditoner. This limited warranty is used in the United States of the product... purchaser of the product and effective only when used in a corrosive atmosphere. 8. Failure of : LG Will Replace: One year from accident, alteration, misuse, abuse, or improper installation, repair, or maintenance. Product Registration Information Model Number Serial Number You can find these excluded circumstances ...
... use or contrary to territory. Date of air. 7. Replacement parts are warranted for delivery or pick-up, installation, instruction, replacement of house fuses, connection of the air conditoner. This limited warranty is used in the United States of the product... purchaser of the product and effective only when used in a corrosive atmosphere. 8. Failure of : LG Will Replace: One year from accident, alteration, misuse, abuse, or improper installation, repair, or maintenance. Product Registration Information Model Number Serial Number You can find these excluded circumstances ...


