
Owners Manual
Page 2
... Installation Kit 10 Selection of Installation Location 11 Assembling the Flexible Vent Hose Set 11 Attaching the Flexible Vent Hose Set 12 Window Vent Panel and Extensions 13 Installing Vent Panels 15 Drain Hose Installation for Heating (On Some Models) 16 Garden Hose Installation for Dehumidifying (Dry Mode Only) 17 OPERATION 17 Control Panel and...
... Installation Kit 10 Selection of Installation Location 11 Assembling the Flexible Vent Hose Set 11 Attaching the Flexible Vent Hose Set 12 Window Vent Panel and Extensions 13 Installing Vent Panels 15 Drain Hose Installation for Heating (On Some Models) 16 Garden Hose Installation for Dehumidifying (Dry Mode Only) 17 OPERATION 17 Control Panel and...

Owners Manual
Page 7
...drainage when running the air conditioner in Dry mode. 8 PUMP DRAIN PORT (On Some Models) Connect the provided pump drain hose for drainage when running the air conditioner in Heat mode. 9 10 10 11 79 86 9 11 PUMP DRAIN HOSE (On Some Models) Connect to adjust the temperature and operate most... functions of the air conditioner from across the room. See Drain Hose Installation for Heating. NOTE Features may change depending on model. PRODUCT OVERVIEW Key Parts and Components PRODUCT OVERVIEW 7 ENGLISH temperature, and...
...drainage when running the air conditioner in Dry mode. 8 PUMP DRAIN PORT (On Some Models) Connect the provided pump drain hose for drainage when running the air conditioner in Heat mode. 9 10 10 11 79 86 9 11 PUMP DRAIN HOSE (On Some Models) Connect to adjust the temperature and operate most... functions of the air conditioner from across the room. See Drain Hose Installation for Heating. NOTE Features may change depending on model. PRODUCT OVERVIEW Key Parts and Components PRODUCT OVERVIEW 7 ENGLISH temperature, and...

Owners Manual
Page 10
... panel 2 Short adhesive foam seals 1 Panel D (17″) Extension panel 2 Security brackets 4 Type A screws (1/2") 4 Type B screws (3/4") 1 Type C screw (5/16") 1 Drain hose (on some models) 1 Lock nut (on some models) Selection of Installation Location 20″ 20″ 20″ 20″ NOTE The length of this... could cause malfunction. Do not replace or extend it with a hose that is specially designed according to the specification of the flexible vent hose is not specifically designed for use with this product as this product.
... panel 2 Short adhesive foam seals 1 Panel D (17″) Extension panel 2 Security brackets 4 Type A screws (1/2") 4 Type B screws (3/4") 1 Type C screw (5/16") 1 Drain hose (on some models) 1 Lock nut (on some models) Selection of Installation Location 20″ 20″ 20″ 20″ NOTE The length of this... could cause malfunction. Do not replace or extend it with a hose that is specially designed according to the specification of the flexible vent hose is not specifically designed for use with this product as this product.
Owners Manual
Page 14
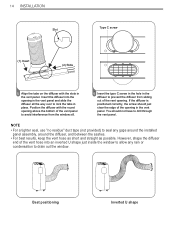
... Position the diffuser with the slots in the vent panel and slide the diffuser all the way over to drain out the window. However, shape the diffuser end of the vent hose into the opening in the vent panel. Insert the diffuser into an inverted U shape just inside the window... to allow any gaps around the installed panel assembly, around the diffuser, and between the sashes. • For best results, keep the vent hose as short and straight as possible. Best positioning Inverted U shape 14 INSTALLATION Slot Type C screw (1) Insert (2) Slide 5 Align the tabs on the ...
... Position the diffuser with the slots in the vent panel and slide the diffuser all the way over to drain out the window. However, shape the diffuser end of the vent hose into the opening in the vent panel. Insert the diffuser into an inverted U shape just inside the window... to allow any gaps around the installed panel assembly, around the diffuser, and between the sashes. • For best results, keep the vent hose as short and straight as possible. Best positioning Inverted U shape 14 INSTALLATION Slot Type C screw (1) Insert (2) Slide 5 Align the tabs on the ...

Owners Manual
Page 15
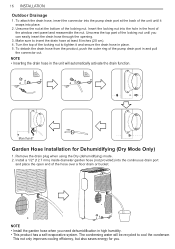
...be stained or damaged by the draining water. NOTE • Inserting the drain hose into place. 2. Place the other end of the hose is at the back of the pump drain port in a bucket that could be set up to drain to avoid overflows. 3. ENGLISH INSTALLATION 15 Drain Hose Installation for Heating (On Some...ring of the unit until it snaps into the unit will automatically activate the drain function. To detach the drain hose from nearby surfaces that holds at least 28 ounces. Make sure the outlet of the drain hose in and pull the connector out. If only the Cool mode is used, ...
...be stained or damaged by the draining water. NOTE • Inserting the drain hose into place. 2. Place the other end of the hose is at the back of the pump drain port in a bucket that could be set up to drain to avoid overflows. 3. ENGLISH INSTALLATION 15 Drain Hose Installation for Heating (On Some...ring of the unit until it snaps into the unit will automatically activate the drain function. To detach the drain hose from nearby surfaces that holds at least 28 ounces. Make sure the outlet of the drain hose in and pull the connector out. If only the Cool mode is used, ...
Owners Manual
Page 16
..., but also saves energy for Dehumidifying (Dry Mode Only) 1. NOTE • Install the garden hose when you need dehumidification in the unit will be recycled to insert the drain hose at the bottom of the window vent panel and reassemble the nut. Install a 1/2" (12.7 ...the condenser. More than 8″ Garden Hose Installation for you can easily insert the drain hose through the opening. 3. The condensing water will automatically activate the drain function. Unscrew the nut at least 8 inches (20 cm). 4. NOTE • Inserting the drain hose in high humidity. • This product ...
..., but also saves energy for Dehumidifying (Dry Mode Only) 1. NOTE • Install the garden hose when you need dehumidification in the unit will be recycled to insert the drain hose at the bottom of the window vent panel and reassemble the nut. Install a 1/2" (12.7 ...the condenser. More than 8″ Garden Hose Installation for you can easily insert the drain hose through the opening. 3. The condensing water will automatically activate the drain function. Unscrew the nut at least 8 inches (20 cm). 4. NOTE • Inserting the drain hose in high humidity. • This product ...
Owners Manual
Page 19
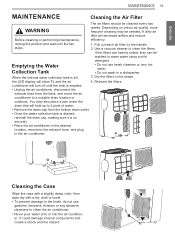
...product and wait until the tank is emptied. • Unplug the air conditioner, disconnect the exhaust hose from the bottom drain outlet. • Once the water collection tank is drained, reinstall the drain cap, making sure it is full, 3. the LED display will decrease airflow and reduce Before cleaning... the shade. When the internal water collection tank is on indoor air quality, more frequent cleaning may also place a pan under the drain that will turn off until the fan stops. 1. It could damage internal components and create a shock and fire hazard. Emptying the Water...
...product and wait until the tank is emptied. • Unplug the air conditioner, disconnect the exhaust hose from the bottom drain outlet. • Once the water collection tank is drained, reinstall the drain cap, making sure it is full, 3. the LED display will decrease airflow and reduce Before cleaning... the shade. When the internal water collection tank is on indoor air quality, more frequent cleaning may also place a pan under the drain that will turn off until the fan stops. 1. It could damage internal components and create a shock and fire hazard. Emptying the Water...


