Owners Manual
Page 1
All Rights Reserved. TYPE: PORTABLE AIR CONDITIONER LP0820WSR LP1020WSR LP1220GSR LP1420BSR LP1420BHR Rev.00 www.lg.com Copyright © 2019 LG Electronics Inc. ENGLISH ESPAÑOL OWNER'S MANUAL AIR CONDITIONER Read this owner's manual thoroughly before operating the appliance and keep it handy for reference at all times.
All Rights Reserved. TYPE: PORTABLE AIR CONDITIONER LP0820WSR LP1020WSR LP1220GSR LP1420BSR LP1420BHR Rev.00 www.lg.com Copyright © 2019 LG Electronics Inc. ENGLISH ESPAÑOL OWNER'S MANUAL AIR CONDITIONER Read this owner's manual thoroughly before operating the appliance and keep it handy for reference at all times.

Owners Manual
Page 2
...SAFETY INSTRUCTIONS 7 PRODUCT OVERVIEW 7 Key Parts and Components 8 INSTALLATION 8 Electrical Information 9 Before Installing the Air Conditioner 9 Wireless Remote Control 10 Contents of Installation Kit 10 Selection of Installation Location 11 Assembling the Flexible Vent Hose Set 11 Attaching the Flexible Vent Hose Set 12 Window Vent Panel and Extensions 13 Installing Vent Panels 15 Drain Hose Installation for Heating (On Some Models) 16 Garden Hose Installation for Dehumidifying (Dry Mode Only) 17 OPERATION 17 Control Panel and Remote Control 19 MAINTENANCE 19 Emptying the Water Collection...
...SAFETY INSTRUCTIONS 7 PRODUCT OVERVIEW 7 Key Parts and Components 8 INSTALLATION 8 Electrical Information 9 Before Installing the Air Conditioner 9 Wireless Remote Control 10 Contents of Installation Kit 10 Selection of Installation Location 11 Assembling the Flexible Vent Hose Set 11 Attaching the Flexible Vent Hose Set 12 Window Vent Panel and Extensions 13 Installing Vent Panels 15 Drain Hose Installation for Heating (On Some Models) 16 Garden Hose Installation for Dehumidifying (Dry Mode Only) 17 OPERATION 17 Control Panel and Remote Control 19 MAINTENANCE 19 Emptying the Water Collection...

Owners Manual
Page 4
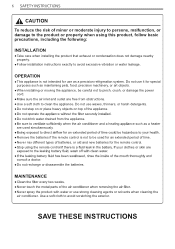
4 SAFETY INSTRUCTIONS When the power cord is to avoid electrical overload. Connect to a properly rated, protected, and sized power circuit to be replaced, replacement work shall be exposed to temperatures below freezing or exposed to operate this appliance only for use of children. Always plug into a shared outlet. Adhere to pinch, crush, or damage the power cord. Store and install the product where it is not intended for its length...
4 SAFETY INSTRUCTIONS When the power cord is to avoid electrical overload. Connect to a properly rated, protected, and sized power circuit to be replaced, replacement work shall be exposed to temperatures below freezing or exposed to operate this appliance only for use of children. Always plug into a shared outlet. Adhere to pinch, crush, or damage the power cord. Store and install the product where it is not intended for its length...

Owners Manual
Page 5
... INSTRUCTIONS 5 If water enters the product, turn off the power at the main circuit, then unplug the product and call for instructions before cleaning. Open a window or door to make sure the receptacle is properly grounded. Do not use . Situations when the appliance will be replaced by a person responsible for long periods. Disconnect the power cord from most local hardware stores. Unplug the product before resuming use...
... INSTRUCTIONS 5 If water enters the product, turn off the power at the main circuit, then unplug the product and call for instructions before cleaning. Open a window or door to make sure the receptacle is properly grounded. Do not use . Situations when the appliance will be replaced by a person responsible for long periods. Disconnect the power cord from most local hardware stores. Unplug the product before resuming use...
Owners Manual
Page 6
... not recharge or disassemble the batteries. Use a soft cloth to pinch, crush, or damage the power cord. are free from the appliance. MAINTENANCE Never spray the product with water or use waxes, thinners, or harsh detergents. When installing or moving the appliance, be used simultaneously. OPERATION This appliance is not to be careful not to clean the appliance. Do not drink water drained from obstructions...
... not recharge or disassemble the batteries. Use a soft cloth to pinch, crush, or damage the power cord. are free from the appliance. MAINTENANCE Never spray the product with water or use waxes, thinners, or harsh detergents. When installing or moving the appliance, be used simultaneously. OPERATION This appliance is not to be careful not to clean the appliance. Do not drink water drained from obstructions...

Owners Manual
Page 7
PRODUCT OVERVIEW Key Parts and Components PRODUCT OVERVIEW 7 ENGLISH temperature, and WIRELESS REMOTE CONTROL The remote control allows you to the pump drain port for pump drainage when running the air conditioner in Heat mode. 9 10 10 11 79 86 9 11 PUMP DRAIN HOSE (On Some Models) Connect to adjust the temperature and operate most functions of the air conditioner from across the room. See Drain Hose Installation for drainage when running the air conditioner in Heat mode. NOTE Features may change depending on model. using the...
PRODUCT OVERVIEW Key Parts and Components PRODUCT OVERVIEW 7 ENGLISH temperature, and WIRELESS REMOTE CONTROL The remote control allows you to the pump drain port for pump drainage when running the air conditioner in Heat mode. 9 10 10 11 79 86 9 11 PUMP DRAIN HOSE (On Some Models) Connect to adjust the temperature and operate most functions of the air conditioner from across the room. See Drain Hose Installation for drainage when running the air conditioner in Heat mode. NOTE Features may change depending on model. using the...
Owners Manual
Page 8
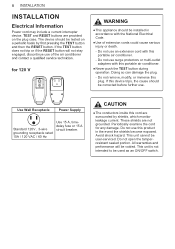
... TEST button during operation. Use Wall Receptacle Power Supply Standard 120V , 3-wire grounding receptacle rated 15A / 120 VAC / 60 Hz Use 15 A, timedelay fuse or 15 A circuit breaker. CAUTION The conductors inside this portable air conditioner. - These shields are surrounded by shields, which monitor leakage current. This unit is not intended to be corrected before further use. Doing so can damage the plug. - Periodically examine the cord for 120 V RESET...
... TEST button during operation. Use Wall Receptacle Power Supply Standard 120V , 3-wire grounding receptacle rated 15A / 120 VAC / 60 Hz Use 15 A, timedelay fuse or 15 A circuit breaker. CAUTION The conductors inside this portable air conditioner. - These shields are surrounded by shields, which monitor leakage current. This unit is not intended to be corrected before further use. Doing so can damage the plug. - Periodically examine the cord for 120 V RESET...
Owners Manual
Page 9
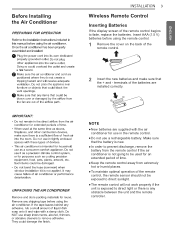
... going to fade, replace the batteries. Insert AAA (1.5 V) batteries before using the remote control. 1 Remove the cover on the back of the batteries are supplied with the air conditioner for an extended period of time. NOTE New batteries are installed correctly. The remote control will not work properly if the unit is any obstacle between the unit and the remote controller. In order to direct light or there is...
... going to fade, replace the batteries. Insert AAA (1.5 V) batteries before using the remote control. 1 Remove the cover on the back of the batteries are supplied with the air conditioner for an extended period of time. NOTE New batteries are installed correctly. The remote control will not work properly if the unit is any obstacle between the unit and the remote controller. In order to direct light or there is...

Owners Manual
Page 10
... panel 2 Security brackets 4 Type A screws (1/2") 4 Type B screws (3/4") 1 Type C screw (5/16") 1 Drain hose (on some models) 1 Lock nut (on some models) Selection of Installation Location 20″ 20″ 20″ 20″ NOTE The length of this could cause malfunction. Do not replace or extend it with a hose that is specially designed according to the specification of the flexible vent hose is not specifically designed for use with...
... panel 2 Security brackets 4 Type A screws (1/2") 4 Type B screws (3/4") 1 Type C screw (5/16") 1 Drain hose (on some models) 1 Lock nut (on some models) Selection of Installation Location 20″ 20″ 20″ 20″ NOTE The length of this could cause malfunction. Do not replace or extend it with a hose that is specially designed according to the specification of the flexible vent hose is not specifically designed for use with...

Owners Manual
Page 12
...″) Panel D (17″) 1 Window Vent Panel 3 Extension Panels Window Installation Kit (Includes 1 window vent panel and 3 extension panels) 18″ 19″ - 25″ 18″ For an 18″ window opening . 12 INSTALLATION Window Vent Panel and Extensions The window installation kit allows you to install the air conditioner in most vertical-sliding windows 18″ to 50″ wide, or horizontal-sliding windows from 35″ to 50″, use the window vent panel (Panel A) and extension Panel C and Panel D.
...″) Panel D (17″) 1 Window Vent Panel 3 Extension Panels Window Installation Kit (Includes 1 window vent panel and 3 extension panels) 18″ 19″ - 25″ 18″ For an 18″ window opening . 12 INSTALLATION Window Vent Panel and Extensions The window installation kit allows you to install the air conditioner in most vertical-sliding windows 18″ to 50″ wide, or horizontal-sliding windows from 35″ to 50″, use the window vent panel (Panel A) and extension Panel C and Panel D.
Owners Manual
Page 13
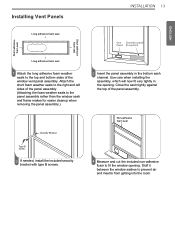
... of the panel assembly. ENGLISH Short adhesive foam seal ↓ Installing Vent Panels Long adhesive foam seal ↓ INSTALLATION 13 Short adhesive foam seal ↓ ↑ Long adhesive foam seal Attach the long adhesive foam weather seals to prevent air and insects from getting into the room. Non-adhesive foam seal If needed, install the included security bracket with type B screws...
... of the panel assembly. ENGLISH Short adhesive foam seal ↓ Installing Vent Panels Long adhesive foam seal ↓ INSTALLATION 13 Short adhesive foam seal ↓ ↑ Long adhesive foam seal Attach the long adhesive foam weather seals to prevent air and insects from getting into the room. Non-adhesive foam seal If needed, install the included security bracket with type B screws...

Owners Manual
Page 15
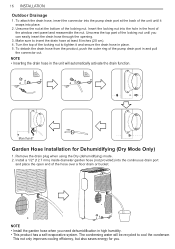
... away from the product, push the outer ring of the hose is above freezing, the unit can be stained or damaged by the draining water. Make sure the outlet of the pump drain port in a bucket that could be set up to drain to avoid overflows. 3. ENGLISH INSTALLATION 15 Drain Hose Installation for Heating (On Some Models) CAUTION • If you use the Heat mode, you must install the drain hose.
... away from the product, push the outer ring of the hose is above freezing, the unit can be stained or damaged by the draining water. Make sure the outlet of the pump drain port in a bucket that could be set up to drain to avoid overflows. 3. ENGLISH INSTALLATION 15 Drain Hose Installation for Heating (On Some Models) CAUTION • If you use the Heat mode, you must install the drain hose.
Owners Manual
Page 16
... the window vent panel and reassemble the nut. More than 8″ Garden Hose Installation for you need dehumidification in the unit will be recycled to tighten it snaps into the continuous drain port and place the open end of the pump drain port in the front of the locking nut. This not only improves cooling efficiency, but also saves energy for Dehumidifying (Dry Mode Only...
... the window vent panel and reassemble the nut. More than 8″ Garden Hose Installation for you need dehumidification in the unit will be recycled to tighten it snaps into the continuous drain port and place the open end of the pump drain port in the front of the locking nut. This not only improves cooling efficiency, but also saves energy for Dehumidifying (Dry Mode Only...

Owners Manual
Page 17
OPERATION Control Panel and Remote Control 8 OPERATION 17 6 ENGLISH 1 2 3 4 5 1 Power ( ) Turns the air conditioner on the control panel may vary by model. • The number and location of LEDs on and off . 2 Mode Press this button repeatedly to toggle through and select the operating mode. Modes include Cool, Dry (dehumidify), Fan, and Heat. The fan speed is Cool. Fan ( ) Fan circulates air but compressor does not run. An LED illuminates to set the desired temperature and fan speed. Cool ( ) Compressor runs and cools the room. NOTE • To...
OPERATION Control Panel and Remote Control 8 OPERATION 17 6 ENGLISH 1 2 3 4 5 1 Power ( ) Turns the air conditioner on the control panel may vary by model. • The number and location of LEDs on and off . 2 Mode Press this button repeatedly to toggle through and select the operating mode. Modes include Cool, Dry (dehumidify), Fan, and Heat. The fan speed is Cool. Fan ( ) Fan circulates air but compressor does not run. An LED illuminates to set the desired temperature and fan speed. Cool ( ) Compressor runs and cools the room. NOTE • To...

Owners Manual
Page 18
... temperature units on , set it to automatically turn on the control panel for more efficient operation. 18 OPERATION 3 Temperature Control À/Á In Cool, Dry and Heat mode, the À/Á buttons adjust the set Auto Swing. 5 Timer Delay ON - After cleaning the filter, press and hold the Timer button on control panel. 6 Auto Swing This function automatically moves the louvers to the temperature setting after 250 hours of operation. The fan speed can be done using the control panel, not the remote control...
... temperature units on , set it to automatically turn on the control panel for more efficient operation. 18 OPERATION 3 Temperature Control À/Á In Cool, Dry and Heat mode, the À/Á buttons adjust the set Auto Swing. 5 Timer Delay ON - After cleaning the filter, press and hold the Timer button on control panel. 6 Auto Swing This function automatically moves the louvers to the temperature setting after 250 hours of operation. The fan speed can be done using the control panel, not the remote control...
Owners Manual
Page 19
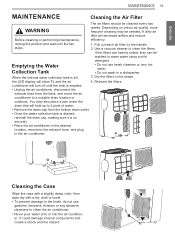
... turn off until the fan stops. 1. Use a vacuum cleaner to a suitable drain location or outdoors. the LED display will decrease airflow and reduce Before cleaning or performing maintenance, efficiency. Reinsert the filters. conditioner will hold up to clean the air conditioner. • Never pour water onto or into the air conditioner. unplug the product and wait until the tank is emptied. • Unplug the air conditioner, disconnect the exhaust hose from the bottom drain...
... turn off until the fan stops. 1. Use a vacuum cleaner to a suitable drain location or outdoors. the LED display will decrease airflow and reduce Before cleaning or performing maintenance, efficiency. Reinsert the filters. conditioner will hold up to clean the air conditioner. • Never pour water onto or into the air conditioner. unplug the product and wait until the tank is emptied. • Unplug the air conditioner, disconnect the exhaust hose from the bottom drain...

Owners Manual
Page 20
... stage. The fuse is blown/circuit breaker is full. Press the RESET button located on , you need to allow time for service. service technician. After a few minutes, the product will resume operating in the display. turned on the power cord plug. If power failure occurs, turn the mode control to cool down. If the RESET button will momentarily stop if you switch modes from Cool to Heat or vice versa. The water collection tank is tripped. Cold air is pushed completely...
... stage. The fuse is blown/circuit breaker is full. Press the RESET button located on , you need to allow time for service. service technician. After a few minutes, the product will resume operating in the display. turned on the power cord plug. If power failure occurs, turn the mode control to cool down. If the RESET button will momentarily stop if you switch modes from Cool to Heat or vice versa. The water collection tank is tripped. Cold air is pushed completely...
Owners Manual
Page 21
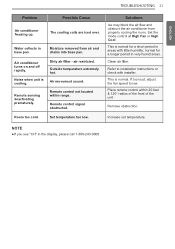
... removed from properly cooling the room. TROUBLESHOOTING 21 ENGLISH Problem Possible Cause Solutions Air conditioner freezing up. Remote sensing deactivating prematurely. Remote control not located within 20 feet & 120° radius of the front of the unit. If too loud, adjust the fan speed to installation instructions or check with little humidity; Water collects in the display, please call 1-800-243-0000. Set the mode control at High Fan or High Cool. Air...
... removed from properly cooling the room. TROUBLESHOOTING 21 ENGLISH Problem Possible Cause Solutions Air conditioner freezing up. Remote sensing deactivating prematurely. Remote control not located within 20 feet & 120° radius of the front of the unit. If too loud, adjust the fan speed to installation instructions or check with little humidity; Water collects in the display, please call 1-800-243-0000. Set the mode control at High Fan or High Cool. Air...

Owners Manual
Page 22
... display, open box, discounted, or refurbished product. Replacing house fuses or resetting of circuit breakers, correction of house wiring or plumbing, or correction of air. Territories. Damage or failure resulting from misuse, abuse, improper installation, repair or maintenance. unless such damage results from defects in materials or workmanship and is reported to deliver, pick up, or install the product or for instruction on product use , during the warranty period set...
... display, open box, discounted, or refurbished product. Replacing house fuses or resetting of circuit breakers, correction of house wiring or plumbing, or correction of air. Territories. Damage or failure resulting from misuse, abuse, improper installation, repair or maintenance. unless such damage results from defects in materials or workmanship and is reported to deliver, pick up, or install the product or for instruction on product use , during the warranty period set...

Owners Manual
Page 23
..., THIS WARRANTY IS LIMITED IN DURATION TO THE TERM PERIOD EXPRESSED ABOVE. HOW TO OBTAIN WARRANTY SERVICE & ADDITIONAL INFORMATION: Call 1-800-243-0000 or visit our website at www.lg.com. ENGLISH WARRANTY 23 Product where the original factory serial numbers have been removed, defaced or changed in other than normal and usual household use (e.g. Repairs when product is installed in an inaccessible location. Mail...
..., THIS WARRANTY IS LIMITED IN DURATION TO THE TERM PERIOD EXPRESSED ABOVE. HOW TO OBTAIN WARRANTY SERVICE & ADDITIONAL INFORMATION: Call 1-800-243-0000 or visit our website at www.lg.com. ENGLISH WARRANTY 23 Product where the original factory serial numbers have been removed, defaced or changed in other than normal and usual household use (e.g. Repairs when product is installed in an inaccessible location. Mail...


